Маанилүү коопсуздук нускамалары
- Аппараттын туруктуу, жалпак бетке коюлганын текшериңиз.
- Суу жана жогорку нымдуу чөйрөлөрдөн алыс болуңуз.
- Түз күн нуруна же өтө жогорку температурага дуушар кылбаңыз.
- Use only the provided USB power cable. Do not attempt to power with batteries.
- Avoid disassembling the device; refer servicing to qualified personnel.
1. Орнотуу
1.1 Пакеттин мазмуну
Пакетте бардык буюмдар бар экенин текшериңиз:
- JALL Wooden Digital Alarm Clock (Model WX18039)
- USB кубат кабели (кубат адаптери кошулган эмес)
- Колдонуучунун колдонмосу (бул документ)
1.2 Аппаратты күйгүзүү
The JALL Digital Alarm Clock is powered exclusively via USB. It does not support battery operation.
- Connect the small end of the USB power cable to the DC 5V port on the back of the alarm clock.
- Plug the larger end of the USB cable into a standard USB power adapter (e.g., phone charger, computer USB port) or a wall outlet with a USB port.
- Дисплей күйүп, түзмөктүн күйүп турганын көрсөтөт.

Image: The JALL alarm clock connected to a USB power source, illustrating the 'Powered by USB Only' feature. This clock requires continuous USB power to function.
1.3 Initial Time and Date Settings
Upon first power-on or after a power interruption, you may need to set the time and date.
- Орнотууларга кирүү: Locate the 'SET' button (usually on the back or top). Press and hold it for a few seconds until the display flashes.
- Setting Time Format (12H/24H): While the time is flashing, use the 'UP' or 'DOWN' buttons to switch between 12-hour and 24-hour formats. Press 'SET' to confirm.
- Setting Hour: The hour digit will flash. Use 'UP' or 'DOWN' to adjust the hour. Press 'SET' to confirm.
- Setting Minute: The minute digit will flash. Use 'UP' or 'DOWN' to adjust the minute. Press 'SET' to confirm.
- Setting Year, Month, Day: Follow similar steps to set the current year, month, and day. Press 'SET' after each adjustment.
- Температура бирдигин орнотуу: After setting the date, the temperature unit (℃/℉) may flash. Use 'UP' or 'DOWN' to select your preferred unit. Press 'SET' to exit settings.
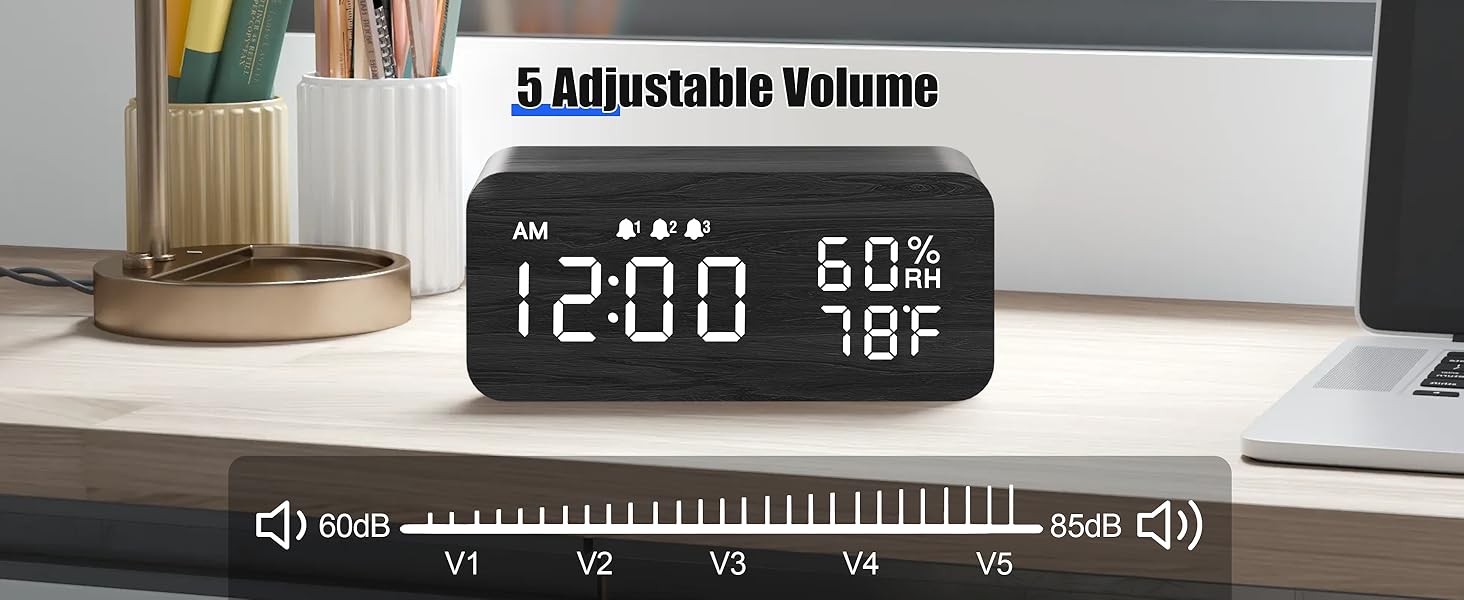
Image: The alarm clock showing both 12-hour (PM 3:00) and 24-hour (15:00) time formats, demonstrating the switchable display option.
2. Иштөө нускамалары
2.1 Дисплейдин жарыктыгын жөндөө
The clock features adjustable brightness levels to suit your environment.
- In normal time display mode, press the 'UP' or 'DOWN' button (or a dedicated brightness button if available) to cycle through the brightness levels.
- There are typically multiple levels, from very dim (L1) to brightest (L6), allowing for comfortable viewкүнү-түнү.

Image: A visual representation of the alarm clock's six adjustable brightness levels, ranging from dim (L1) to bright (L6), suitable for various lighting conditions.
2.2 Setting Alarms (AL1, AL2, AL3)
The clock supports up to three independent alarms with customizable modes.
- Accessing Alarm Settings: Press the 'ALARM' button (or 'SET' button repeatedly until 'AL1' appears).
- Ойготкучтун убактысын коюу: When 'AL1' flashes, press and hold 'SET'. The hour will flash. Use 'UP' or 'DOWN' to adjust, then 'SET' to confirm. Repeat for minutes.
- Setting Alarm Mode: After setting the time, the alarm mode will flash (e.g., 'MON-SUN', 'MON-FRI', 'SAT-SUN'). Use 'UP' or 'DOWN' to select the desired mode. Press 'SET' to confirm.
- Ойготкучту иштетүү/өчүрүү: In normal time display, press the 'ALARM' button to cycle through AL1, AL2, AL3. Press 'UP' or 'DOWN' when an alarm is displayed to turn it ON or OFF. An alarm icon will appear on the display when active.
- Repeat steps for AL2 and AL3 as needed.

Image: The alarm clock displaying three distinct alarm settings, each configurable for 'Everyday', 'Weekday', or 'Weekend' operation, allowing for flexible scheduling.
2.3 Тындыруу функциясы
When an alarm sounds, you can temporarily silence it using the snooze function.
- When the alarm rings, press any button (except the 'OFF' button, if present) to activate snooze.
- Ойготкуч болжол менен 9 мүнөткө тыныгуу жасап, андан кийин кайра иштейт.
- To turn off the alarm completely, press the designated 'OFF' button or follow the instructions in the manual for your specific model.

Image: A person reaching to press the top of the JALL alarm clock to activate the 9-minute snooze function, with the time set to 7:00 AM.
2.4 Зымсыз кубаттоо функциясы
The top surface of the alarm clock features a wireless charging pad compatible with most Qi-enabled smartphones.
- Ойготкуч сааттын күйгүзүлгөнүн текшериңиз.
- Place your Qi-enabled smartphone directly onto the center of the charging pad on top of the clock.
- The phone's display should indicate that charging has begun. If not, slightly adjust the phone's position.
- Зымсыз кубаттоого тоскоол болушу мүмкүн болгон калың каптарды же металл буюмдарды телефонуңуздан алып салыңыз.

Image: A smartphone placed on top of the JALL alarm clock, actively displaying a charging icon, demonstrating the wireless charging capability.

Image: An illustration showing the JALL alarm clock's universal compatibility with various smartphone models for wireless charging, including iPhones and Samsung Galaxy devices.
2.5 Сигнализациянын үнүн тууралоо
The alarm volume can be adjusted to your preference.
- In normal time display mode, press the 'VOLUME' button (or a combination of 'SET' and 'UP'/'DOWN' if no dedicated button) to enter volume adjustment mode.
- Use the 'UP' or 'DOWN' buttons to increase or decrease the alarm volume.
- Confirm your selection by pressing 'SET' or waiting a few seconds for the setting to save automatically.

Image: The alarm clock displaying a volume bar with five distinct levels (V1 to V5), indicating the range of adjustable alarm sound intensity from 60dB to 85dB.
3. Техникалык тейлөө
3.1 Тазалоо
- Before cleaning, disconnect the power cable.
- Wipe the surface of the clock with a soft, dry, or slightly damp кездеме.
- Абразивдүү тазалагычтарды, эриткичтерди же химиялык спрейлерди колдонбоңуз, анткени алар финишке зыян келтириши мүмкүн.
- түзмөктүн тешиктерине суюктуктун кирбегенин текшериңиз.
3.2 Сактоо
- Эгерде түзмөктү көпкө сактасаңыз, аны электр тармагынан сууруп коюңуз.
- Салкын, кургак жерде, түз күндүн нурунан жана экстремалдык температурадан алыс сактаңыз.
4. Кыйынчылыктарды
4.1 Жалпы маселелер жана чечимдер
| Маселе | Мүмкүн себеп | Чечим |
|---|---|---|
| Clock not powering on / Display is blank. | Электр энергиясына туташуу жок же кабель/адаптер бузук. | Ensure the USB cable is securely connected to both the clock and a working power source. Try a different USB adapter or port. |
| Дисплей өтө күңүрт же өтө жарык. | Brightness level is set incorrectly. | Adjust the display brightness using the 'UP' or 'DOWN' buttons as described in Section 2.1. |
| Сигнал угулбай жатат. | Alarm is not activated, volume is too low, or incorrect alarm mode. | Verify the alarm is turned ON (check for alarm icon). Increase alarm volume (Section 2.5). Ensure the alarm mode (Weekday/Weekend/Everyday) is set correctly for the current day (Section 2.2). |
| Зымсыз кубаттоо иштебейт. | Phone not positioned correctly, phone case interference, or phone not Qi-enabled. | Reposition the phone centrally on the charging pad. Remove thick phone cases or metallic objects. Confirm your phone supports Qi wireless charging. Ensure the clock is powered on. |
| Clock losing time. | Internal clock drift or power interruptions. | Reset the time as per Section 1.3. Ensure a stable power supply. If the issue persists, contact customer support. |
5. Техникалык шарттар
| Өзгөчөлүк | Деталь |
|---|---|
| Бренд | ЖАЛ |
| Модель номери | WX18039 |
| Дисплей түрү | Digital LED |
| Материал | Жыгач |
| Power Source | Corded Electric (USB DC 5V) |
| Батареянын иштеши | Колдоого алынбайт |
| Ойготкуч сааттар | 3 Independent Alarms |
| Өзгөчөлүктөр | Wireless Charging, Dimmable Display, Adjustable Volume, Snooze, Temperature Display, Humidity Display |
| Элемент Салмагы | 9.9 унция (0.62 фунт) |
| Пакеттин өлчөмдөрү | 7.24 x 3.46 x 3.23 дюйм |
6. Кепилдик жана колдоо
6.1 Продукциянын кепилдиги
JALL products are manufactured with quality and performance in mind. This product comes with a standard manufacturer's warranty against defects in materials and workmanship under normal use. Please refer to the product packaging or the official JALL webкепилдиктин белгилүү бир шарттары жана мөөнөтү үчүн сайтты караңыз.
6.2 Кардарларды колдоо
If you encounter any issues or have questions regarding your JALL Wooden Digital Alarm Clock, please contact JALL customer support. For the most up-to-date contact information, visit the official JALL webсайтка же сатып алуу документтериңизге кайрылыңыз.
Note: Please have your model number (WX18039) and purchase details ready when contacting support.


