1. Киришүү
This manual provides essential information for the safe operation, assembly, maintenance, and troubleshooting of your BILT HARD 13-inch Floor Drill Press. Please read and understand all instructions before operating the machine to ensure personal safety and optimal performance.
The BILT HARD 13-inch Floor Drill Press is designed for drilling through various materials such as metal, wood, and plastics. It features a 16-speed adjustment, a 1 HP motor, and a 5/8-inch keyed chuck.
2. Коопсуздук нускамалары
Жалпы коопсуздук
- Ар дайым тиешелүү жеке коргоочу шаймандарды (ЖКК), анын ичинде коопсуздук көз айнектерин, угууну коргоочу жана кол каптарды кийиңиз.
- Иш аянты таза, жакшы жарык жана тоскоолдуктар жок болушун камсыз кылыңыз.
- Иштеп жаткан учурда балдарды жана уруксаты жок адамдарды машинадан алыс кармаңыз.
- Securely clamp all workpieces to the drill press table before drilling.
- Never wear loose clothing, jewelry, or long hair that could become entangled in moving parts.
- Жөндөөлөрдү жасоодон, аксессуарларды алмаштыруудан же техникалык тейлөө иштерин жүргүзүүдөн мурун электр кубатынан ажыратыңыз.
Электр коопсуздугу
- Ensure the power supply matches the specifications of the drill press (120 Volts).
- Бургулоочу станокту d абалында иштетпеңизamp же нымдуу шарттар.
- Avoid using extension cords unless absolutely necessary, and ensure they are rated for the tool's power requirements.
- Regularly inspect the power cord for damage. Do not use if damaged.
3. Пакеттин мазмуну
Төмөндө тизмеленген нерселердин бардыгы пакетте бар экенин текшериңиз:
- BILT HARD 13-inch Floor Drill Press unit
- 5/8-inch Keyed Chuck and Chuck Key
- Hex ачкычтары
- Куралдар
- Drill Vise (if included with specific model variant)

Image 1: BILT HARD 13-inch Floor Drill Press with included drill vise. The main unit is blue and black, featuring a motor housing, column, worktable, and base. A separate blue drill vise is shown next to it.
4. Орнотуу жана чогултуу
Follow these steps to assemble your drill press. It is recommended to have assistance due to the weight of the unit (approximately 76 lbs).
- Пакеттен чыгаруу: Бардык компоненттерди таңгактан кылдаттык менен алып салыңыз. Ар кандай жеткирүү зыянын текшериңиз.
- Негизги жана мамычанын жыйындысы: Secure the column to the base using the provided hardware. Ensure all bolts are tightened securely. The base has pre-drilled holes for mounting to a workbench or stand.
- Башкы Ассамблея: Mount the head assembly (motor and spindle housing) onto the top of the column. Tighten the securing bolts.
- Worktable Assembly: Attach the worktable support arm to the column and then secure the worktable to the support arm. Adjust the height and position as needed.
- Чак орнотуу: Clean the tapered spindle and the inside of the chuck. Place the chuck onto the spindle and firmly tap it into place with a rubber mallet or block of wood to ensure a secure fit.
- Орнотуу туткасы: Attach the feed handles to the spindle quill.
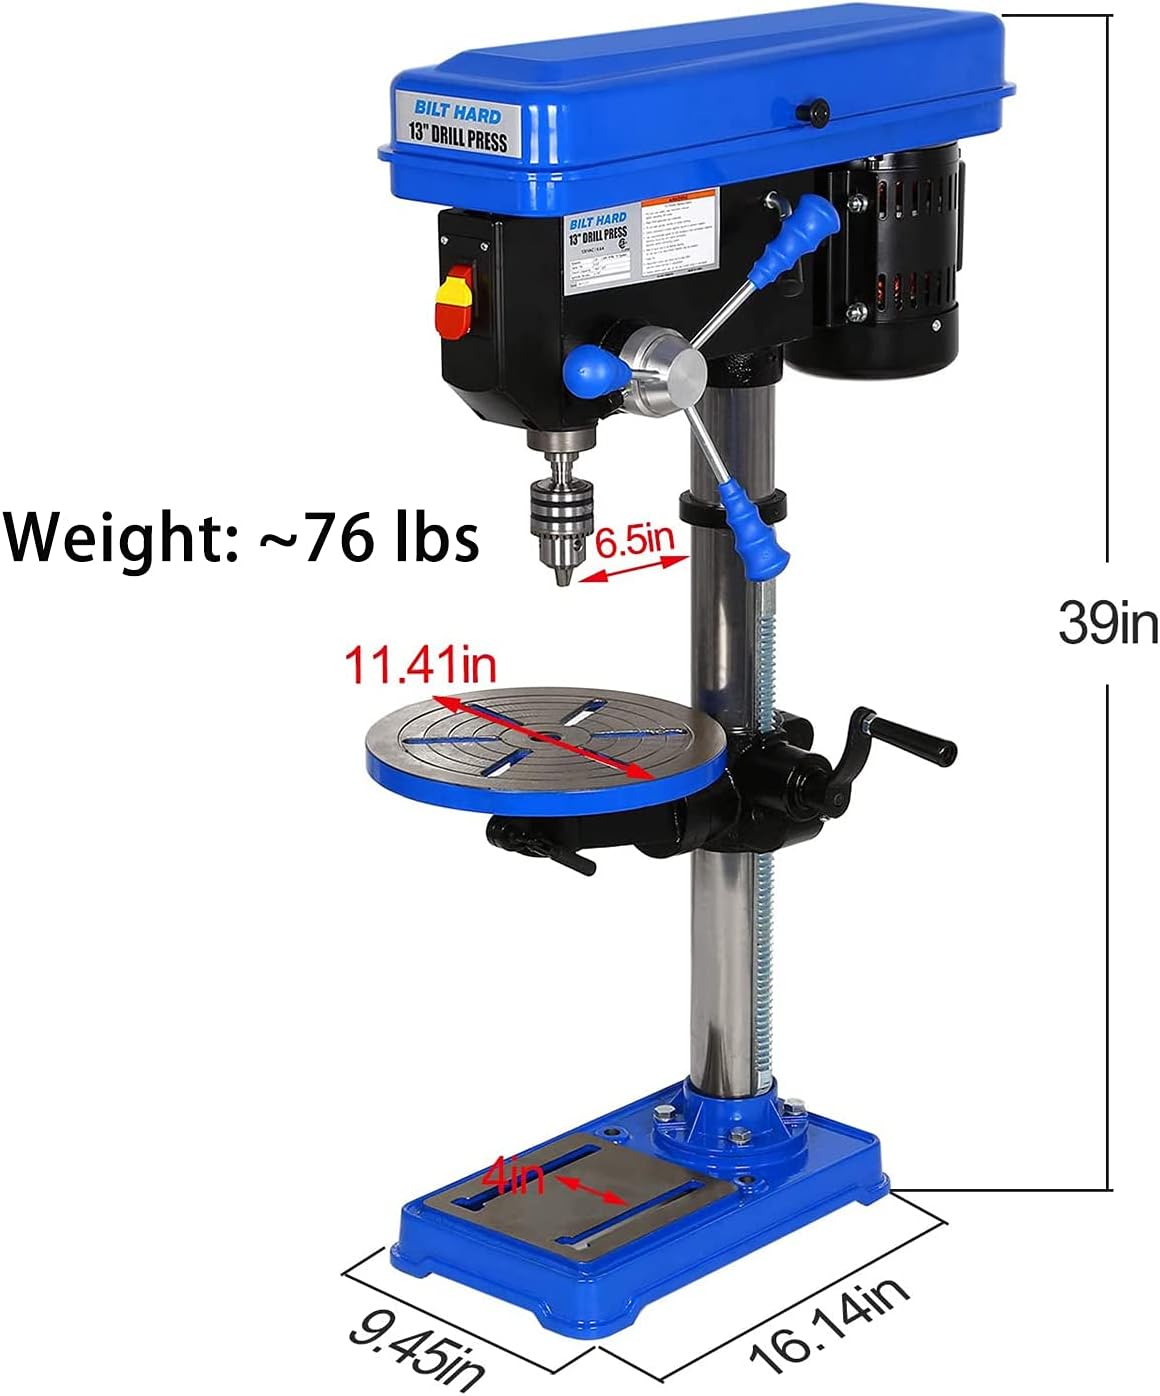
Image 2: Diagram showing the dimensions of the BILT HARD 13-inch Floor Drill Press. Key measurements include a total height of 39 inches, a base of approximately 9.45 x 16.14 inches, and a worktable diameter of 11.41 inches. The approximate weight is 76 lbs.
5. Иштөө нускамалары
5.1. Speed Adjustment (16 Speeds)
The drill press offers 16 operating speeds ranging from 220 to 3600 RPM. To adjust the speed:
- Бургулоочу прессти кубат булагынан ажыратыңыз.
- Open the top cover of the head assembly.
- Refer to the belt speed settings chart located inside the cover.
- Loosen the motor lock nuts and adjust the belt tension lever to release tension.
- Move the drive belt to the desired pulley combination for the required speed.
- Re-tension the belt and tighten the motor lock nuts.
- Жогорку капкакты жабыңыз.

Сүрөт 3: View of the open top cover of the drill press head, showing the belt and pulley system for 16-speed adjustment. A diagram inside the cover illustrates different belt configurations for various RPMs.
5.2. Worktable Adjustment
The worktable can be adjusted for height and angle:
- Бийиктигин тууралоо: Loosen the worktable locking handle. Use the crank handle to raise or lower the table to the desired height. Tighten the locking handle securely.
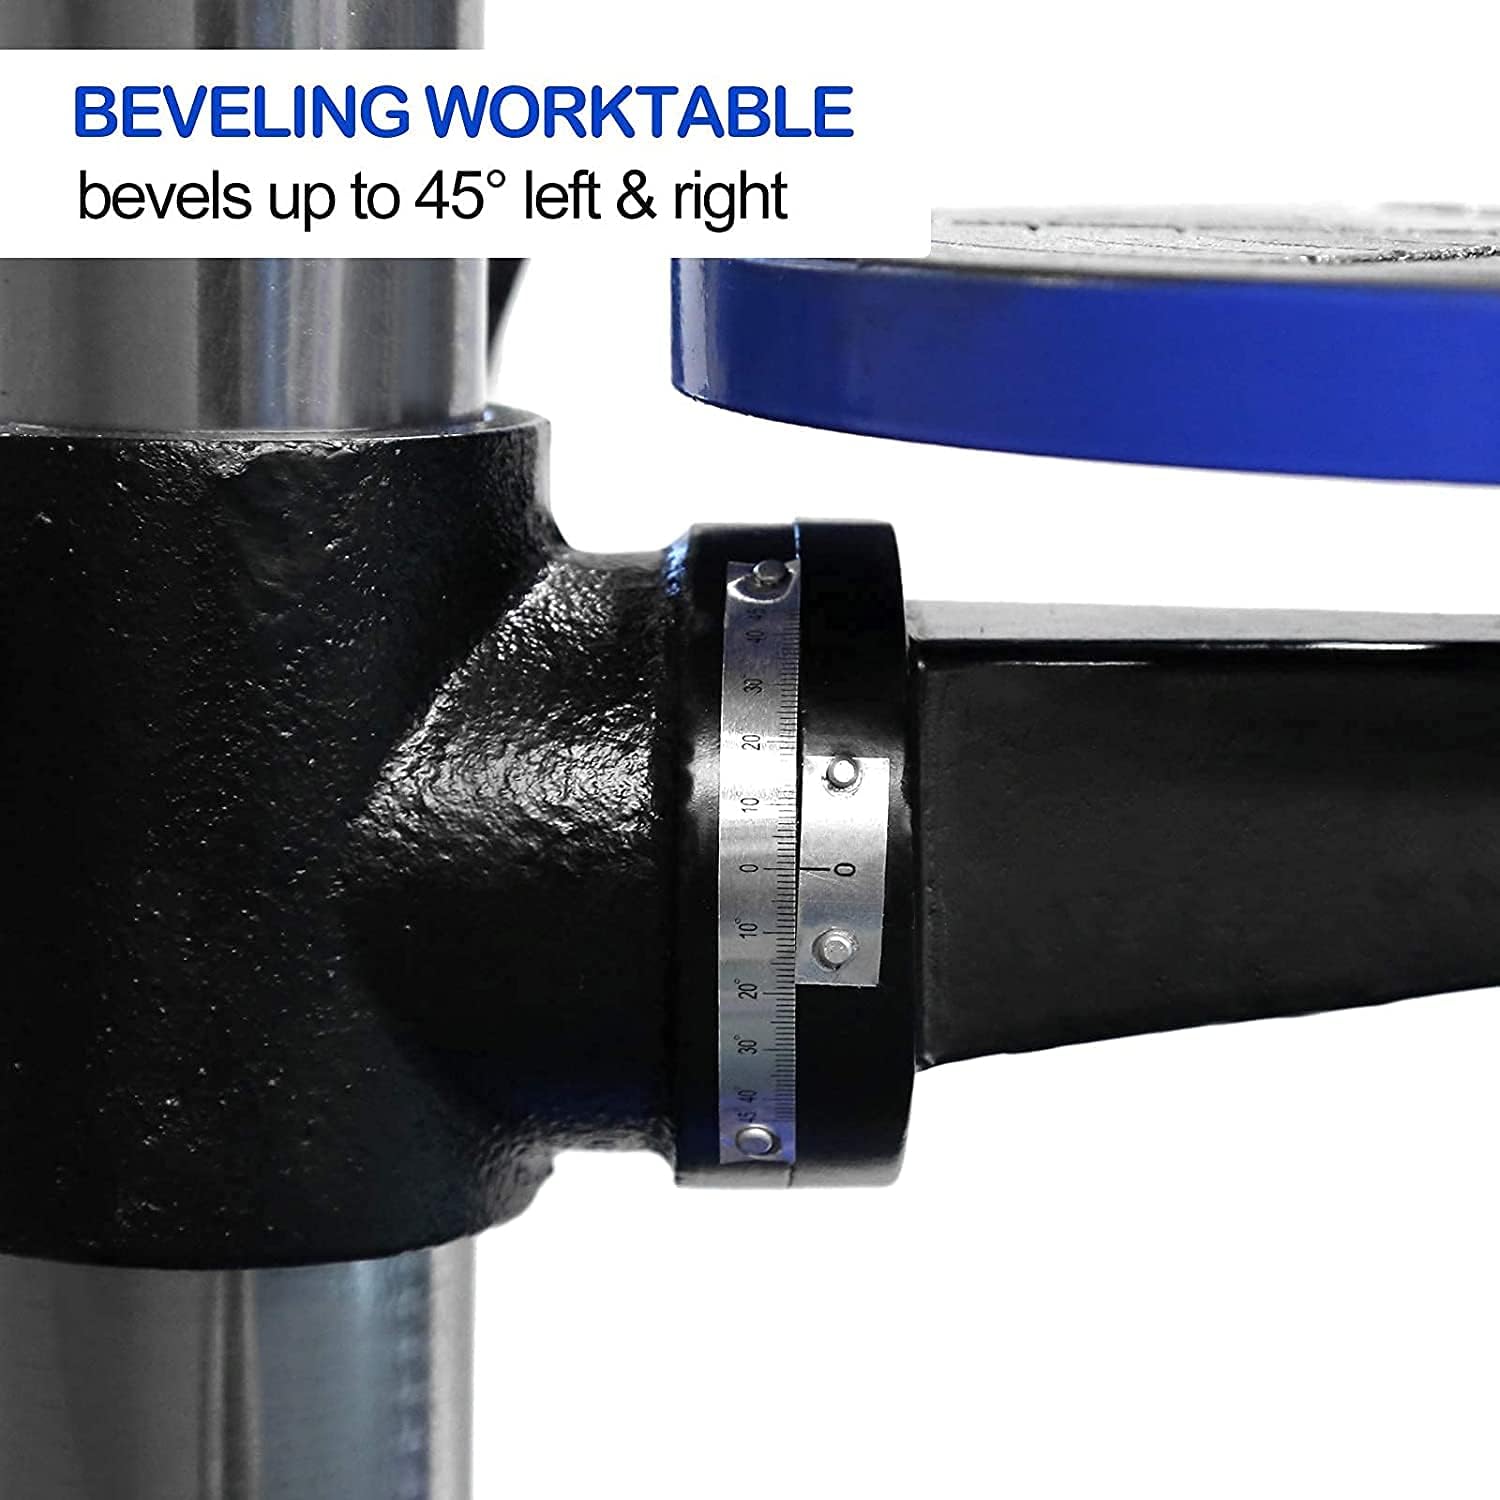
- Жөндөө: The worktable can bevel up to 45 degrees left and right for angled drilling. Loosen the bevel locking bolts beneath the table. Adjust the table to the desired angle using the angle scale, then tighten the bolts.

Image 4: Close-up of the drill press worktable support, showing the mechanism for bevel adjustment. An angle scale indicates the degree of tilt, up to 45 degrees left or right.
5.3. Chuck and Drill Bit Installation
Бургулоочу бит орнотуу үчүн:
- Ensure the drill press is unplugged.
- Insert the drill bit into the chuck jaws. Ensure the bit is centered and fully seated.
- Use the chuck key to tighten the chuck jaws around the drill bit. Tighten all three holes for maximum grip.
- Remove the chuck key immediately after tightening to prevent it from becoming a projectile during operation.
Сүрөт 5: Жакын пландан view of the 5/8-inch keyed chuck on the BILT HARD drill press, showing the jaws ready to accept a drill bit. The chuck is located at the bottom of the spindle.
5.4. Setting Drilling Depth
The adjustable depth stop allows for precise and repeatable drilling depths:
- Lower the drill bit until it touches the workpiece.
- Adjust the depth stop collar to the desired depth.
- Tighten the depth stop lock nut. The drill will stop feeding once this depth is reached.

Image 6: Close-up of the drill press head, highlighting the depth stop mechanism and the feed handles. The image also indicates the 3-1/8 inch spindle travel.
5.5. General Drilling Procedure
- Select the appropriate drill bit and speed for your material.
- Securely clamp the workpiece to the drill press table or use the included drill vise.
- Adjust the worktable height and angle as needed.
- Set the drilling depth stop.
- Бургулоочу прессти күйгүзүңүз.
- Slowly lower the drill bit into the workpiece using the feed handles, applying steady, even pressure.
- Каалаган тереңдикке жеткенден кийин, бургу учун даяр бөлүктөн тартып алыңыз.
- Turn off the drill press.
6. Техникалык тейлөө
Бургулоочу станогуңуздун үзгүлтүксүз техникалык тейлөөсү анын узак мөөнөттүү иштешин жана коопсуз иштешин камсыз кылат.
- Тазалоо: Keep the machine clean and free of dust and debris. Use compressed air to clear chips from the motor and spindle area.
- Майлоо: Periodically apply a light machine oil to the column, quill, and other moving parts to ensure smooth operation.
- Белдик текшерүү: Диск курунун эскирип, жарака кеткендигин же чоюлуп кеткендигин дайыма текшерип туруңуз. Керек болсо алмаштырыңыз.
- Чакты тейлөө: Keep the chuck jaws clean and free of rust. Apply a small amount of lubricant to the chuck key mechanism.
- Электр текшерүү: Inspect the power cord and switch for any signs of damage.
7. Кыйынчылыктарды
| Көйгөй | Мүмкүн себеп | Чечим |
|---|---|---|
| Бургулоочу пресс иштебей жатат | No power, faulty switch, motor overload | Check power connection, inspect switch, allow motor to cool |
| Ашыкча термелүү | Loose components, unbalanced drill bit, worn belt | Tighten all fasteners, replace or re-seat drill bit, inspect/replace belt |
| Бургулоочу бит натыйжалуу кесилбейт | Dull drill bit, incorrect speed, insufficient pressure | Replace/sharpen drill bit, adjust speed, apply steady pressure |
| Chuck key flies out during operation | Chuck key left in chuck | Always remove chuck key immediately after tightening. |
8. Техникалык шарттар
| Өзгөчөлүк | Спецификация |
|---|---|
| Модель номери | 5f7eb013-a088-4192-86b4-f814df914a06 |
| Свинг | 13-1/4 дюйм |
| Spindle Travel | 3-1/8 дюйм |
| Чак кубаттуулугу | 7/64" to 5/8-inch (B16) |
| Мотор | 6.6 Amp, 1 HP Induction Motor |
| Иштөө ылдамдыгы | 16 ылдамдык (220-3600 айн/мин) |
| Worktable Diameter | 11.41 дюйм |
| Worktable Bevel | 45 degrees left and right |
| Power Source | Электр зымдары |
| Тtage | 120 вольт |
| Ватtage | 792 Ватт |
| Продукциянын өлчөмдөрү | 355.6 x 50.8 x 50.8 см (бийиктиги 39 дюйм) |
| Элемент Салмагы | 38.1 кг (болжол менен 76 фунт) |
| Материал | Metal (Steel construction for head, table, base) |
| Сертификаттар | CSA Certified |
9. Кепилдик жана колдоо
BILT HARD offers a warranty of 90 days from the date of purchase for replacement or refund. For warranty claims, technical assistance, or to order replacement parts, please contact BILT HARD customer support.
Refer to your purchase documentation or the official BILT HARD webакыркы байланыш маалыматы жана деталдуу кепилдик шарттары үчүн сайт.


