1. Киришүү
This manual provides essential information for the safe and efficient operation, installation, and maintenance of your HASWING Protruar G 3.0 Electric Trolling Motor. Please read this manual thoroughly before using the product to ensure proper function and longevity.

Figure 1: ашыкview of the HASWING Protruar G 3.0 Electric Trolling Motor.
2. Коопсуздук маалыматы
Always prioritize safety when operating any marine equipment. Failure to follow these instructions may result in injury or damage to the product or vessel.
- Бардык нускамаларды окуңуз: Familiarize yourself with all features and operating procedures before use.
- Батареянын коопсуздугу: Always connect the motor to a compatible 24V deep cycle battery system. Ensure proper polarity (+ to + and - to -). Disconnect battery power when the motor is not in use or during maintenance.
- Пропеллердин коопсуздугу: Keep hands, feet, and clothing clear of the propeller at all times, especially when the motor is connected to power.
- Kill Switch: Always use the provided kill switch lanyard. Attach it to yourself or the boat to ensure immediate power cut-off in an emergency.
- Суу шарттары: Operate the motor cautiously in shallow water or areas with submerged obstacles to prevent propeller damage.
- Вентиляция: Ensure adequate ventilation around batteries to prevent accumulation of explosive gases.
- Балдар: Keep children away from the motor and controls.
3. Пакеттин мазмуну
Пакетте бардык буюмдар бар экенин текшериңиз:
- HASWING Protruar G 3.0 Trolling Motor with 35.4-inch shaft
- Extendable Tiller Handle
- Транзомду орнотуучу кронштейн
- 3-Blade Propeller (11.8-inch diameter)
- Kill Switch Lanyard
- Орнотуу жабдуулары (бурамалар, шайбалар, гайкалар)
- Instruction Manual

Figure 2: Key components of the trolling motor, including the kill switch, battery meter, stepless speed control, foldable handle, bracket, durable motor, and anti-impact propeller.
4. Техникалык шарттар
| Өзгөчөлүк | Спецификация |
|---|---|
| Модел | Protruar G 3.0 |
| Валдын күчү | 3HP |
| Peak Thrust | 110 LBS |
| Макс томtage | DC 24V |
| Max Power | 1200 Вт |
| Макс Amp | 50A |
| Тереңдикти жөндөө | Тереңдик жакасы |
| Prop Type/Size | 3 Blade Prop/11.8 In. Diam |
| Pro Speed at Full Power | Суу астында макс. 630 айн/мин |
| Батарея түрү | 2 x 10⁵ AH Deep Cycle (recommended) |
| Рулдун катышы | 360 Degree Control |
| Decibel Level (db) | 65дб |
| Салмагы | 8.0 кг/17.6 фунт |
| Shaft Length | 900mm/35.4 Inch |
| Кайыктын максималдуу узундугу жана жүгү | 7м/22.9 фут |
| Монтаж түрү | Трансом тоосу |
5. Орнотуу
5.1 Моторду монтаждоо
The Protruar G 3.0 is designed for transom mounting. Follow these steps to securely attach the motor to your boat:
- Position the transom mount bracket on the stern of your boat.
- Клamp screws on the bracket firmly to secure it to the transom. Ensure the motor is centered and stable.
- Adjust the motor's shaft depth using the depth collar to ensure the propeller is submerged at the desired level, avoiding contact with the bottom or excessive splashing.
- The motor offers 7 levels of tilting positions. Adjust the tilt to optimize performance and propeller depth.
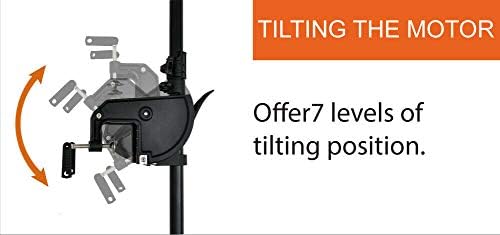
Figure 3: Adjusting the motor's tilt for optimal operation.
5.2 Батареяны туташтыруу
The Protruar G 3.0 requires a 24V power supply. This typically involves two 12V deep cycle batteries connected in series. The motor includes a 60A resettable inline fuse for protection.
- Ensure the motor is OFF and the kill switch is disengaged before connecting batteries.
- Connect the positive (+) terminal of the first 12V battery to the negative (-) terminal of the second 12V battery using a short jumper cable.
- Connect the motor's positive (+) cable (red) to the remaining positive (+) terminal of the battery series.
- Connect the motor's negative (-) cable (black) to the remaining negative (-) terminal of the battery series.
- Бардык байланыштарды бекем бекитиңиз.
WARNING: Incorrect battery connection can cause severe damage to the motor and pose a safety hazard.
5.3 Иштетүү тутуму
The tiller handle is extendable and foldable for convenience.
- To extend the handle, pull it outwards until it locks into position.
- To fold the handle, release the locking mechanism and fold it down. The handle can fold at angles of 0-100 degrees.
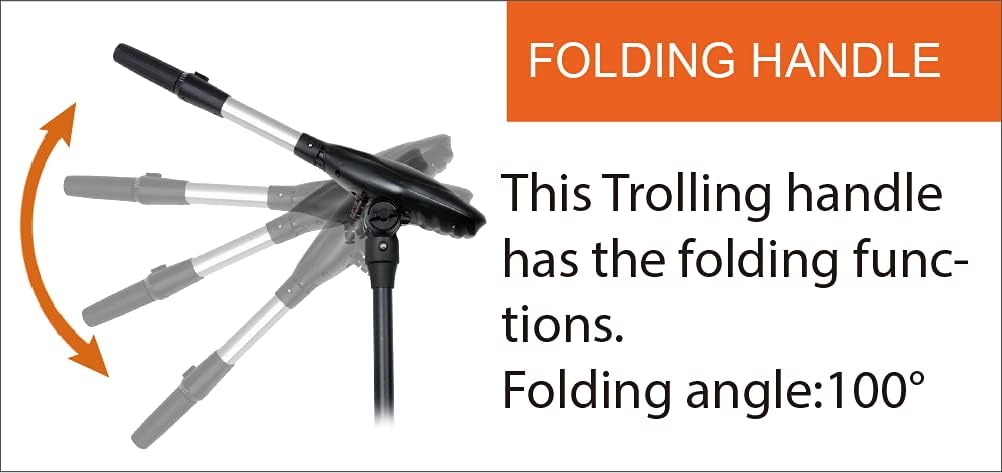
Figure 4: The tiller handle can be folded for storage or adjusted for comfortable operation.
6. Операция
6.1 Күйгүзүү/өчүрүү жана ылдамдыкты көзөмөлдөө
The motor features digital stepless forward and reverse speed control directly from the tiller handle.
- Attach the kill switch lanyard to the motor and yourself or the boat.
- To engage forward motion, rotate the tiller handle clockwise. The further you rotate, the higher the speed.
- To engage reverse motion, rotate the tiller handle counter-clockwise. The further you rotate, the higher the reverse speed.
- To stop the motor, return the tiller handle to the neutral (OFF) position.

Figure 5: Digital stepless speed control for precise adjustments.
6.2 Батарея көрсөткүчү
The motor head features a 5-level power display to indicate the battery's charge status.
- Monitor the display regularly to avoid unexpected power loss.
- Recharge batteries when the indicator shows low power.
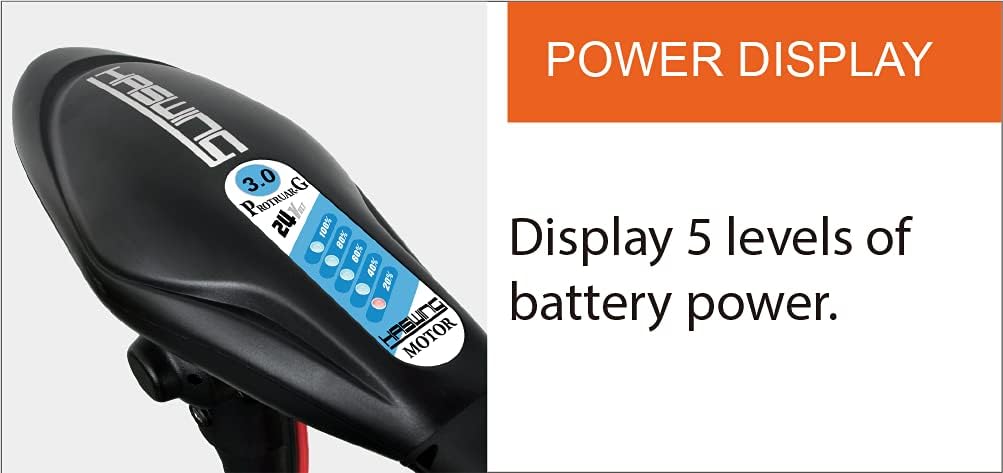
Figure 6: The 5-level battery meter on the motor head.
6.3 Авариялык токтотуу
The kill switch provides an immediate power cut-off for safety.
- In an emergency, pull the kill switch lanyard to instantly stop the motor.
- Always ensure the kill switch is properly engaged before starting the motor.
7. Техникалык тейлөө
7.1 Пропеллерге кам көрүү
The anti-impact propeller features a prop-clutch ability to prevent damage if it strikes an object.
- Regularly inspect the propeller for weeds, fishing line, or damage. Clear any obstructions.
- If the propeller is damaged, replace it with an authentic HASWING replacement propeller.
- Do not overtighten the propeller nut, as this can damage the motor if the prop strikes an object.

Figure 7: The prop-clutch mechanism helps prevent damage to the propeller and motor.
7.2 Тазалоо жана сактоо
- After each use, especially in saltwater, rinse the motor thoroughly with fresh water.
- Wipe down all surfaces to remove salt, dirt, and debris.
- Store the motor in a dry, well-ventilated area, away from direct sunlight and extreme temperatures.
- Disconnect batteries during long-term storage.
8. Кыйынчылыктарды
| Көйгөй | Мүмкүн себеп | Чечим |
|---|---|---|
| Мотор иштебейт |
|
|
| Кыскартылган күч же ылдамдык |
|
|
| Ашыкча титирөө же ызы-чуу |
|
|
9. Кепилдик жана колдоо
For warranty information, technical support, or replacement parts, please refer to the official HASWING webсайтка же ыйгарым укуктуу дилериңизге кайрылыңыз. Сатып алганыңыздын далили катары сатып алуу дүмүрчөгүңүздү сактаңыз.


