
Introduction
This manual provides detailed instructions for the setup, operation, and maintenance of your Explore Scientific Projection Radio Controlled Clock with Weather Forecast Display and Outdoor Sensor, Model RPW3008CM3000. Please read these instructions carefully before using the device to ensure proper function and longevity.
Пакеттин мазмуну
- 1x Explore Scientific Projection Radio Controlled Clock (Main Unit)
- 1x зымсыз тышкы сенсор
- Batteries (for main unit and sensor)
- User Manual

Image: The product packaging, displaying the main clock unit, the outdoor sensor, and branding.
Продукт бүттүview
The Explore Scientific Projection Radio Controlled Clock features a digital time display, weather forecast, and an outdoor temperature sensor. It includes dual alarms, a 180° time projection, and a backlight for enhanced visibility.

Сүрөт: алдыңкы view of the clock displaying time, day, indoor temperature, and outdoor temperature, along with weather icons.

Image: Technical drawing showing the dimensions of the clock unit in millimeters.
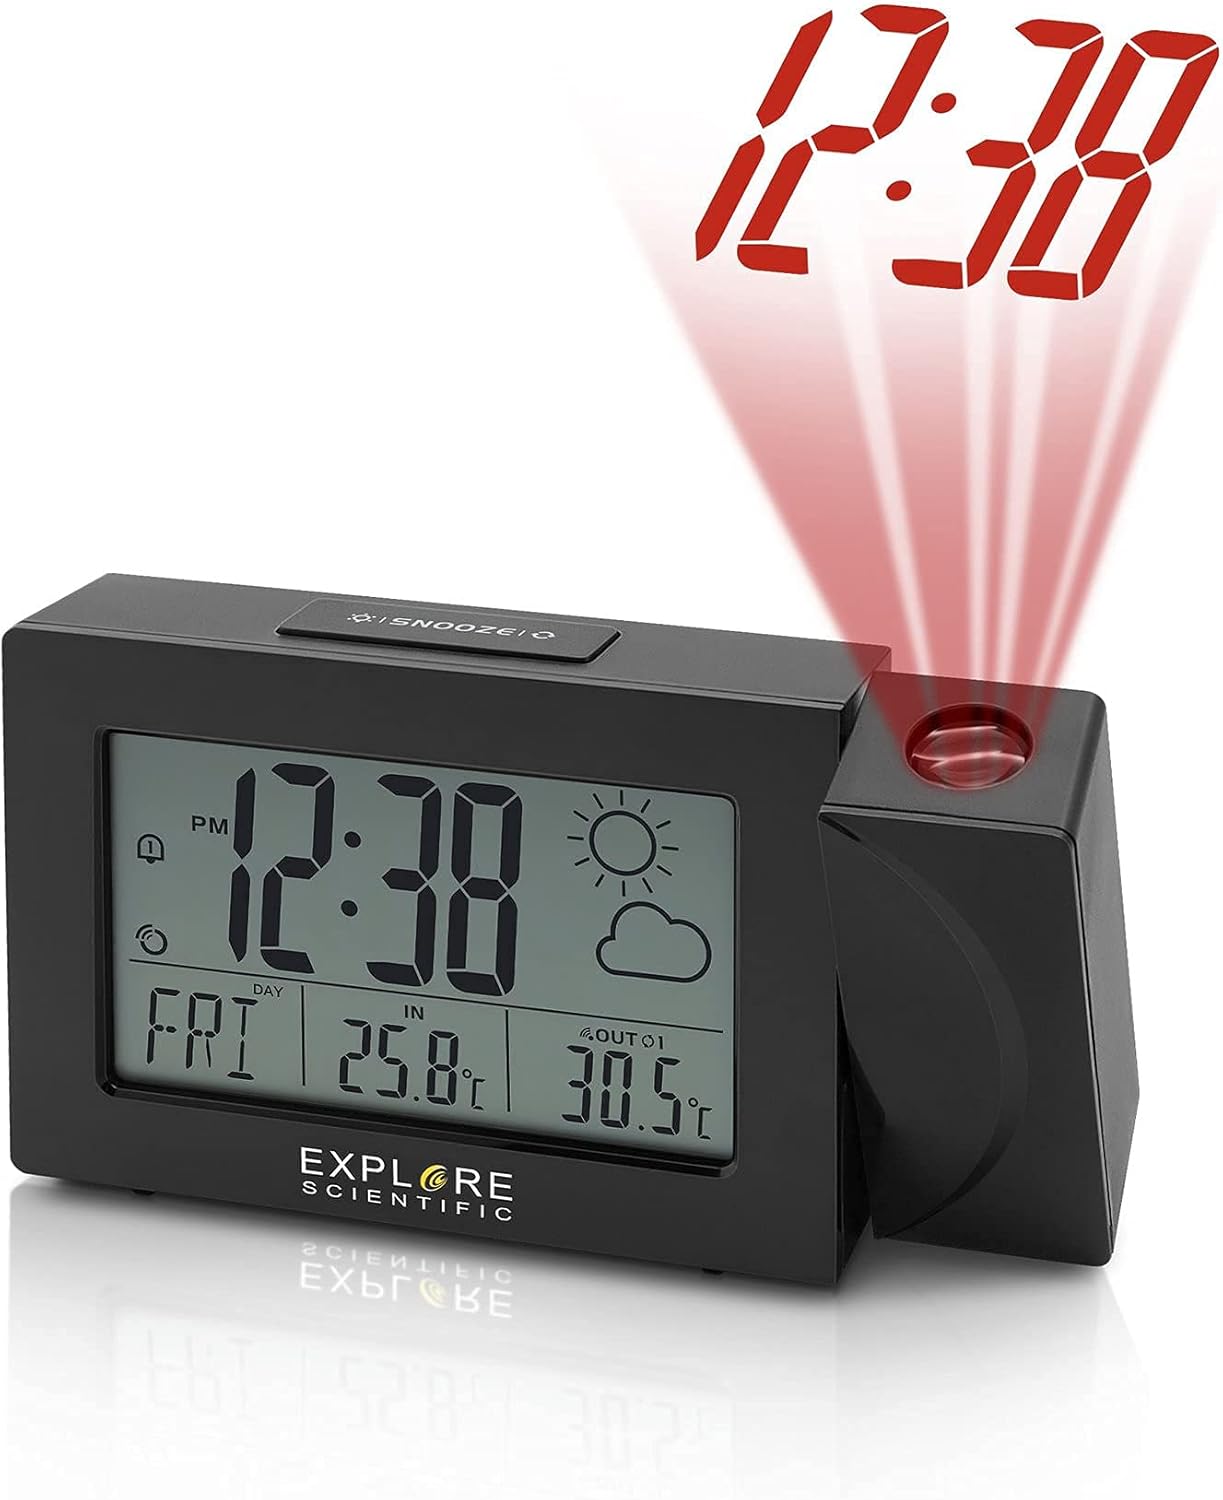
Image: The clock unit with its projection arm extended, showing the time '12:38' projected in red light.

Image: The clock placed on a shelf, projecting the time '12:38' onto a nearby wall.

Сүрөт: Арткы view of the clock, highlighting the battery compartment and control buttons for time, alarm, and settings.

Сүрөт: Жогорку view of the clock, clearly showing the 'SNOOZE' button.
Жайгашуу
- Батарея орнотуу:
- Open the battery compartment on the back of the main clock unit.
- Insert the required batteries, observing the correct polarity (+/-).
- Батарея отсегин жабыңыз.
- Repeat this process for the wireless outdoor sensor.
- Баштапкы кубаттоо:
Once batteries are inserted, the clock will power on and begin searching for the Radio Controlled (RC) signal (WWVB in North America). This process may take several minutes or up to 24 hours depending on signal strength and location. Place the clock near a window for better reception.
- Outdoor Sensor Pairing:
The main unit will automatically attempt to connect with the outdoor sensor. Ensure the sensor is placed within range (typically up to 30 meters/100 feet in open air) and away from major metallic objects or electronic interference. If pairing does not occur automatically, refer to the troubleshooting section.
- Жайгашкан жери:
Position the main clock unit indoors on a flat surface. Place the outdoor sensor in a shaded, dry location outdoors, protected from direct sunlight and rain, to ensure accurate temperature readings.
Иштөө нускамалары
Убакыт жана дата орнотуулары
- Radio Controlled Time (WWVB): The clock automatically synchronizes with the WWVB signal for accurate time. The signal icon will indicate successful reception.
- Убакытты кол менен орнотуу: If the RC signal is unavailable, press and hold the 'TIME SET' button (often marked with a clock icon) to enter manual time setting mode. Use the '+' and '-' buttons to adjust hours, minutes, year, month, and day. Press 'TIME SET' again to confirm each setting.
- 12/24 саат форматы: Press the '+' button during normal time display to switch between 12-hour (with AM/PM indicator) and 24-hour formats.
- Жумуш күндөрүнүн тили: Press and hold the 'LANGUAGE' button (if available, or often combined with other settings) to cycle through English (EN), German (GE), French (FR), Italian (IT), and Dutch (DU).
Сигнал орнотуулары
- Ойготкучтарды орнотуу: Press the 'ALARM' button (often marked with a bell icon) to view Alarm 1. Press and hold 'ALARM' to enter Alarm 1 setting mode. Use '+' and '-' to adjust the alarm time. Press 'ALARM' to confirm. Repeat for Alarm 2.
- Ойготкучтарды иштетүү/өчүрүү: Press 'ALARM' repeatedly to toggle Alarm 1 ON/OFF, then Alarm 2 ON/OFF. An alarm icon will appear on the display when active.
- Чырым Function: When an alarm sounds, press the 'SNOOZE' button (located on top) to temporarily silence the alarm for a few minutes. The alarm will sound again after the snooze period.
Weather and Temperature Display
- Температура бирдиктери: Press the '°C/°F' button (often combined with '+' or '-') to switch between Celsius and Fahrenheit display for both indoor and outdoor temperatures.
- Аба ырайы: The clock displays a weather forecast icon (e.g., sunny, cloudy, rainy) based on changes in atmospheric pressure. This is a prediction and may not always match current conditions precisely.
- Multiple Outdoor Sensors: If you have additional compatible sensors (up to 3 supported), press the 'CHANNEL' button (often combined with '+') to cycle through the outdoor sensor readings.
Проекциялоо өзгөчөлүгү
- Проекцияны активдештирүү: Press the 'PROJECTION' button (or a dedicated button near the projector lens) to turn the time projection ON/OFF.
- 180° айлануу: The projection arm can be rotated 180 degrees to adjust the projection angle. The projected time can also be flipped 180 degrees digitally by pressing the projection button repeatedly to ensure correct orientation on the wall or ceiling.
- Фокусту тууралоо: Проекцияланган сүрөттү курчутуу үчүн проектордун линзасындагы фокустук шакекчени айландырыңыз.
Арткы жарык
- Press the 'LIGHT' or 'SNOOZE' button to activate the display backlight for a few seconds.
Техникалык тейлөө
- Тазалоо: Wipe the clock and sensor with a soft, damp кездеме. Абразивдүү тазалагычтарды же эриткичтерди колдонбоңуз.
- Батареяны алмаштыруу: Replace batteries in both the main unit and outdoor sensor when the low battery indicator appears on the display. Use fresh batteries of the specified type.
- Сактагыч: Аппаратты узак убакытка сактасаңыз, агып кетпеш үчүн бардык батарейкаларды алып салыңыз.
Проблемаларды чечүү
| Көйгөй | Мүмкүн себеп | Чечим |
|---|---|---|
| Дисплей жок же күңүрт дисплей | Төмөн же өлүп калган батарейкалар; туура эмес батареянын полярдуулугу. | Туура полярдуулукту камсыз кылуу менен батарейкаларды жаңысына алмаштырыңыз. |
| No RC time signal (WWVB) | Interference; poor reception area; signal not yet received. | Move the clock closer to a window; avoid electronic devices; allow up to 24 hours for signal acquisition. Manually set time if necessary. |
| Сырткы температура көрсөтүлгөн эмес же туура эмес | Sensor out of range; sensor batteries low; interference; sensor not paired. | Ensure sensor is within range; replace sensor batteries; re-pair sensor (refer to setup); avoid placing sensor in direct sunlight. |
| Проекция бүдөмүк | Фокус туураланган жок. | Проектордун объективиндеги фокус шакекчесин сүрөт таза болгонго чейин айлантыңыз. |
Техникалык шарттар
- Модель номери: RPW3008CM3000
- UPC: 811803033238
- Дисплей түрү: Санарип
- Убакыт форматы: 12/24 Hour Selectable
- Weekday Display: 5 Languages (EN, GE, FR, IT, DU)
- Ички температура диапазону: 23°F – 122°F (-5°C – 50°C)
- Тышкы температура диапазону: -4°F – 140°F (-20°C – 60°C)
- Температура бирдиктери: ° F/° C которулуучу
- Радио башкаруу: NIST WWVB Receiver
- Проекция: Time with 180° Flip
- Ойготкучтар: Dual Alarms with Snooze
- Арткы жарык: Ооба
- Outdoor Sensor Support: Up to 3 sensors (1 included)
- Кубат булагы: Battery Powered (Batteries included)
- Материал: Acrylonitrile бутадиен Styrene
- Монтаж түрү: Стол үстү
Кепилдик жана колдоо
Explore Scientific products are designed for quality and reliability. This product is covered by a manufacturer's warranty. For specific warranty terms, registration, or technical support, please refer to the warranty card included in your package or visit the official Explore Scientific webсайт. Кепилдик дооматтары үчүн сатып алганыңыздын далилин сактап коюңуз.
GTIN: 00811803033238


