Introduction
Бул колдонуучу колдонмосунда Thinkware X1000 кош каналдуу видеокамераңызды орнотуу, иштетүү жана техникалык тейлөө боюнча кеңири көрсөтмөлөр берилген. X1000 жогорку сапаттагы видео жаздыруу үчүн иштелип чыккан.tagУнааңыздын алдыңкы жана арткы жагынан коопсуздугун жана жан дүйнө тынчтыгын камсыз кылат. Түзмөктүн туура иштешин жана коопсуздугун камсыз кылуу үчүн, аны колдонуудан мурун ушул колдонмону кылдат окуп чыгыңыз.
Кутуда эмне бар
Пакетте бардык компоненттер бар экенин текшериңиз:
- 2K QHD негизги блогу (алдыңкы видеорегистратор)
- 2K QHD арткы камера
- 32 ГБ MicroSD карта
- Hardwiring Cable
- 3M скотч менен алдыңкы айнекти бекитүү
- (Кошумча: GPS антеннасы, 12V кубат кабели, жабышчаак зым клиптери, запастык монтаждоочу скотч, CS маалыматы - таңгакка жараша өзгөрүшү мүмкүн)

Сүрөт: Thinkware X1000 Dash Cam системасына кирген компоненттер.
Продукт бүттүview
Thinkware X1000 – бул жогорку өндүрүмдүүлүктөгү кош каналдуу видеорегистратор системасы. Негизги өзгөчөлүктөрүнө төмөнкүлөр кирет:
- Кош 2K QHD жаздыруу: Таза жана деталдуу тамак-ашты тартып алатtagалдыңкы жана арткы камералардан e (2560 x 1440 чечилиште).
- Sony STARVIS IMX335 сенсору: Жарык аз болгон шартта да видеонун так сапатын камсыз кылат.
- Real DOL HDR менен Түнкү көрүү 3.0: Түнкүсүн көрүнүүнү жана түстөрдүн тактыгын жакшыртуу үчүн өркүндөтүлгөн технология.
- 3.5 дюймдук IPS сенсордук экран: Түз эфирде камсыз кылат view, ойнотуу жана түзмөктүн жөндөөлөрүнө түз жетүү.
- G-сенсор: Соккуларды автоматтык түрдө аныктап, азык-түлүктү үнөмдөйтtagкорголгон папкага e.
- каршыFile Коррупция: Коопсуздук чаралары видеого жаздырылган filemicroSD картада.
- Акылдуу унаа токтотуучу жайды көзөмөлдөө топтому: Кыймылды жана соккуну аныктоону, убакыт аралыгын аныктоону жана энергияны үнөмдөө 2.0 режимдерин камтыйт (катуу зымдарды туташтырууну талап кылат).
- Айдоочуга жардам көрсөтүүнүн өркүндөтүлгөн системасы (ADAS): Тилкеден чыгып кетүү, алдыга кагылышуу жана алдыңкы унаанын чыгып кетиши жөнүндө эскертүүлөрдү берет (кошумча GPS антеннасы талап кылынат).

Сүрөт: Thinkware X1000 Dash Cam системасы, негизги блокту, арткы камераны жана зым кабелин көрсөтөт.

Сүрөт: алдыңкы пландан view Thinkware X1000 негизги блогунун QHD жазгыч линзасын баса белгилеп турат.
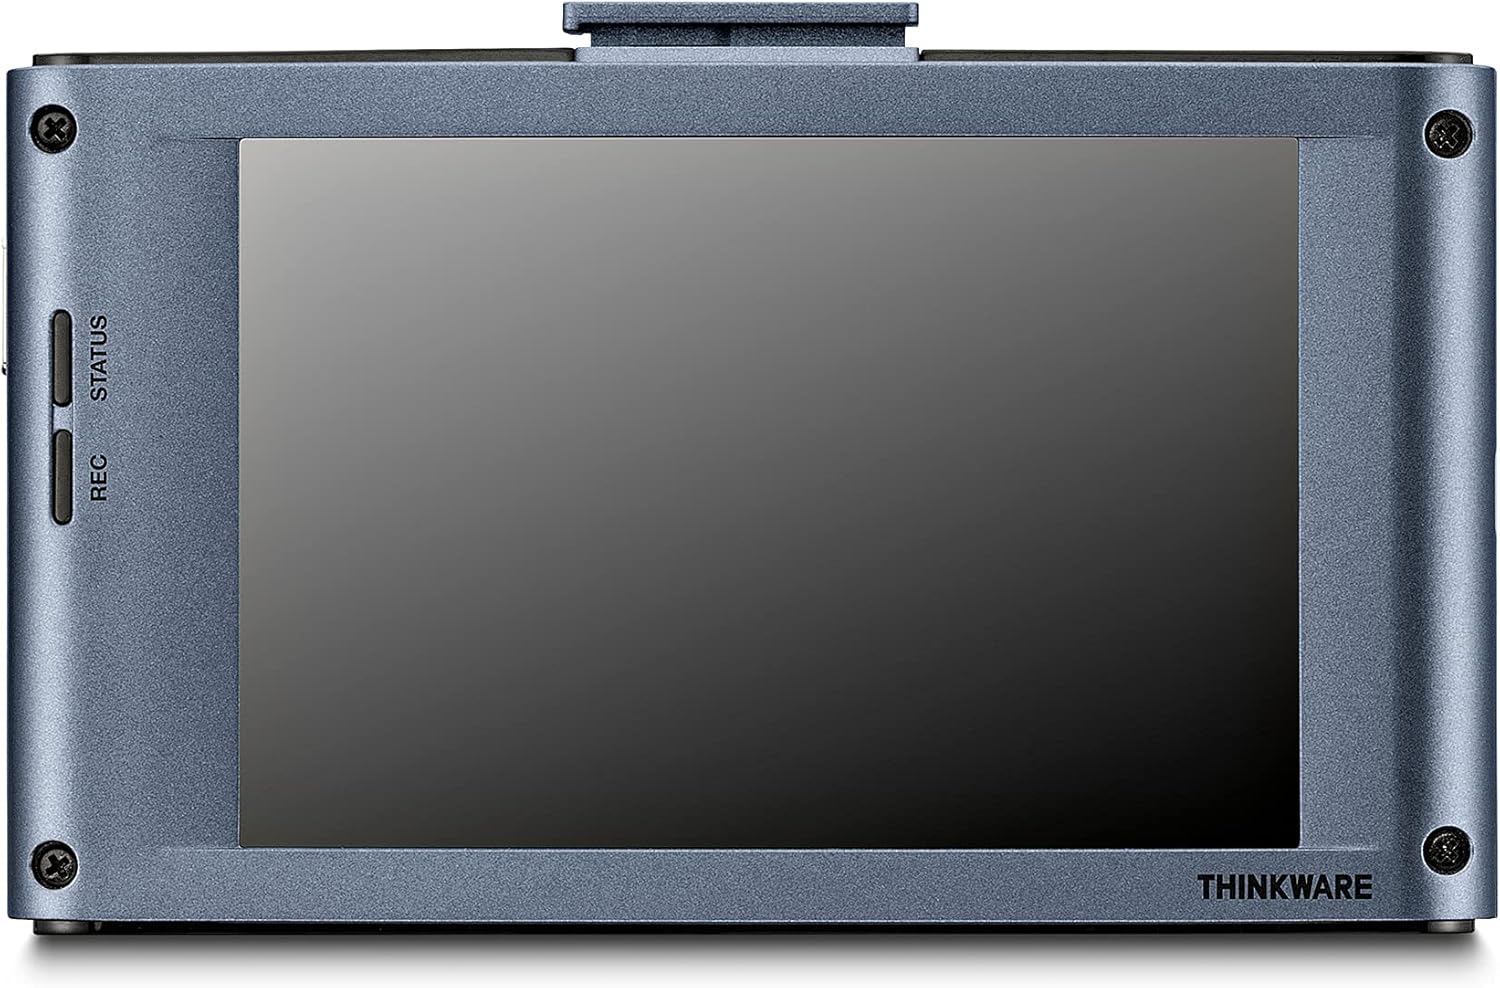
Сүрөт: Арткы view Thinkware X1000 негизги блогунун 3.5 дюймдук IPS сенсордук экраны көрсөтүлөт.
Орнотуу жана орнотуу
1. MicroSD картасын даярдаңыз
Биринчи жолу колдонуудан мурун, берилген 32 ГБ MicroSD картасын видеорегистратордун менюсун же Thinkware PC аркылуу форматтоо сунушталат. Viewпрограммалык камсыздоо. Бул оптималдуу иштөөнү жана шайкештикти камсыз кылат.
2. Алдыңкы видеорегистраторду орнотуңуз
- Камера орнотула турган алдыңкы айнекти тазалаңыз. Анын чаң жана май жок экенин текшериңиз.
- 3M скотчту алдыңкы айнектин бекиткичине чаптаңыз.
- Жабыштыргыч лентадан коргоочу пленканы сыйрып алып, бекиткичти алдыңкы айнекке, идеалдуу түрдө арткы бетине бекем басыңызview тоскоолдуксуз күзгү viewЖок дегенде 30 секунд кармап туруңуз.
- Негизги блокту орнотулган кронштейнге жылдырыңыз.
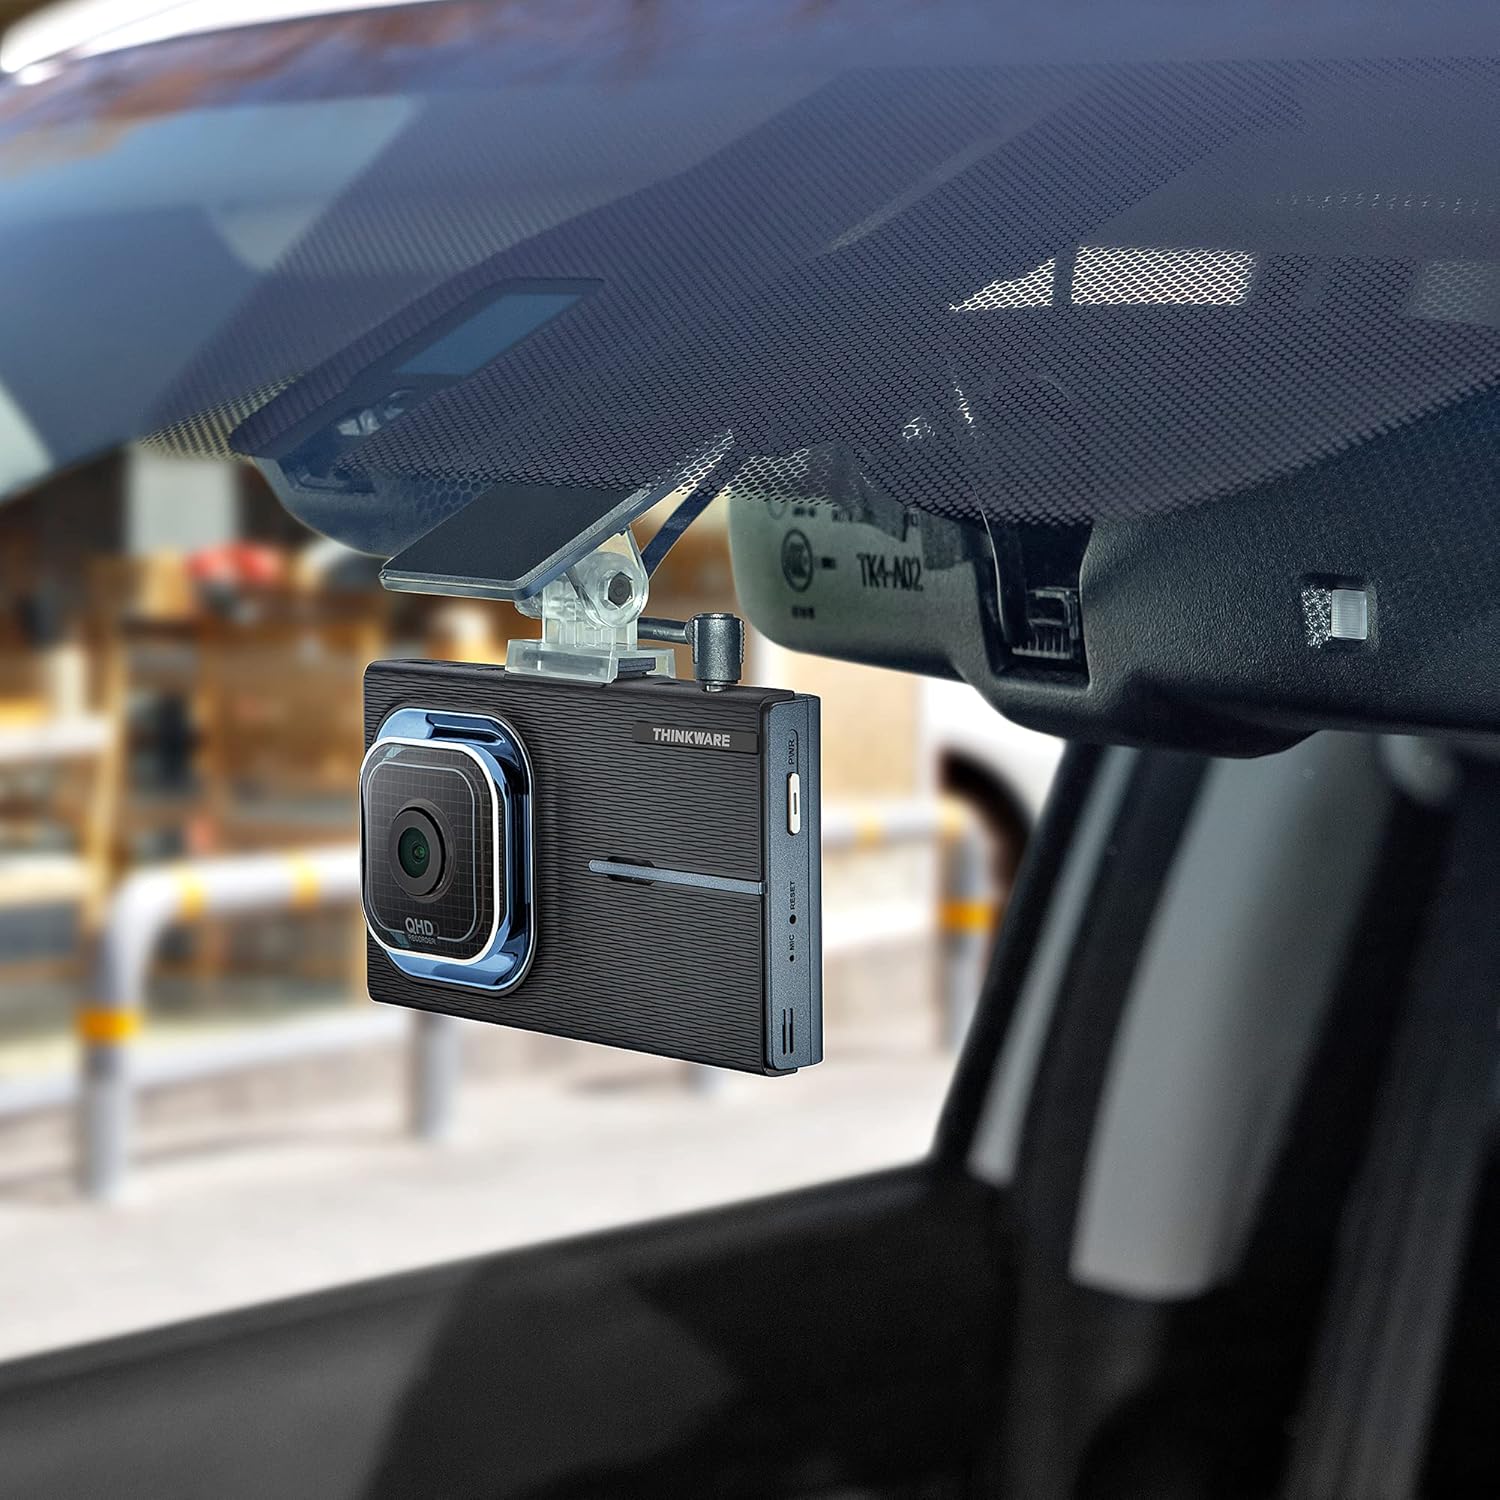
Сүрөт: Thinkware X1000 негизги блогу унаанын алдыңкы айнегине орнотулган жана арткы бөлүгүнүн артына жашыруун жайгаштырылган.view күзгү.

Сүрөт: Интерьер view алдыңкы айнекке орнотулган Thinkware X1000 Dash Cam экранын көрсөтүп турат.
3. Арткы камераны орнотуңуз
- Арткы камераны арткы маңдайкы айнекке орнотуп, тазалыгын камсыз кылыңыз view.
- Арткы камеранын кабелин арткы камерага туташтырып, аны унаанын тумшугу жана А-мамычалары боюнча негизги блокко тыкан өткөрүңүз.
- Арткы камеранын кабелин негизги блоктогу тиешелүү портко сайыңыз (адатта "V-IN" же "REAR CAM" деп белгиленет).
4. Электр энергиясына туташуу (катуу зымдарды туташтыруу)
X1000 үзгүлтүксүз электр энергиясы жана унаа токтотуучу жайды көзөмөлдөө функциялары үчүн зым кабели менен жабдылган. Зымдарды кесипкөй орнотуу сунушталат.
- Сары зымды (BATT) туруктуу кубаттуулуктагы сактагычка туташтырыңыз (ар дайым күйүк).
- Кызыл зымды (ACC) кошумча кубат сактагычына туташтырыңыз (от алдыруу күйүк болгондо күйөт).
- Кара зымды (GND) унаанын шассисиндеги металл жерге туташтыруу чекитине туташтырыңыз.
- Зым кабелин негизги блоктогу DC-IN портуна сайыңыз.
Же болбосо, негизги жаздыруу үчүн 12V кубат кабелин (тамеки күйгүзгүч адаптер) колдонсо болот, бирок унаа токтотуучу жайды көзөмөлдөө функциялары жеткиликтүү болбойт.

Сүрөт: Жогорку view Thinkware X1000 негизги блогунун сүрөтү, кубат булагы, GPS жана арткы камера үчүн ар кандай туташуу портторун көрсөтөт.
5. GPS антеннасын орнотуунун кошумча мүмкүнчүлүгү
Эгер сизде кошумча GPS антеннасы болсо, аны негизги түзмөктөгү GPS портуна туташтырыңыз. Бул ылдамдыкты каттоону, маршрутту көзөмөлдөөнү жана ADAS функцияларын иштетет.
Иштөө нускамалары
Күйгүзүү/өчүрүү
- Унаанын от алдыруу системасы күйгүзүлгөндө (эгер зым аркылуу туташтырылган болсо) же 12 В кубат булагына туташтырылганда, видеорегистратор автоматтык түрдө күйөт.
- Кол менен өчүрүү үчүн, түзмөктүн капталындагы PWR баскычын басып, кармап туруңуз.
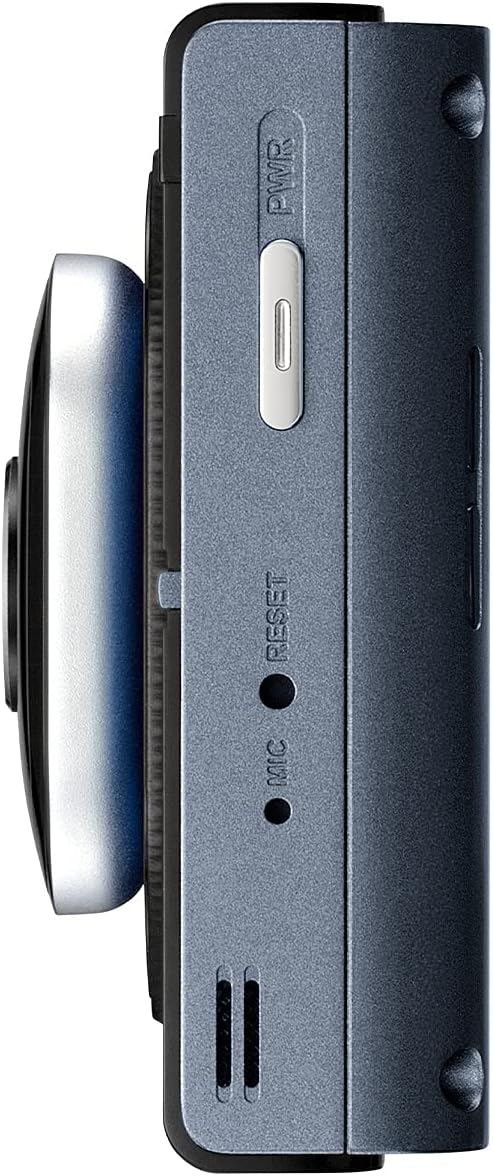
Сүрөт: каптал view Thinkware X1000 негизги блогунун, кубат баскычын жана баштапкы абалга келтирүү үчүн төөнөгүч тешигин көрсөтөт.
Жазуу режимдери
X1000 ар кандай жаздыруу режимдерин колдойт:
- Тынымсыз жаздыруу: Унаа иштеп турганда автоматтык түрдө жаздырат.tage 1 мүнөттүк сегменттерде сакталат.
- Окуяны жаздыруу: Сокку учурунда G-сенсору тарабынан иштетилет. Булар files өзүнчө, корголгон папкада сакталат жана үзгүлтүксүз жаздыруу менен үстүнө жазылбайт.
- Кол менен жаздыруу: Окуяны кол менен жаздырууну баштоо үчүн REC баскычын басыңыз.
Сенсордук экранды колдонуу
3.5 дюймдук IPS сенсордук экраны башкарууну жеңилдетүү үчүн колдонулат:
- Live View: реалдуу убакыт foo көрсөтөтtagалдыңкы жана арткы камералардан алынган e.
- Ойнотуу: Review Видеолорду түз түзмөккө жаздырыңыз. Папкалар аркылуу өтүңүз (Үзгүлтүксүз, Окуя, Кол менен, Унаа токтотуучу жай).
- Орнотуулар: Жаздыруу сапаты, G-сенсор сезгичтиги, унаа токтотуу режиминин параметрлери жана ADAS жөндөөлөрү сыяктуу ар кандай жөндөөлөргө кирип, тууралаңыз.

Сүрөт: Мыктысын көрсөткөн визуалдык салыштыруу viewX1000 сенсордук экранында көрсөтүлгөндөй, IPS панелинин стандарттуу панелге салыштырмалуу бурчтары.
Унаа токтоочу жайларды көзөмөлдөө режимдери
Катуу туташтырылганда, X1000 унааңызды токтоп турганда коргоо үчүн өркүндөтүлгөн токтотуучу жайды көзөмөлдөө функцияларын сунуштайт:
- Кыймылды аныктоо: Унаанын айланасында кыймыл аныкталганда 20 секунддук видеоклиптерди жаздырат.
- Таасирди аныктоо: Токтоп турганда кагылышуу аныкталганда 20 секунддук видеоклиптерди жаздырат.
- Убакыт өтүп жаздыруу: Секундасына 2 кадр менен үзгүлтүксүз жаздырат, сааттык тамак-ашты кысатtagмүнөттөрдүн ичинде.
- Энергияны үнөмдөө 2.0: Видеорегистраторду аз кубаттуулуктагы күтүү режимине коюу менен унаа токтотуучу жайдын иштөө мөөнөтүн кеңейтет, ал эми урунуу аныкталганда гана жаздыруу үчүн ойгонот.

Сүрөт: Унаа токтотуучу жайдагы кыймылды аныктоону көрсөткөн видеорегистратордун унаа токтотуучу жайды көзөмөлдөө режиминин сүрөтү.

Сүрөт: Жаздыруу убактысын узартуу үчүн иштелип чыккан, унаа токтотуучу жайды көзөмөлдөө режиминин энергияны үнөмдөө функциясын билдирген батарея индикатору.
Өркүндөтүлгөн айдоочуга жардам берүү системасы (ADAS)
Кошумча GPS антеннасы менен X1000 айдоо коопсуздугун жогорулатуу үчүн ADAS функцияларын камсыз кылат:
- Тилкеден чыгып кетүү жөнүндө эскертүү системасы (LDWS): Унааңыз тилкеден чыгып кетсе, сизге эскертет.
- Алдыга кагылышуу жөнүндө эскертүү системасы (FCWS): Алдыдагы унаа менен кагылышуу болорун эскертет.
- Алдыңкы унаанын кетип калуу жөнүндө эскертүүсү (FVDW): Алдыдагы унаа токтоп турган жерден кыймылдай баштаганда сизге кабарлайт.

Сүрөт: Айдоочуга жардам берүү боюнча өркүндөтүлгөн системанын (ADAS) иш жүзүндөгү визуалдык көрүнүшү, анда тилкеден чыгып кетүүлөр жана алдыга карай кагылышуулар жөнүндө эскертүүлөр көрсөтүлгөн.
Техникалык тейлөө
- MicroSD картасын башкаруу: Маалыматтардын бузулушун алдын алуу жана жаздыруунун оптималдуу иштешин камсыз кылуу үчүн microSD картасын үзгүлтүксүз форматтап туруңуз (мисалы, айына бир жолу). X1000 анти-File Коррупция технологиясы, бирок мезгил-мезгили менен форматтоо дагы эле сунушталат.
- Тазалоо: Видеорегистратордун линзасын жана сенсордук экранды тазалоо үчүн жумшак, кургак чүпүрөктү колдонуңуз. Абразивдүү тазалоочу каражаттарды же эриткичтерди колдонбоңуз.
- Программалык камсыздоонун жаңыртуулары: Thinkware'ди текшериңиз webВидеорегистраторуңузда эң акыркы функциялар жана каталарды оңдоо бар экенине ынануу үчүн, мезгил-мезгили менен сайттын микропрограммалык камсыздоосун жаңыртып туруңуз.

Сүрөт: каптал view Thinkware X1000 негизги блогунун, оңой жетүү жана тейлөө үчүн microSD карта уячасын баса белгилеген.

Сүрөт: Анти-File Жаздырылган видеону коргогон коррупциялык технология fileмаалыматтардын жоголушунан улам эстутум картасындагы s.
Проблемаларды чечүү
| Көйгөй | Мүмкүн себеп | Чечим |
|---|---|---|
| Dash камерасы күйбөйт. | Электр энергиясына туташуу бошоп калган, унаанын электр энергиясы менен камсыздоо көйгөйү, кабелдин бузук болушу. | Бардык электр кабелдеринин туташууларын текшериңиз. Эгерде ACC кубатын колдонсоңуз, унаанын от алдыруу системасы күйүк экенин текшериңиз. Мүмкүн болсо, башка кубат булагы менен сынап көрүңүз. |
| Жаздыруу токтойт жеtage бузулган. | MicroSD картасында ката бар, карта толуп калган, карта шайкеш келбейт, картанын эскириши. | microSD картасын форматтаңыз. Жаңы, жогорку сапаттагы microSD картасын колдонуп көрүңүз. Картанын 10-класста же андан жогору экенин текшериңиз. |
| Экран бош же жооп бербей жатат. | Программалык камсыздоонун иштебей калышы, кубат көйгөйү. | Кайра калыбына келтирүү үчүн ийне тешигин колдонуп, жумшак баштапкы абалга келтириңиз (капталын караңыз) view сүрөт). Туруктуу электр энергиясы менен камсыздоону камсыз кылыңыз. |
| Унаа токтотуу режими иштебейт. | Зым туташтырылган эмес, туура эмес зым туташтырылган, унаанын аккумуляторунун кубаты аз. | Видеорегистратор туруктуу жана кошумча кубатка туура туташтырылганын текшериңиз. Унаанын аккумуляторунун кубаттуулугун текшериңизtage. |
| ADAS функциялары активдүү эмес. | GPS антеннасы туташкан эмес же бузук, ADAS жөндөөлөрү өчүрүлгөн. | Кошумча GPS антеннасы бекем туташтырылганын текшериңиз. Видеорегистратордун жөндөөлөрүнөн ADAS функцияларын иштетиңиз. |
Техникалык шарттар
| Өзгөчөлүк | Деталь |
|---|---|
| Модель аты | TW-X1000D32H |
| Продукциянын өлчөмдөрү | 3.9 x 0.9 x 1.3 дюйм |
| Элемент Салмагы | 1.25 фунт |
| Видео тартуунун резолюциясы | Алдыңкы: 2K QHD (2560x1440p), Арткы: 2K QHD (2560x1440p) |
| талаасы View | 156 градус (кең бурч) |
| Сенсор | Sony STARVIS IMX335 |
| Дисплей | 3.5 дюймдук IPS сенсордук экран |
| Байланыш технологиясы | USB (компьютерге туташуу үчүн) |
| Өзгөчөлүктөр | Түнкү көрүү 3.0, Real DOL HDR, G-сенсор, Анти-File Коррупция, Акылдуу унаа токтотуучу жайды көзөмөлдөө топтому (Кыймылды/соккуну аныктоо, Убакыт аралыгы, Энергияны үнөмдөө 2.0), ADAS (LDWS, FCWS, FVDW - кошумча GPS менен) |
| Камтылган компоненттер | Негизги блок, арткы камера, 32 ГБ MicroSD картасы, зым кабели, 3M скотч менен алдыңкы айнекке бекиткич |
| Монтаж түрү | Жабыштыруучу тоо |
| Түс | Кара |
Коопсуздук маалыматы
- Видеорегистраторду айдоочунун кыймылына тоскоол болгон жерге орнотпоңуз view же коопсуздук жаздыкчасынын ачылышына тоскоол болот.
- Бардык кабелдердин коопсуз өткөрүлгөнүн жана унаанын башкаруу элементтерине тоскоол болбогонун текшериңиз.
- Аппаратты экстремалдык температурага, тике күн нуруна же ашыкча нымдуулукка узак убакытка калтырбаңыз.
- Аппаратты ажыратууга же өзгөртүүгө аракет кылбаңыз. Бул кепилдикти жокко чыгарат жана зыян келтириши мүмкүн.
- Түпнуска Thinkware аксессуарларын жана электр кабелдерин гана колдонуңуз.
Кепилдик жана колдоо
Кепилдик жөнүндө маалымат жана техникалык колдоо алуу үчүн, өнүмүңүз менен кошо берилген документтерди караңыз же расмий THINKWARE веб-сайтына кириңиз. webсайт. Сиз да зыярат кылсаңыз болот Amazonдогу THINKWARE дүкөнү кошумча ресурстар жана байланыш маалыматы үчүн.
Продукция THINKWARE USA тарабынан сатылат, бул расмий колдоо каналдарынын жеткиликтүүлүгүн камсыздайт.


