Introduction
Сатып алганыңыз үчүн рахматasing the Kitchen 10L Desktop Electric Oven. This manual provides important information regarding the safe operation, maintenance, and troubleshooting of your new appliance. Please read this manual thoroughly before use and retain it for future reference.
Маанилүү коопсуздук нускамалары
Электр шаймандарын колдонууда негизги коопсуздук чараларын дайыма сактоо керек, анын ичинде төмөнкүлөр:
- Бардык нускамаларды окуңуз.
- ысык беттерге тийбеңиз. Туткаларды же туткаларды колдонуңуз.
- Электрдик шоктон коргоо үчүн шнурду, сайгычты же шайманды сууга же башка суюктукка салбаңыз.
- Кандайдыр бир шайманды балдар же алардын жанында колдонуп жатканда, катуу көзөмөл керек.
- Колдонбогондо жана тазалоодон мурун розеткадан ажыратыңыз. Бөлүктөрүн кийүүдөн же чечүүдөн мурун муздатыңыз.
- Эч бир шайманды зымы же сайы бузулган же шайман иштебей калгандан кийин же кандайдыр бир түрдө бузулгандан кийин иштетпеңиз.
- Шаймандын өндүрүүчүсү сунуш кылбаган кошумча тиркемелерди колдонуу жаракатка алып келиши мүмкүн.
- Сыртта колдонбоңуз.
- Шнур столдун же столдун четине илинип калышына же ысык беттерге тийбеңиз.
- Ыстык газ же электр мешине же ысытылган мештин жанына коюуга болбойт.
- Курамында ысык май же башка ысык суюктуктар бар шайманды жылдырууда өтө этияттык керек.
- Ар дайым алгач сайгычка сайыңыз, андан кийин шнурду розеткага сайыңыз. Өчүрүү үчүн каалаган башкарууну "өчүрүү" абалына буруңуз, андан кийин розеткадан сайгычты чыгарыңыз.
- Шайманды максаттуу колдонуудан башка максатта колдонбоңуз.
Продукт бүттүview
Familiarize yourself with the components of your electric oven.

Сүрөт 1: Алдыңкы view of the 10L Desktop Electric Oven, showing the glass door, handle, and control knobs on the right side.
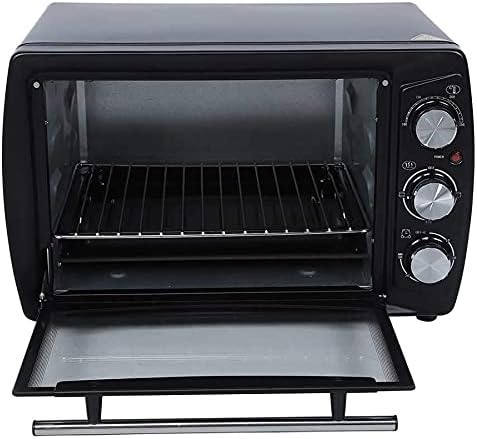
2-сүрөт: Интерьер view of the oven with the door open, revealing the wire rack and the removable crumb tray at the bottom.
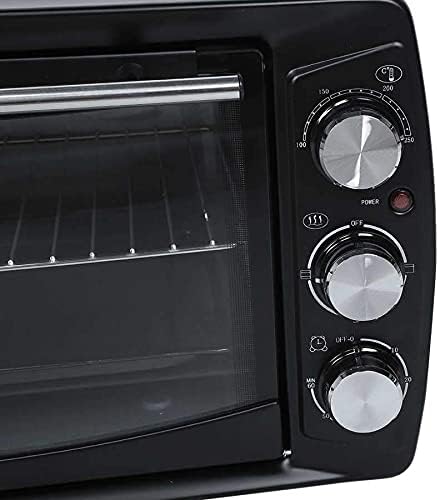
Figure 3: Close-up of the control panel, featuring three rotary knobs for temperature, function, and timer settings, along with a power indicator light.
Компоненттери:
- Температураны көзөмөлдөө баскычы: Каалаган бышыруу температурасын коюу үчүн колдонулат.
- Функцияны башкаруу баскычы: Selects heating elements (e.g., upper, lower, or both).
- Таймерди башкаруу баскычы: Бышыруу убактысын орнотот.
- Кубаттуулук көрсөткүчү: Меш иштеп жатканда күйөт.
- Айнек эшик: мүмкүндүк берет viewтамак бышыруу учурунда.
- Зым торчосу: Азык-түлүктөрдү коюу үчүн.
- Чакан табак: Оңой тазалоо үчүн күкүмдөрдү жана тамчыларды чогултат.
- Жылытуу элементтери: Four heating elements for efficient cooking.
Жайгашуу
- Пакеттен чыгаруу: Духовканы жана бардык аксессуарларды таңгактан этияттык менен чыгарып алыңыз. Келечекте сактоо же ташуу үчүн таңгактарды сактаңыз.
- Жайгашкан жери: Place the oven on a stable, heat-resistant, and flat surface. Ensure there is adequate ventilation around the oven (at least 4 inches of clearance on all sides). Do not place it near flammable materials or heat sources.
- Алгачкы тазалоо: Биринчи колдонуудан мурун мештин ичин жана сыртын жарнама менен сүртүңүзamp cloth. Wash the wire rack and crumb tray with warm, soapy water, rinse thoroughly, and dry completely.
- Биринчи колдонуу күйгүзүү: It is recommended to run the oven empty for about 10-15 minutes at maximum temperature (250°C) with the function set to both upper and lower heating. This will burn off any manufacturing residues and odors. A slight smoke or odor is normal during this process. Ensure the area is well-ventilated.
- Кубат туташуу: Кубат шнурын жерге туташтырылган 220 В электр розеткасына сайыңыз.
Иштөө нускамалары
Follow these steps to operate your electric oven:
- Тамак даярдоо: Place your food item on the wire rack. Ensure proper cookware is used that is safe for oven use.
- Insert Rack: Slide the wire rack with food into the desired rack position inside the oven.
- Жабуу: Мештин эшигин бекем жабыңыз.
- Температураны коюу: бургула Температураны көзөмөлдөө баскычы to your desired cooking temperature (e.g., 100°C to 250°C).
- Функцияны тандоо: бургула Функцияны башкаруу баскычы to select the desired heating mode (e.g., upper heating, lower heating, or both).
- Таймерди коюу: бургула Таймерди башкаруу баскычы to the desired cooking time (up to 60 minutes). The power indicator light will illuminate, indicating the oven is heating. The oven will automatically turn off when the timer reaches zero, and a bell will sound. For continuous operation, turn the timer past the 60-minute mark to the "Stay On" position (if available).
- Бышыруу мониторинги: Айнек эшик аркылуу тамактын бышыруу процессин байкай аласыз.
- Тамак-ашты алып салуу: Once cooking is complete and the timer has sounded, carefully open the oven door. Use oven mitts to remove the hot food and rack.
- Муздатуу: Духовканы тазалоодон же сактоодон мурун толугу менен муздатыңыз.
Тейлөө жана тазалоо
Үзгүлтүксүз тазалоо жана тейлөө мешиңиздин узак иштөөсүн жана оптималдуу иштешин камсыздайт.
- Ар дайым розеткадан ажыратыңыз: Before cleaning, always unplug the oven from the power outlet and allow it to cool down completely.
- Тышкы тазалоо: Сырткы беттерин жумшак менен сүртүңүз, гamp кездеме. Абразивдүү тазалагычтарды же сүртүүчү жайларды колдонбоңуз, анткени алар финишке зыян келтириши мүмкүн.
- Ички тазалоо: Ички иштер үчүн, жарнама менен сүртүңүзamp cloth and mild detergent. For stubborn stains, a non-abrasive oven cleaner designed for small appliances can be used, following the product's instructions. Ensure all cleaner residue is wiped away.
- Чакан табак: The crumb tray should be emptied and cleaned regularly to prevent grease buildup and potential fire hazards. Wash with warm, soapy water, rinse, and dry thoroughly.
- Зым торчосу: The wire rack can be washed in warm, soapy water or placed in a dishwasher.
- Чөмүлбө: Never immerse the main body of the oven, cord, or plug in water or any other liquid.
- Сактагыч: Колдонулбай турган учурда, духовканы таза, кургак жерде сактаңыз.
Проблемаларды чечүү
Мешиңизде көйгөйлөргө туш болсоңуз, төмөнкү жалпы көйгөйлөрдү жана чечимдерди караңыз:
| Көйгөй | Мүмкүн себеп | Чечим |
|---|---|---|
| Меш күйбөйт. | Сайылган эмес; розеткада көйгөй бар; таймер коюлган эмес. | Ensure the oven is securely plugged into a working 220V outlet. Check if the timer knob is set to a cooking time or "Stay On". |
| Тамак бир калыпта бышпайт. | Incorrect rack position; uneven food placement; door not fully closed. | Adjust rack position for optimal heat distribution. Ensure food is placed centrally. Check that the oven door is fully closed during operation. |
| Бышыруу учурунда ашыкча түтүн же жыт. | Food spills; crumb tray not cleaned; first use burn-off. | Clean any food spills immediately. Empty and clean the crumb tray regularly. If it's the first use, this is normal; ensure ventilation. |
| Таймер иштебей жатат. | Timer knob malfunction. | Ensure the timer knob is turned past the initial resistance point to activate. If it still doesn't work, contact customer support. |
Бул чечимдерди колдонуп көргөндөн кийин көйгөй чечилбесе, кардарларды колдоо менен байланышыңыз.
Техникалык шарттар
| Өзгөчөлүк | Деталь |
|---|---|
| Модел | 10L Desktop Electric Oven |
| Кубаттуулугу | 10 Liters (11-20L range specified in description, but product is 10L variant) |
| Күч (Вт) | 1201-1500W |
| Тtage (V) | 220V |
| Сертификация | CE |
| Power Source | Электр (зымдуу электр) |
| Жылытуу элементтеринин саны | 4 |
| Стиль | Горизонталдуу |
| Материал | Алюминий |
| Башкаруу режими | Mechanical Timer Control |
| Башкаруу түрү | баскыч |
| эшик стили | Ашылма эшик |
| Камтылган компоненттер | Crumb науасы |
| Түс | Кара |
| UPC | 808233200514 |
Кепилдик жана колдоо
For information regarding warranty coverage, product registration, or technical support, please refer to the warranty card included with your product packaging or visit the manufacturer's official website. Please have your model number (10L Desktop Electric Oven) and UPC (808233200514) ready when contacting support.
Кошумча жардам алуу үчүн, сиз продукт сатылып алынган сатуучуга да кайрылсаңыз болот.


