1. Киришүү
Бул колдонмо Intel NUC 10 Performance NUC10i5FNKN Barebone системасын орнотуу, иштетүү, тейлөө жана мүчүлүштүктөрдү оңдоо боюнча кеңири көрсөтмөлөрдү берет. Intel NUC (Кийинки эсептөө бирдиги) - бул ийкемдүүлүк жана ыңгайлаштыруу үчүн иштелип чыккан кичинекей форма фактордук компьютердик комплект. Негизги система катары, ал толук кандуу иштеши үчүн колдонуучудан эс тутумду (RAM), сактагычты (SSD/HDD) жана операциялык системаны орнотууну талап кылат.
Туура орнотууну жана иштөөнү камсыз кылуу үчүн орнотуу процессин баштоодон мурун, бул колдонмону кунт коюп окуп чыгыңыз.

1-сүрөт: Intel NUC 10 Performance NUC10i5FNKN Barebone системасы. Бул сүрөттө NUCтун компакттуу дизайны көрсөтүлгөн, анда алдыңкы бетинде ар кандай порттору жана капталында желдеткичи бар кара шасси бар.
2. Кутуда эмне бар
Пакетте бардык буюмдар бар экенин текшериңиз:
- NUC 10 Performance комплекти - NUC10i5FNKN
- АКШ шнуру (кубат адаптери)
Эскертүү: Эстутум, сактагыч жана операциялык система комплектке кирбейт жана аларды өзүнчө сатып алуу керек.
3. Орнотуу жана орнотуу
Бул бөлүм сизге компоненттерди физикалык орнотуу жана баштапкы орнотуу боюнча көрсөтмөлөрдү берет.
3.1. Эстутумду орнотуу (RAM)
- NUC шассисинин астыңкы капкагын бурап ачыңыз.
- Энелик платадагы DDR4 SO-DIMM уячаларын табыңыз.
- SO-DIMM модулундагы оюкту оюктагы оюк менен тегиздеңиз.
- Модулду 45 градус бурчта салып, кармагыч клиптер ордуна бекитилгенче басыңыз.
- Эгер мүмкүн болсо, кошумча эс тутум модулдары үчүн кайталаңыз.
3.2. Сактоочу жайды (SSD/HDD) орнотуу
NUC10i5FNKN M.2 SSD жана 2.5 дюймдук SATA дисктерин колдойт.
3.2.1. M.2 SSD орнотуу
- Motherboard боюнча M.2 уячасын табыңыз.
- M.2 уячасынын учундагы кичинекей бураманы алып салыңыз.
- M.2 SSDди уячага бурч менен салыңыз.
- SSDди акырын басып, аны бурамалар менен бекитиңиз.
3.2.2. 2.5 дюймдук SATA дискти орнотуу
- 2.5 дюймдук дискти диск бөлүмүнүн кронштейнине орнотуңуз (эгер бар болсо).
- SATA маалыматтарын жана кубат кабелдерин энелик платадан дискке туташтырыңыз.
- Диск бөлүмүнүн кронштейнин шассинин ичинде бекитиңиз.
Эстутумду жана сактагычты орноткондон кийин, астыңкы капкакты кайра бекитиңиз.
3.3. Перифериялык түзүлүштөрдү туташтыруу
Мониторуңузду, клавиатураңызды, чычканыңызды жана башка керектүү түзмөктөрдү NUCке туташтырыңыз.

2-сүрөт: Intel NUC 10 алдыңкы панелинин порттору. Бул сүрөттө ар кандай перифериялык түзүлүштөрдү туташтыруу үчүн алдыңкы USB 3.1 Gen2 порттору (Type-A жана Type-C), ошондой эле кубат баскычы жана кулакчын уячасы баса белгиленген.

3-сүрөт: Intel NUC 10 арткы панелинин порттору. Бул сүрөттө кубат киргизүү (19V), HDMI порту, Ethernet порту, эки USB 3.1 Gen2 Type-A порту жана Thunderbolt 3 колдоосу бар USB-C порту көрсөтүлгөн, бул ар кандай туташуу мүмкүнчүлүктөрүн камсыз кылат.
- Монитор: Дисплейиңизди арткы панелдеги HDMI портуна туташтырыңыз. NUC 4096x2304 чейин чечилишти колдойт.
- Баскычтоп/Чычкан: Бардык жеткиликтүү USB портторуна (алдыңкы же арткы) туташтырыңыз.
- Тармак: Зымдуу тармакка кирүү үчүн Ethernet кабелин RJ45 портуна туташтырыңыз.
- Күч: Кубат адаптерин арткы панелдеги 19V DC киргизүүсүнө туташтырыңыз, андан кийин кубат шнурун электр розеткасына сайыңыз.
3.4. Операциялық системаны орнотуу
Бардык жабдуулар орнотулуп, перифериялык түзүлүштөр туташтырылгандан кийин, сизге операциялык системаны (мисалы, Windows 10, Linux) орнотуу керек болот. Толук кадамдар үчүн операциялык системанын орнотуу көрсөтмөсүн караңыз. Орнотуу үчүн жүктөлүүчү USB дискти түзүү керек болушу мүмкүн.
4. Иштөө нускамалары
4.1. Күйгүзүү / Өчүрүү
- Күйгүзүү: Алдыңкы панелде жайгашкан кубат баскычын басыңыз. Система күйүп турганда кубат баскычы күйөт.
- Өчүрүү: Операциялык системанын өчүрүү процедурасын колдонуңуз. Же болбосо, мажбурлап өчүрүү үчүн күйгүзүү баскычын 4 секунд басып туруңуз (зарыл болгон учурда гана колдонуңуз).

4-сүрөт: Intel NUC 10 алдыңкы панелинин жакындан тартылган көрүнүшү, анда жарыктандырылган кубат баскычы көрсөтүлгөн. Бул баскыч системаны күйгүзүү жана өчүрүү үчүн колдонулат.
4.2. SD карта уячасын колдонуу
NUC 10 Performance сол каптал панелинде UHS-II колдоосу бар SDXC карта уячасы менен жабдылган. Бул шайкеш келген эстутум карталарынан сүрөттөрдү, видеолорду жана башка маалыматтарды оңой өткөрүп берүүгө мүмкүндүк берет.
- SD картаны ордуна чыкылдаганча уячага салыңыз.
- Чыгаруу үчүн, картаны ал секирип чыкканча бир аз басыңыз.
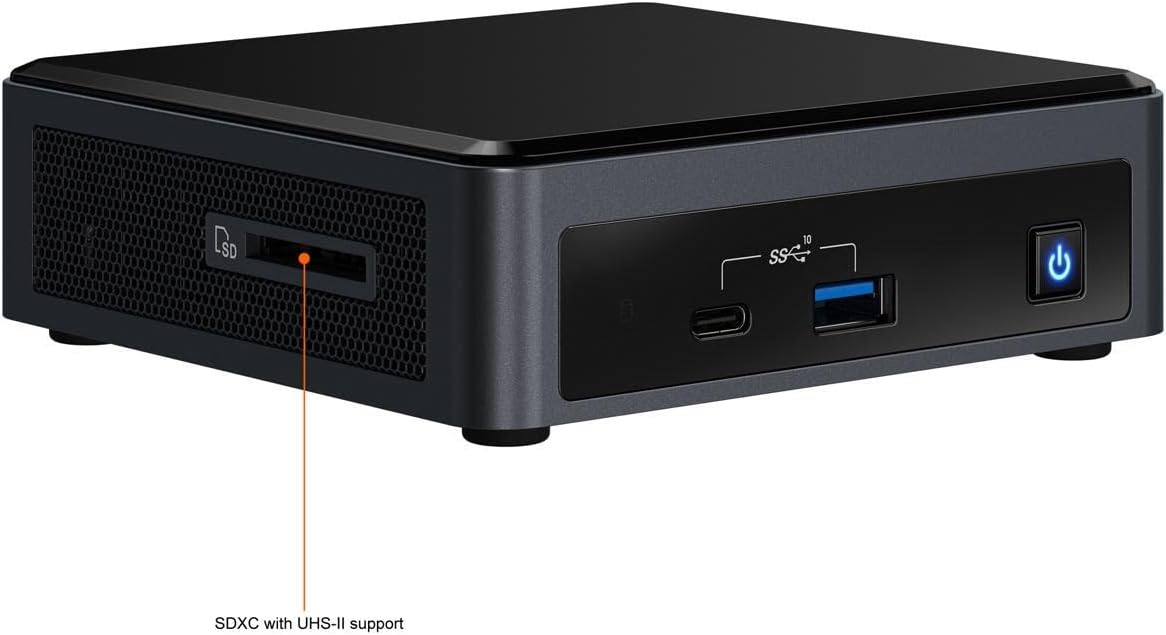
5-сүрөт: Side view Intel NUC 10дун UHS-II колдоосу бар SDXC карта уячасын баса белгилеп, бул уяча SD карталарынан маалыматтарды окуу жана жазуу үчүн ыңгайлуу мүмкүнчүлүк берет.
4.3. BIOS/UEFI жөндөөлөрү
BIOS/UEFI жөндөөлөрүнө кирүү үчүн баскычын басыңыз F2 Баштоо учурунда баскычты кайра-кайра басыңыз. Бул жүктөө тартибин, система жөндөөлөрүн жана өркүндөтүлгөн функцияларды конфигурациялоого мүмкүндүк берет.
5. Техникалык тейлөө
Туура тейлөө сиздин NUCтин узак мөөнөттүү жана оптималдуу иштешин камсыз кылат.
5.1. Тазалоо
- NUCти таза, чаңсыз чөйрөдө сактаңыз.
- Сырткы бетин мезгил-мезгили менен жумшак, кургак чүпүрөк менен тазалап туруңуз.
- Аба агымын жана муздатууну туура сактоо үчүн желдетүү тешиктеринен чаңды акырын тазалоо үчүн кысылган абаны колдонуңуз. Тазалоодон мурун системанын өчүрүлгөнүн текшериңиз.
5.2. Программалык камсыздоону жаңыртуу
- Операциялык системаңызды, драйверлериңизди жана BIOS/UEFI микропрограммаңызды үзгүлтүксүз жаңыртып туруңуз. Intelдин расмий колдоо кызматына кайрылыңыз webNUC моделиңиз үчүн эң акыркы драйверлер жана микропрограммалар үчүн сайт.
- Программалык камсыздоону жаңыртып туруу системанын туруктуулугун, коопсуздугун жана иштешин жакшыртат.
6. Кыйынчылыктарды
Бул бөлүм сиз кабылышы мүмкүн болгон жалпы көйгөйлөрдү карайт.
6.1. Күч жок
- Кубат адаптери NUC жана иштеп жаткан электр розеткасына бекем туташтырылганын текшериңиз.
- Кубат шнуру кубат адаптерине толугу менен сайылганын текшериңиз.
- Электр розеткасын башка түзмөк менен текшериңиз.
6.2. Дисплейдин чыгышы жок
- Монитор күйгүзүлгөнүн жана видео кабелдин (HDMI) NUCке да, мониторго да бекем туташтырылганын текшериңиз.
- Монитор туура киргизүү булагына коюлганын текшериңиз.
- Эгер бир нече монитор колдонсоңуз, бирөөсүн гана туташтырып көрүңүз.
- RAM модулдарынын туура орнотулганын текшерүү үчүн аларды кайра орнотуңуз.
6.3. Операциялык система жүктөлбөй жатат
- Сактоо диски (SSD/HDD) туура орнотулганын жана BIOS/UEFI жөндөөлөрүндө аныкталганын текшериңиз.
- Туура диск негизги жүктөө түзмөгү катары тандалып алынганын текшерүү үчүн BIOS/UEFI'деги жүктөө тартибин текшериңиз.
- Эгер сиз жакында эле жаңы ОС орноткон болсоңуз, орнотуу медиасы туура түзүлгөнүн текшериңиз.
Көбүрөөк жардам алуу үчүн Intel колдоо кызматына кайрылыңыз webсайтка же кардарларды колдоо менен байланышыңыз.
7. Техникалык шарттар
Intel NUC 10 Performance NUC10i5FNKN үчүн негизги техникалык мүнөздөмөлөр:
| Өзгөчөлүк | Деталь |
|---|---|
| Модель номери | NUC10i5FNKN |
| Процессор | Intel Core i5-10210U (10-муундагы, 2.5 ГГц) |
| Графика | Intel UHD графикасы (интегралдык) |
| Max Screen Resolution | 4096x2304 |
| RAM түрү | DDR4 SDRAM (SO-DIMM уячалары) |
| Сактагыч интерфейси | SATA/600 (2.5 дюймдук дисктер үчүн), M.2 (SSD үчүн) |
| USB порттору | 7 (USB 3.1 Gen2 Type-A жана Type-C кошо алганда) |
| Ethernet | Гигабит Ethernet |
| Өлчөмдөрү (LxWxH) | 6 x 5 x 4 дюйм |
| Салмагы | 2.55 фунт |
| Операциялык система (колдоого алынат) | Windows 10 (жана башка шайкеш келген ОС) |
8. Кепилдик жана колдоо
8.1. Продукцияга кепилдик
Бул Intel NUC продуктусу Intel компаниясынын стандарттуу чектелген кепилдиги менен камтылган. Кепилдиктин белгилүү бир шарттары, эрежелери жана мөөнөтү үчүн, сатып алууңузга тиркелген кепилдик маалыматын караңыз же расмий Intel веб-сайтына кириңиз. webсайт. Кепилдик дооматтар үчүн сатып алганыңыздын далилин сактаңыз.
8.2. Техникалык колдоо
Техникалык жардам, драйверлерди жүктөп алуу, микропрограммалык камсыздоону жаңыртуу жана кошумча документтер үчүн расмий Intel колдоо кызматына кайрылыңыз webсайт:
Колдоо кызматына кайрылганда, продуктуңуздун моделинин номерин (NUC10i5FNKN) жана сериялык номерин даярдап коюңуз.


