1. Киришүү
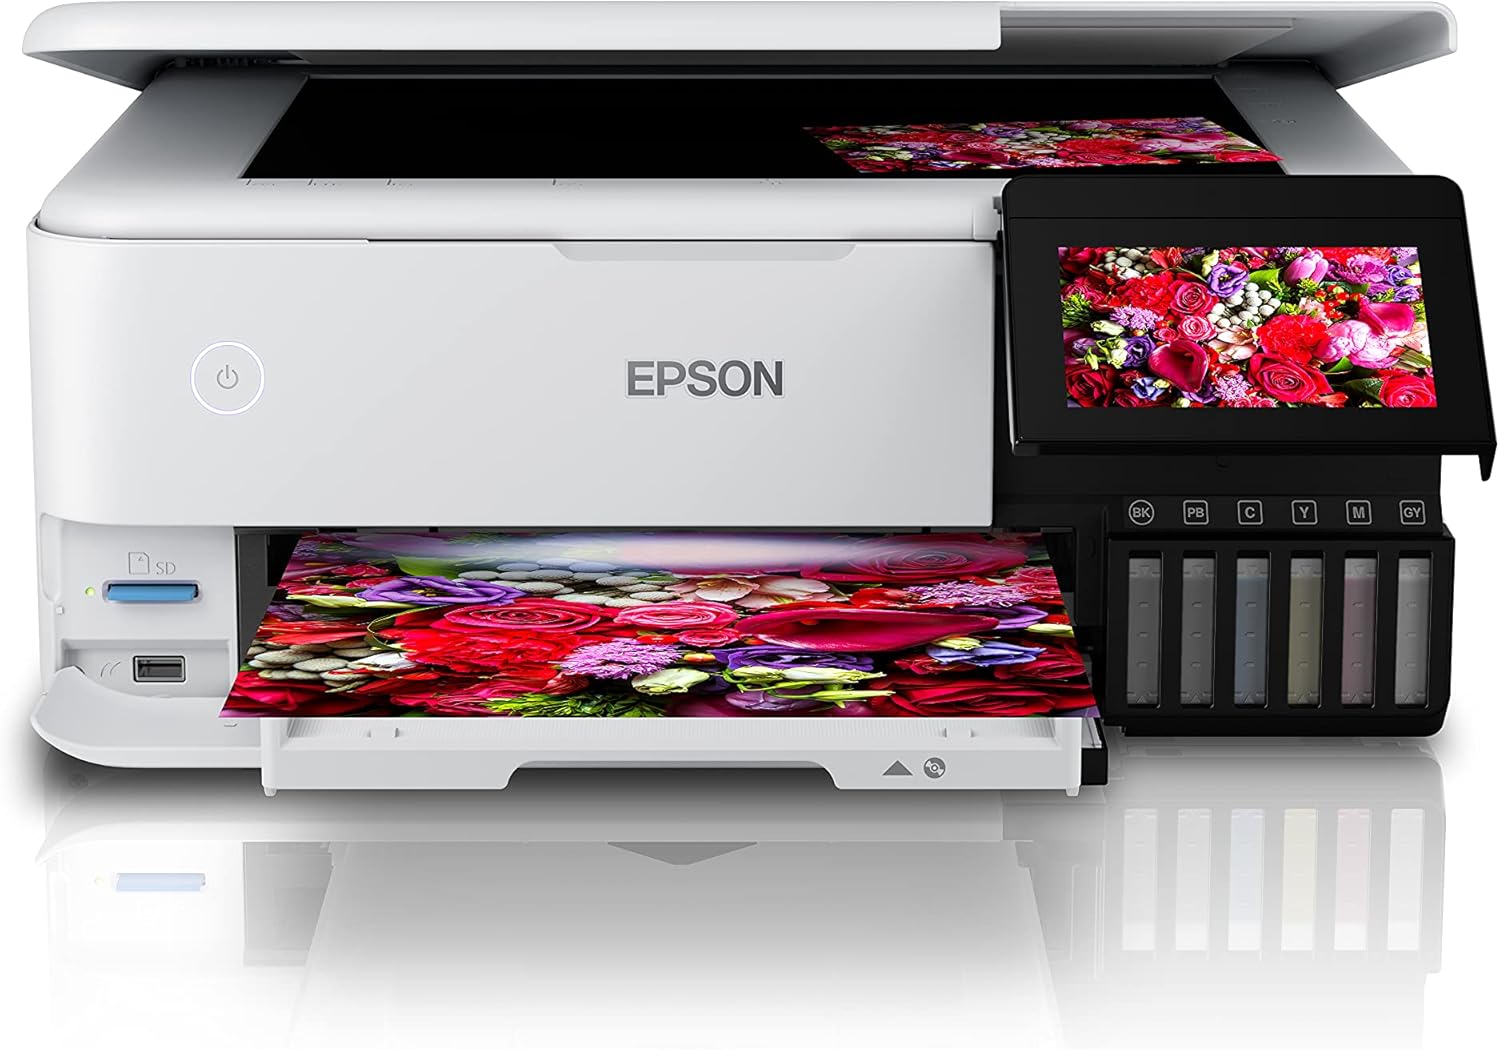
The Epson EcoTank L8160 is a high-performance, low-cost A4 photo printer designed for both photos and documents. This multifunction inkjet printer features a 6-color Epson Claria ET Premium ink system, allowing for borderless A4 color photos and stunning black and white prints. With its integrated ink tank system, it offers ultra-low-cost printing, capable of producing up to 2300 high-quality photos with replacement ink bottles.
The L8160 provides modern connectivity options including Wi-Fi, Wi-Fi Direct, Ethernet, and Apple AirPrint, ensuring seamless integration into your home or office network. It supports versatile paper handling with dedicated A4 and photo paper trays, plus two rear feeds for thicker media. Additionally, it offers convenient duplex printing for clear text on A4 documents using pigment black ink.

Сүрөт 1.1: Epson EcoTank L8160 printer with key features labeled, including the 10.9cm touchscreen, 6-color ink system, and wireless connectivity.
2. Коопсуздук маалыматы
Принтерди колдонуудан мурун жараат же аппаратка зыян келтирбөө үчүн бардык коопсуздук нускамаларын окуп чыгыңыз. Бул колдонмону келечекте маалымат алуу үчүн сактаңыз.
- Кубат булагы: Use only the power cable supplied with the printer. Connect to a grounded outlet.
- Жайгашкан жери: Place the printer on a stable, level surface. Avoid locations with excessive dust, humidity, or direct sunlight. Ensure adequate ventilation around the printer.
- Сыя менен иштөө: Handle ink bottles carefully to avoid spills. If ink comes into contact with skin, wash thoroughly with soap and water. Keep ink out of reach of children.
- Принтерди жылдыруу: Before moving the printer, ensure all ink tank caps are securely closed and the printer is powered off and unplugged.
- Бөлүнбөңүз: Do not attempt to disassemble or repair the printer yourself. Refer to qualified service personnel for repairs.
3. Пакеттин мазмуну
Баардык буюмдар пакетте камтылганын текшериңиз:
- Epson EcoTank L8160 принтери
- Full set of ink bottles (6 colors)
- Электр кабели
- User Guide / Setup Guide
- CD / DVD табагы
4. Орнотуу
4.1 Кутудан чыгаруу жана жайгаштыруу
- Принтерди таңгагынан чыгарып, бардык коргоочу ленталарды жана материалдарды алып салыңыз.
- Принтерди электр розеткасынын жанындагы тегиз, туруктуу бетке коюңуз.
4.2 Сыя цистерналарын толтуруу
The EcoTank L8160 uses an integrated ink tank system. Follow these steps to fill the tanks:
- Принтердин капталындагы сыя куюучу цистернанын капкагын ачыңыз.
- Uncap the ink bottle for the corresponding color. The bottles are designed to fit only the correct tank to prevent accidental filling errors.
- Insert the ink bottle into the tank's filling port. The ink will automatically start to fill the tank. Do not squeeze the bottle.
- Once the tank is full, the ink flow will stop automatically. Remove the bottle and recap it.
- Repeat for all colors. Close the ink tank unit cover.
Сүрөт 4.1: Filling the ink tanks on the Epson EcoTank L8160.
4.3 Электр кубатына туташуу жана баштапкы орнотуу
- Connect the power cable to the printer and a wall outlet.
- Принтерди иштетүү үчүн кубат баскычын басыңыз.
- Follow the on-screen instructions on the 10.9 cm touchscreen display to select your language, date, and time.
- The printer will then initiate the ink charging process, which may take several minutes. Do not turn off the printer during this process.
4.4 Программалык камсыздоону орнотуу жана тармакка туташуу
To use all printer features, install the necessary software and drivers on your computer or connect via a smart device.
- Компьютер үчүн: Epson колдоо кызматына кайрылыңыз website for the L8160 model to download the latest drivers and software. Follow the on-screen instructions for installation.
- Wi-Fi туташуусу: On the printer's touchscreen, navigate to the Wi-Fi setup menu. Select your network from the list and enter the password.
- Wi-Fi Direct: This allows direct connection from a device without a router. Refer to the printer's display for Wi-Fi Direct setup instructions and credentials.
- Ethernet туташуусу: Connect an Ethernet cable from your router to the printer's Ethernet port. The printer should automatically connect to the network.
- Apple AirPrint: For Apple devices, ensure your device and printer are on the same Wi-Fi network. AirPrint functionality is typically automatic.
5. Иштөө нускамалары
5.1 Кагазды жүктөө
The L8160 features multiple paper input options:
- Front Paper Cassette (A4): Pull out the front paper cassette. Load A4 plain paper print-side down. Adjust the side guides to fit the paper size.
- Photo Paper Tray: A dedicated tray for photo paper is available. Load photo paper print-side down.
- Rear Feed Slots: Two rear feed slots are available for thicker media or specialty papers. Open the rear paper support and load paper one sheet at a time, print-side up.

Сүрөт 5.1: Loading paper into the Epson EcoTank L8160.
5.2 Документтерди жана сүрөттөрдү басып чыгаруу
- Принтер күйгүзүлгөнүн жана түзмөгүңүзгө туташканын текшериңиз.
- Open the document or photo you wish to print on your computer or smart device.
- Колдонмоңуздан басып чыгаруу опциясын тандаңыз.
- Принтериңиз катары Epson EcoTank L8160 тандаңыз.
- Adjust print settings such as paper size, media type, print quality, and color options. For duplex printing, select the two-sided printing option.
- Click Басып чыгаруу.
5.3 Printing from Smart Devices
The Epson Smart Panel app allows you to print, scan, and copy directly from your smartphone or tablet.
- Түзмөгүңүздүн колдонмолор дүкөнүнөн Epson Smart Panel колдонмосун жүктөп алып, орнотуңуз.
- Ensure your smart device and printer are connected to the same Wi-Fi network.
- Open the app and follow the on-screen instructions to connect to your L8160 printer.
- You can now select photos or documents from your device to print directly.

Сүрөт 5.2: Printing from a smart device using the Epson Smart Panel app.
5.4 CD/DVD басып чыгаруу
The printer supports direct printing onto compatible inkjet-printable CDs/DVDs.
- Design your CD/DVD label using compatible software.
- Place the printable CD/DVD onto the included CD/DVD tray.
- Insert the CD/DVD tray into the designated slot on the printer.
- Follow the software prompts to print your design.
6. Техникалык тейлөө
6.1 Сыя деңгээлин текшерүү жана кайра толтуруу
Regularly check the ink levels through the transparent ink tanks or on the printer's display. When a tank is low, refill it using genuine Epson replacement ink bottles as described in Section 4.2.
6.2 Басып чыгаруу башын тазалоо
If print quality declines (e.g., missing lines, streaking), perform a print head cleaning. This can be done from the printer's control panel or through the printer utility software on your computer.
- Принтердин сенсордук экранында төмөнкүгө өтүңүз Техникалык тейлөө or Жайгашуу.
- Тандоо Басып чыгаруу башын тазалоо.
- Follow the on-screen instructions. A nozzle check pattern will be printed to verify improvement.
6.3 Жалпы тазалоо
Принтердин сыртын жумшак менен сүртүңүз, damp, lint-free cloth. Do not use abrasive cleaners or solvents. Regularly remove dust from paper trays and vents.
7. Кыйынчылыктарды
Бул бөлүм сиз кабылышы мүмкүн болгон жалпы көйгөйлөрдү карайт.
| Көйгөй | Мүмкүн себеп | Чечим |
|---|---|---|
| Принтер күйбөйт | Электр кабели туташкан эмес; розетка бузук | Ensure power cable is securely connected to printer and a working outlet. Try a different outlet. |
| Басып чыгаруунун сапаты начар (сызыктар, өңү өчкөн) | Low ink levels; clogged print nozzles; incorrect paper type settings | Check ink levels and refill if necessary. Perform a print head cleaning and nozzle check. Ensure paper type settings match the loaded paper. |
| Кагаз тыгылышы | Incorrectly loaded paper; too much paper loaded; foreign object in paper path | Remove all paper from trays. Carefully open covers and remove any jammed paper. Ensure paper is loaded correctly and not over the maximum capacity. |
| Wi-Fi'га туташпай жатат | Incorrect password; printer too far from router; network issues | Verify Wi-Fi password. Move printer closer to the router. Restart your router and printer. Reconfigure Wi-Fi settings on the printer. |
8. Техникалык шарттар
Detailed technical specifications for the Epson EcoTank L8160 printer.
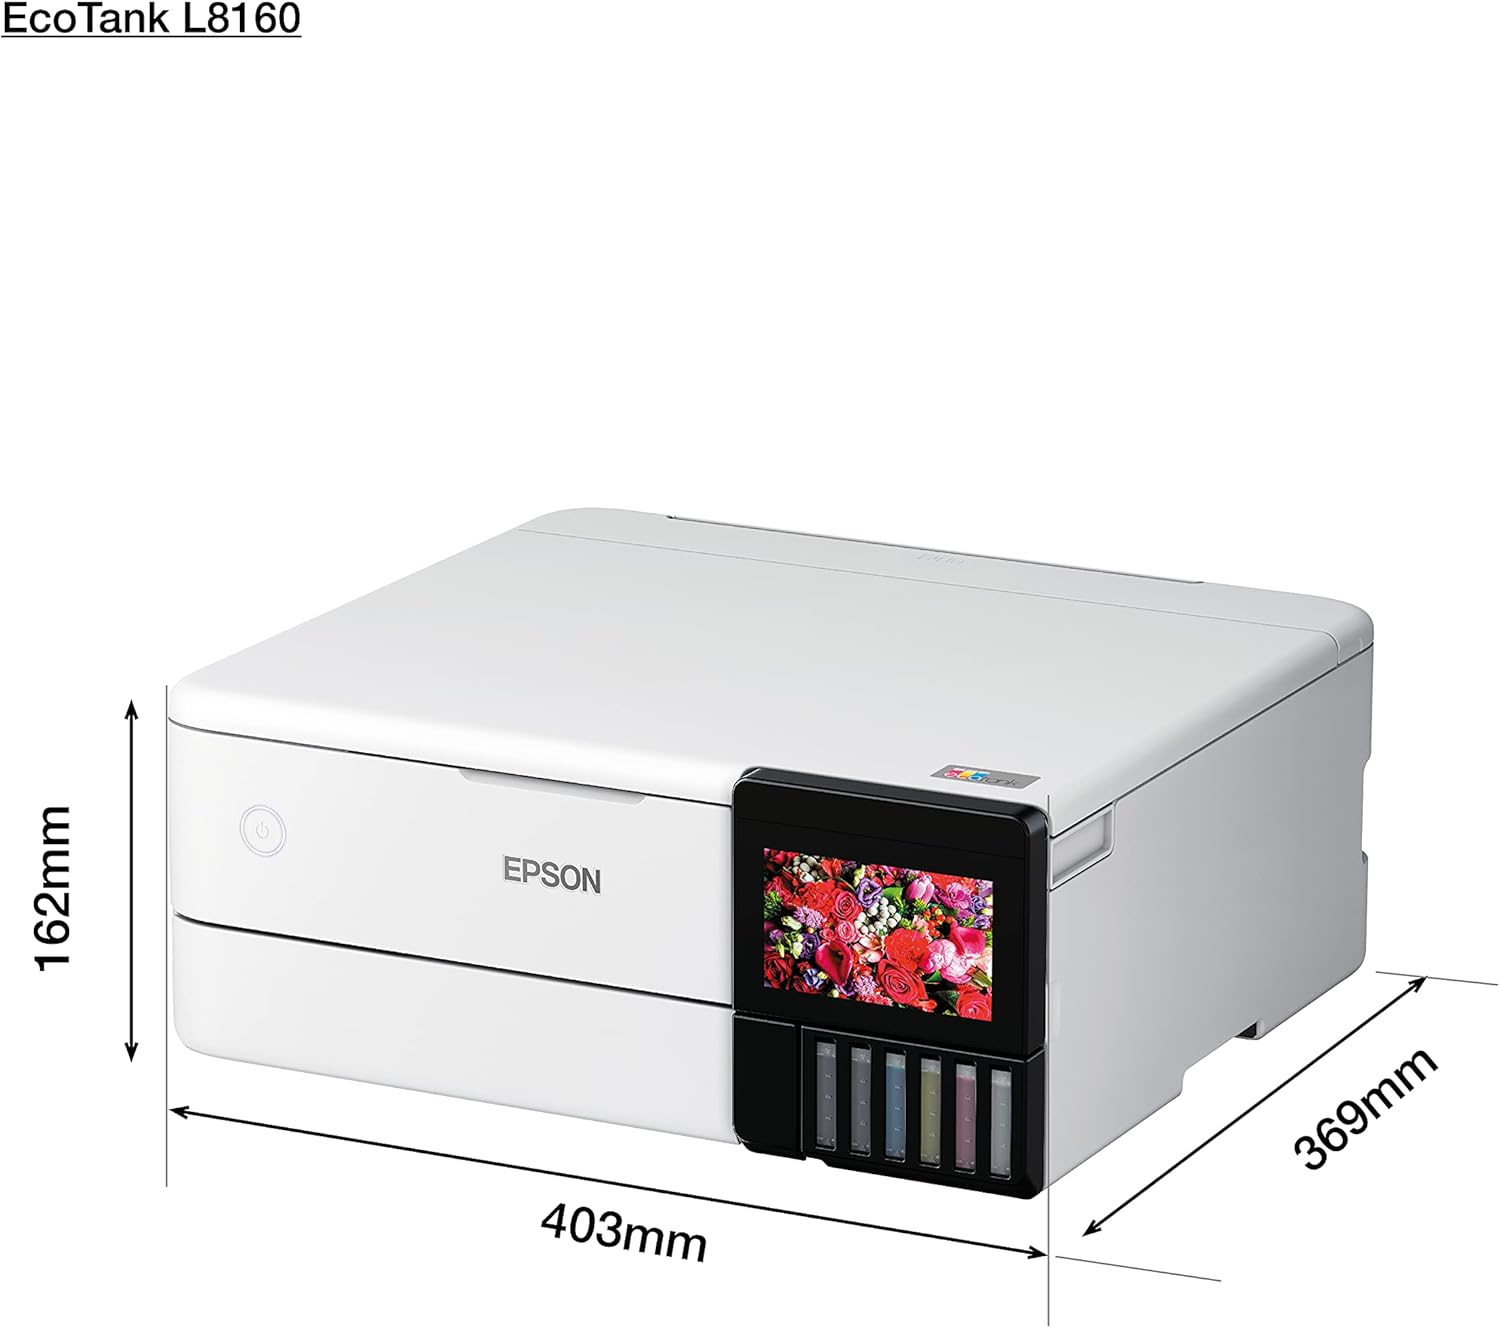
Сүрөт 8.1: Physical dimensions of the Epson EcoTank L8160.
| Өзгөчөлүк | Деталь |
|---|---|
| Бренд | Epson |
| Модель аты | L8160 |
| Элемент моделинин номери | L8160 |
| Принтер технологиясы | Inkjet |
| Принтердин чыгышы | Көп функциялуу |
| Байланыш технологиясы | Wi-Fi |
| Өзгөчөлүктөр | Тармак даяр |
| Түс | Ак |
| Продукциянын өлчөмдөрү (тереңдик x туурасы x бийиктик) | 36.9D x 40.3W x 16.2H см |
| Максималдуу медиа өлчөмү | 8.5 x 11 дюйм |
| Камтылган компоненттер | Paper trays, power cable, user guide |
| Басма маалымат каражаттары | Envelopes, Paper (plain), Glossy photo paper |
| Сканер түрү | Сүрөт |
| Кагаздын максималдуу сыйымдуулугу | 100 барак |
| Maximum Black & White Print Speed | Мүнөтүнө 32 бет |
| Шайкеш түзмөктөр | Смартфондор |
| Максималдуу түстүү басып чыгаруу чечими | 600 x 600 dpi |
| Кагаз өлчөмү | A4 |
| Ак-кара басып чыгаруунун максималдуу чечилиши | 600 x 600 dpi |
| Дуплекстүү басып чыгаруу | Ооба |
| Өндүрүүчү | Epson |
| Форма фактору | All-in-One |
| Экрандын өлчөмү | 10.9 сантиметр |
| Элемент Салмагы | 11.3 Kilograms (11.27 Kilograms) |
| ASIN | B09G35WQDW |
| Кардар Reviews | 4.0 ичинен 5 жылдыз (125 баа) |
| Best Sellers Rank | #18,311 in Electronics, #14 in Ink Tank Printers |
| Дата биринчи жеткиликтүү | 11-январь, 2022-жыл |
| Maximum Color Print Speed (Color) | Мүнөтүнө 32 бет |
| Maximum Black & White Print Speed (B&W) | Мүнөтүнө 32 бет |
9. Кепилдик жана колдоо
9.1 Кепилдик маалыматы
The Epson EcoTank L8160 comes with a 3-year promotional warranty. Please refer to the warranty card included in your package or visit the official Epson webкепилдик камтууга жана каттоого байланыштуу толук шарттар жана шарттар үчүн сайт.
9.2 Кардарларды колдоо
For further assistance, technical support, or service inquiries, please contact Epson customer support through their official website or the contact information provided in your product documentation. Have your printer model number (L8160) and serial number ready when contacting support.


