1. Киришүү
This manual provides detailed instructions for the installation, operation, and maintenance of your Oversteel Iridium PC Gaming Case. Please read this manual thoroughly before beginning assembly to ensure proper setup and safe operation. Keep this manual for future reference.
2. Коопсуздук маалыматы
- Компьютердин корпусунун ичиндеги кандайдыр бир компоненттерди орнотуудан же тейлөөдөн мурун, ар дайым кубат булагын розеткадан сууруп коюңуз.
- Электростатикалык разряддан (ЭСД) улам зыян келтирбөө үчүн компоненттерди этияттык менен кармаңыз. Антистатикалык билек боону колдонууну карап көрүңүз.
- Корпустун ичиндеги курч бурчтардан этият болуңуз.
- Желдетүүчү тешиктерди жаппаңыз. Корпустун айланасында жетиштүү аба айланышын камсыз кылыңыз.
- Корпусун суюктуктан жана ашыкча нымдуулуктан алыс кармаңыз.
3. Пакеттин мазмуну
Пакетиңизде бардык буюмдар бар экенин текшериңиз:
- Oversteel Iridium PC Gaming Case
- Accessory box (screws, standoffs, cable ties)
- Колдонуучунун Колдонмосу (бул документ)
- A-RGB fan (pre-installed at rear)
- A-RGB remote control (if included with your specific model)
4. Продукт бүтүп калдыview
The Oversteel Iridium PC Gaming Case features a mesh front panel for optimal airflow, a tempered glass side panel for component visibility, and integrated A-RGB lighting for aesthetic customization.
4.1 Тышкы Views

Сүрөт 4.1: Алдыңкы-сол view of the Oversteel Iridium PC Gaming Case, showcasing the mesh front panel, tempered glass side, and rear A-RGB fan.
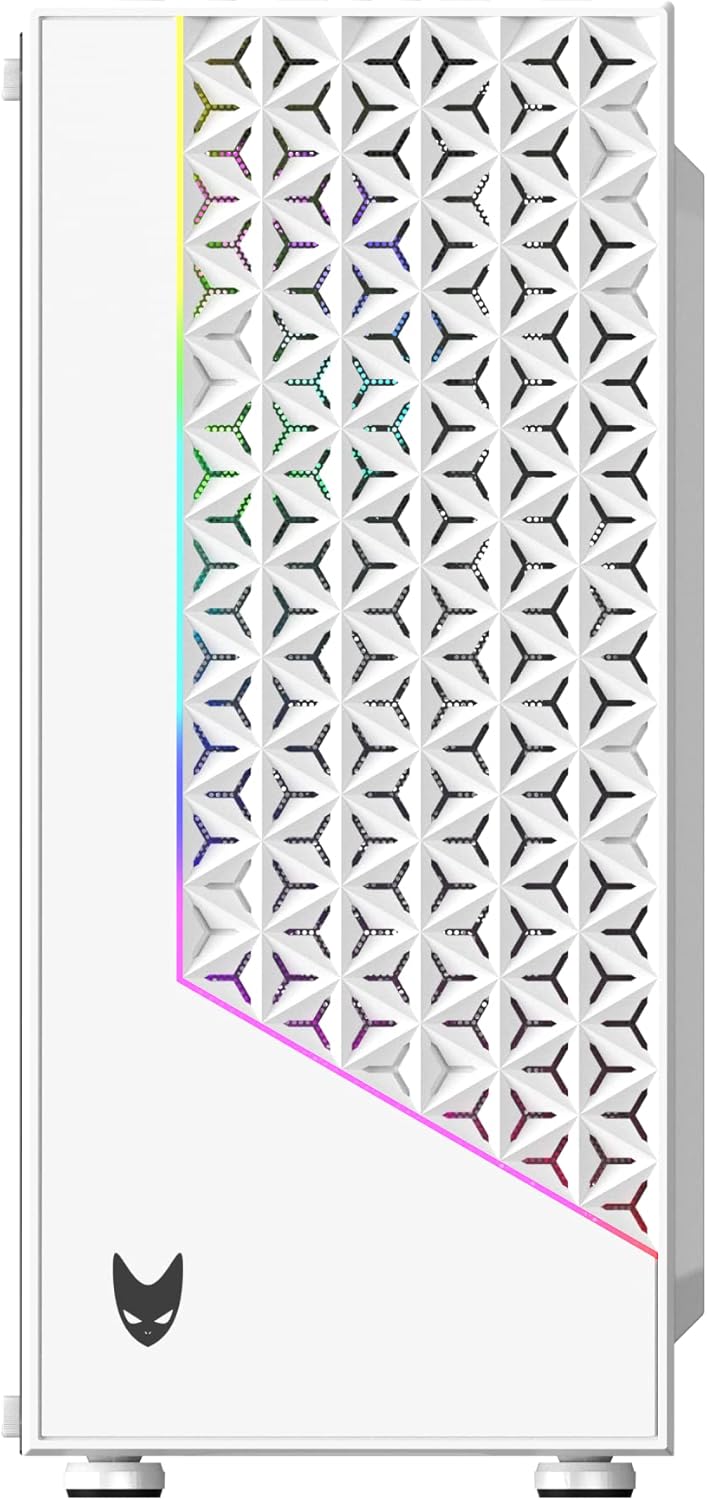
4.2-сүрөт: Детальдуу view of the mesh front panel with integrated A-RGB lighting strip.

Figure 4.3: Top panel showing power button, reset/RGB control button, audio jacks, 2x USB 2.0 ports, and 1x USB 3.0 port.
4.2 Ички жайгашуу

4.4-сүрөт: Ички view of the case, highlighting motherboard tray, drive bays, and cable routing options.
The case supports ATX, Micro ATX, and ITX motherboards. It features dedicated areas for power supply installation and storage drives, along with cutouts for efficient cable management.
5. Орнотуу жана Компонентти орнотуу
5.1 Ишти даярдоо
- Корпусту тегиз, туруктуу бетке коюңуз.
- Remove the tempered glass side panel by unscrewing the four thumb screws. Carefully set the panel aside on a soft, non-abrasive surface.
- Remove the solid metal side panel by unscrewing the two thumb screws at the rear of the case and sliding the panel backward.
5.2 Motherboard орнотуу
- Install the I/O shield that came with your motherboard into the opening at the rear of the case.
- Ensure the correct standoffs are installed for your motherboard form factor (ATX, Micro ATX, or ITX). The case typically comes with pre-installed standoffs for ATX. Adjust as needed.
- Этияттык менен энелик платаңызды буроо тешикчелерин тегиздеп, стендтерге жайгаштырыңыз.
- Энелик платаны берилген бурамалар менен бекитиңиз. Өтө катуу тартпаңыз.
5.3 Электр менен камсыздоо блогун (PSU) орнотуу
- Кубат блогун корпустун арткы жагындагы атайын бөлүмгө коюңуз.
- Ensure the PSU fan faces downwards (if there's a filtered vent at the bottom) or upwards (if no bottom vent).
- Secure the PSU to the case with the provided screws from the rear.
5.4 Сактоочу дискти орнотуу
- 3.5" HDD: Locate the drive cage, typically beneath the PSU shroud. Slide the HDD into the drive tray and secure it with screws.
- 2.5" SSD: Mount SSDs to the designated mounting points on the motherboard tray or PSU shroud using the provided screws.
5.5 Видеокартаны жана кеңейтүү картасын орнотуу
- Remove the necessary PCI-E slot covers at the rear of the case.
- Insert your graphics card or other expansion cards into the motherboard's PCI-E slots.
- Карталарды бурамалар менен бекитиңиз.
5.6 Кабелди башкаруу
Кабельдерди уюштуруу үчүн энелик плата лотоктун артындагы кабелдик маршруттук кескичтерди жана байлоо пункттарын колдонуңуз. Бул аба агымын жана эстетиканы жакшыртат.
5.7 Алдыңкы панелдин киргизүү/чыгаруу тутумун туташтыруу
Connect the front panel cables (USB 3.0, USB 2.0, HD Audio, Power Switch, Reset Switch, Power LED, HDD LED) to the corresponding headers on your motherboard. Refer to your motherboard manual for exact pin layouts.
6. Ишти иштетүү
6.1 Күйгүзүү
Once all components are installed and cables are connected, replace both side panels. Connect the power cable to your PSU and a wall outlet. Press the power button on the top panel to start your system.
6.2 A-RGB Lighting Control
The Oversteel Iridium case features an A-RGB front panel strip and a pre-installed A-RGB rear fan. These are typically connected to an integrated controller.
- Корпусту башкаруу баскычы: Press the dedicated RGB/Reset button on the top panel (often shared with the reset function) to cycle through various lighting modes and colors.
- Алыстан башкаруу: If your model includes an A-RGB remote, use it to select specific colors, effects, brightness levels, and fan speeds (if fans are connected to the controller).
- Motherboard синхрондоштуруу: If the A-RGB controller is connected to a compatible 3-pin 5V A-RGB header on your motherboard, you can control the lighting via your motherboard's RGB software (e.g., ASUS Aura Sync, MSI Mystic Light, Gigabyte RGB Fusion, ASRock Polychrome Sync). Ensure the remote control is set to motherboard sync mode if applicable.
7. Техникалык тейлөө
7.1 Чаң чыпкасын тазалоо
The Oversteel Iridium case includes dust filters to prevent dust buildup. Regularly clean these filters to maintain optimal airflow and cooling performance.
- Жогорку чыпка: The magnetic top filter can be easily lifted off for cleaning.
- Төмөнкү чыпка: The bottom filter (for the PSU intake) can be slid out from the rear or side.
- Алдыңкы чыпка: The mesh front panel acts as a filter. It may require removal of the front panel to clean thoroughly. Consult the manufacturer's website for specific instructions on front panel removal.
Clean filters using compressed air or by gently washing with water and allowing them to dry completely before reinstallation.
7.2 Жалпы тазалоо
жумшак колдонуу, damp cloth to wipe down the exterior of the case. Avoid abrasive cleaners or solvents that could damage the finish or tempered glass.
8. Кыйынчылыктарды
8.1 Күч жок
- PSU күйгүзүлгөнүн жана розеткага туура туташтырылганын текшериңиз.
- Алдыңкы панелдин кубат которгучу кабели эне платасынын башына туура туташтырылганын текшериңиз.
- Check all power connections from the PSU to the motherboard and components.
8.2 Вентиляторлор айланбай жатат / RGB иштебей жатат
- Confirm that the fan power cables (e.g., 3-pin, 4-pin PWM, or SATA power for controller) are securely connected.
- Check the A-RGB connections to the controller or motherboard.
- If using motherboard software, ensure it is up-to-date and configured correctly.
- If using a remote, check its battery.
8.3 Ашыкча ысып кетүү
- Бардык чаң чыпкаларын жана ички компоненттерин тазалаңыз.
- Ensure fans are spinning correctly and oriented for optimal airflow (intake at front, exhaust at rear/top).
- Verify that there is sufficient space around the PC case for proper ventilation.
8.4 USB порттору иштебей жатат
- Check that the front panel USB cables are correctly connected to the motherboard's USB headers.
- Ensure motherboard USB drivers are installed and up-to-date.
9. Техникалык шарттар
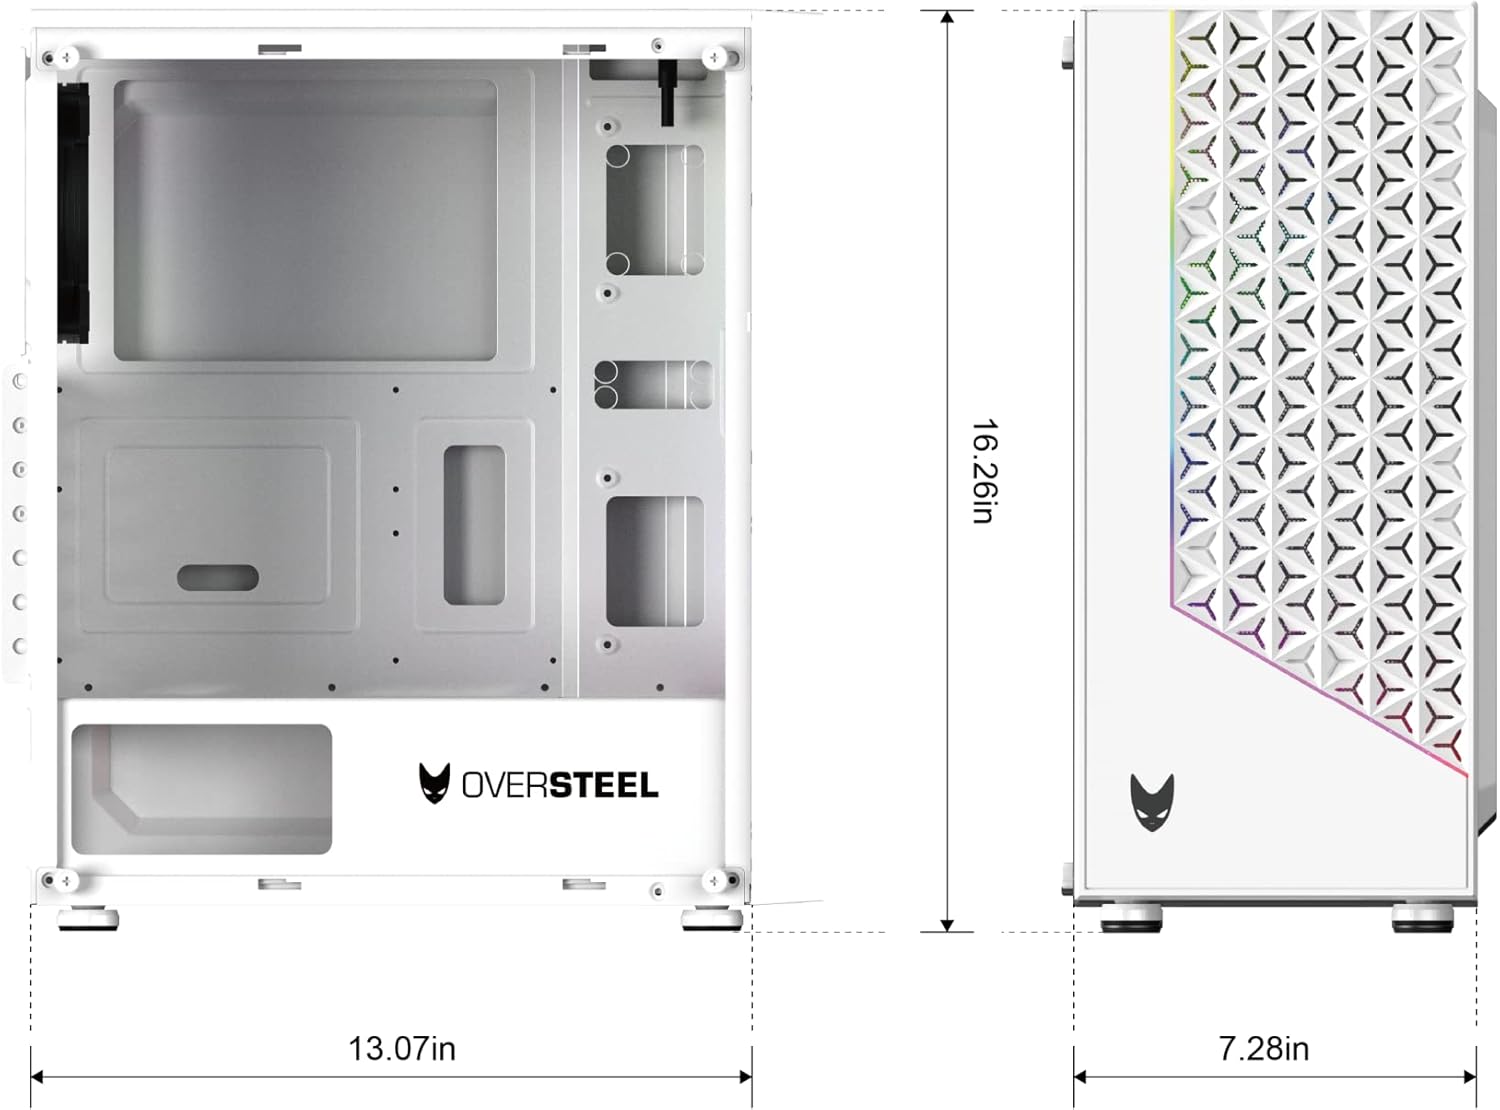
Figure 9.1: Dimensions of the Oversteel Iridium PC Gaming Case.
| Өзгөчөлүк | Спецификация |
|---|---|
| Модель аты | Иридий |
| Модель номери | NAT-OV-CS-IRIDIUM-W |
| Иштин түрү | Орто мунара |
| Motherboard шайкештиги | ATX, Micro ATX, ITX |
| Материал | Tempered Glass (side panel) |
| Түс | Ак |
| Муздатуу ыкмасы | Аба |
| Алдын ала орнотулган күйөрмандар | 1x 120mm A-RGB fan (rear) |
| Алдыңкы I / O порттору | 2x USB 2.0, 1x USB 3.0, Audio In/Out, Power Button, Reset/RGB Button |
| Өзгөчөлүктөр | Dust filters, Integrated A-RGB lighting |
| Өлчөмдөрү (болжол менен) | Height: 16.26 in (41.3 cm), Depth: 13.07 in (33.2 cm), Width: 7.28 in (18.5 cm) |
10. Кепилдик жана колдоо
For warranty information and technical support, please refer to the official Oversteel webсайтка же сатуучуга кайрылыңыз. Кепилдик дооматтар үчүн сатып алганыңыздын далилин сактаңыз.


