Introduction
This manual provides detailed instructions for the installation, operation, and maintenance of your Jansite 12-inch 2.5K Mirror Dash Cam. Please read this manual thoroughly before using the product to ensure proper function and safety. This device features a 12-inch IPS full touch screen, dual lenses for front 2.5K and rear 1080P recording, enhanced night vision with a Sony sensor, and includes a hardwire kit for 24-hour monitoring.
Пакеттин мазмуну
Төмөндө тизмеленген нерселердин баары пакетиңизде бар экенин текшериңиз:
- 1 x Jansite 12-inch Mirror Dash Cam (Mirror DVR)
- 1 x 1080P Rear Camera (Sony IMX415)
- 1 x 32.8ft (10m) Rear Camera Cable
- 1 x Кубат кабели
- 1 x Унаа заряддагыч
- 1 x Hardwire Kit (for 24-hour monitoring)
- 1 x User Manual
- 1 x Mirror Cleaning Cloth
- Орнотуучу боолор/тилкелер
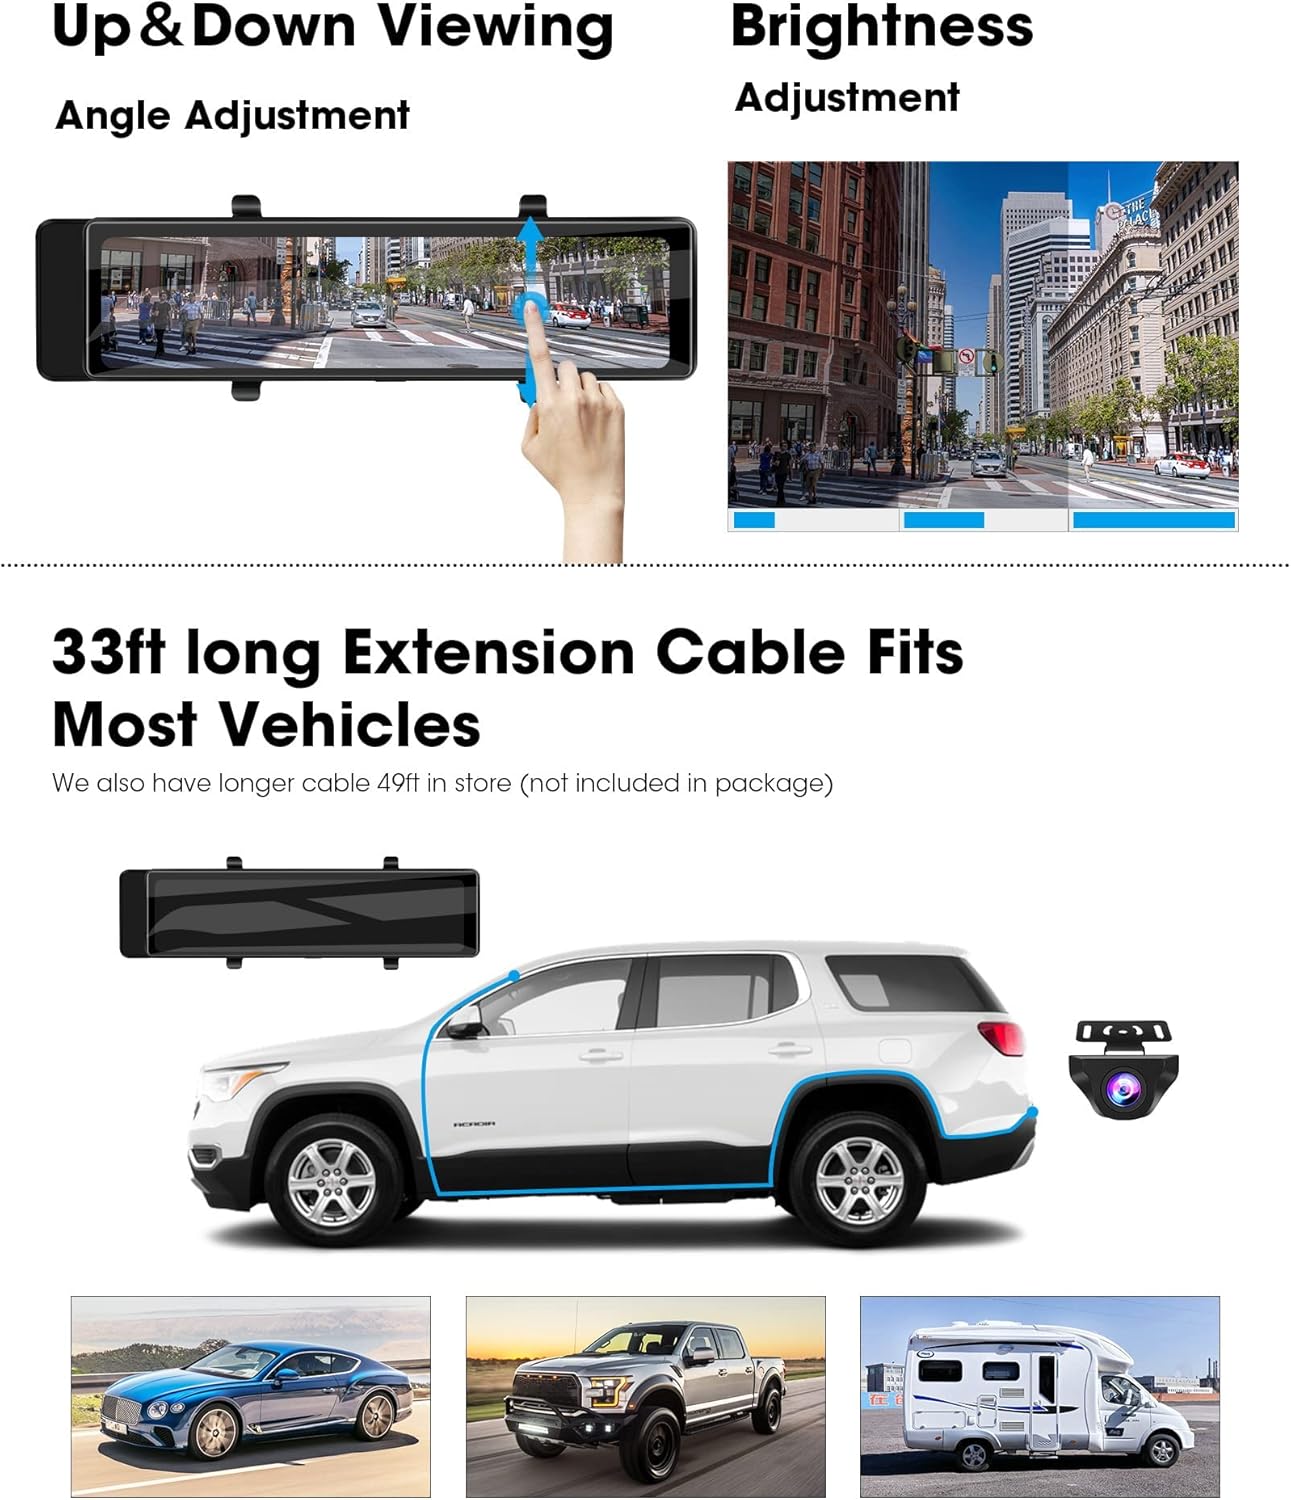
Image: Contents of the Jansite Mirror Dash Cam package, showing the main mirror unit, rear camera, various cables, and accessories.
Жайгашуу
1. Эстутум картасын салуу
Locate the MicroSD card slot on the side of the mirror dash cam. Insert a MicroSD card (Class 10 or higher, up to 128GB, not included) with the contacts facing the screen until it clicks into place. Ensure the card is formatted before first use (refer to 'Operating Instructions - Formatting the Memory Card').
2. Күзгүлүү видеорегистраторду орнотуу
- Secure the mirror dash cam over your vehicle's existing rearview күзгүгө берилген резина боолор менен бекитиңиз. Ал бекем бекитилгенин жана көзүңүзгө тоскоол болбогонун текшериңиз view.
- Connect the car charger to the dash cam's power input port and plug the other end into your vehicle's cigarette lighter socket.
- Route the power cable neatly along the windshield trim and dashboard to avoid interference with driving.
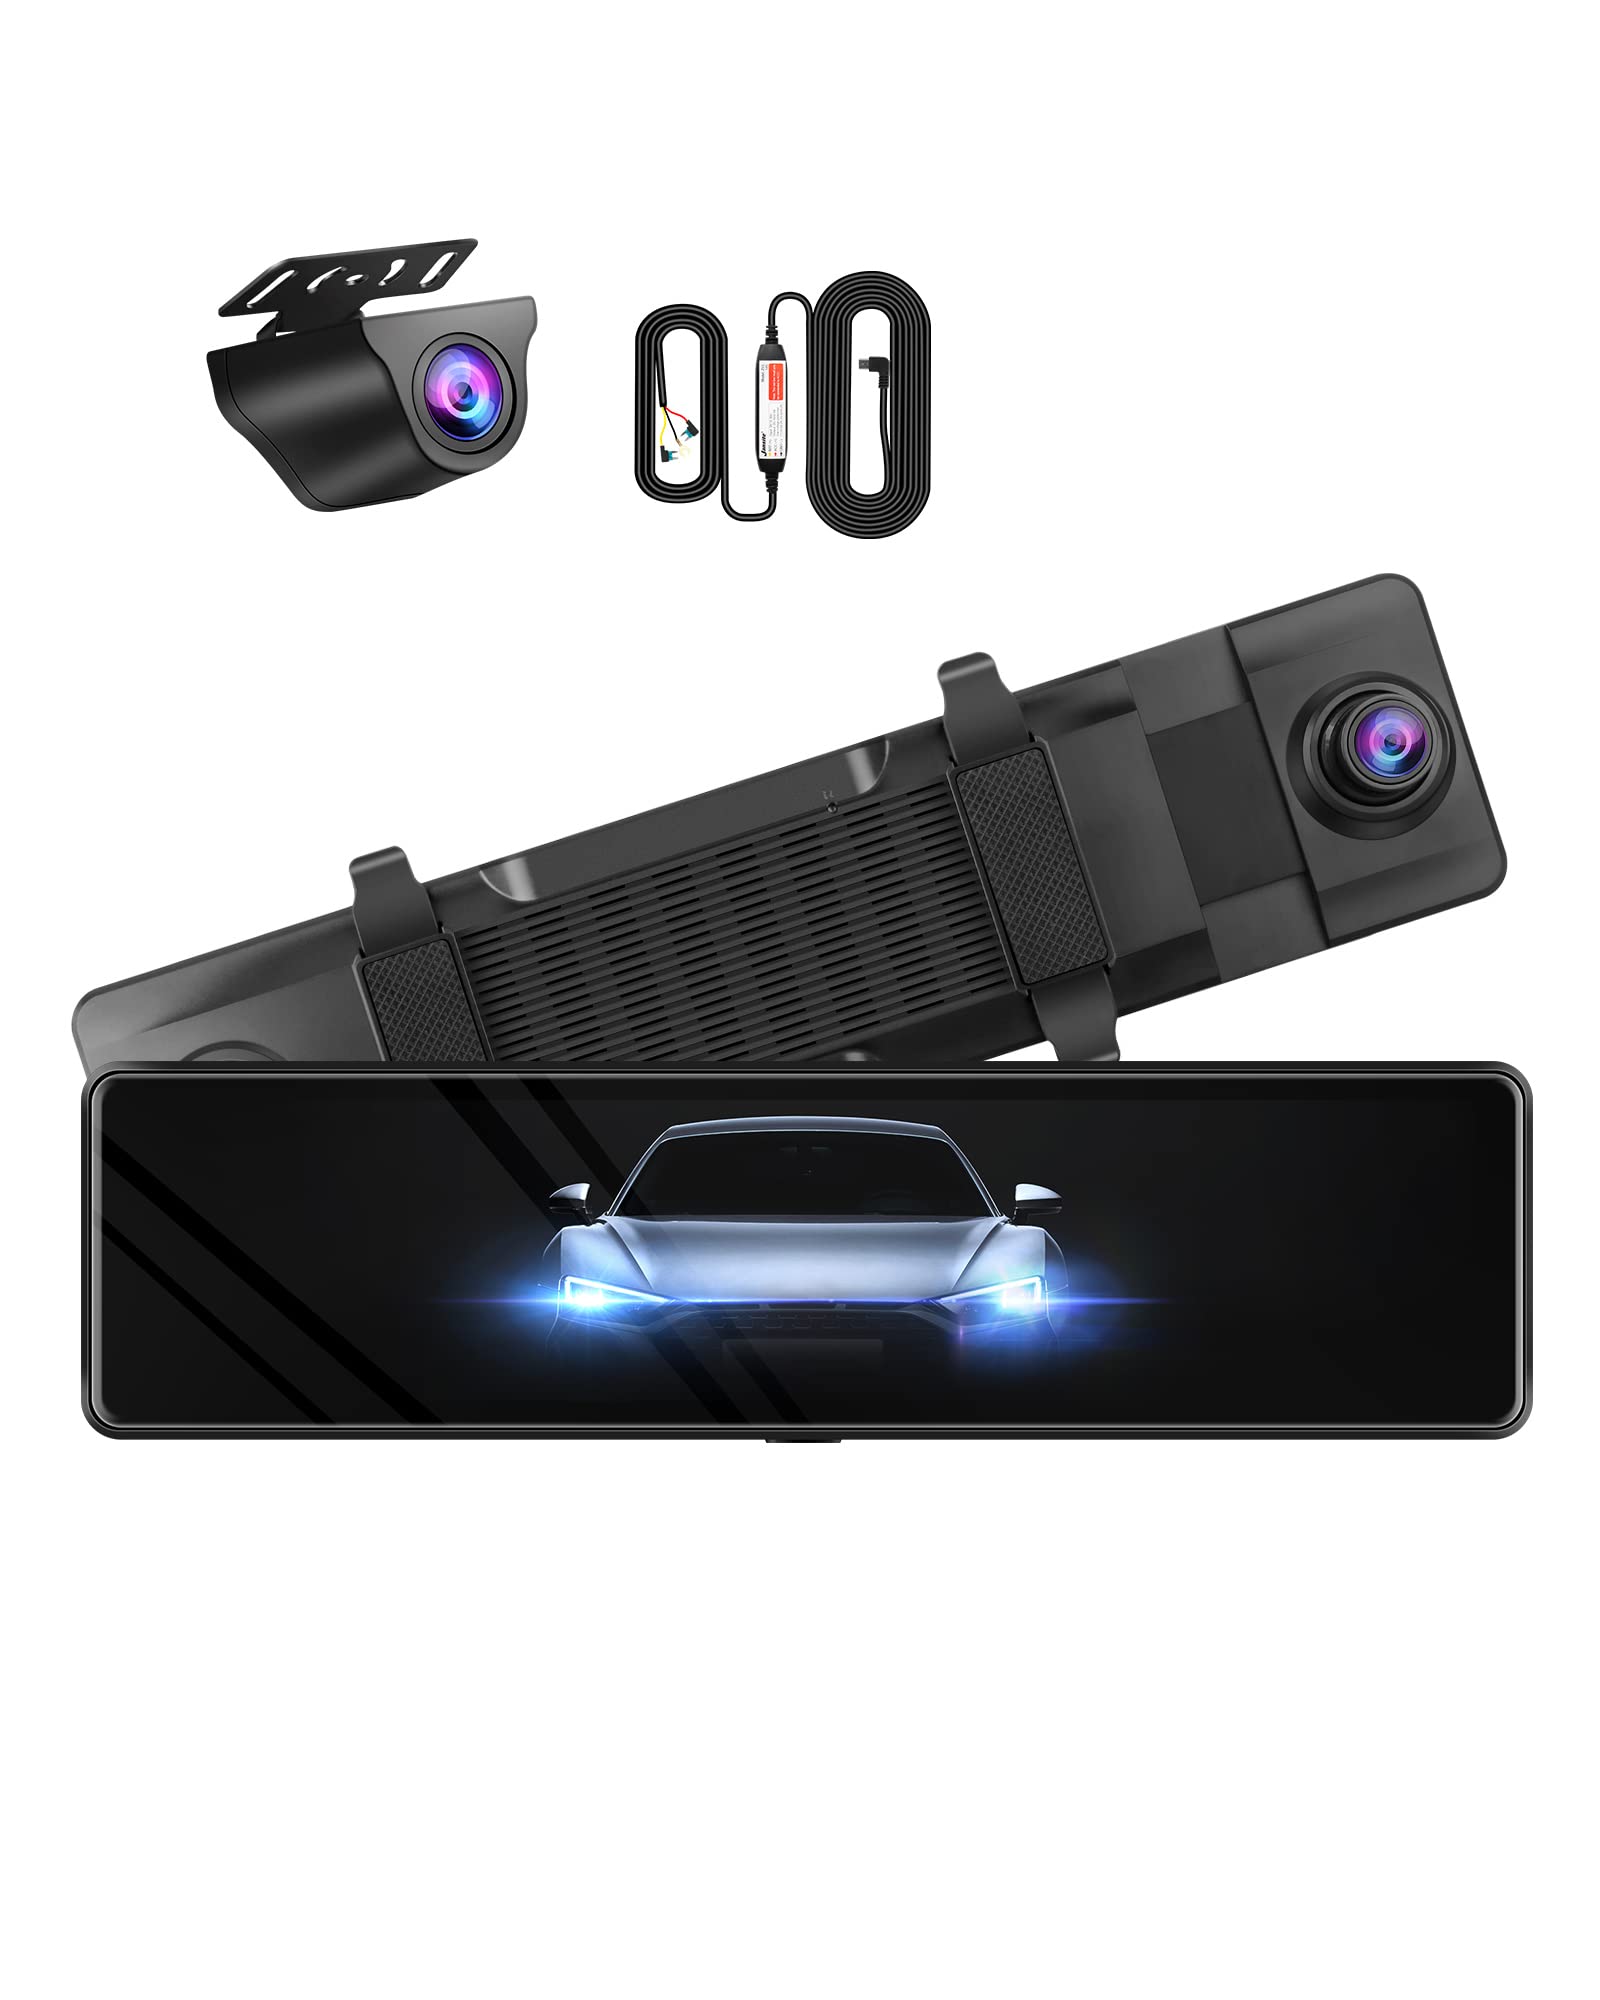
Image: The Jansite Mirror Dash Cam mounted over a vehicle's existing rearview mirror, displaying the front camera view.
3. Арткы камераны орнотуу
- Choose a suitable location for the rear camera, typically above the license plate or on the rear window. Clean the surface thoroughly before mounting.
- Secure the rear camera using the provided adhesive or screws.
- Connect the rear camera cable to the rear camera.
- Route the 32.8ft (10m) rear camera cable from the rear of the vehicle to the front dash cam. Ensure the cable is tucked away safely, avoiding sharp edges or moving parts.
- Арткы камеранын кабелин күзгү панелиндеги атайын портко туташтырыңыз.
- For backup assist functionality, connect the red wire from the rear camera cable to your vehicle's reverse light positive wire. This enables the parking guidelines to appear when reversing.
Image: Illustration demonstrating the routing of the 33ft extension cable for the rear camera, suitable for various vehicle types including SUVs and RVs.
4. Hardwire Kit Installation (for 24-Hour Monitoring)
The included hardwire kit allows for continuous power supply to the dash cam, enabling parking monitoring features even when the vehicle is off. Professional installation is recommended for the hardwire kit.
- Connect the ACC wire to a fuse that is only powered when the ignition is on.
- Connect the B+ wire to a constant power fuse (always on).
- Connect the GND wire to a metal part of the vehicle chassis for grounding.
The hardwire kit includes voltage protection to prevent draining your car battery. It will automatically cut off power if the voltage drops below 11.6V (for 12V systems) or 23.5V (for 24V systems).

Image: An illustration detailing the hardwire kit and its function for enabling 24-hour parking monitoring.
Иштөө нускамалары
1. Күйгүзүү/өчүрүү
- Автоматтык: The dash cam will automatically power on and begin recording when your vehicle's ignition is turned on (when connected to the car charger).
- Кол менен: Press and hold the power button on the side of the mirror dash cam to manually turn it on or off.
2. Сенсордук экранды башкаруу элементтери
The 12-inch IPS full touch screen allows for intuitive control of all functions.
- Солго/Оңго сүрүү: Switch between front view, арткы view, and split-screen display modes.
- Swipe Up/Down (on left side of screen): Вертикалды тууралаңыз viewкамеранын бурчу.
- Swipe Up/Down (on right side of screen): Экран жарыктыгын тууралаңыз.
- Тийме сүрөтчөлөрү: Access menu settings, playback, and other functions.
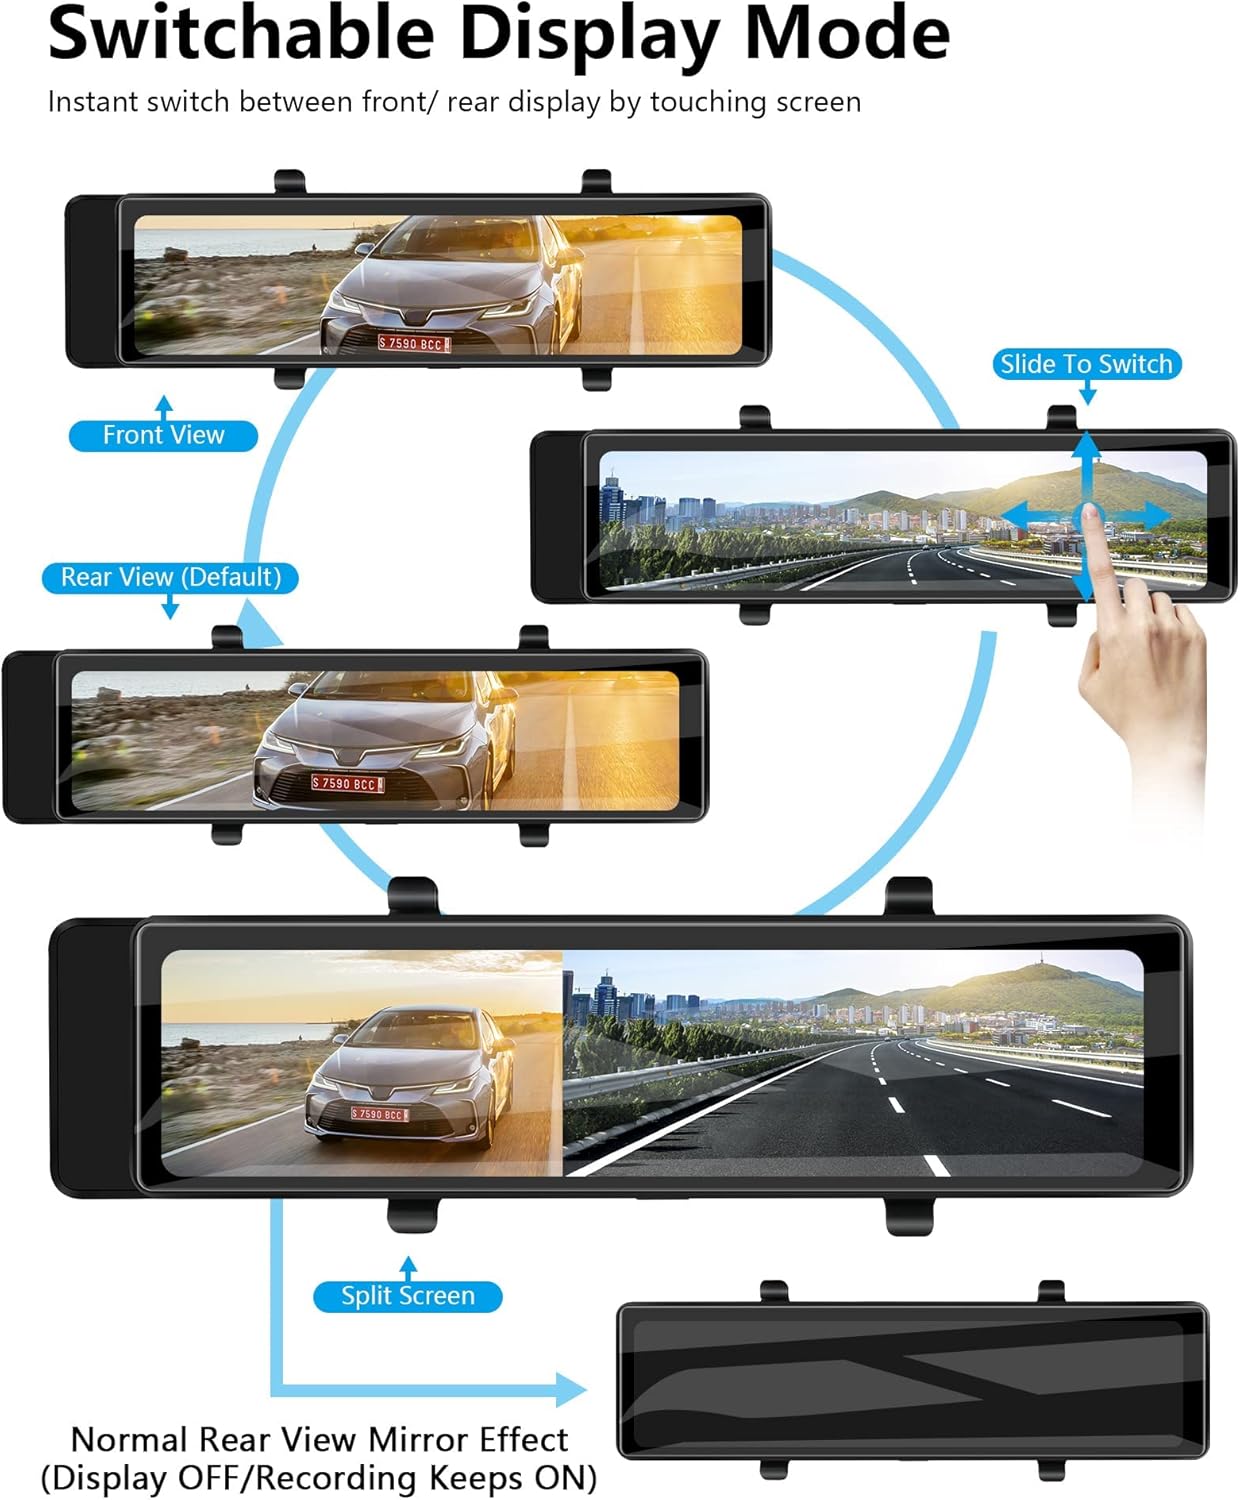
Image: Visual guide on how to use touch gestures to switch display modes (front, rear, split screen) and adjust camera angle and screen brightness.
3. Жазуу режимдери
- Цикл жаздыруу: The dash cam records continuously in segments (e.g., 1, 3, or 5 minutes). When the memory card is full, the oldest unlocked fileлар үстүнөн жазылган.
- G-сенсор (авариялык кулпу): In the event of a sudden impact or collision, the built-in G-sensor will automatically detect the event and lock the current video segment, preventing it from being overwritten.
- Унаа токтотуучу жай: When the hardwire kit is installed and enabled, the dash cam can detect impacts or motion while the vehicle is parked and automatically record a short video.
4. Reversing Guide Lines Adjustment
When the rear camera is connected to the reverse light, parking guidelines will appear on the screen when you shift into reverse. These guidelines can be adjusted to match your vehicle's dimensions for accurate parking assistance.
- Shift your vehicle into reverse.
- On the screen, tap the settings icon for parking lines.
- Drag the lines on the screen to adjust their width and position.
- Save the settings once adjusted.

Image: The dash cam display showing adjustable reversing guide lines, which can be customized for various vehicle types.
5. Image Flip and Mirroring Functions
The rear camera image can be flipped or mirrored to ensure correct orientation, especially if the camera is mounted in a non-standard position or if you prefer a specific view.
- Системанын орнотуулары менюсуна кириңиз.
- Locate the 'Rear Camera Flip' or 'Mirroring' option.
- Toggle the setting to achieve the desired image orientation.

Сүрөт: Мисamples of the upgraded flip and mirroring functions for the rear camera, showing how the image can be adjusted for correct display.
6. Түнкү көрүнүш
The dash cam utilizes a Sony sensor for enhanced night vision capabilities, providing clearer recordings in low-light conditions.

Image: A visual representation of the dash cam's incredible night vision, powered by a Sony sensor for high sensitivity and low noise technology.
7. Эстутум картасын форматтоо
Regularly formatting the memory card is recommended to maintain optimal performance and prevent data corruption. This will erase all data on the card, so back up any important fileс биринчи.
- Access the system settings menu on the dash cam.
- Navigate to the 'Format' or 'SD Card Management' option.
- Форматтоо процессин ырастаңыз.
Техникалык тейлөө
- Линзаны тазалоо: Use a soft, lint-free cloth to gently wipe the front and rear camera lenses. Avoid abrasive materials or harsh chemicals.
- Экранды тазалоо: Use the provided mirror cleaning cloth or a soft, dry cloth to clean the touch screen. Do not spray cleaning solutions directly onto the screen.
- Эстутум картасы: Format the MicroSD card regularly (e.g., once a month) to ensure stable recording performance. Replace the memory card if it shows signs of degradation or errors.
- Кабелдик башкаруу: Periodically check all cables to ensure they are securely connected and not damaged or interfering with vehicle operation.
Проблемаларды чечүү
If you encounter issues with your Jansite Mirror Dash Cam, refer to the following common problems and solutions:
| Көйгөй | Мүмкүн себеп | Чечим |
|---|---|---|
| Dash камерасы күйбөйт. | Электр менен камсыздоо жок; кабель бузулган; байланыштын үзгүлтүккө учурашы. | Check car charger connection. Ensure vehicle's cigarette lighter socket is functional. Verify hardwire kit connections if used. Try a different power source if available. |
| Жаздыруу токтотулат же fileлар бузулган. | Memory card full; slow memory card; memory card error. | Format the MicroSD card. Use a high-speed (Class 10 or U3) MicroSD card. Replace the memory card if issues persist. |
| Rear camera image is not displayed or is distorted. | Loose cable connection; faulty camera; incorrect settings. | Check the rear camera cable connection to both the camera and the main unit. Ensure the cable is not damaged. Verify rear camera display settings in the menu. |
| Экран катып калат же жооп бербей калат. | Программалык камсыздоонун иштебей калышы; эс тутум картасынын көйгөйү. | Press and hold the power button to force a restart. If the issue persists, try formatting the memory card or using a different one. |
| Time/Date settings reset. | Internal battery low or depleted. | Ensure the dash cam is consistently powered when the vehicle is running to allow the internal battery to charge. |
Техникалык шарттар
| Өзгөчөлүк | Спецификация |
|---|---|
| Screen Size | 12 дюйм |
| Алдыңкы видео тартуу чечилиши | 2.5K |
| Арткы видео тартуу чечилиши | 1080p |
| Башкаруу ыкмасы | Сенсордук экран |
| Байланыш технологиясы | USB, зымсыз |
| Flash эс тутум түрү | MicroSD (128 ГБ чейин) |
| Камтылган компоненттер | Mirror DVR, Rear Camera, Cables, Memory Card (optional), Hardwire Kit |
| Унаа кызматынын түрү | Машина |
| Элемент Салмагы | 2.51 фунт |
| Пакеттин өлчөмдөрү | 13.7 x 4.57 x 3.23 дюйм |
Кепилдик жана колдоо
For warranty information or technical support, please refer to the contact details provided with your purchase documentation or visit the official Jansite webсайт. Сатып алганыңыздын далили катары сатып алуу дүмүрчөгүңүздү сактаңыз.


