1. Киришүү
This user manual provides detailed instructions for the installation, operation, and maintenance of your ESCAM WNK710 3MP Wireless WiFi IP Camera. This smart home indoor camera is designed for monitoring various indoor environments such as nurseries, pet areas, garages, or yards, offering features like 3MP high-definition video, two-way audio, motion detection, and night vision capabilities. Please read this manual thoroughly before using the product to ensure proper and safe operation.

Figure 1: ESCAM WNK710 3MP Wireless WiFi IP Camera, front view.
2. Коопсуздук маалыматы
- Use only the power adapter provided with the camera. Using unauthorized power sources may damage the device and void the warranty.
- Do not expose the camera to extreme temperatures, humidity, or direct sunlight. This product is designed for indoor use.
- Камераны күчтүү магниттик талаалардын же тоскоолдук булактарынын жанына койбоңуз.
- Камераны ажыратууга же өзгөртүүгө аракет кылбаңыз. Бардык тейлөөлөрдү квалификациялуу кызматкерлерге тапшырыңыз.
- Камераны жана анын аксессуарларын балдар жана үй жаныбарлары жетпеген жерде сактаңыз.
- Ensure the camera is securely mounted to prevent accidental falls.
3. Кутуда эмне бар
Орнотууну улантуудан мурун, бардык компоненттердин пакетте бар экенин текшериңиз.
- ESCAM WNK710 WiFi IP Camera (x1)
- 12V 2A Power Adapter (x1)
- Бурама топтому (x1)
- Ыкчам баштоо боюнча колдонмо (x1)
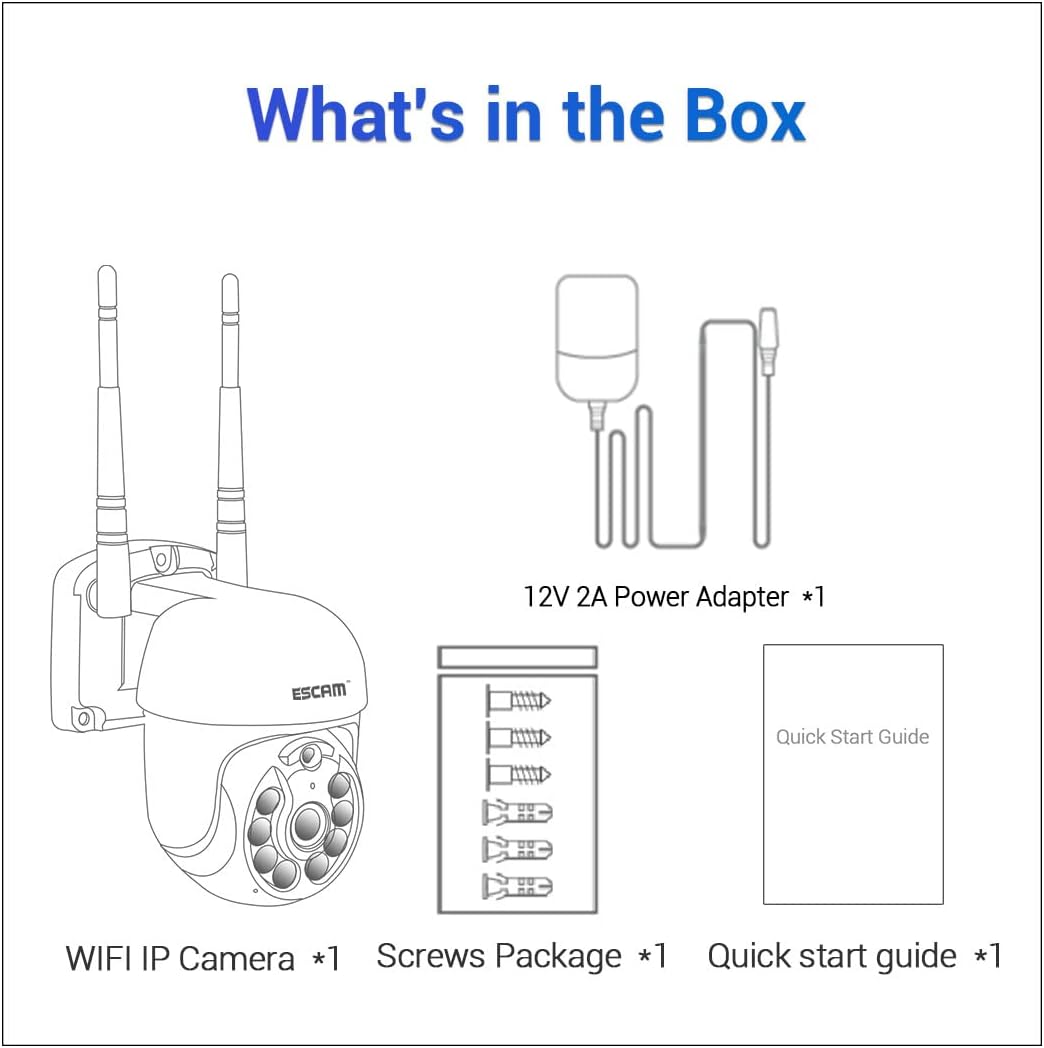
Figure 2: Package contents including the camera, power adapter, screws, and quick start guide.
4. Продукт бүтүп калдыview
Familiarize yourself with the various parts and interfaces of the ESCAM WNK710 camera.
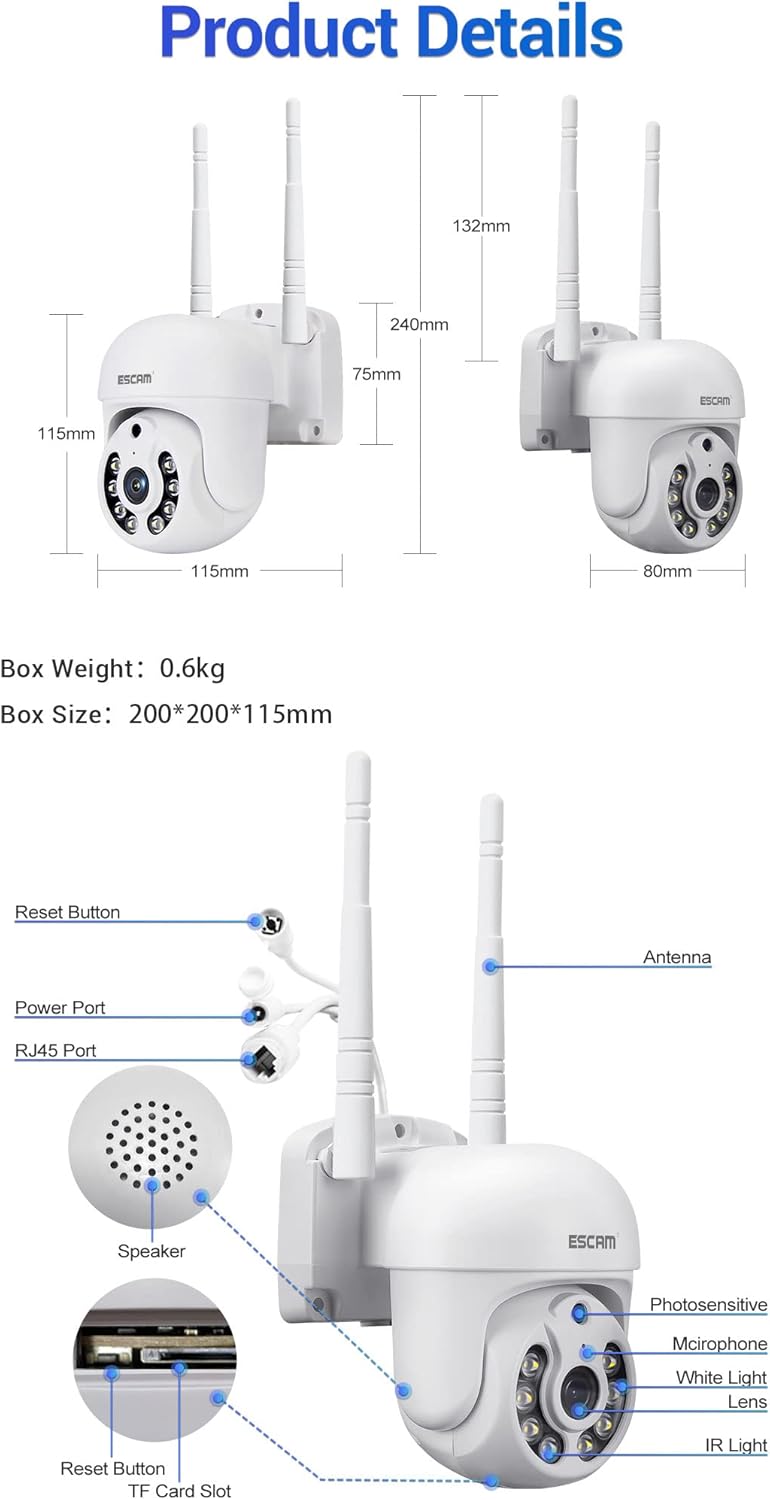
3-сүрөт: Детальдуу view of the camera showing dimensions, reset button, power port, RJ45 port, speaker, photosensitive sensor, microphone, white light LEDs, lens, IR light LEDs, and TF card slot.
- Объектив: Video foo тартатtage.
- IR Light LEDs: Түнкү көрүү үчүн инфракызыл жарыктандырууну камсыз кылыңыз.
- Ак жарык диоддору: Provide white light illumination for full-color night vision and deterrence.
- Фотосезгич сенсор: Detects ambient light levels to switch between day and night modes.
- Микрофон: Эки тараптуу байланыш жана жаздыруу үчүн аудио жаздырат.
- Баяндамачы: Эки тараптуу байланыш үчүн аудио чыгарат.
- Антенна: For wireless (WiFi) connectivity.
- Электр порту: Connects to the 12V 2A power adapter.
- RJ45 Порт: Зымдуу Ethernet туташуусу үчүн.
- Калыбына келтирүү баскычы: Камераны заводдук жөндөөлөргө кайтаруу үчүн колдонулат.
- TF карта уячасы: Жергиликтүү сактоо үчүн 128 ГБ чейинки Micro SD картаны колдойт.
5. Орнотуу
5.1 Физикалык орнотуу
The camera can be wall-mounted or placed on a flat surface. For wall mounting, use the provided screw pack.
- Камера үчүн ылайыктуу жерди тандап, анын так болушун камсыз кылыңыз view of the area you wish to monitor and is within range of your WiFi network (if using wireless).
- Үлгү катары камеранын негизин колдонуп дубалга бургулоо жерлерин белгилеңиз.
- Drill holes and insert wall anchors (if necessary).
- Secure the camera to the wall using the provided screws.
5.2 Кубат туташтыруу
Connect the provided 12V 2A power adapter to the camera's power port and then plug it into a power outlet. The camera will power on and initiate its self-test sequence.
5.3 Тармактык туташуу
The ESCAM WNK710 supports both WiFi and wired Ethernet connections.

Figure 4: Connection methods for the camera, including direct AP connection to a phone and WiFi connection via a router.
5.3.1 WiFi туташуу
- жүктөп алыңыз EseeCloud app from your mobile device's app store (iOS App Store or Google Play Store).
- Каттоо эсебин жана кирүү.
- Жаңы түзмөк кошуу үчүн колдонмодогу "+" сүрөтчөсүн таптаңыз.
- Select "WiFi Camera" and follow the on-screen instructions to connect the camera to your home WiFi network. This typically involves scanning a QR code on the camera or entering your WiFi credentials.
- Once connected, the camera's status indicator will change, and you will see the camera added to your device list in the app.
5.3.2 Wired Ethernet Connection
For a stable connection, you can use the RJ45 Ethernet port.
- Connect one end of an Ethernet cable to the camera's RJ45 port.
- Ethernet кабелинин экинчи учун роутериңиздеги же тармак которгучуңуздагы жеткиликтүү LAN портуна туташтырыңыз.
- Камера DHCP аркылуу автоматтык түрдө IP дарегин алат.
- ачыңыз EseeCloud app, tap "+" to add a device, and select "Wired Camera" or "Издөө devices on LAN" to discover and add the camera.
6. Иштөө нускамалары
6.1 Live View
After successfully adding the camera to the EseeCloud app, tap on the camera's name in the device list to access the live video feed. You can view реалдуу убакыт footagкаалаган убакта, каалаган жерде камераңыздан e.
6.2 Pan/Tilt башкаруусу
The ESCAM WNK710 features pan and tilt functionality, allowing you to remotely adjust the camera's viewбурч.
- Түз эфирде view interface of the EseeCloud app, use the directional controls (usually an on-screen joystick or arrows) to pan the camera horizontally (350°) and tilt it vertically (90°).
6.3 Эки тараптуу аудио
The camera is equipped with a built-in microphone and speaker for two-way audio communication.
- To speak through the camera, tap the microphone icon in the live view interface of the app. Hold the button to speak, and release to listen.
- Ensure your phone's microphone is enabled for the EseeCloud app.
6.4 Кыймылды аныктоо жана эскертүүлөр
Камера кыймылды аныктап, мобилдик түзмөгүңүзгө эскертүүлөрдү жөнөтө алат.
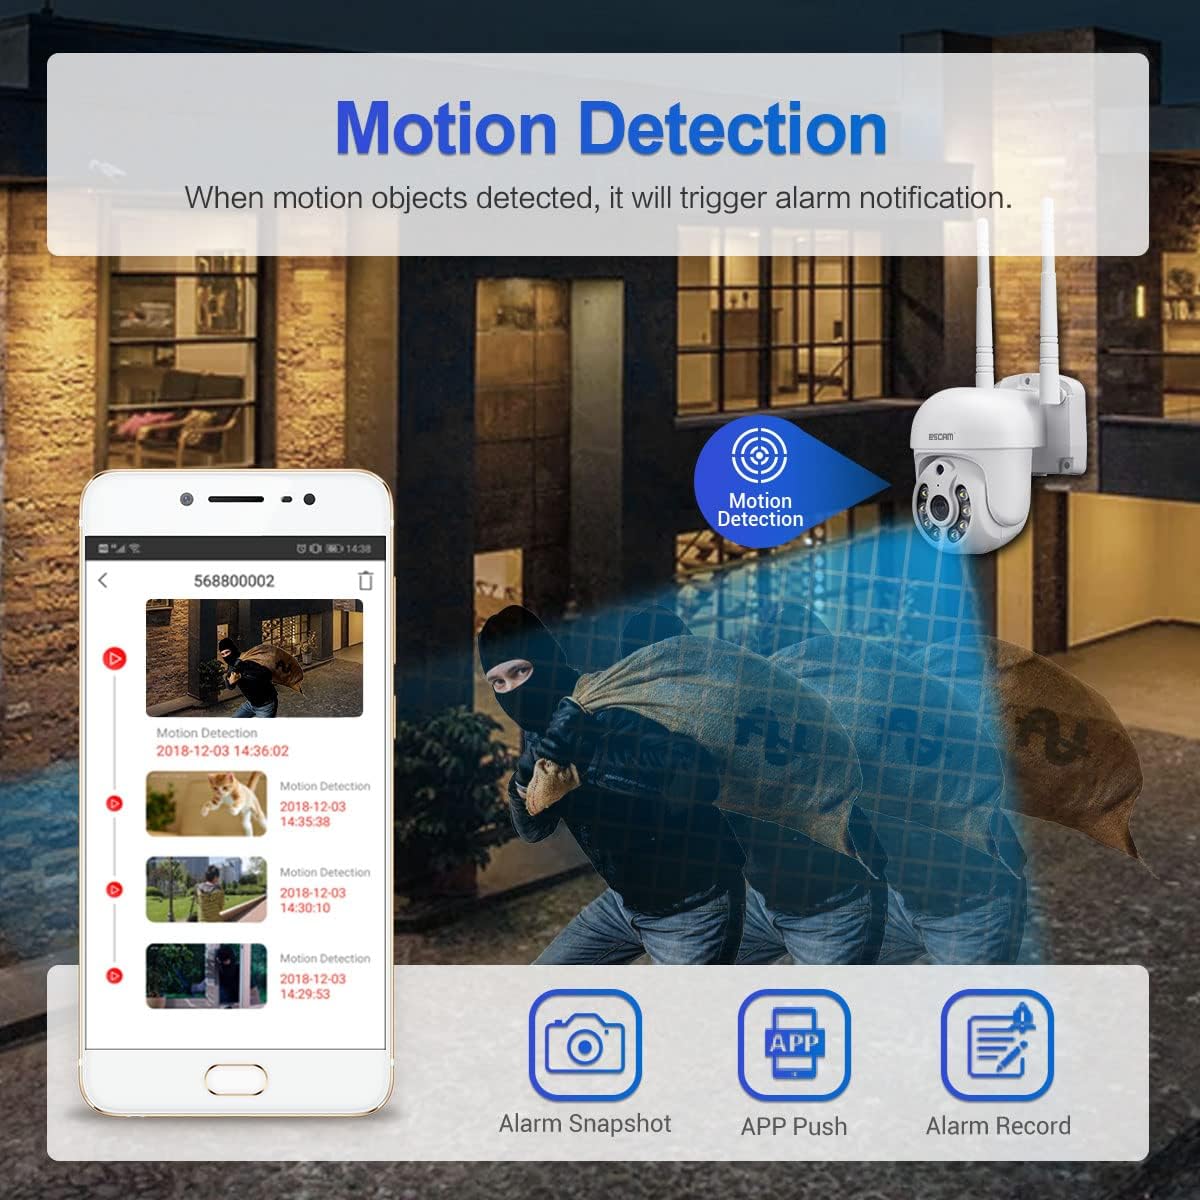
Figure 5: Illustration of motion detection triggering an alarm notification on a mobile phone, with options for alarm snapshot, app push, and alarm record.
- Navigate to the camera settings in the EseeCloud app.
- "Кыймылды аныктоону" иштетиңиз жана керек болсо сезгичтик деңгээлин тууралаңыз.
- You can also set up specific detection zones and schedules.
- When motion is detected, the camera will trigger an alarm notification, send a push alert to your phone, and can record video clips.
- The camera features intelligent humanoid detection to reduce false positives.
6.5 Түнкү көрүү режимдери
The ESCAM WNK710 offers three intelligent night vision modes for clear monitoring in low-light conditions.
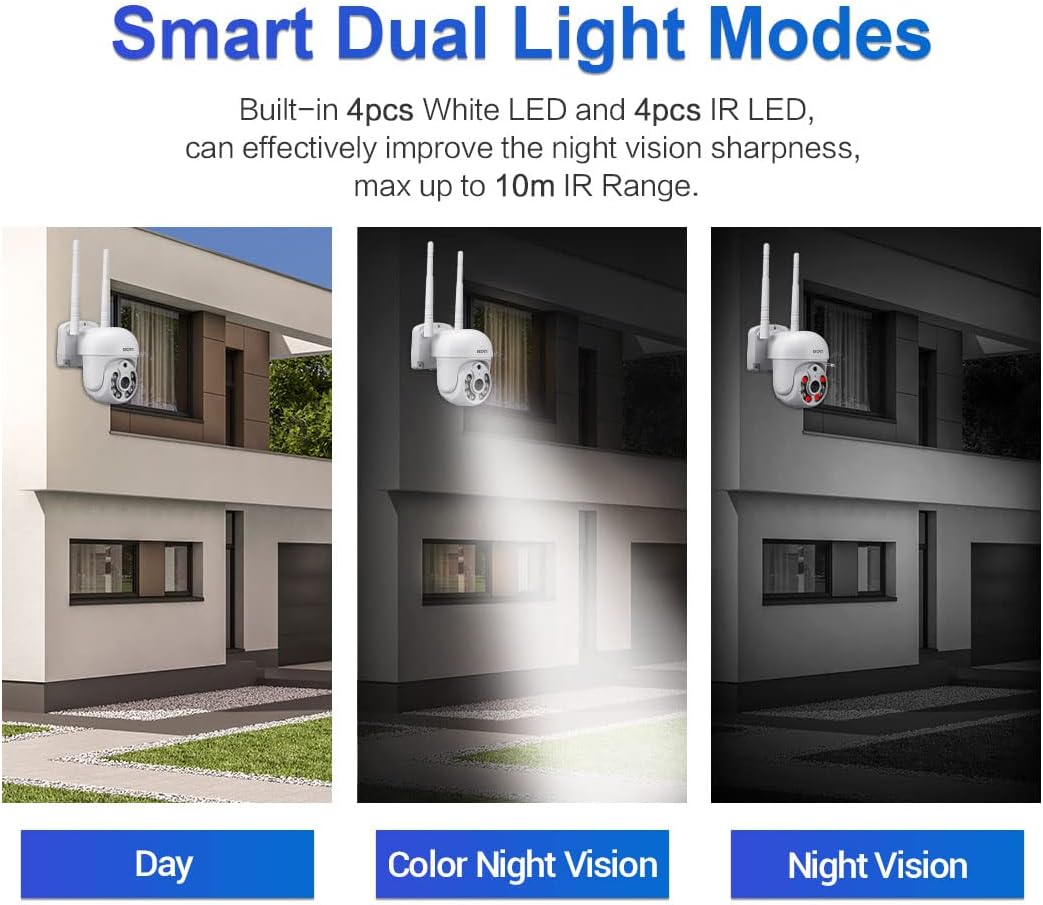
Figure 6: Comparison of Day mode, Color Night Vision mode (using white LEDs), and Night Vision mode (using IR LEDs).
- Infrared Mode (Black/White Night Vision): Uses IR LEDs for clear black and white images in complete darkness, up to 10m range.
- Full-Color Mode (Color Night Vision): Activates the built-in white light LEDs to provide full-color video even in low light. This mode can also act as a deterrent.
- Smart Mode: The camera automatically switches between IR and white light based on detected motion or specific settings, providing full-color video when activity is detected.
- You can select your preferred night vision mode in the EseeCloud app settings.
6.6 Жазуу жана ойнотуу
The camera supports continuous recording, motion-triggered recording, and scheduled recording to a Micro SD card (up to 128GB, not included) or cloud storage (subscription may be required).
- Микро SD картаны орнотуу: Insert a Micro SD card into the TF card slot on the camera. Ensure the camera is powered off before inserting or removing the card.
- Ойнотуу: In the EseeCloud app, navigate to the playback section to view foo жазылганtage. You can filter by date and time.
7. Техникалык тейлөө
- Тазалоо: Камера линзасын жана корпусун тазалоо үчүн жумшак, кургак чүпүрөктү колдонуңуз. Суюк тазалоочу каражаттарды же абразивдүү материалдарды колдонбоңуз.
- Программалык камсыздоонун жаңыртуулары: Regularly check for firmware updates through the EseeCloud app. Updates can improve performance, add new features, and enhance security. Follow the app's instructions carefully during updates.
- SD Card башкаруу: If using an SD card, periodically check its status in the app. Format the card occasionally to maintain optimal recording performance.
8. Кыйынчылыктарды
| Көйгөй | Мүмкүн болгон себеп / Чечим |
|---|---|
| Колдонмодо камера оффлайн режиминде. |
|
| WiFi'га туташа албай жатат. |
|
| No sound from camera or app. |
|
| Motion detection alerts not received. |
|
| SD карта жаздырбай жатат. |
|
9. Техникалык шарттар
| Өзгөчөлүк | Деталь |
|---|---|
| Модел | WNK710 |
| пиксел | 3 Million Pixels (2304*1296) |
| Сенсор | 1/2.7 ”CMOS сенсору |
| Видеону иштетүү | H.264/H.265 video encoding, support dual stream |
| Frame Rate | 15 кадр/сек |
| Күн жана түн режими | IR-CUT infrared filter, supports infrared / full color / smart modes |
| Аудио иштетүү | G.711 codec standard, support audio and video synchronization |
| Аудио порт | 1 input (MIC/pickup), 1 output (speaker) |
| Зымдуу тармак | 1 RJ45 Ethernet interface, 10/100M adaptive |
| Зымсыз тармак | 802.11b/g/n (2.4GHz WiFi) |
| Сактагыч | Support 128G Micro SD card (not included) |
| Түнкү көрүнүш | 4 infrared LEDs + 4 white light LEDs |
| Pan/Tilt | 350° панорамалоо / 90° жантайтуу |
| Электр камсыздоо | 12V 2A (Power adapter included) |
| Өлчөмдөрү (L x W x Y) | 7.87 x 7.87 x 4.72 дюйм (200 x 200 x 115 мм) |
| Элемент Салмагы | 1.76 фунт (0.8 кг) |
| Ички/тышкы колдонуу | Indoor |
10. Кепилдик жана колдоо
For technical support, troubleshooting assistance, or warranty inquiries, please contact visiPower customer service. Refer to the contact information provided in the Quick Start Guide or on the official visiPower webсайт.
Please note that protection plans are available for purchase separately to extend coverage beyond the standard manufacturer's warranty. These plans are offered by third-party providers and details can be found where the product was purchased.
