1. Киришүү
This manual provides detailed instructions for the safe and efficient operation of your InFocus P120 INL412 Multimedia Projector (Model INL4128). Please read this manual thoroughly before using the projector and keep it for future reference. This projector is designed for high-quality image projection, suitable for various applications including presentations, home entertainment, and gaming.
2. Коопсуздук маалыматы
Проекторго зыян келтирбөө жана колдонуучунун коопсуздугун камсыз кылуу үчүн төмөнкү коопсуздук чараларын сактаңыз:
- Вентиляция: Ensure adequate ventilation around the projector. Do not block ventilation openings. Maintain a minimum distance of 30 cm (12 inches) from walls or other objects.
- Кубат булагы: Белгиленген электр менен жабдууну гана колдонуңузtage. Электр шнурун бекем туташтырыңыз.
- Жылуулук: The projector generates heat during operation. Do not touch the projector's vents or exhaust areas directly after use.
- Жарык чыгаруу: l болгондо проектордун объективине тике карабаamp күйүп турат, анткени катуу жарык көзгө зыян келтириши мүмкүн.
- Жайгашкан жери: Проекторду туруктуу, тегиз жерге коюңуз. Аны күн нуру түз тийген жерге, жылуулук булактарынын жанына же нымдуулугу жогору же чаңдуу жерлерге койбоңуз.
- Тазалоо: Тазалоодон мурун электр шнурын ажыратыңыз. Жумшак, кургак чүпүрөктү колдонуңуз. Суюктук же аэрозолдук тазалоочу каражаттарды колдонбоңуз.
- Тейлөө: Проекторду өзүңүз тейлөөгө аракет кылбаңыз. Бардык тейлөө иштерин квалификациялуу тейлөө кызматкерлерине тапшырыңыз.
3. Продукт бүтүп калдыview
3.1 Top Panel and Lens Area
The top panel features the control buttons for basic operation and the lens area with focus and zoom adjustments.

3.1-сүрөт: Жогорку view of the InFocus P120 INL412 projector, highlighting the control panel on the right and the lens adjustment area on the left. The InFocus logo is visible on the top surface.
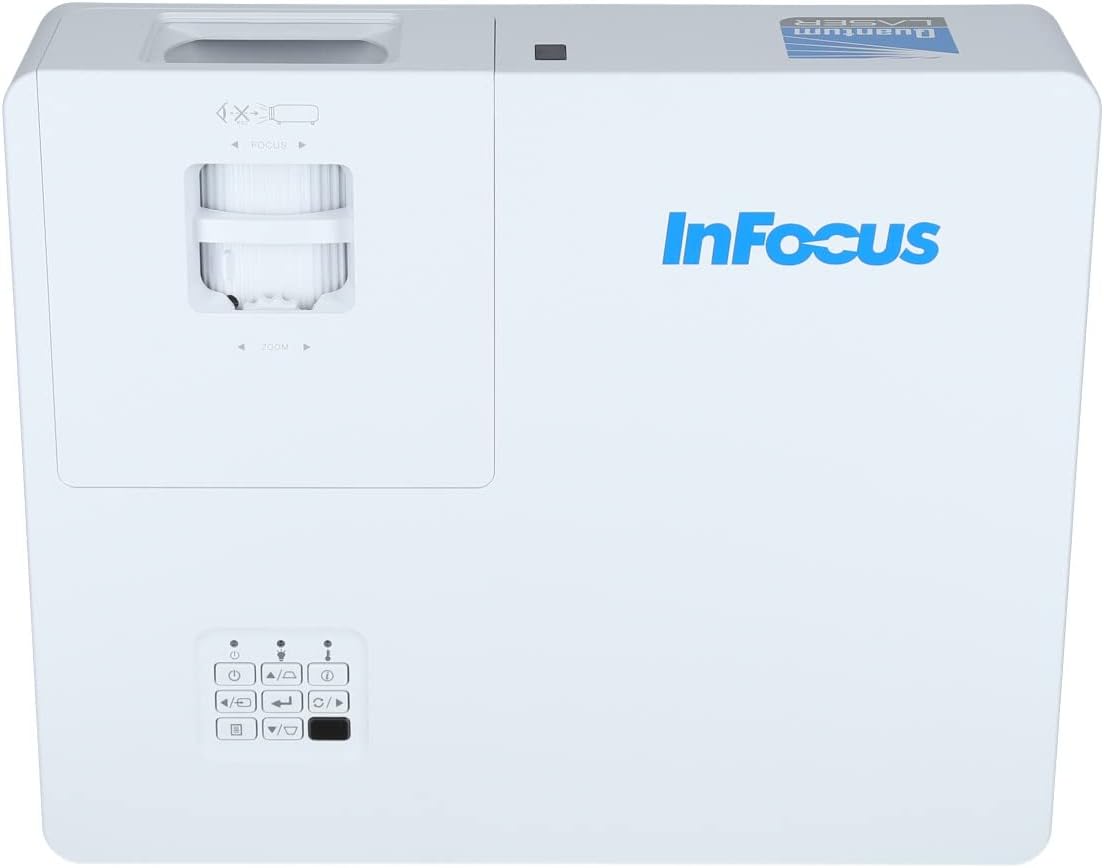
Сүрөт 3.2: Жакыныраак view of the projector's top panel, showing the focus and zoom rings near the lens opening and the array of control buttons for power, menu, source selection, and navigation.
3.2 Арткы панелдин туташуулары
Арткы панелде тышкы түзмөктөрдү туташтыруу үчүн ар кандай киргизүү жана чыгаруу порттору бар.

Figure 3.3: Rear panel of the InFocus P120 INL412 projector, displaying a comprehensive array of connectivity options including HDMI (x2), USB, S-Video, Ethernet (LAN), VGA In (x2), VGA Out, RS232, and Audio In/Out ports. The power input is located on the bottom left.
Key ports include:
- HDMI 1 жана 2: For connecting high-definition digital video and audio sources.
- USB: For connecting USB devices, potentially for media playback or firmware updates.
- S-Video: For connecting older video sources.
- VGA IN 1 & 2: For connecting computers or other devices with VGA output.
- VGA OUT: Тышкы мониторго туташуу үчүн.
- Ethernet (LAN): Тармакка туташуу жана башкаруу үчүн.
- Audio IN 1 & 2 / Audio OUT: For analog audio connections.
- 232: Сериялык башкаруу үчүн.
- Кубат киргизүү: AC кубат шнурын туташтыруу үчүн.
3.3 Front and Side Panels
The front panel houses the projection lens and front ventilation, while the side panels feature additional ventilation grilles.

Сүрөт 3.4: Алдыңкы view of the InFocus P120 INL412 projector, displaying the main projection lens on the right and the extensive front ventilation grille on the left, crucial for heat dissipation.

3.5-сүрөт: Каптал view of the InFocus P120 INL412 projector, illustrating the side ventilation grilles that contribute to maintaining optimal operating temperature.
4. Орнотуу
4.1 Проекторду жайгаштыруу
Position the projector on a stable, flat surface or mount it securely. Ensure the projector is within the optimal projection distance for your screen size. Maintain clear space around the projector for proper ventilation.
4.2 Түзмөктөрдү туташтыруу
Before connecting any cables, ensure the projector and all source devices are powered off.
- HDMI туташуу: Connect an HDMI cable from your source device (e.g., laptop, Blu-ray player, gaming console) to either the HDMI 1 or HDMI 2 port on the projector.
- VGA туташуу: Connect a VGA cable from your computer to either VGA IN 1 or VGA IN 2. For audio, connect a separate audio cable from your computer's audio output to the corresponding Audio IN port on the projector.
- USB туташуу: Insert a USB drive into the USB port for media playback (if supported by firmware) or service functions.
- Ethernet (LAN) туташуусу: Connect an Ethernet cable to the LAN port for network control or updates.
- Аудио чыгаруу: If using external speakers, connect an audio cable from the Audio OUT port on the projector to your audio system.
4.3 Кубат туташтыруу
Connect the power cord to the projector's power input and then plug the other end into a grounded electrical outlet.
5. Иштөө нускамалары
5.1 Күйгүзүү/өчүрүү
- Күйгүзүү: басыңыз Күч проектордун башкаруу панелиндеги же пульттагы баскычты басыңыз. Кубат индикаторунун жарыгы өзгөрөт.
- Өчүрүү: басыңыз Күч button again. A confirmation message may appear. Press the button a second time to confirm shutdown. Allow the projector to cool down before unplugging it.
5.2 Фокусту жана масштабды тууралоо
Rotate the focus ring around the lens until the image appears sharp and clear. Use the zoom ring to adjust the image size to fit your screen.
5.3 Киргизүү булагын тандоо
басыңыз Булак button on the control panel or remote control to cycle through available input sources (HDMI 1, HDMI 2, VGA 1, VGA 2, S-Video, USB). Select the input corresponding to your connected device.
5.4 Меню Навигациясы
колдонуу Меню button to access the on-screen display (OSD) menu. Use the arrow buttons to navigate through menu options and the Кириңиз тандоо үчүн баскычын басыңыз. Меню кайра чыгуу үчүн.
6. Техникалык тейлөө
6.1 Линзаны тазалоо
Линзаны оптикалык беттер үчүн атайын иштелип чыккан жумшак, мамыксыз чүпүрөк менен акырын сүртүңүз. Абразивдүү тазалоочу каражаттарды же ашыкча күч колдонбоңуз, анткени бул линзаны чийип алышы мүмкүн.
6.2 Cleaning the Projector Exterior
Проектордун экранын тазалоо үчүн жумшак, кургак чүпүрөктү колдонуңузasing. For stubborn dirt, dampen the cloth slightly with water, then wipe dry immediately. Avoid getting liquids into the projector's openings.
6.3 Ventilation Care
Regularly check the projector's ventilation grilles for dust accumulation. Use a soft brush or a vacuum cleaner with a brush attachment to gently remove dust from the vents to ensure proper airflow and prevent overheating.
7. Кыйынчылыктарды
7.1 Сүрөт көрсөтүлгөн жок
- Ensure the projector is powered on and the power indicator light is solid.
- Verify that the video cable (HDMI, VGA, etc.) is securely connected to both the projector and the source device.
- Проектордо туура киргизүү булагы тандалганын текшериңиз.
- Confirm that the source device (laptop, player) is powered on and outputting a signal.
7.2 Сүрөт бүдөмүк же фокустан тышкары
- Проектордун объективиндеги фокус шакекчесин сүрөт курч болгонго чейин тууралаңыз.
- Проектордун экрандан туура аралыкта жайгашканын текшериңиз.
- Эгерде проектордун линзасы кирдеп калса, аны тазалаңыз.
7.3 Үн жок
- If using HDMI, ensure the source device's audio output is set to HDMI.
- If using VGA, ensure a separate audio cable is connected from the source to the projector's Audio IN port.
- Проектордогу жана булак түзмөгүндөгү үн жөндөөлөрүн текшериңиз.
- If using external speakers, ensure they are properly connected to the Audio OUT port and powered on.
8. Техникалык шарттар
| Өзгөчөлүк | Деталь |
|---|---|
| Бренд | InFocus |
| Өндүрүүчү | Фокуста |
| Модель аты | P120 INL412 |
| Модель номери | INL4128 |
| Жыл | 2023 |
| Аппараттык интерфейс | Ethernet, HDMI, S-Video, USB |
| Элементтердин саны | 1 |
| Аспект катышы | 16:9 |
| Ватtage | 341 ватт |
| Батареялар камтылган | Жок |
| Батареялар талап кылынат | Жок |
| Форма фактору | Иш такта |
| Монтаж түрү | Стол орнотуу |
| Алыстан башкаруу камтылган | Ооба |
| Продукциянын өлчөмдөрү | 56.13 x 46.48 x 25.15 см |
| Элемент Салмагы | 5.5 кг |
| Сүрөттүн максималдуу өлчөмү | 308.28 дюйм |
| Минималдуу Сүрөт өлчөмү | 910.63 миллиметр |
| Биринчи жеткиликтүү күн | 5-январь, 2022-жыл |
9. Кепилдик жана колдоо
For warranty information and technical support, please refer to the documentation included with your purchase or visit the official InFocus webсайт. Кепилдик дооматтар үчүн сатып алганыңыздын далилин сактаңыз.


