1. Киришүү
Thank you for choosing the Marantz Model 40n Integrated Stereo Ampкөтөргүч. Бул amplifier is designed to deliver exceptional audio performance with modern connectivity options, including HEOS Built-in for seamless music streaming. This manual provides essential information for setting up, operating, and maintaining your Model 40n to ensure optimal performance and longevity.
2. Маанилүү коопсуздук нускамалары
Please read these safety instructions carefully before using your Marantz Model 40n. Keep this manual for future reference.
- Кубат булагы: Түзмөктү AC розеткасына гана туташтырыңызtage арткы панелде көрсөтүлгөн.
- Вентиляция: Ensure adequate ventilation. Do not block ventilation openings. Maintain a minimum distance of 10 cm (4 inches) from other objects.
- Суу жана ным: Агрегатты жамгырга, нымдуулукка же ашыкча нымдуулукка дуушар кылбаңыз. Ваза сыяктуу суюктуктар толтурулган нерселерди аппараттын үстүнө койбоңуз.
- Жылуулук: Аппаратты радиаторлор, жылуулук регистрлери, мештер же жылуулук чыгарган башка аппараттар сыяктуу жылуулук булактарынын жанына коюудан алыс болуңуз.
- Тазалоо: Тазалоодон мурун блокту розеткадан сууруп алыңыз. Кургак чүпүрөктү гана колдонуңуз.
- Тейлөө: Бул продуктту өзүңүз тейлөөгө аракет кылбаңыз. Бардык тейлөөнү квалификациялуу тейлөө кызматкерлерине тапшырыңыз.
- Кабелдер: Электр зымдарын басуудан же кысып калуудан сактаңыз, өзгөчө сайгычтарда, розеткаларда жана алар аппараттан чыга турган жеринде.
3. Пакеттин мазмуну
Пакетте бардык буюмдар бар экенин текшериңиз:
- Marantz Model 40n Integrated Stereo Ampөмүрлүү
- Алыстан башкаруу бирдиги
- Электр кабели
- FM/AM Antennas (if applicable to region)
- Quick Start Guide
- Коопсуздук нускамалары
4. Продукт бүтүп калдыview
4.1 алдыңкы панели

Алдыңкы панель негизги башкаруу элементтерине жана көрсөткүчтөрүнө мүмкүнчүлүк берет:
- Кубат баскычы (⑂): Агрегатты күйгүзөт же өчүрөт.
- Киргизүү тандагыч: Rotates to choose the desired audio input source.
- Түз булак: Bypasses tone controls for the purest audio signal.
- Bass/Treble/Balance Controls: Adjusts audio characteristics.
- Үн баскычы: Жалпы чыгаруу көлөмүн көзөмөлдөйт.
- Дисплей: Учурдагы киргизүүнү, үн деңгээлин жана башка абал маалыматын көрсөтөт.
- Гарнитура уячасы: Наушник менен жеке угуу үчүн.
4.2 Арткы панель
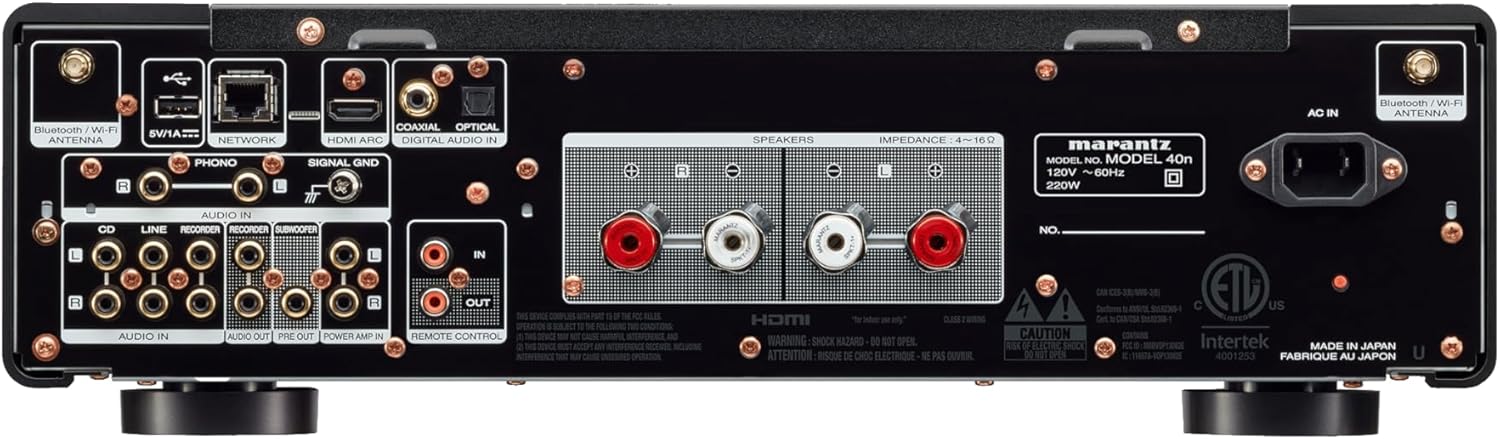
The rear panel houses all connectivity options:
- Динамик терминалдары: Connect your passive loudspeakers.
- Analog Audio Inputs (CD, LINE, RECORDER IN): For connecting external analog audio sources.
- PHONO Input (MM): For connecting a turntable with a moving magnet cartridge. Includes a ground terminal.
- Digital Audio Inputs (COAXIAL, OPTICAL): For connecting digital audio sources like CD players or TVs.
- HDMI ARC киргизүү: For connecting to a TV to receive audio.
- NETWORK порту (Ethernet): Зымдуу тармак туташуусу үчүн.
- USB-A порту: USB сактагыч түзмөктөрдү туташтыруу үчүн.
- Bluetooth/Wi-Fi Antenna Terminals: Зымсыз байланыш үчүн.
- АЛДЫН АЛА ЧЫГАРУУ: Тышкы кубатка туташуу үчүн ampөмүрлүү.
- КҮЧ AMP IN: Allows the Model 40n to function as a power ampөмүрлүү.
- САБВУФЕР ЧЫГЫШЫ: Активдүү сабвуферди туташтыруу үчүн.
- REMOTE CONTROL IN/OUT: For integration into a custom control system.
- AC IN: Электр шнурунун туташуусу.
5. Орнотуу
5.1 Орнотуу
Place the Model 40n on a stable, level surface with adequate ventilation. Avoid direct sunlight, heat sources, and areas with high humidity or dust. Ensure there is sufficient space around the unit for proper airflow.
5.2 Динамиктерди бириктирүү
The Model 40n supports a speaker impedance range of 4-16 ohms. Use high-quality speaker cables for optimal sound.
- Turn off the Model 40n and unplug the power cord.
- Connect the positive (+) terminal (red) of the left speaker to the L+ terminal on the ampөмүрлүү.
- Connect the negative (-) terminal (black) of the left speaker to the L- terminal on the ampөмүрлүү.
- R+ жана R- терминалдарына туташтырып, оң динамик үчүн кайталаңыз.
- Ensure all connections are secure and there are no stray wire strands touching other terminals.

5.3 Аудио булактарын туташтыруу
Connect your audio components to the appropriate input terminals on the rear panel.
- CD ойноткуч: Use RCA cables to connect the CD player's analog output to the CD киргизүү терминалдары.
- Other Analog Sources (e.g., Tuner, Cassette Deck): туташуу үчүн RCA кабелдерин колдонуңуз LINE or RECORDER IN терминалдар.
- Айлануучу стол: Connect your turntable's RCA outputs to the ТЕЛЕФОН input terminals. If your turntable has a ground wire, connect it to the SIGNAL GND terminal. Ensure your turntable has a Moving Magnet (MM) cartridge, as the Model 40n's phono input is designed for MM.
- Digital Sources (e.g., TV, Blu-ray Player): Use an optical or coaxial digital cable to connect to the ОПТИКАЛЫК or COAXIAL DIGITAL IN терминалдар.
- TV (HDMI ARC): Connect an HDMI cable from your TV's HDMI ARC port to the HDMI ARC input on the Model 40n. This allows your TV to send audio to the ampөмүрлүү.
- USB сактагыч: USB дискти салыңыз USB-A port for playing audio files.
5.4 Тармактык туташуу
The Model 40n supports both wired and wireless network connections for streaming services and firmware updates.
- Зымдуу туташуу: Роутериңизден Ethernet кабелин туташтырыңыз ТАРМАК порт.
- Зымсыз байланыш (Wi-Fi): Screw the supplied Wi-Fi/Bluetooth antennas onto the corresponding terminals. Follow the on-screen instructions or use the HEOS app for initial Wi-Fi setup.
5.5 Кубат туташтыруу
Once all audio and network connections are made, connect the supplied power cord to the AC IN terminal on the rear panel and then to a wall outlet.
6. Иштөө нускамалары
6.1 Негизги операция
- Күйгүзүү: Алдыңкы панелдеги же алыстан башкаруу пультундагы кубат баскычын басыңыз.
- Киргизүүнү тандоо: Rotate the Input Selector knob or use the remote control to choose your desired audio source (e.g., CD, PHONO, HDMI ARC, HEOS).
- Үндү тууралоо: Rotate the Volume knob or use the Volume +/- buttons on the remote control to set the listening level.
6.2 Tone Controls and Source Direct
- Бас/Жогорку жыштыктар/Баланс: Use the corresponding knobs on the front panel to fine-tune the audio output to your preference.
- Түз булак: Engage the Source Direct switch to bypass the bass, treble, and balance circuits. This provides a purer, uncolored audio signal, ideal for audiophile listening.
6.3 Music Streaming with HEOS Built-in
The Model 40n features HEOS Built-in, allowing access to a wide range of streaming services and multi-room audio capabilities.


- Download HEOS App: Download the free HEOS app to your smartphone or tablet from the App Store or Google Play.
- Setup HEOS: Follow the in-app instructions to connect your Model 40n to your home network and set up your streaming accounts (e.g., Spotify, Apple Music, Tidal).
- Музыканы агым: Use the HEOS app to browse and play music from various online services, your local music library, or other HEOS-enabled devices.
6.4 AirPlay 2 and Bluetooth
- Air Play 2: From an Apple device, select the Model 40n as an AirPlay speaker to stream audio.
- Bluetooth: Enable Bluetooth on your mobile device, search for 'Marantz Model 40n', and pair.
6.5 Үн менен башкаруу
The Model 40n supports voice control via Amazon Alexa, Google Assistant, and Apple Siri when integrated with compatible devices.

- Көндүм/аракетти иштетүү: Enable the Marantz HEOS skill/action in your Amazon Alexa or Google Home app.
- Каттоо эсебин байланыштыруу: Link your HEOS account within the respective voice assistant app.
- Буйруктарды колдонуу: You can now use voice commands to control playback, volume, and input selection. For Siri, use AirPlay 2 from your Apple device.
7. Техникалык тейлөө
To ensure the longevity and optimal performance of your Model 40n, follow these maintenance guidelines:
- Тазалоо: Disconnect the power cord before cleaning. Use a soft, dry cloth to wipe the exterior surfaces. Do not use abrasive cleaners, solvents, or chemical sprays, as they may damage the finish.
- Вентиляция: Regularly check that the ventilation openings are not blocked by dust or debris. Use a soft brush or vacuum cleaner with a brush attachment to gently clear any obstructions.
- Байланыштары: Periodically check all cable connections to ensure they are secure. Loose connections can lead to signal degradation or intermittent issues.
- Сактагыч: If storing the unit for an extended period, unplug it from the power outlet and cover it to protect against dust.
8. Кыйынчылыктарды
If you encounter issues with your Model 40n, refer to the following common problems and solutions:
| Көйгөй | Мүмкүн себеп | Чечим |
|---|---|---|
| Күч жок | Электр шнуру үзүлдү; Розетка бузук | Электр шнурунун бекем туташтырылганын текшериңиз; Башка розетканы колдонуп көрүңүз. |
| Үн жок | Incorrect input selected; Speaker cables loose; Volume too low; Mute activated | Туура киргизүүнү тандаңыз; Динамиктин туташууларын текшериңиз; Үнүн катуулатыңыз; Үнсүз режимди өчүрүңүз. |
| Үн сапаты начар | Poor cable connections; Source Direct enabled; Speaker phase incorrect | Check all audio cable connections; Disable Source Direct to use tone controls; Verify speaker polarity (+ to + and - to -). |
| Cannot connect to network/HEOS | Wi-Fi antennas not connected; Incorrect Wi-Fi password; Router issue | Ensure antennas are attached; Re-enter Wi-Fi password in HEOS app; Restart your router and the Model 40n. |
| Пульт иштебей жатат | Батареялары түгөнгөн; Алыстан жана аппараттын ортосундагы тоскоолдук | Replace batteries; Remove any obstructions; Ensure remote is pointed at the unit's IR sensor. |
If the problem persists after trying these solutions, please contact Marantz customer support.
9. Техникалык шарттар
Key technical specifications for the Marantz Model 40n Integrated Stereo Ampөмүр берүүчү:
- Бренд: Marantz
- Модель номери: MODEL40N
- Каналдардын саны: 2
- Чыгуу күчү: 70 watts per channel (8 ohms, 20 Hz - 20 kHz, 0.07% THD)
- Интерфейс түрү: USB
- Материал: SECC, Aluminum
- Продукциянын өлчөмдөрү: 17 x 17.4 x 5.1 дюйм (43.18 x 44.2 x 12.95 см)
- Элемент Салмагы: 36.8 фунт (16.7 кг)
- UPC: 747192135959
- Байланыш: HDMI ARC, Phono (MM), Analog RCA, Optical, Coaxial, USB-A, Ethernet, Wi-Fi, Bluetooth, HEOS Built-in
- Үн менен башкаруу: Works with Amazon Alexa, Google Assistant, Apple Siri
- Биринчи жеткиликтүү болгон күнү: 24-февраль, 2022-жыл
10. Кепилдик жана колдоо
Marantz продуктулары ишенимдүүлүк жана аткаруу үчүн иштелип чыккан. Кепилдик тууралуу маалымат алуу үчүн продуктуңузга кошулган кепилдик картасын караңыз же расмий Marantz компаниясына барыңыз webсайт.
For technical support, product registration, or service inquiries, please visit the Marantz support page:
You can also find frequently asked questions and additional resources on their webсайт.


