1. Киришүү
Thank you for choosing the Prechen 19.5-inch 1600x900 LED Monitor. This monitor is designed to provide a high-quality visual experience for various applications, including office work, multimedia, and gaming. Featuring a 1600x900 resolution TN panel, 60Hz refresh rate, and built-in speakers, it offers a versatile display solution. This manual provides detailed instructions for setup, operation, maintenance, and troubleshooting to ensure optimal performance and longevity of your device.

Сүрөт 1: Алдыңкы view of the Prechen 19.5-inch LED Monitor.
2. Коопсуздук боюнча маанилүү маалымат
Please read all safety warnings and instructions carefully before using this monitor to prevent damage or injury.
- Өрткө же электр тогуна урунбоо үчүн мониторду жамгырдын же нымдуулуктун таасирине дуушар кылбаңыз.
- Мониторду ачпаңыз casinг. Ичинде колдонуучу тейлей турган бөлүктөр жок. Бардык тейлөөлөрдү квалификациялуу тейлөө кызматкерлерине тапшырыңыз.
- Монитор кулап калбаш үчүн аны туруктуу, тегиз бетке коюңуз.
- Монитордун айланасында туура желдетүүнү камсыз кылыңыз. Вентиляция тешиктерин жаап албаңыз.
- Монитор менен кошо берилген кубат адаптерин гана колдонуңуз.
- Монитор узак убакыт бою колдонулбай турган болсо, электр сайгычын розеткадан ажыратыңыз.
- Avoid placing the monitor near heat sources such as radiators, heat registers, stoves, or other products (including ampкөтөргүчтөр) жылуулукту пайда кылуучу.
3. Пакеттин мазмуну
Сураныч, пакеттин мазмунун текшерип, бардык буюмдардын бар экенин жана бузулбаганын текшериңиз:
- Prechen 19.5-inch LED Monitor
- Кубаттуу адаптер
- HDMI кабели
- User Manual

Figure 2: Included accessories: Monitor, Power Adapter, HDMI Cable, and User Manual.
4. Орнотуу колдонмосу
4.1 Стендди чогултуу
- Мониторду жана стенд компоненттерин таңгактан этияттык менен алып салыңыз.
- Тирөөчтүн негизин тирөөчтүн моюнуна бекитип, аны берилген бурама менен (эгер бар болсо) бекитиңиз.
- Align the assembled stand with the mounting slot on the back of the monitor and gently push until it clicks into place or secure with screws as per the stand design.
4.2 Мониторду туташтыруу
The monitor supports both HDMI and VGA connections.
- Кубат туташуу: Кубат адаптерин монитордун DC IN портуна туташтырыңыз, андан кийин адаптерди розеткага сайыңыз.
- Видео туташуу (HDMI): Connect one end of the HDMI cable to the HDMI port on your computer or device, and the other end to the HDMI port on the monitor.
- Видео туташуу (VGA): Connect one end of the VGA cable to the VGA port on your computer or device, and the other end to the VGA port on the monitor.
- Аудио туташуусу: If using a VGA connection and external speakers, connect an audio cable from your computer's audio output to the monitor's audio input port. The built-in speakers will function automatically with HDMI.

Figure 3: Monitor back panel with input ports and control buttons.

Figure 4: Multiple connection options for the monitor.
5. Иштөө нускамалары
5.1 Күйгүзүү/өчүрүү
Press the power button located on the back of the monitor to turn it on or off. The power indicator light will illuminate when the monitor is on.
5.2 OSD менюсун колдонуу
The On-Screen Display (OSD) menu allows you to adjust various monitor settings. The control buttons are located on the back of the monitor (refer to Figure 3).
- МЕНЮ: OSD менюсун ачуу үчүн басыңыз.
- UP/DOWN (Volume Up/Down): Use to navigate through menu options or adjust values.
- ENTER (Switch): Тандоону ырастоо же кошумча менюга кирүү үчүн басыңыз.
- EXIT (Return): Учурдагы менюдан чыгуу же мурунку деңгээлге кайтуу үчүн басыңыз.
5.3 Дисплей орнотууларын тууралоо
Navigate the OSD menu to adjust settings such as:
- Жарыктык/Контраст: Дисплейдин жалпы жарыктыгын жана контрастын тууралаңыз.
- Түс жөндөөлөрү: Түс температурасын, RGB деңгээлин өзгөртүңүз же алдын ала коюлган түс режимдерин тандаңыз.
- Киргизүүнү тандоо: HDMI жана VGA киргизүү булактарынын ортосунда кол менен которулуңуз.
- Аспект катышы: Choose between 16:9 (widescreen) or 4:3 (standard) display modes.
- Айкындыгы: Adjust the clarity of the image.
5.4 Аудио орнотуулары
The monitor features two built-in speakers. You can adjust the volume using the OSD menu or the dedicated volume buttons on the back of the monitor.
6. Техникалык тейлөө жана кам көрүү
Proper care and maintenance will extend the life of your monitor.
- Экранды тазалоо: Экранды жумшак, түксүз чүпүрөк менен акырын сүртүңүз. өжөр белгилер үчүн, гampen the cloth slightly with water or a non-ammonia, non-alcohol based screen cleaner. Never spray cleaner directly onto the screen.
- Тазалоо Casing: Мониторду сүртүү үчүн жумшак, кургак чүпүрөктү колдонуңуз casinг. Абразивдүү тазалагычтарды же эриткичтерди колдонуудан алыс болуңуз.
- Сактагыч: Эгерде мониторду узак убакытка сактап жатсаңыз, аны электр тармагынан сууруп, салкын, кургак жерде, мүмкүн болсо, баштапкы таңгагында сактаңыз.
7. Кыйынчылыктарды
If you encounter problems with your monitor, please refer to the following table for common issues and solutions.
| Көйгөй | Мүмкүн себеп | Чечим |
|---|---|---|
| Күч жок | Электр кабели туташкан эмес; Розетка бузук; Монитор өчүк. | Ensure power cable is securely connected. Try a different power outlet. Press the power button on the monitor. |
| Сигнал жок | Видео кабель туташкан эмес; Туура эмес киргизүү булагы тандалып алынган; Компьютер сигнал чыгарбай жатат. | Check HDMI/VGA cable connection. Select the correct input source via the OSD menu. Ensure your computer is on and outputting video. |
| Камтылган динамиктерден үн чыкпайт | Volume too low/muted; Incorrect audio output selected on PC; Audio cable not connected (for VGA). | Increase monitor volume. Check PC audio settings to ensure monitor is selected as output. For VGA, ensure audio cable is connected. |
| Сүрөт бүдөмүк же бурмаланган | туура эмес чечим; Кабель маселеси. | Set your computer's display resolution to 1600x900. Try a different video cable. |
8. Продукттун спецификациялары
| Өзгөчөлүк | Спецификация |
|---|---|
| Бренд | Prechen |
| Screen Size | 19.5 дюйм |
| Дисплей түрү | LED |
| Дисплейдин максималдуу чечилиши | 1600 x 900 |
| Жаңыртуу ылдамдыгы | 60 Гц |
| Жооп убактысы | 5 Миллисекунд |
| Аспект катышы | 16:9 |
| Байланыш технологиясы | Сапаттуу, VGA |
| Өзгөчөлүктөр | Камтылган динамиктер |
| VESA тоосунун шайкештиги | 100 x 100 мм |
9. VESA орнотуу
The Prechen monitor supports VESA standard mounting (100 x 100 mm), allowing you to mount it on a wall or an articulating arm for flexible viewing options. This feature makes the monitor lightweight and easy to install in various setups.
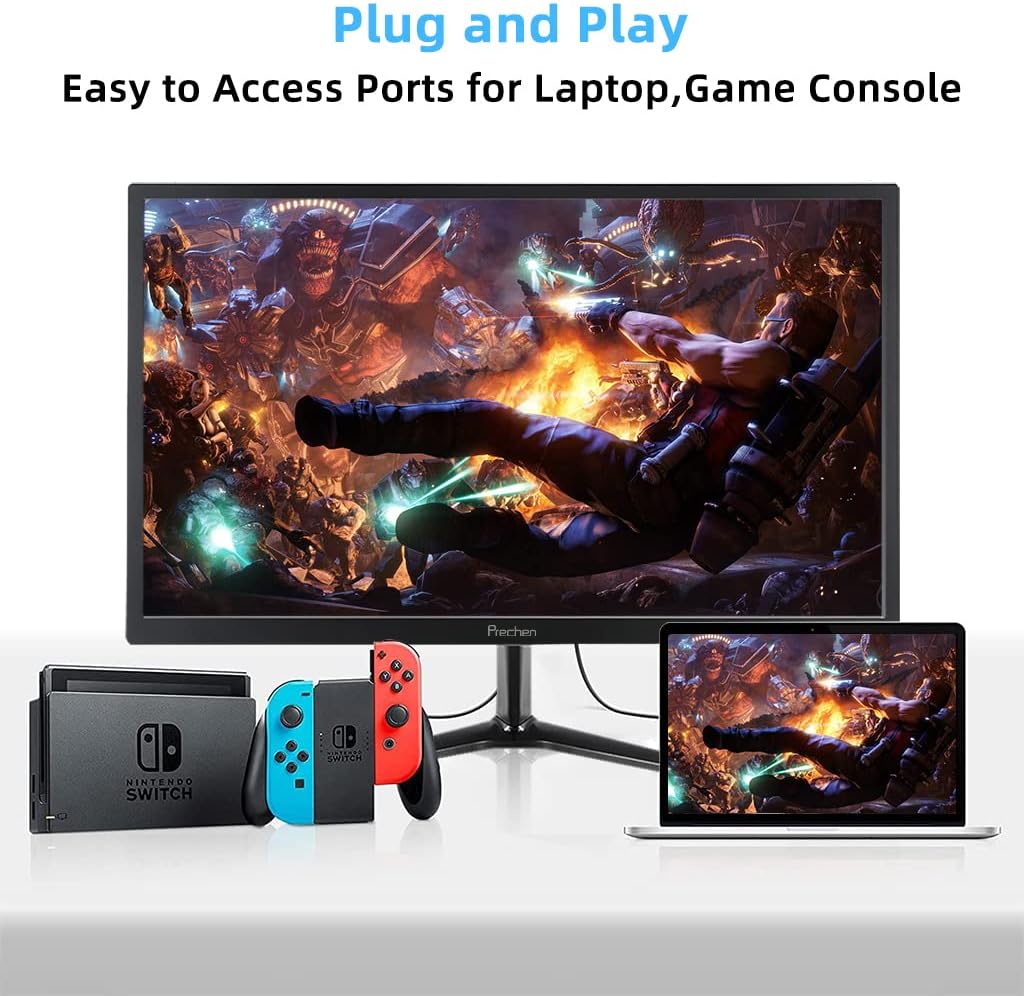
Figure 5: VESA mount dimensions on the monitor back.

6-сүрөт: Мисample of VESA mounting with an articulating arm.
10. Кепилдик жана колдоо
Each Prechen product is covered by a one-year warranty from the date of purchase, which includes a one-month refund and exchange policy. This warranty covers manufacturing defects and issues arising from normal use.
For any questions, technical support, or warranty claims, please contact Prechen customer service. Please have your product model and purchase information ready when contacting support.
Contact information for customer service can typically be found on the product packaging or the official Prechen webсайт.


