1. Киришүү
This manual provides detailed instructions for the safe and effective use of your GOLDCHAMP GCUS-36D Capacitance Meter Digital Multimeter. This device is designed for measuring capacitance across a wide range, from 200pF to 20mF. It features a large LCD display with backlight, data hold function, and a convenient foldable stand for ease of use.
АлтынчыAMP GCUS-36D is a manual range capacitance meter suitable for various applications including home electrical repair, laboratory work, and electronics engineering tasks.
2. Пакеттин мазмуну
Verify that all items are present and in good condition upon unpacking. The package should contain the following:
- 1 x GOLDCHAMP GCUS-36D Capacitance Meter Digital Multimeter
- 1 x Сыноочу линиялар (Кызыл жана Кара)
- 1 x 9V батарея
- 1 x Чакан бурагыч (батарея отсеги үчүн)
- 1 x User Manual

Figure 2.1: Contents of the GOLDCHAMP GCUS-36D package, including the multimeter, test leads, 9V battery, and screwdriver.
3. Орнотуу
3.1 Батареяны орнотуу
- Мультиметрдин артындагы батарея бөлүкчөсүн табыңыз.
- Use the provided screwdriver to loosen the screw securing the battery cover.
- Батареянын капкагын алып салыңыз.
- Connect the 9V battery to the battery clips, ensuring correct polarity.
- Place the battery inside the compartment and replace the cover, securing it with the screw.

3.1-сүрөт: Арткы view of the multimeter, illustrating the battery compartment and the integrated foldable stand.
3.2 Сыноо өткөргүчтөрүн туташтыруу
- Insert the black test lead into the 'Cx-' input jack.
- Insert the red test lead into the 'Cx+' input jack.
- Ensure connections are firm before proceeding with measurements.
4. Иштөө нускамалары
4.1 Мультиметрдин жайгашуусу

Figure 4.1: Front panel of the multimeter, highlighting the LCD display, function switch, ZERO button, Data-Hold button, Backlight button, and input jacks.
4.2 Күйгүзүү/өчүрүү
Rotate the Function Switch from 'OFF' to any desired measurement range to power on the device. To power off, rotate the Function Switch back to 'OFF'.
4.3 Сыйымдуулукту өлчөө
- Rotate the Function Switch to the desired capacitance range (e.g., 200pF, 20nF, 2uF, 200uF, 20mF).
- Press the 'ZERO' button to clear any residual capacitance from the test leads.
- Connect the test leads to the capacitor you wish to measure.
- ЖК дисплейдеги сыйымдуулуктун маанисин окуңуз.

Figure 4.2: The multimeter actively measuring the capacitance of a component, demonstrating the test lead connection and display reading.
4.4 Маалыматты кармоо функциясы
Press the 'HOLD' button to freeze the current reading on the display. Press it again to release the hold and resume live readings.
4.5 Арткы жарык функциясы
Press the 'Backlight' button to illuminate the LCD display for improved visibility in low-light conditions. Press it again to turn off the backlight.

Figure 4.3: The multimeter's display with the backlight activated, showing enhanced readability in a darker environment.
5. Техникалык шарттар
| Өзгөчөлүк | Спецификация |
|---|---|
| Бренд | GOLDCHAMP |
| Модель номери | GCUS-36D |
| Өлчөө түрү | Capacitance Meter |
| Кубаттуулук диапазону | 200pF/2000pF/20nF/200nF/2uF/20uF/200uF/2000uF/20mF |
| Accuracy (200pF-200uF) | ±0.5% |
| Accuracy (2000uF) | ±2.0% |
| Accuracy (20mF) | ±4.0% |
| Дисплей | Large LCD, 1999 Санат |
| Power Source | 1 x 9V Батарея (кошулган) |
| Элемент Салмагы | 200 грамм |
| Почталардын өлчөмдөрү | 16 x 11.61 x 4.7 см |
| Өзгөчөлүктөр | ZERO setting, Backlight, Data-Hold, Foldable Stand |
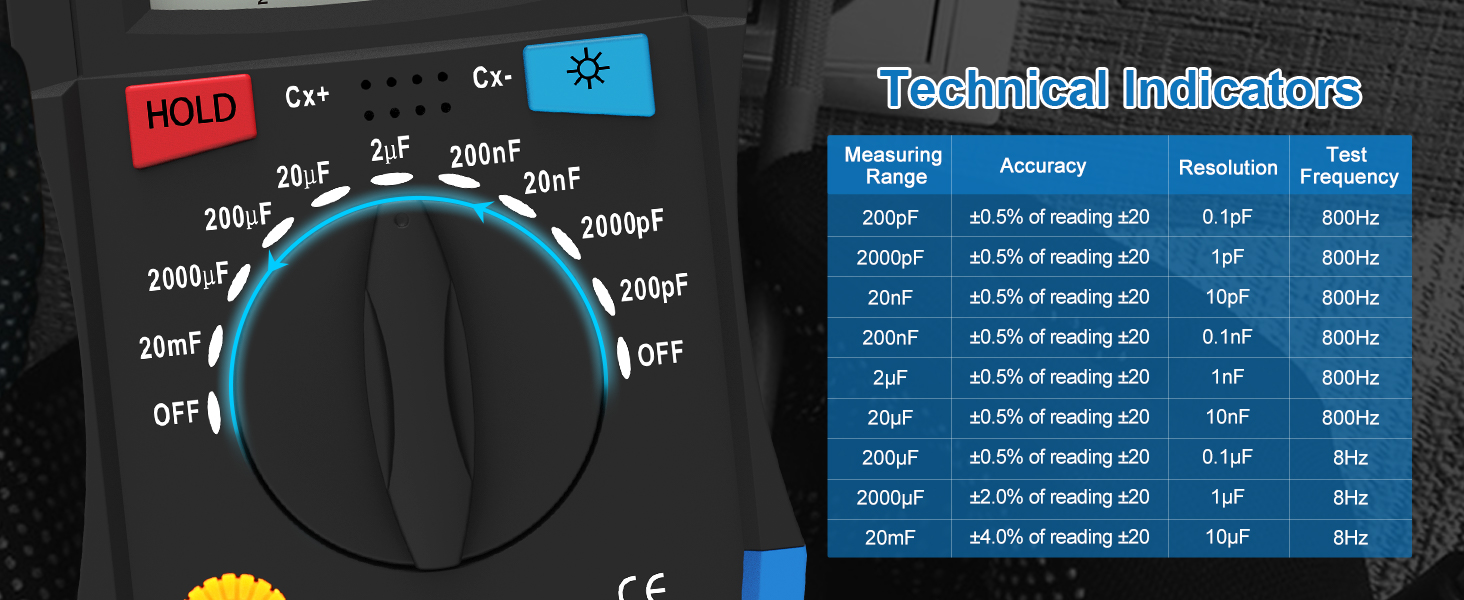
Figure 5.1: Detailed technical indicators for the GOLDCHAMP GCUS-36D, including measurement ranges, accuracy, resolution, and test frequency.
6. Техникалык тейлөө
6.1 Батареяны алмаштыруу
When the battery low indicator appears on the display, replace the 9V battery promptly to ensure accurate readings. Follow the battery installation steps in Section 3.1.
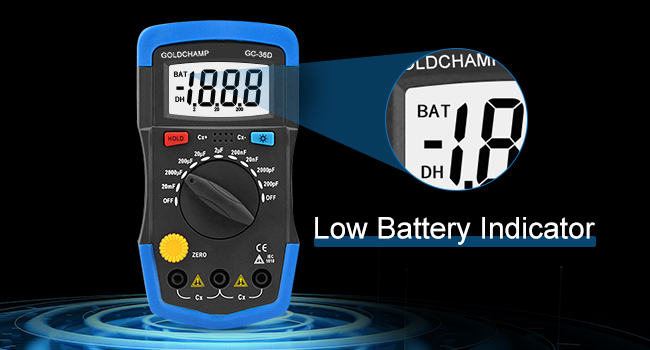
Figure 6.1: The LCD display indicating a low battery status, prompting replacement.
6.2 Тазалоо
Аппаратты кургак, жумшак чүпүрөк менен сүртүңүз. Абразивдүү тазалагычтарды же эриткичтерди колдонбоңуз.
6.3 Сактоо
If the multimeter is not used for an extended period, remove the battery to prevent leakage. Store the device in a cool, dry place away from direct sunlight.
7. Кыйынчылыктарды
- Дисплей жок/Алсыз дисплей: Check battery level and replace if necessary. Ensure the battery is installed correctly.
- Туура эмес окуулар: Verify the Function Switch is set to the correct range for the measurement. Ensure test leads are properly connected and making good contact with the component. Press the 'ZERO' button before capacitance measurements.
- 'OL' or 'Overload' on Display: This indicates the measured value exceeds the selected range. Switch to a higher range setting.
8. Кепилдик жана колдоо
For warranty information or technical support, please refer to the contact details provided with your purchase or visit the official GOLDCHAMP webсайт. Сатып алганыңыздын далили катары сатып алуу дүмүрчөгүңүздү сактаңыз.


