Introduction
This manual provides comprehensive instructions for the operation, maintenance, and troubleshooting of your BOBLOV A21 Body Worn Camera. The A21 is a compact, high-definition 1080P camera featuring a 180° rotatable lens, up to 8 hours of recording time, and support for IR night vision and loop recording. It is designed for daily video recording in various scenarios, including delivery services, sales assistance, and personal documentation.
Please read this manual carefully before using the device to ensure proper function and to maximize its capabilities.

Image: The BOBLOV A21 Body Camera is suitable for various applications such as group discussions, lecture recording, sales assistance, and parcel delivery.
Продукт бүттүview
The BOBLOV A21 Body Worn Camera is designed for portability and ease of use. Familiarize yourself with its components:
- 180° айлануучу линза: Ийкемдүү жаздыруу бурчтарын камсыз кылат.
- Power/Snapshot Button: Controls power and captures still images.
- Video/Audio Recording Slider: Toggles between video and audio recording modes.
- IR On/Off Slider: Activates or deactivates infrared night vision.
- Микро SD карта слоту: For external memory storage (supports up to 128GB).
- USB порт: Заряддоо жана маалыматтарды өткөрүү үчүн.
- Калыбына келтирүү баскычы: For factory reset if needed.
- Артка клип: Камераны кийимге же башка беттерге бекитүү үчүн.

Сүрөт: алдыңкы жана арткы views of the BOBLOV A21 Body Worn Camera, highlighting its compact design and the included 64GB Micro SD card.
Сүрөт: деталдуу view of the BOBLOV A21, showing the slide buttons for Video Mode, Audio Mode, and IR On/Off, along with the Power Button/Snapshot function.
Жайгашуу
1. Баштапкы заряддоо
Before first use, fully charge the camera. Connect the camera to a wall socket using the provided standard USB cable and a compatible 5V, 1A charger plug. A full charge typically takes 3-4 hours.
- Заряддоо көрсөткүчү: The red light will slow flash when charging.
- Толугу менен заряддалган: The red light will become steady.
- Узак мөөнөттүү сактоо: If the camera is idle for an extended period, it is recommended to fully charge it every 2 months to maintain battery health.

Image: The camera connected to a power source, illustrating the 1800mAh battery and approximate charging time of 3 hours for 8 hours of usage.
2. Micro SD картаны салуу
The BOBLOV A21 requires a Micro SD card for operation. It supports Class 10 Micro SD cards from 8GB up to a maximum of 128GB. A 64GB card is typically included.
- Камераңыздын капталынан Micro SD карта уячасын табыңыз.
- Gently insert the Micro SD card into the slot until it clicks into place. Ensure the card is inserted correctly to avoid damage.
- If using a 256GB SD card, it must be formatted to FAT32 using the camera itself to ensure compatibility.

Сүрөт: жакын план view of the BOBLOV A21 camera showing the Micro SD card slot and a 64GB card ready for insertion.

Image: Illustration of the external card storage feature, indicating support for 32GB, 64GB, and up to 128GB (Max) Micro SD cards.
3. Easy Setup Steps Overview

Image: A step-by-step visual guide for setting up the BOBLOV A21, including inserting the TF card, powering on/off, recording video/audio, taking snapshots, activating IR light, and connecting to a PC.
Иштөө нускамалары
1. Күйгүзүү/өчүрүү
Long press the Power Button for 3 seconds to power the camera on or off. Upon powering on, the camera will automatically begin video or audio recording based on the slider's position.
2. Видео жаздыруу
Slide the recording button upwards to initiate video recording. A blue light will flash to indicate video recording is active. Ensure the indicator light remains on for at least 7 seconds to confirm proper recording initiation.
3. Аудио жазуу
Slide the recording button downwards to initiate audio-only recording. A red light will flash to indicate audio recording is active.
4. Taking a Snapshot
While in Video Mode, short press the Power Button to capture a still image (snapshot).
5. 180° айлануучу линза
The camera features a manually rotatable lens that can be adjusted 180 degrees. This allows you to capture footage from various angles without repositioning the entire device. Simply rotate the lens to your desired orientation.

Image: Illustration demonstrating the 180° rotatable lens of the BOBLOV A21, allowing for flexible shooting angles from 0° to 180°.
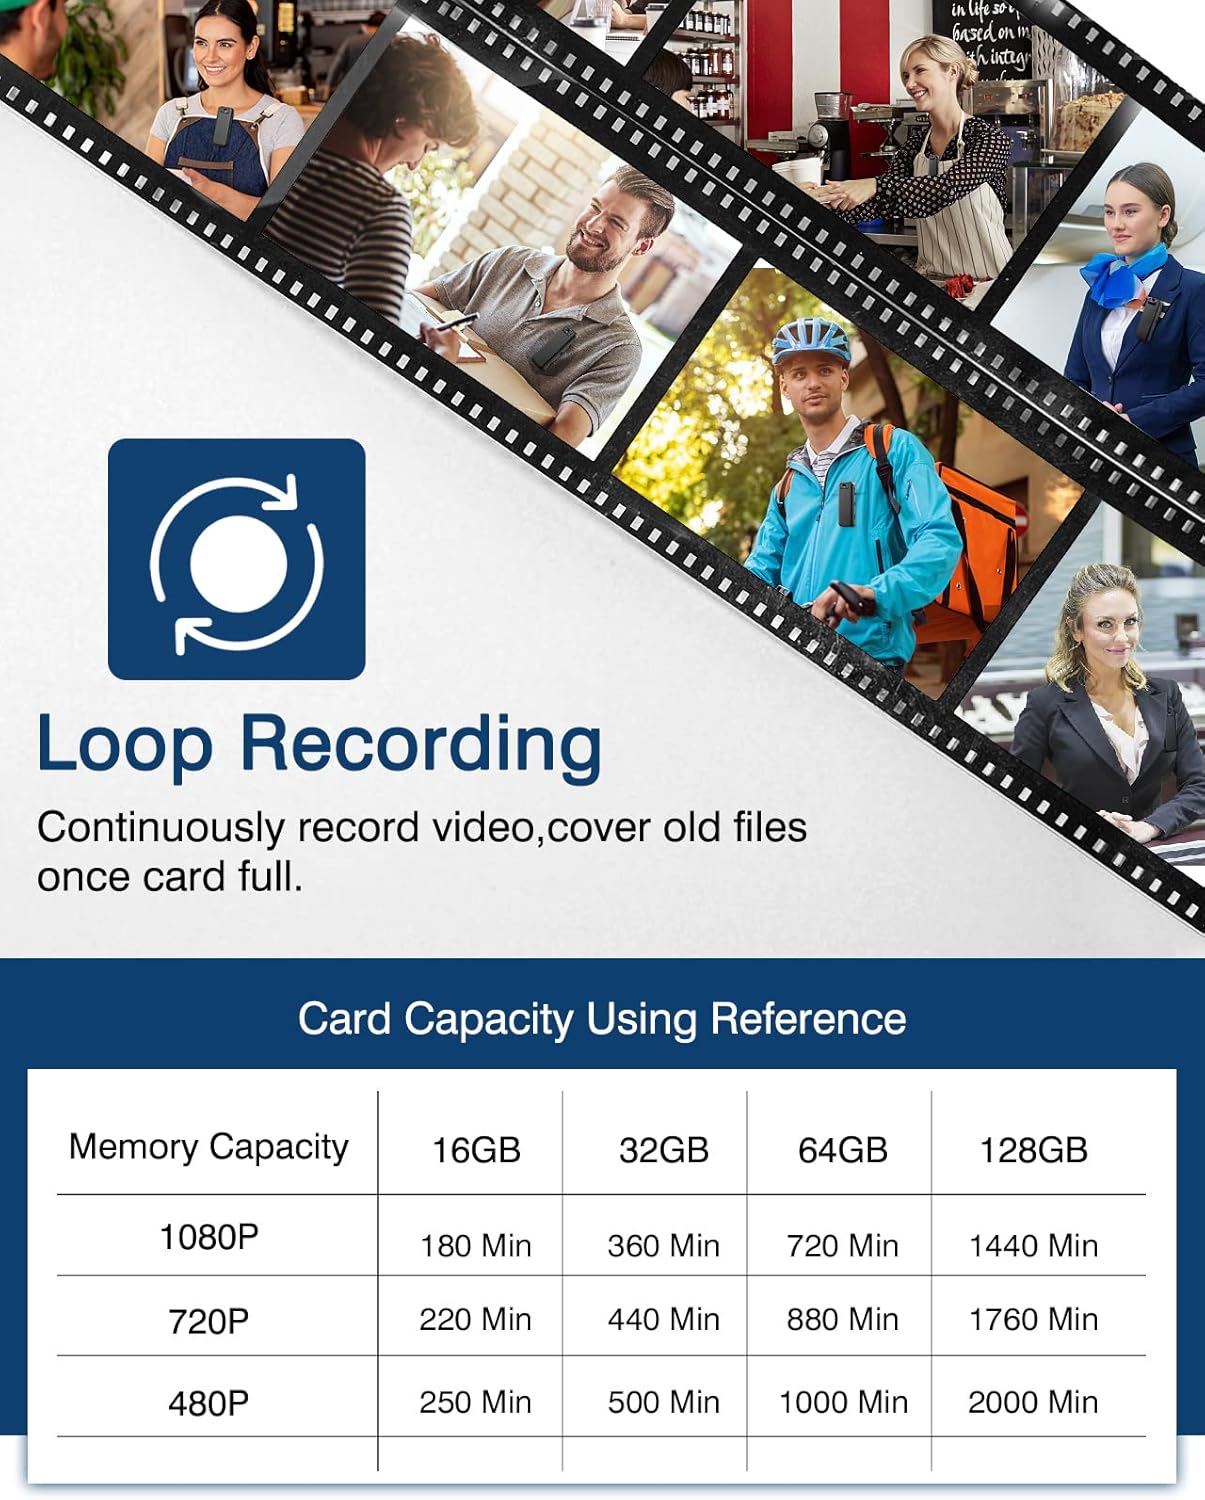
6. Loop жаздыруу
The camera supports loop recording, which means it will record video in 10-minute clips. When the memory card is full, the camera will automatically overwrite the oldest files to continue recording. This ensures continuous operation without manual deletion of old files.

Image: Explanation of the loop recording feature and a table showing approximate recording times for different memory capacities (16GB, 32GB, 64GB, 128GB) at various resolutions (1080P, 720P, 480P).
7. Night Vision (IR)
The A21 is equipped with manually activated infrared (IR) night vision. Slide the IR button upwards to activate night vision for clear black and white images in low-light or dark conditions. Slide it downwards to turn IR off. This feature is suitable for both day and night use.

Image: Comparison of recording quality during day and night, demonstrating the effectiveness of the built-in 4pcs IR light for 1080P HD video recording in dark environments.

Image: Close-up showing the IR On/Off slider for manual activation of night vision.
8. Connecting to a Computer for Playback
үчүн view жазылган files, connect the camera to your computer using the provided USB cable. The camera will appear as a removable disk, allowing you to access and transfer your video and audio files.
Техникалык тейлөө
- Тазалоо: Use a soft, dry cloth to clean the camera body. For the lens, use a specialized lens cleaning cloth and solution if necessary. Avoid harsh chemicals or abrasive materials.
- Сактагыч: Камераны салкын, кургак жерде, күндүн түз нурунан жана өтө жогорку температурадан алыс сактаңыз. Узак убакытка сакталса, батареянын жарым-жартылай заряддалганын (болжол менен 50%) текшериңиз.
- SD картага кам көрүү: Regularly back up important recordings from your Micro SD card to a computer or cloud storage. Consider formatting the SD card periodically (after backing up data) to maintain optimal performance.
Проблемаларды чечүү
| Көйгөй | Мүмкүн болгон себеп / Чечим |
|---|---|
| Камера күйбөйт. | Battery may be depleted. Charge the camera fully. Ensure the power button is pressed and held for 3 seconds. |
| Camera not recording or indicator light goes off quickly. | Ensure the Micro SD card is properly inserted and formatted. The card may be full; enable loop recording or transfer files. When starting recording, ensure the indicator light stays on for at least 7 seconds to confirm recording has begun. |
| Видео/аудио сапаты начар. | Ensure the lens is clean. Check recording resolution settings (if adjustable). Ensure sufficient lighting for non-IR recording. |
| Кирүү мүмкүн эмес fileкомпьютерде. | Ensure the USB cable is securely connected to both the camera and the computer. Try a different USB port or cable. The camera should appear as a removable drive. |
| Micro SD card not recognized or won't stay in. | Ensure the card is inserted correctly and clicks into place. If the card slot is physically damaged, contact support. For 256GB cards, ensure it's formatted to FAT32 by the camera. |
| Камера жооп бербей жатат. | Locate the reset button (often a small pinhole) and gently press it with a paperclip or similar tool to reset the device. |
Техникалык шарттар
- Модел: A21
- Видео тартуу токтому: 1080p HD
- Кадр ылдамдыгы: 30 кадр/сек
- Объектив: 180° Айлануучу
- Батарея: 1800 mAh (up to 8 hours recording, IR off)
- Заряддоо убактысы: Болжол менен 3-4 саат
- Flash Memory Installed Size: 64 ГБ (кошулган)
- Flash эстутум түрү: Micro SD (supports 8GB-128GB, Class 10)
- Байланыш технологиясы: USB
- Өзгөчө өзгөчөлүгү: Night Vision (Manual IR)
- Цикл жаздыруу: Yes (10-minute clips)
- Продукциянын өлчөмдөрү: 3.66 x 0.79 x 1.42 дюйм
- Элемент Салмагы: 5 ounces (approx. 60g/2.1oz with back clip)
- Эл аралык коргоо рейтинги: IP54
- Видео тартуу форматы: MPEG-4
Кепилдик жана колдоо
BOBLOV is committed to providing quality products and customer satisfaction.
- Акчаны кайтарып берүү/алмаштыруу: 1-Month refund or replacement for any reason.
- Аксессуарлар: 1-Year free sending or repair for accessories.
- Онлайн колдоо: Lifetime online support is provided.
For further assistance or inquiries, please visit the official BOBLOV store or contact customer support through the platform where you purchased the product.
BOBLOV Official Store: https://www.amazon.com/stores/BOBLOV/page/6BA47664-D53E-4D52-B894-912E6D24DF7F


