1. Киришүү
This manual provides detailed instructions for the installation, operation, and maintenance of your Thinkbee Wireless Light Switch Kit. Please read this manual thoroughly before installation and use to ensure proper function and safety.
2. Коопсуздук боюнча маалымат жана эскертүүлөр
- ЭСКЕРТҮҮ: Always turn off power at the circuit breaker before installing or servicing the receiver. Failure to do so may result in serious injury or death.
- The receiver requires both live and neutral wires for power. Do not install in a single-pole switch box that lacks a neutral wire.
- It is not recommended to install the switch on a metal surface or the receiver in a metal cover. Metal can block the wireless signal and reduce the remote control distance.
- Ensure all wiring connections are secure and comply with local electrical codes. If you are unsure about wiring, consult a qualified electrician.
- Do not exceed the maximum load capacity of 1000W or 10A for the receiver.
- This product is IP66 waterproof, suitable for damp locations, but avoid submerging it in water.
3. Пакеттин мазмуну
Пакетиңизде бардык буюмдар бар экенин текшериңиз:
- 1x Wireless Switch (Transmitter)
- 1x Mini Receiver
- 2x Чаптамалар
- 2x Wiring Connectors
- 1x Колдонуучунун колдонмосу (Бул документ)

Image 3.1: Components of the Thinkbee Wireless Light Switch Kit, including the switch and receiver.
4. Продукттун спецификациялары
| Компонент | Спецификация |
|---|---|
| Transmitter (Wireless Switch) | |
| Суу өткөрбөйт рейтинги | IP66 |
| Өлчөмдөр | 8.6 x 8.6 x 1.1 см |
| Иштөө температурасы | -30°C ~ +75°C |
| Батарея модели | 3V CR2032 (кошулган) |
| Алуучу | |
| Тtage | AC 80-275V |
| Composite Load | 1000 Вт |
| Максималдуу жүк | 10A |
| Өлчөмдөр | 3.9 x 2.3 x 2.2 см |
| Алыстан башкаруу режими | Радио жыштыгы |
| Common Attributes | |
| Сезимталдуулук | -116 дБ |
| Радио жыштыгы | 433.932 МГц |
| Материал | Fire protection ABS (refractory PC Chimei) |
| Remote Control Distance | Outdoor 600M (1969ft), Indoor 40M (130ft) (through-wall) |
| Сертификаттар | CE, FCC, RoHS |

Image 4.1: Detailed dimensions and specifications for the wireless switch and receiver.
5. Орнотуу боюнча нускамалар
5.1. Кабылдагычтын зымдары
- Кубатты өчүрүү: Электр иштерин баштоодон мурун, негизги автоматтык өчүргүчтөн чынжырдын кубат булагы өчүрүлгөнүн текшериңиз.
- Зымдарды аныктоо: The receiver has input and output wires.
- Input Live Line (Red)
- Input Neutral Line (Blue)
- Output Live Line (Brown)
- Output Neutral Line (Blue)
- Киргизүүнү туташтыруу: Connect the Input Live Line (Red) and Input Neutral Line (Blue) of the receiver to the corresponding live and neutral wires from your power source.
- Туташуу чыгаруу: Connect the Output Live Line (Brown) and Output Neutral Line (Blue) of the receiver to the corresponding live and neutral wires of the light fixture or appliance you wish to control.
- Коопсуз байланыштар: Use the provided wiring connectors or appropriate wire nuts to ensure all connections are secure and insulated.
- Орнотуучу кабыл алгыч: The mini receiver is designed to fit into control boxes such as canopy, distribution box, or electrical box. Ensure it is placed in a location where the signal will not be obstructed by metal.
- Күчтү калыбына келтирүү: Бардык туташуулар бекем орнотулуп, кабыл алгыч коопсуз жайгаштырылгандан кийин, автоматтык өчүргүчтөгү кубаттуулукту калыбына келтириңиз.
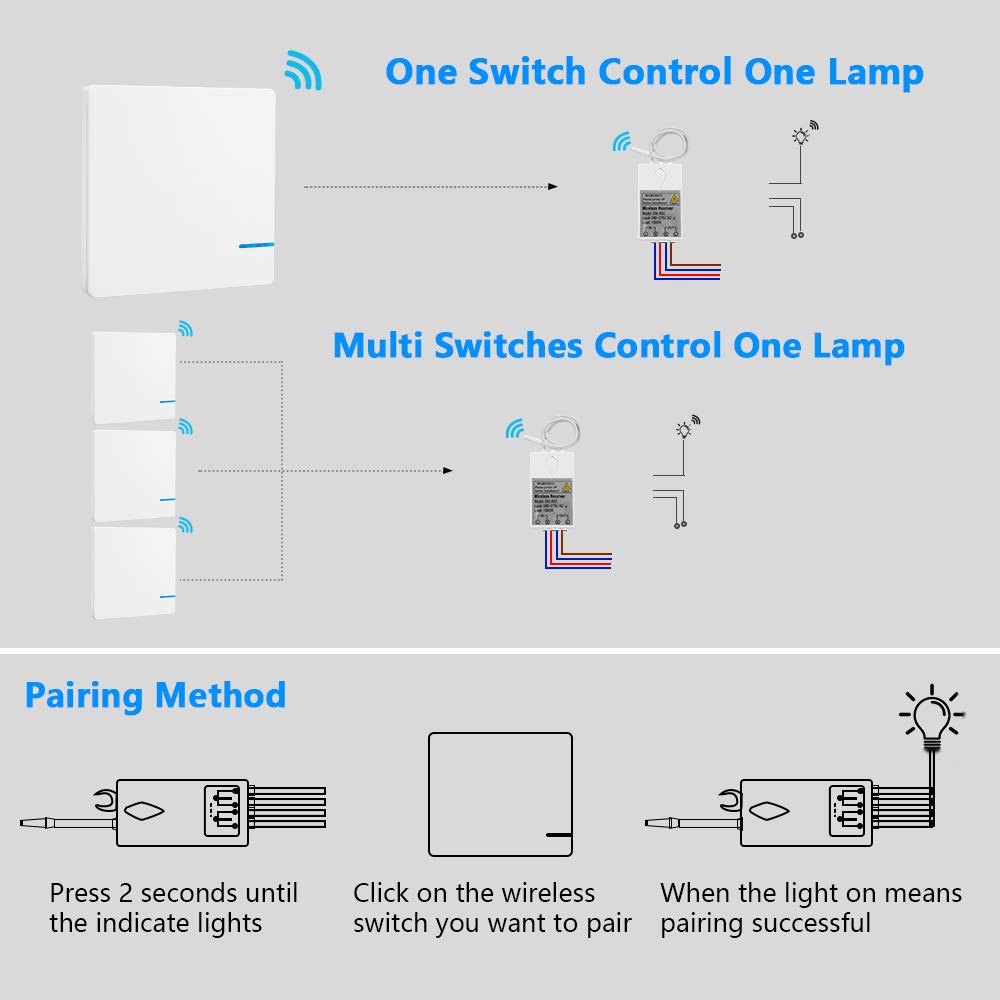
Image 5.1: Wiring diagram for connecting the receiver to a power source and a light.

Image 5.2: Visual comparison of traditional wired switch setup versus the simplified wireless switch installation.
5.2. Wireless Switch Mounting
The wireless switch does not require wiring and can be mounted in various locations:
- Клей монтаждоо: Use the provided self-adhesive stickers to attach the switch to any flat, clean surface. Ensure the surface is dry and free of dust or grease for optimal adhesion.
- Бурама орнотуу: The switch can also be mounted using screws (not included) through designated holes if a more permanent fixture is desired.

Сүрөт 5.3: Мисample of the wireless switch mounted on a wall.
6. Иштөө нускамалары
6.1. Зымсыз коммутаторду кабыл алгыч менен жупташтыруу
Follow these steps to pair your wireless switch with the receiver:
- Activate Pairing Mode on Receiver: Press and hold the pairing key on the receiver for approximately 2 seconds until the indicator light on the receiver begins to flash. This indicates the receiver is in pairing mode.
- Которуштурууну иштетүү: Within 10 seconds of the receiver entering pairing mode, click the wireless switch you wish to pair.
- Ырастоо: The light connected to the receiver will turn on, indicating successful pairing.
- Multiple Switches: One receiver can be paired with up to 8 wireless switches. Repeat the pairing process for each additional switch.

Image 6.1: Step-by-step guide for pairing the wireless switch with the receiver.
6.2. Негизги операция
Once paired, simply press the wireless switch to toggle the connected light or appliance ON/OFF.

Image 6.2: Demonstrating the simple operation of the wireless switch.
7. Техникалык тейлөө
7.1. Тазалоо
Wipe the surfaces of the wireless switch and receiver with a soft, dry cloth. Do not use abrasive cleaners or solvents.
7.2. Battery Replacement (Wireless Switch)
The wireless switch is powered by a 3V CR2032 lithium battery. The battery has a lifespan of approximately 10 years. When replacement is needed:
- Carefully pry open the switch casing батарейка бөлүмүнө жетүү үчүн.
- Эски CR2032 батареясын алып салыңыз.
- Туура полярдуулукту камсыз кылып, жаңы 3V CR2032 батарейкасын салыңыз.
- Snap the switch casing кайра бекем бириктирилет.
8. Кыйынчылыктарды
| Көйгөй | Мүмкүн себеп | Чечим |
|---|---|---|
| Жарык күйбөйт/өчпөйт. | Ресиверге электр кубаты берилбейт. Кабыл алгыч коммутатор менен жупташтырылган эмес. Зымсыз сигналдын тоскоолдуктары. Туура эмес зымдар. | Check circuit breaker and receiver power connections. Re-pair the switch and receiver (refer to Section 6.1). Ensure receiver is not in a metal enclosure; move switch closer to receiver. Бардык зымдардын туташууларынын туура жана коопсуз экенин текшериңиз. |
| Reduced remote control distance. | Obstruction by metal surfaces. Excessive distance. | Relocate the receiver or switch away from metal. Ensure the distance is within the specified indoor (40m) or outdoor (600m) range. |
| Switch indicator light does not illuminate when pressed. | Low or dead battery in wireless switch. | CR2032 батареясын алмаштырыңыз (7.2-бөлүмдү караңыз). |
9. Кепилдик жана колдоо
Thinkbee provides a no-hassle 36-month warranty for this product. For technical support, troubleshooting assistance, or warranty claims, please contact Thinkbee customer service. You can typically find contact information on the product packaging or the official Thinkbee webсайт.
Кардарларды тейлөө: 24 саат бою жеткиликтүү.


