1. Киришүү
Сатып алганыңыз үчүн рахматasing the LEICKE Portable DAB+ Radio. This device offers a versatile listening experience with DAB/DAB+ and FM radio, Bluetooth 5.0 connectivity, and various media playback options. Its compact design and rechargeable battery make it ideal for both indoor and outdoor use. Please read this manual carefully to ensure proper operation and to get the most out of your radio.
2. Коопсуздук нускамалары
- Аппаратты жамгырдын, нымдуулуктун же экстремалдык температуранын таасиринде калтырбаңыз.
- Аппаратты түшүрүүдөн же катуу таасирлерден сактаныңыз.
- Аппаратты өзүңүз ажыратпаңыз же оңдоого аракет кылбаңыз. Бардык тейлөөлөрдү квалификациялуу кызматкерлерге тапшырыңыз.
- Keep the device away from heat sources such as radiators, stoves, or other heat-producing appliances.
- Use only the provided power cable and accessories.
- Иштеп жаткан учурда аппараттын айланасында туура желдетүүнү камсыз кылыңыз.
3. Пакеттин мазмуну
Сураныч, кутучада бардык буюмдар бар экенин текшериңиз:
- 1 x LEICKE Portable DAB+ Radio
- 1 x Кубат кабели
- 1 x AUX аудио кабели
- 1 x Quick Start Guide

Сүрөт: Продукт пакетинин мазмуну.
4. Продукт бүтүп калдыview
Familiarize yourself with the radio's controls and ports.
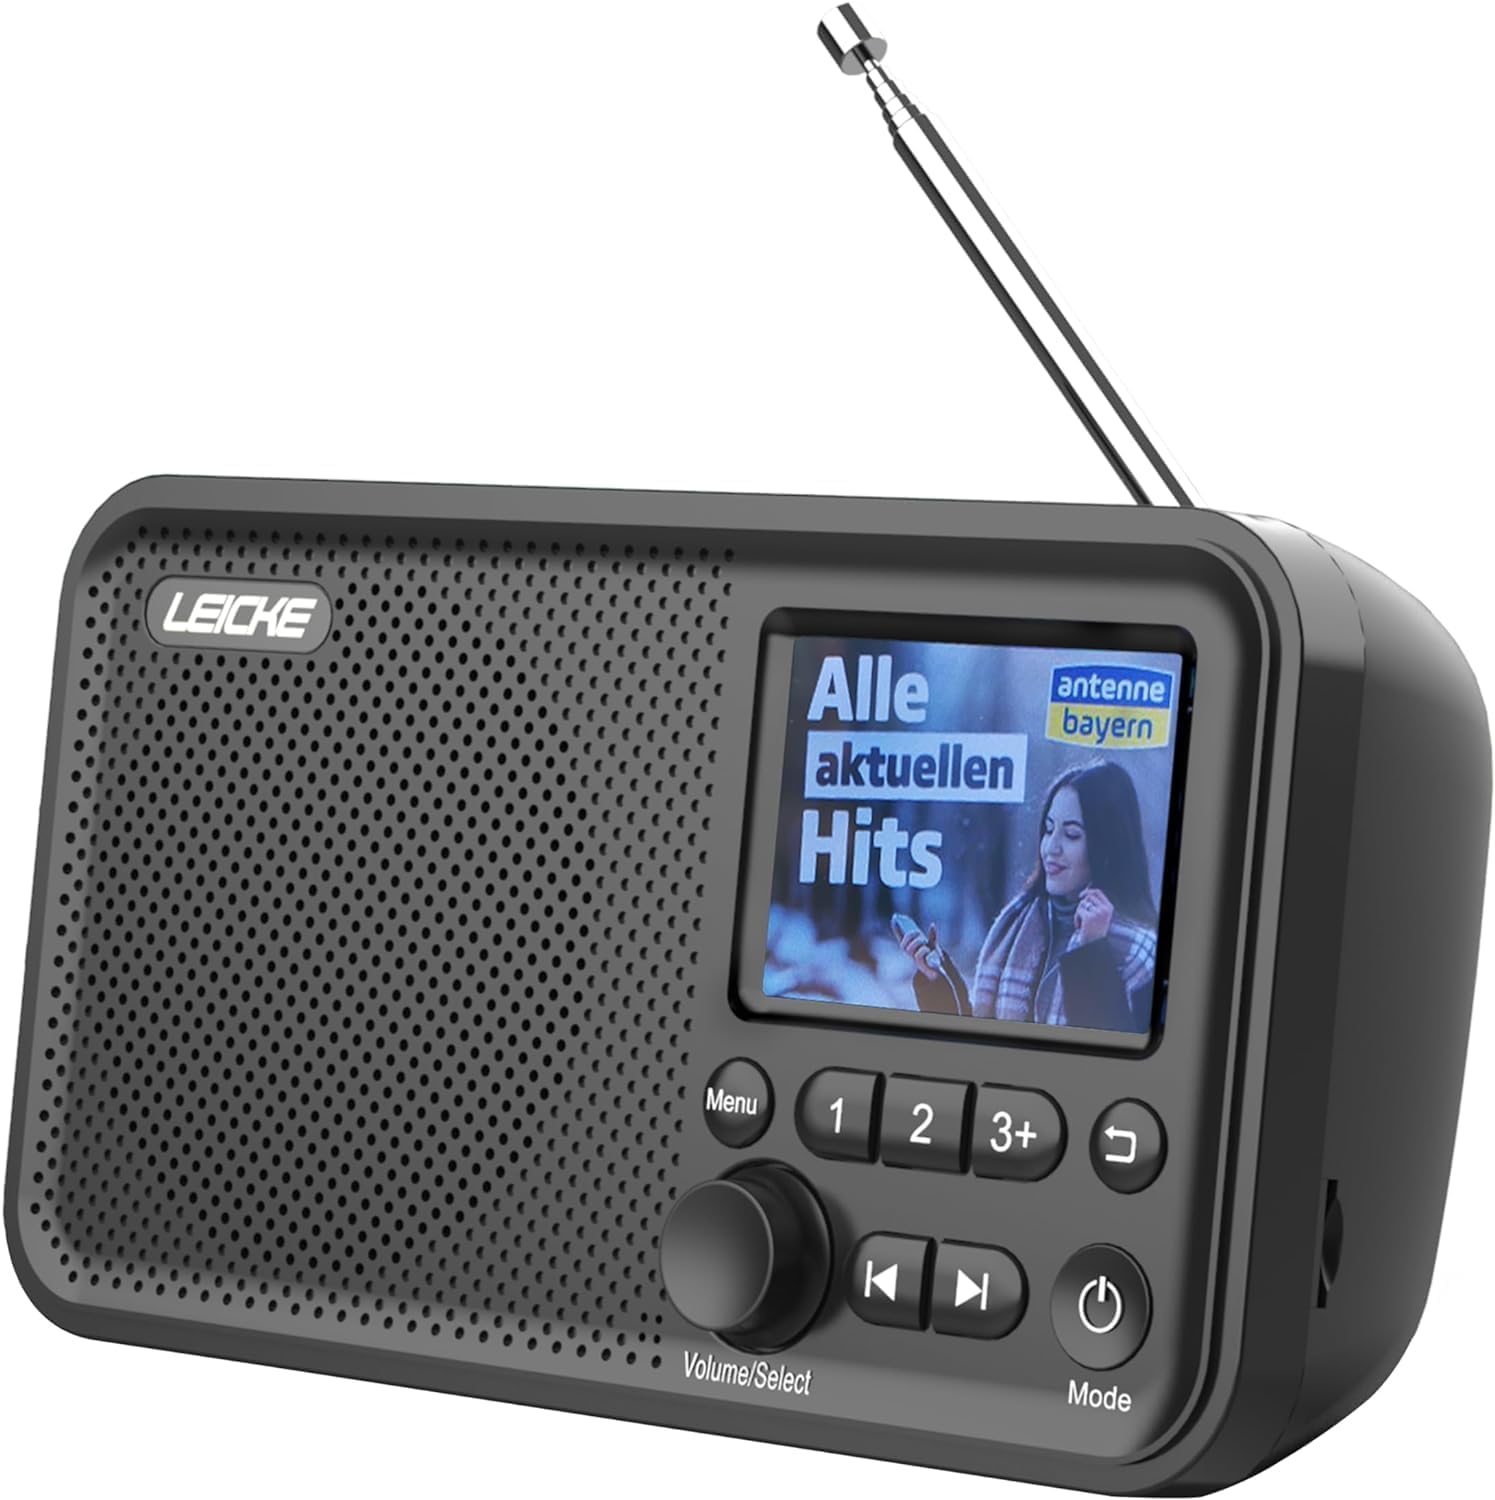
Сүрөт: алдыңкы view of the LEICKE Portable DAB+ Radio.
Башкаруу жана дисплей:
- 2.4-inch Colour Display: Станция маалыматын, убакытты жана меню параметрлерин көрсөтөт.
- Меню баскычы: Негизги менюга кирет.
- Volume/Select Knob: Үндү тууралоо же менюларды чабыттоо үчүн айланат; тандоо үчүн басыңыз.
- Preset Buttons (1, 2, 3+): Quick access to saved stations.
- Мурунку/Кийинки баскычтары: Станциялар же жолдор аркылуу багыт алат.
- Артка баскычы: Мурунку экранга кайтат.
- Кубат / режим баскычы: Turns the radio on/off and switches between modes (DAB, FM, Bluetooth, AUX, MicroSD).
Порттор жана байланыштар:

Сүрөт: Арткы view of the radio highlighting the MicroSD/TF card slot and 3.5mm headphone jack.
- Телескопиялык антенна: Оптималдуу радио кабыл алуу үчүн.
- MicroSD/TF карта уячасы: Аудио ойнотуу үчүн fileэстутум картасынан.
- 3.5 мм гарнитура уячасы: Жеке угуу үчүн.
- AUX киргизүү: Тышкы аудио түзүлүштөрдү туташтыруу үчүн.
- DC 5V порт: For charging the internal battery and powering the device.
5. Орнотуу
5.1 Батареяны заряддоо
The radio has a built-in 2000 mAh rechargeable battery. Before first use, fully charge the battery.
- Connect the provided power cable to the DC 5V port on the radio.
- Plug the other end of the power cable into a suitable USB power adapter (not always included) or a powered USB port.
- The charging indicator on the display will show the charging status.
- Once fully charged, the indicator will show a full battery icon.

Image: The radio displaying battery charging status.
5.2 Антеннаны орнотуу
For optimal radio reception, extend the telescopic antenna fully.
5.3 Initial Power On & Language Selection
- басып, кармап туруңуз Кубат/Режим радиону күйгүзүү үчүн баскыч.
- Upon first use, the radio may prompt you to select a language.
- айлантыңыз Үн/Тандоо knob to scroll through the language options.
- басыңыз Үн/Тандоо тандооңузду ырастоо үчүн баскычты басыңыз.
6. Иштөө режимдери
6.1 DAB/DAB+ радио режими
The radio supports DAB/DAB+ (Digital Audio Broadcasting) for crystal clear digital radio reception.

Image: The radio displaying radio frequency information.
6.1.1 Станцияларды издөө
- басыңыз Кубат/Режим button to switch to DAB mode.
- The radio will automatically perform a full scan for available DAB/DAB+ stations. This may take a few moments.
- Once the scan is complete, the first available station will begin playing.
6.1.2 Станцияларды тандоо
- айлантыңыз Үн/Тандоо knob to browse through the list of available stations.
- басыңыз Үн/Тандоо knob to select and tune into a station.
6.1.3 Saving Presets
You can store up to 20 DAB+ stations as presets.
- Каалаган DAB+ станциясына тууралаңыз.
- Press and hold one of the preset buttons (1, 2, же 3+) until the display confirms the station has been saved.
- For presets beyond 3, press and hold 3+, then rotate the Үн/Тандоо knob to choose a preset number (4-20), and press to confirm.
6.1.4 RDS/DLS Information
The 2.4-inch colour display shows station information (DLS - Dynamic Label Segment) and program details (RDS - Radio Data System) where available.
6.2 FM радио режими
The radio supports FM radio with RDS (Radio Data System).
6.2.1 Станцияларды издөө
- басыңыз Кубат/Режим FM режимине өтүү үчүн баскыч.
- басып, кармап туруңуз Үн/Тандоо knob to initiate an auto-scan for FM stations. The radio will scan and save all strong signals.
6.2.2 Станцияларды тандоо
- айлантыңыз Үн/Тандоо knob to manually tune the frequency.
- колдонуу Мурунку/Кийинки buttons to jump to the next available strong station.
6.2.3 Saving Presets
You can store up to 40 FM stations as presets, similar to DAB+ mode.
- Каалаган FM станциясына коюңуз.
- Press and hold one of the preset buttons (1, 2, же 3+) until the display confirms the station has been saved.
- For presets beyond 3, press and hold 3+, then rotate the Үн/Тандоо knob to choose a preset number (4-40), and press to confirm.
6.3 Bluetooth режими
Bluetooth иштетилген түзмөктөрүңүздөн аудиону зымсыз агылтыңыз.

Image: The radio displaying Bluetooth connection status.
6.3.1 Жупташуу
- басыңыз Кубат/Режим button to switch to Bluetooth mode. The display will show "Bluetooth" and indicate it's ready for pairing.
- Bluetooth түзмөгүңүздө (мисалы, смартфон, планшет) Bluetooth иштетип, жеткиликтүү түзмөктөрдү издеңиз.
- Select "LEICKE DAB Radio" from the list of devices.
- Жупташтырылгандан кийин, радио дисплейинде туташууну ырастайт.
6.3.2 Аудиону ойнотуу
- Once connected, play audio from your Bluetooth device. The sound will be output through the radio's speaker.
- колдонуу Үн/Тандоо knob on the radio or the volume controls on your connected device to adjust the volume.
- The Мурунку/Кийинки buttons on the radio can control track skipping on your connected device.
6.4 MicroSD/TF Card Playback
Аудио ойнотуу files directly from a MicroSD/TF card.
6.4.1 Inserting Card
- Ensure the radio is powered off or in another mode.
- Carefully insert a MicroSD/TF card (up to 32GB, FAT32 format) into the card slot until it clicks into place.
6.4.2 Аудиону ойнотуу
- басыңыз Кубат/Режим button to switch to MicroSD/TF mode.
- The radio will automatically start playing audio fileкартадан.
- колдонуу Мурунку/Кийинки тректер арасында өтүү үчүн баскычтар.
- айлантыңыз Үн/Тандоо үнүн тууралоо үчүн баскыч.
6.5 AUX киргизүү
Connect external audio devices using the 3.5mm AUX cable.
6.5.1 Тышкы түзмөктөрдү туташтыруу
- Connect one end of the 3.5mm AUX audio cable to the AUX input port on the radio.
- Экинчи учун тышкы түзмөгүңүздүн (мисалы, MP3 ойноткуч, смартфон) кулакчын уячасына же аудио чыгышына туташтырыңыз.
- басыңыз Кубат/Режим AUX режимине өтүү үчүн баскыч.
- Play audio from your external device. The sound will be output through the radio's speaker.
6.6 Ойготкуч функциялары
The radio features dual alarm clocks.
6.6.1 Ойготкучтарды орнотуу
- басыңыз Меню баскычы.
- айлантыңыз Үн/Тандоо knob to navigate to "Alarm" and press to select.
- Select "Alarm 1" or "Alarm 2".
- Follow the on-screen prompts to set the alarm time, source (Buzzer, DAB, or FM), frequency (Once, Daily, Weekdays, Weekends), and volume.
- басыңыз Үн/Тандоо knob to confirm each setting.
6.6.2 Snooze/Stop Alarm
- Ойготкуч басылганда, басыңыз Үн/Тандоо knob to activate snooze (alarm will sound again after a short period).
- Ойготкучту толугу менен токтотуу үчүн басыңыз Кубат/Режим баскычы.
6.7 Уйку таймери
Set the radio to automatically turn off after a specified period.
- басыңыз Меню баскычы.
- айлантыңыз Үн/Тандоо "Уйку таймерине" өтүү үчүн баскычын басып, тандоо үчүн басыңыз.
- Choose the desired sleep duration (e.g., 15, 30, 60, 90, 120 minutes, or Off).
- Тандалган убакыттан кийин радио автоматтык түрдө өчөт.
7. Техникалык тейлөө
7.1 Тазалоо
- Тазалоодон мурун ар дайым электр кабелин сууруп алыңыз.
- Радионун сыртын жумшак, кургак чүпүрөк менен сүртүңүз.
- Абразивдүү тазалагычтарды, момдорду же эриткичтерди колдонбоңуз, анткени алар финишке зыян келтириши мүмкүн.
7.2 Батареяга кам көрүү
- Батареянын иштөө мөөнөтүн узартуу үчүн, бат-баттан батарейканы толук зарядсыздандырбаңыз.
- If the radio will not be used for an extended period, charge it fully before storage and recharge every few months.
7.3 Сактоо
- Store the radio in a cool, dry place, away from direct sunlight and extreme temperatures.
8. Кыйынчылыктарды
If you encounter issues with your radio, please refer to the following table:
| Көйгөй | Мүмкүн себеп | Чечим |
|---|---|---|
| No power/Radio won't turn on | Батарея түгөндү; Кубат кабели туура эмес туташтырылган. | Батареяны заряддоо; Кубат кабели коопсуз туташтырылганын текшериңиз. |
| Радио кабыл алуу начар (DAB/FM) | Антенна узартылган эмес; Сигнал аймагы алсыз; Интерференция. | Fully extend the telescopic antenna; Relocate the radio to an area with better signal; Move away from other electronic devices. |
| Bluetooth туташпай жатат | Радио Bluetooth режиминде эмес; Түзмөк жупташтыруу режиминде эмес; Башка түзмөккө мурунтан эле туташкан. | Switch radio to Bluetooth mode; Ensure your device's Bluetooth is on and searching; Disconnect from other devices. |
| No sound from MicroSD/TF card | Card not inserted correctly; Unsupported file формат; Бузулган files. | Reinsert the card; Ensure files are in a supported format (e.g., MP3); Try a different card. |
| Дисплей бош же тоңуп калган | Убактылуу программалык ката. | Press and hold the Power/Mode button for 10 seconds to force a restart. |
9. Техникалык шарттар

Image: Dimensions of the LEICKE Portable DAB+ Radio.
| Өзгөчөлүк | Деталь |
|---|---|
| Модель номери | EP18227 |
| Бренд | ЛЕЙК |
| DAB/DAB+ жыштыгы | 174-240 МГц |
| FM жыштыгы | 87.5 - 108 МГц |
| Bluetooth версиясы | 5.0 |
| Дисплей | 2.4 inch Colour LCD |
| Алдын ала орнотуулар | 60 (40 FM, 20 DAB+) |
| Батарея сыйымдуулугу | 2000 мАч |
| Power Source | Battery Powered / DC 5V |
| Байланыш | Bluetooth, Auxiliary, MicroSD/TF |
| Продукциянын өлчөмдөрү | 17 x 5.5 x 9.5 см (болжол менен) |
| Салмагы | 370 г (болжол менен) |
10. Кепилдик жана колдоо
LEICKE products come with a standard manufacturer's warranty. For detailed warranty terms and conditions, please refer to the warranty card included with your product or visit the official LEICKE webсайт.
If you require technical support or have any questions regarding your LEICKE Portable DAB+ Radio, please contact LEICKE customer service through the following channels:
- Webсайт: www.leicke.com
- Электрондук почта: Refer to the contact information on the LEICKE website or your quick start guide.
Please have your model number (EP18227) and purchase details ready when contacting support.


