1. Киришүү
Thank you for choosing the PRIXTON Cinema Mini Projector. This compact and versatile projector is designed to provide an immersive viewing experience for movies, games, and presentations. Its multiple connectivity options and portable design make it ideal for various environments. Please read this manual carefully before using the projector to ensure proper operation and to maximize its lifespan.
2. Коопсуздук маалыматы
- Электр камсыздоо: Белгиленген кубат адаптерин гана колдонуңуз. Voltage сиздин аймагыңызга шайкеш келет.
- Вентиляция: Желдетүүчү тешиктерди жаппаңыз. Ашыкча ысып кетүүнүн алдын алуу үчүн проектордун айланасында абанын туура айланышы үчүн жетиштүү орун бар экенин текшериңиз.
- Көздүн коопсуздугу: l болгондо проектордун объективине тике карабаamp күйүк. Жарык жарык көзгө зыян келтириши мүмкүн.
- Суу жана ным: Проекторду суудан, жамгырдан жана ашыкча нымдуулуктан алыс кармаңыз. Суу кол менен иштетпеңиз.
- Тазалоо: Тазалоодон мурун электр кубатынан сууруп алыңыз. Жумшак, кургак чүпүрөктү колдонуңуз. Суюк тазалоочу каражаттарды колдонбоңуз.
- Жайгашкан жери: Проекторду туруктуу, тегиз бетке коюңуз. Аны күн нуру түз тийген жерге же жылуулук булактарына жакын койбоңуз.
- Балдар: Keep the projector and its accessories out of reach of children.
3. Пакеттин мазмуну
Пакетиңизде бардык буюмдар бар экенин текшериңиз:
- PRIXTON Cinema Mini проектор
- Алыстан башкаруу
- Кубаттуу адаптер
- User Manual
4. Продукт бүтүп калдыview
Familiarize yourself with the various parts of your PRIXTON Cinema Mini Projector.
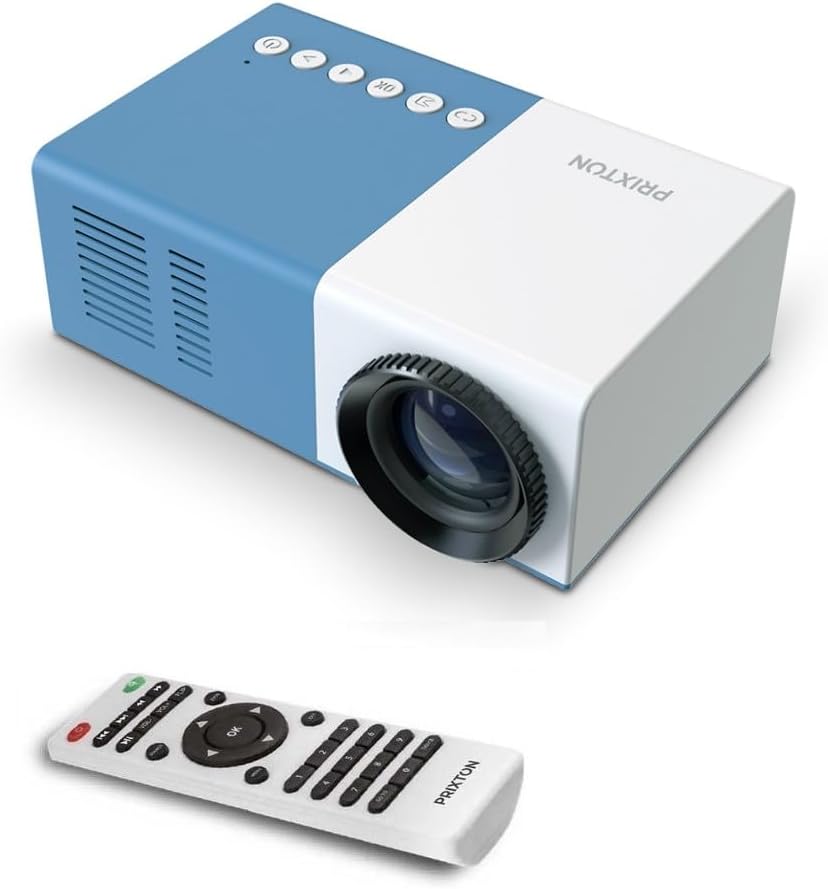
4.1-сүрөт: Алдыңкы жана үстү View of the PRIXTON Cinema Mini Projector with its remote control. The projector is blue and white, showing the lens, control buttons, and the included remote.
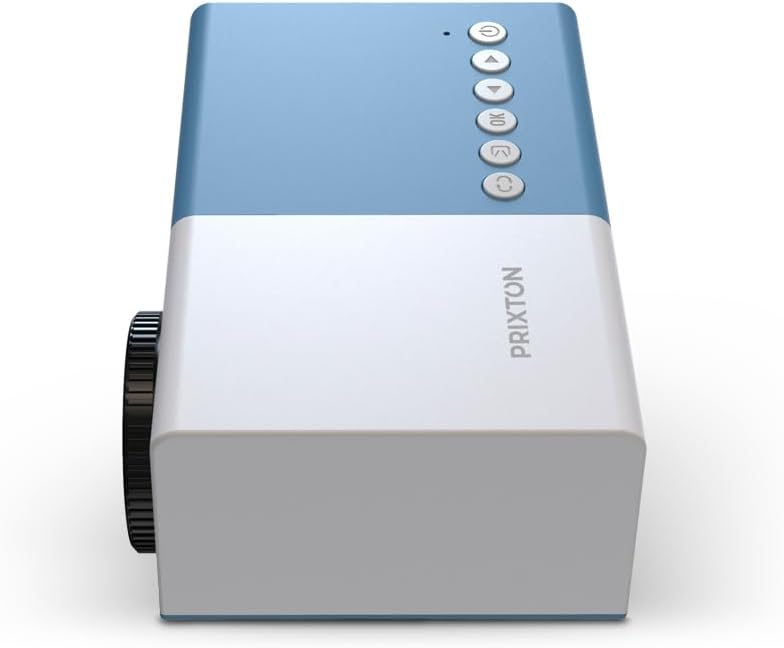
4.2-сүрөт: Жогорку view of the projector, highlighting the control buttons (Power, Menu, OK, Navigation) and the focus wheel on the side.
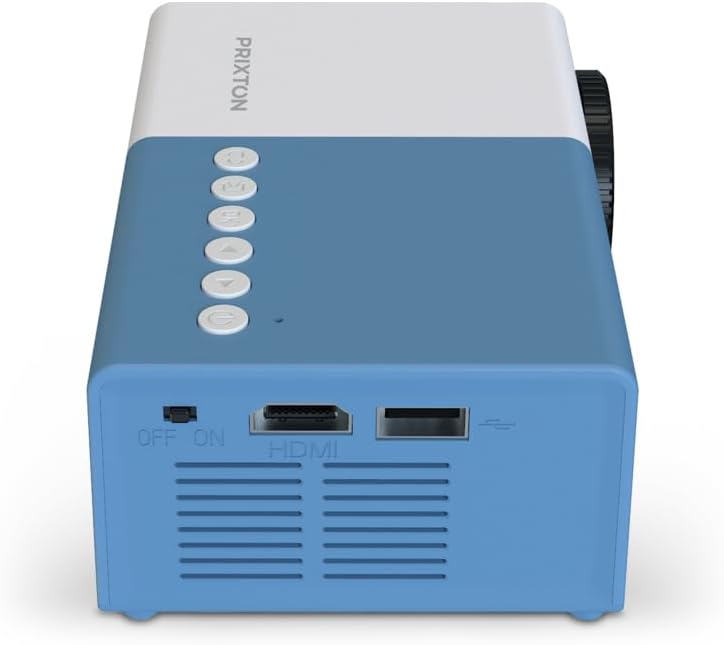
4.3-сүрөт: Арткы view of the projector, showing the power switch, HDMI port, USB port, and ventilation grilles.

4.4-сүрөт: Side view of the projector, displaying the MicroSD card slot, AV In port, and additional ventilation.
Компоненттери:
- Объектив: Сүрөттү экранга проекциялайт.
- Фокус дөңгөлөк: Сүрөттүн тунуктугун тууралайт.
- Башкаруу баскычтары: Power, Menu, OK, and navigation buttons for on-device control.
- Кубат которгучу: Проекторду күйгүзөт же өчүрөт.
- HDMI порту: Connects to devices like laptops, streaming sticks, and game consoles.
- USB порт: USB дисктерден медиа ойнотуу үчүн.
- MicroSD слоту: For media playback from MicroSD cards.
- AV ичинде: Connects to older devices using an AV cable.
- Интегралдык спикер: Аудио чыгарууну камсыз кылат.
5. Орнотуу
5.1 Кубат туташтыруу
- Кубат адаптерин проектордун кубат киргизүү портуна туташтырыңыз.
- Кубат адаптерин розеткага сайыңыз.
- Flip the power switch on the projector to the 'ON' position. The power indicator light should illuminate.
5.2 Жайгаштыруу жана проекциялоо
Place the projector on a stable surface, ensuring the lens is facing the projection surface (wall or screen).

5.1-сүрөт: Illustration of projection distance and screen size. The projector can project images between 24 and 60 inches, with a maximum distance of 2 meters from the surface.
- For optimal image quality, ensure the room is dark.
- The projector can display images from 24 inches to 60 inches.
- The optimal projection distance is up to 2 meters (approximately 6.5 feet). Adjust the distance to achieve your desired screen size.
6. Иштөө
6.1 Күйгүзүү/өчүрүү
- Күйгүзүү үчүн: After connecting power, press the Power button on the projector or the remote control.
- Өчүрүү үчүн: Кубат баскычын кайра басыңыз. Суралса, өчүрүүнү ырастаңыз.
6.2 Фокусту тууралоо
After powering on, the image may appear blurry. Use the focus wheel located on the side of the projector to sharpen the image until it is clear.
6.3 Булакты тандоо
To select an input source (HDMI, USB, MicroSD, AV):
- Press the 'Source' or 'Input' button on the remote control or the projector.
- Use the navigation buttons to highlight your desired input source.
- Тандооңузду ырастоо үчүн "OK" баскычын басыңыз.
7. Байланыш
The PRIXTON Cinema Mini Projector offers multiple ways to connect your devices.
7.1 HDMI туташуу
Connect devices such as laptops, streaming sticks (e.g., Chromecast, Fire TV Stick), game consoles, or Blu-ray players using an HDMI cable.
- Connect one end of the HDMI cable to your device and the other end to the HDMI port on the projector.
- Select 'HDMI' as the input source (refer to Section 6.3).
7.2 USB and MicroSD Playback
The projector supports direct media playback from USB drives and MicroSD cards.
- Insert your USB drive into the USB port or your MicroSD card into the MicroSD slot.
- Select 'USB' or 'MicroSD' as the input source.
- аркылуу чабыттоо files using the remote control and select the media you wish to play.
7.3 AV In Connection
For older devices that use composite video and stereo audio (RCA), connect them via the AV In port.
- Connect the AV cable from your device to the AV In port on the projector.
- Select 'AV' as the input source.
8. Аудио чыгаруу
The projector features an integrated stereo speaker, providing audio for your content. Volume can be adjusted using the remote control.

8.1-сүрөт: The PRIXTON Cinema Mini Projector in use, projecting content in a living room environment, demonstrating its portability and ease of setup for home entertainment.
9. Техникалык тейлөө
9.1 Линзаны тазалоо
Оптикалык линзалар үчүн атайын иштелип чыккан жумшак, мамыксыз чүпүрөктү колдонуңуз. Абразивдүү тазалоочу каражаттарды же ашыкча күч колдонбоңуз, анткени бул линзаны чийип алышы мүмкүн.
9.2 Проектордун корпусун тазалоо
Wipe the exterior of the projector with a soft, dry cloth. Avoid using chemical cleaners that may damage the finish.
9.3 Вентиляция
Regularly check that the ventilation grilles are free from dust and debris to ensure proper heat dissipation and prevent overheating.
9.4 Сактоо
When not in use, store the projector in a cool, dry place, away from direct sunlight and extreme temperatures. If possible, use the original packaging or a protective case.
10. Кыйынчылыктарды
Эгерде сиз проекторуңуз менен көйгөйлөргө туш болсоңуз, төмөнкү кеңири таралган көйгөйлөрдү жана чечимдерди караңыз.
| Көйгөй | Мүмкүн себеп | Чечим |
|---|---|---|
| Экранда сүрөт жок | No power; Incorrect input source; Cable not connected. | Check power connection and switch; Select correct input source; Ensure HDMI/AV/USB cable is securely connected. |
| Сүрөт бүдөмүк | Фокус туураланган эмес; Проектор өтө жакын/алыс. | Adjust the focus wheel; Adjust projection distance. |
| Үн жок | Volume too low; Muted; Source device audio issue. | Increase volume; Unmute projector; Check audio settings on source device. |
| Пульт иштебей жатат | Batteries low/dead; Obstruction; Remote not aimed at sensor. | Replace batteries; Remove obstructions; Aim remote directly at the projector's IR sensor. |
| Проектор ысып, өчүп калат | Бөгөттөлгөн желдетүү; Узак убакытка колдонуу. | Ensure vents are clear; Allow projector to cool down; Operate in a well-ventilated area. |
11. Техникалык шарттар
Technical specifications for the PRIXTON Cinema Mini Projector.
| Өзгөчөлүк | Спецификация |
|---|---|
| Бренд | Прикстон |
| Модель номери | Cinema Mini |
| Түс | Көк |
| Проекциялоо технологиясы | LED |
| Native Resolution | QVGA 320 x 240 |
| Колдоого алынган резолюция | Up to Full HD (1920 x 1080) |
| Жарыктык | 900 Lumens (15 ANSI Lumens) |
| Проекциянын өлчөмү | 24" - 60" |
| Проекциялык аралык | 2 метрге чейин |
| Байланыш | HDMI, USB, MicroSD, AV In |
| Аудио чыгаруу | Интеграцияланган стерео спикер |
| Өзгөчөлүктөр | Жеңил, портативдик |
| Камтылган компоненттер | Алыстан башкаруу |
12. Кепилдик жана колдоо
For warranty information, please refer to the documentation provided at the time of purchase or contact your retailer. Information regarding spare parts availability and software updates is not available in this manual. For further assistance or technical support, please visit the official PRIXTON webсайтка же кардарларды тейлөөгө кайрылыңыз.


