1. Киришүү
This manual provides comprehensive instructions for the installation, operation, maintenance, and troubleshooting of your MAXSUN A520 M-ATX Motherboard. Please read this manual thoroughly before proceeding with any installation or operation to ensure proper functionality and to prevent damage to your components.
The MAXSUN A520 M-ATX Motherboard supports AMD AM4 Zen 3 processors, DDR4 memory, PCIe 3.0 x16, SATA 6Gb/s, M.2, USB 3.1, and offers HDMI/VGA outputs. It is designed for compatibility with all Ryzen 1000-4000 Series APU/CPU and Ryzen 5000 Series CPU. Note that 5000 Series APUs may require a BIOS flash to activate the internal GPU.

The MAXSUN A520M M-ATX Motherboard, shown alongside its retail packaging.
2. Motherboard Layout
Энелик платаңыздагы ар кандай компоненттер жана туташтыргычтар менен таанышып алыңыз.

An angled perspective of the MAXSUN A520M Motherboard, highlighting its compact M-ATX form factor and component layout.

Деталдаштырылган view of the motherboard's PCIe 3.0 slots, including one PCIe 3.0 x16 slot for graphics cards and one PCIe 3.0 x1 slot for expansion cards.

Illustration showing the dual DDR4 memory slots and the M.2 NVMe SSD slot, compatible with SATA, for high-speed storage.

View of the motherboard's power delivery system, featuring 3+2 phases pure digital PWM for stable power to the CPU.
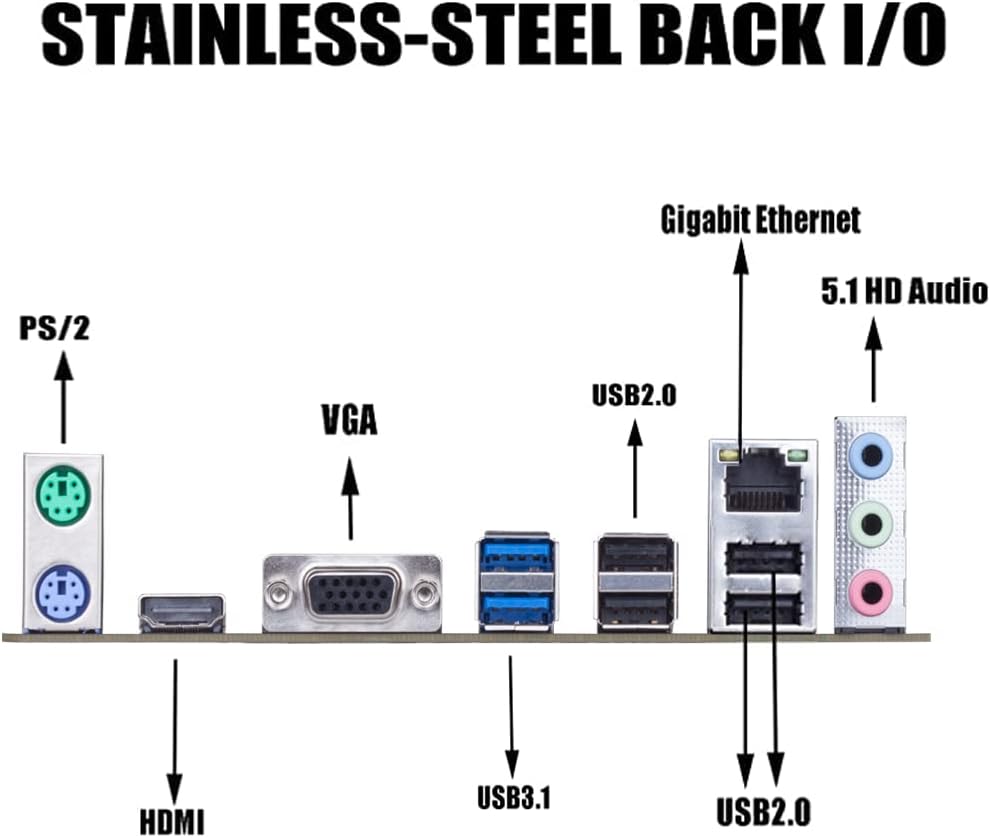
The rear input/output panel, showcasing ports such as PS/2, HDMI, VGA, USB 3.1, USB 2.0, Gigabit Ethernet, and 5.1 HD Audio jacks.

Үстүбүздөгү чыгым view of the entire MAXSUN A520M Motherboard, providing a comprehensive look at all its components and connectors.
3. Орнотуу жана орнотуу
3.1. CPU орнотуу
AMD AM4 процессоруңузду энелик платадагы розеткага кылдаттык менен тууралаңыз. CPUдагы үч бурчтук розеткадагы үч бурчтукка дал келишин текшериңиз. Процессорду бекемдөө үчүн кармап туруучу колду түшүрүңүз.
3.2. RAM орнотуу
This motherboard supports Dual Channel DDR4 memory. Open the clips on both ends of the memory slots. Align the notch on the RAM module with the key in the slot, then press down firmly on both ends until the clips snap into place.
3.3. Сактоочу жайды орнотуу
The motherboard features an M.2 NVMe SSD slot and SATA 6Gb/s ports. For M.2 SSDs, insert the drive into the slot at an angle and secure it with the provided screw (ensure your M.2 drive comes with one, as the motherboard package may not include it). For SATA drives, connect the SATA data cable to the motherboard and the drive, and ensure the power cable is connected from your power supply.
3.4. Электр байланыштары
Connect the 24-pin ATX power connector and the 8-pin CPU power connector from your power supply to the corresponding ports on the motherboard. Ensure all connections are secure.
3.5. Front Panel Connections
Connect the front panel headers (power button, reset button, USB ports, audio jacks, etc.) to the corresponding pins on the motherboard. Refer to the motherboard's detailed diagram for precise pin assignments.
3.6. BIOS жаңыртуу
Updating the BIOS may be necessary for compatibility with newer CPUs, especially AMD Ryzen 5000 Series APUs. This process typically involves downloading the latest BIOS file from the MAXSUN support website and flashing it using a USB drive. Ensure all hard drives (M.2 and SATA SSDs) are disconnected before proceeding with a BIOS update to prevent data loss or corruption.
This video provides a step-by-step guide on how to update the BIOS for your MAXSUN motherboard using a USB storage device. It covers preparing the USB, downloading the BIOS file, configuring BIOS settings, and initiating the flash process.
4. Операциялық системаны орнотуу
After assembling your system, you can proceed with installing your preferred operating system. Insert your OS installation media (USB drive or DVD) and follow the on-screen prompts. You may need to adjust the boot order in the BIOS to boot from the installation media.
5. Drivers and Software
For optimal performance and stability, install the latest drivers for your motherboard's components. These include chipset drivers, graphics drivers (if using an integrated GPU or dedicated graphics card), audio drivers, and LAN drivers. Drivers can typically be found on the MAXSUN support webсайт.
6. Техникалык тейлөө жана кам көрүү
- Чаңды тазалоо: Regularly clean dust from the motherboard and other components using compressed air. Accumulation of dust can lead to overheating and reduced performance.
- Туура иштетүү: Always handle the motherboard by its edges to avoid touching sensitive components or circuits. Use an anti-static wrist strap when working inside your PC.
- BIOS жаңыртуулары: Only update the BIOS when necessary, such as for new CPU support or critical bug fixes. Follow the update procedure carefully to avoid damaging the BIOS.
7. Кыйынчылыктарды
- No Boot/POST Errors: Ensure all power cables are securely connected. Verify that RAM modules are properly seated in their slots. Check CPU and GPU seating. If the system fails to POST (Power-On Self-Test), listen for beep codes or check for diagnostic LEDs on the motherboard (if available) to identify the issue.
- Айдоочу маселелери: If a component is not functioning correctly after OS installation, ensure the correct drivers are installed. Download the latest drivers directly from the MAXSUN website or the component manufacturer's webсайт.
- Сактагыч табылган жок: Verify SATA data and power connections for traditional drives. For M.2 SSDs, ensure it is properly seated and secured. Some M.2 slots may share bandwidth with SATA ports, disabling certain SATA ports when an M.2 drive is used. Consult the motherboard's detailed manual for specific configurations.
- Bent CPU Pins: Exercise extreme caution when installing the CPU. Bent pins can prevent the system from booting. If pins are bent, professional repair may be required.
8. Техникалык шарттар
| Өзгөчөлүк | Спецификация |
|---|---|
| Бренд | MAXSUN |
| Модель аты | A520M CHALLENGER Motherboard |
| CPU розетка | Розетка AM4 |
| Шайкеш процессорлор | Ryzen 1000, 2000, 3000, 4000 Series CPU, Ryzen 5000 Series WITHOUT Internal GPU |
| RAM эс технологиясы | DDR4 |
| Memory Clock Speed | 2400 МГц |
| Чипсет түрү | AMD A520 |
| Пакеттин өлчөмдөрү | 10.24 x 9.88 x 2.32 дюйм |
| Элемент Салмагы | 1.54 фунт |
| Платформа | Linux |
9. Кепилдик жана колдоо
MAXSUN products are covered by a limited warranty. For detailed warranty terms, conditions, and duration, please refer to the warranty information included with your product or visit the official MAXSUN website. For technical support, driver downloads, and further assistance, please visit the MAXSUN Official Support Site.


