1. Киришүү
This manual provides essential information for the assembly, operation, maintenance, and troubleshooting of your HONEY JOY 6V Kids Electric Chopper Motorcycle. Please read all instructions carefully before use to ensure safe and proper operation.

Image 1.1: The HONEY JOY 6V Kids Electric Chopper Motorcycle in use, highlighting the importance of supervision.
2. Коопсуздук маалыматы
Your HONEY JOY Kids Electric Chopper Motorcycle is designed for safe play when used correctly. It is CPC and ASTM approved, ensuring it meets safety standards. Adult supervision is required at all times.
2.1 Жалпы коопсуздук эрежелери
- Операция учурунда балдарды дайыма көзөмөлдөп туруңуз.
- Баланын тийиштүү коопсуздук каражаттарын, анын ичинде туулга кийип турганын текшериңиз.
- Do not operate on public roads, near motor vehicles, steep inclines, swimming pools, or other bodies of water.
- Operate only on flat, dry surfaces such as sidewalks, driveways, or playgrounds.
- Колду, чачты жана кийимди кыймылдуу бөлүктөрдөн алыс кармаңыз.
- 66 LBS максималдуу салмагы кубаттуулугу ашпагыла.
- Ensure all bolts and fasteners are securely tightened before each use.

Image 2.1: Safety certifications and features of the motorcycle.
3. Орнотуу жана чогултуу
Follow these steps to assemble your HONEY JOY Kids Electric Chopper Motorcycle. Refer to the assembly video for visual guidance.
3.1 Жыйноо видеосу
Video 3.1: Official assembly guide for the HONEY JOY Kids Electric Chopper Motorcycle.
This video demonstrates the step-by-step process of assembling the motorcycle, including attaching the handlebars, front wheel, and backrest.
3.2 Этап-этабы менен монтаждоо нускамалары
- Руткаларды тиркөө: Insert the handlebar assembly into the front fork. Secure it using the provided M6*30 bolts and M6 nuts. Ensure the handlebars are firmly in place.
- Install Front Fender: Slide the pink front fender onto the front fork assembly.
- Mount Front Wheel: Place the front wheel between the forks. Insert the axle (parts 10+11+12) through the wheel and forks, securing it with the M5 nuts on both sides.
- Connect Headlight Wiring: Connect the wiring from the headlight assembly to the main body of the motorcycle.
- Secure Headlight: Attach the headlight assembly to the front of the motorcycle using the M5*37 bolts and M5 nuts.
- Артка орнотуу: Insert the backrest into its designated slot at the rear of the seat. Secure it by tightening the 2*M3.5*12 screw bolts from underneath the seat.
- Арткы жакты бекитүүview Күзгүлөр: артын бураңызview mirrors into the designated holes on the handlebars. Tighten them securely.

Image 3.2: The fully assembled electric chopper motorcycle.
4. Иштөө нускамалары
Балага мотоциклди айдоого уруксат берүүдөн мурун, башкаруу элементтери менен таанышып алыңыз.
4.1 Controls Overview
- General Power Switch: Located on the dashboard, turns the motorcycle on or off.
- Алдыга/Артка которуу: Selects the driving direction.
- Бут педалы: Press to accelerate, release to brake or slow down.
- Мүйүз баскычы: Activates the horn sound.
- Музыка баскычы: Plays pre-installed music.
- Фара: жарыктандырууну камсыз кылат.

Image 4.1: Dashboard controls for the electric motorcycle.
4.2 Баштоо жана айдоо
- Ensure the motorcycle is fully charged.
- күйгүзүңүз General Power Switch.
- Экөөнү тандаңыз Алга or Тескери которгучту колдонуу.
- басыңыз Бут педалы to begin moving. Release the pedal to stop.
- колдонуу Мүйүз баскычы жана Музыка баскычы for entertainment.

Image 4.2: A child driving the motorcycle, illustrating the 'real driving experience'.
5. Техникалык тейлөө
Regular maintenance ensures the longevity and safe operation of your electric motorcycle.
5.1 Батареяны заряддоо
- Locate the charging input socket, typically near the foot pedal.
- Connect the charger to the socket and then plug it into a standard wall outlet.
- Charge the 6V battery for 8-12 hours before first use, and for 8-12 hours after each use, or until fully charged. Do not overcharge.
- Заряддоо аяктагандан кийин заряддагычты ажыратыңыз.

Image 5.1: Key features including the charging input socket.
5.2 Тазалоо жана сактоо
- Мотоциклди жумшак, d менен сүртүңүзamp кездеме. Абразивдүү тазалагычтарды же эриткичтерди колдонбоңуз.
- Электр компоненттерине түз суу чачпаңыз.
- Мотоциклди кургак, салкын жерде, күн нуру түз тийбеген жана нымдуулуктан алыс сактаңыз.
- If storing for an extended period, charge the battery fully every 30 days to maintain battery life.
6. Кыйынчылыктарды
Эгер көйгөйлөргө туш болсоңуз, төмөнкү жалпы көйгөйлөрдү жана аларды чечүү жолдорун караңыз.
| Көйгөй | Мүмкүн себеп | Чечим |
|---|---|---|
| Мотоцикл кыймылдабай жатат | Батарея аз же өлүп калды Кубат өчүргүч өчүк Бошоң зымдар байланышы | Батареяны заряддаңыз Кубат которгучун күйгүзүңүз Check all wiring connections |
| Мотоцикл жай жүрөт | Батарея заряды аз Overloaded (exceeds weight capacity) Тегиз эмес же жумшак беттерде иштөө | Батареяны кайра заряддаңыз Жүргүнчүнүн салмагы белгиленген чекте экенине ынаныңыз Move to a flat, hard surface |
| No sound from horn/music | Бошоң зымдар Компоненттин бузулушу | Зымдарды байланыштарды текшериңиз Көйгөй чечилбесе, кардарларды колдоо кызматына кайрылыңыз |
7. Техникалык шарттар
| Өзгөчөлүк | Деталь |
|---|---|
| Продукциянын өлчөмдөрү | 36 x 19 x 25 дюйм (L x W x H) |
| Элемент Салмагы | 14 фунт |
| Батарея | DC 6 V, 4.5AH (1 Nonstandard Battery required) |
| Ылдамдык | 1.6-1.9 миль/саат |
| Салмак сыйымдуулугу | 66 фунт |
| Сунушталган Жаш | 3 жаш жана андан жогору |
| Материал | PP + Metal |
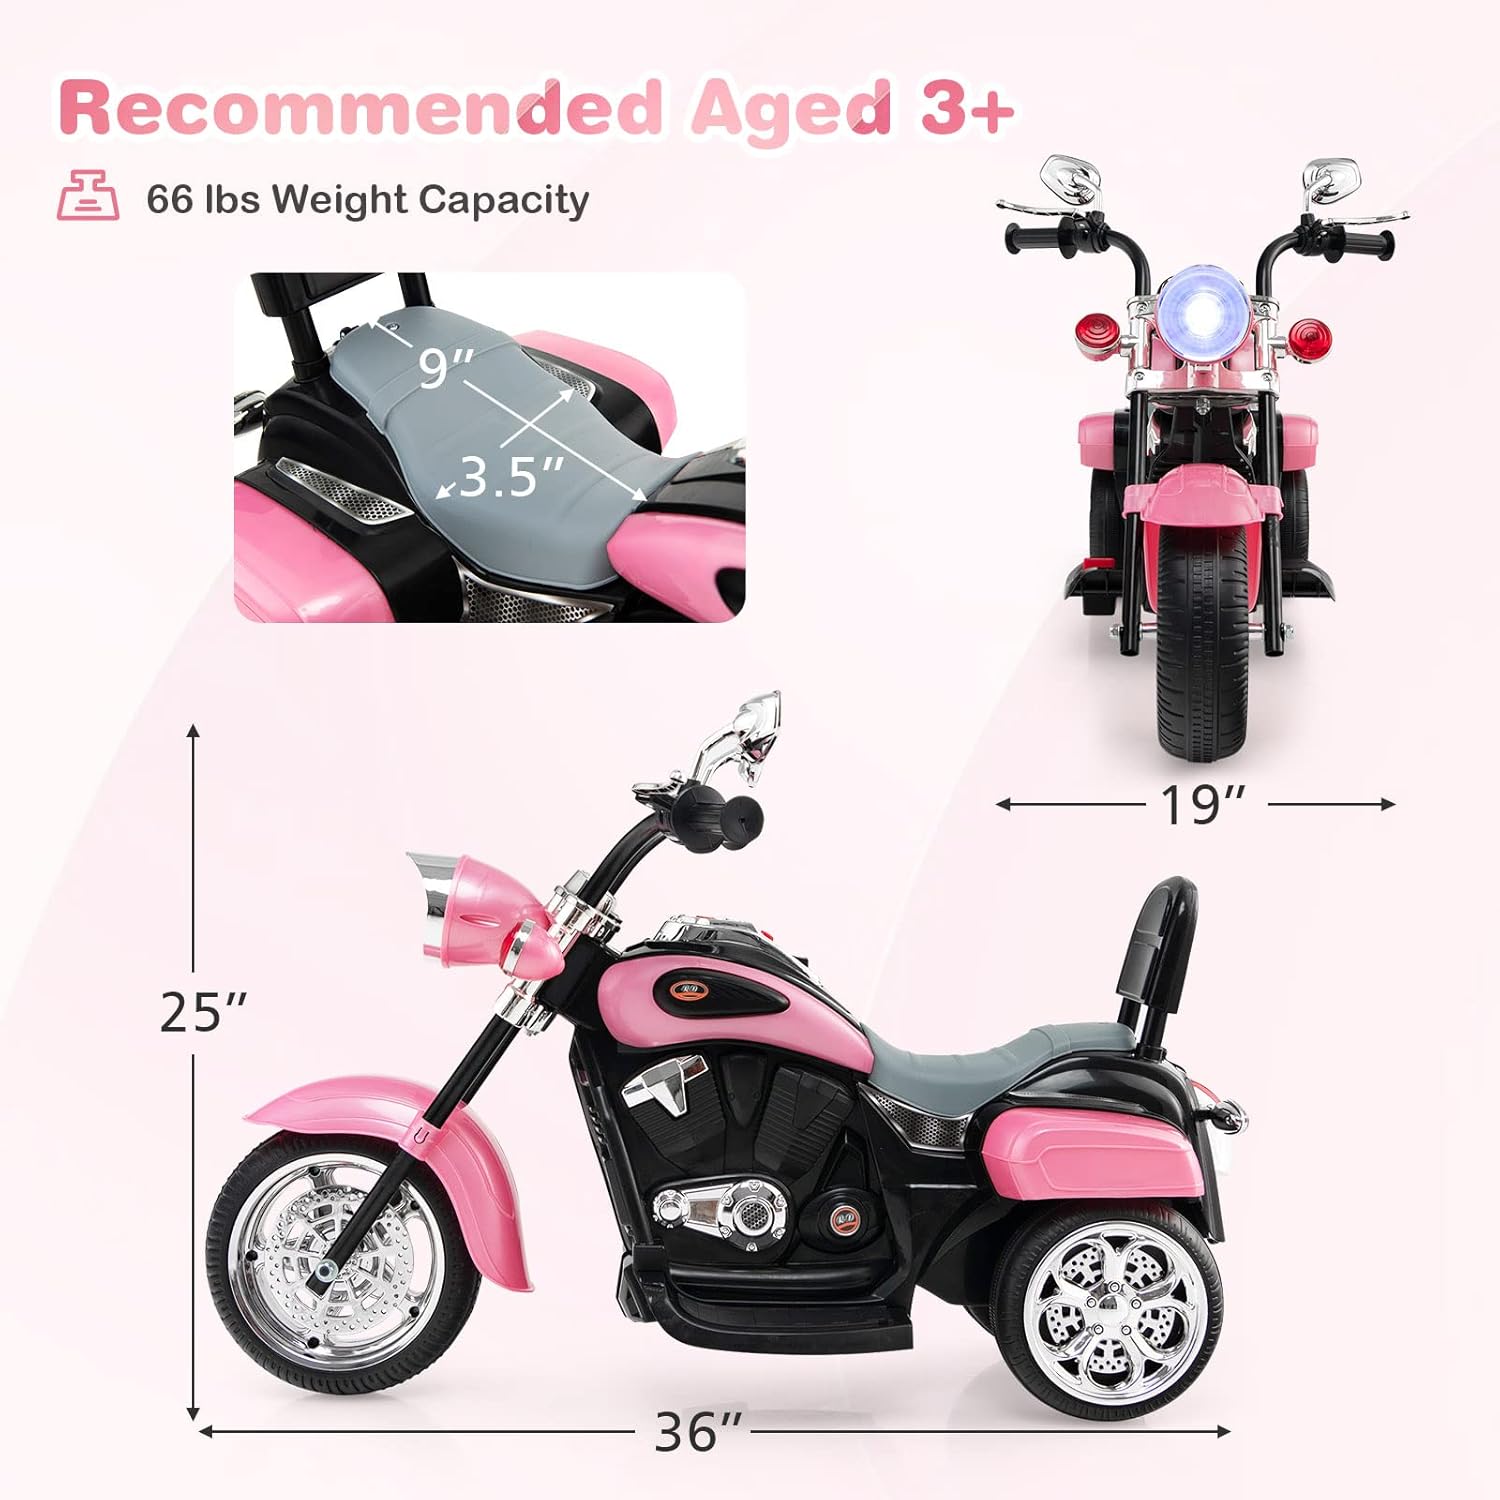
Image 7.1: Product dimensions and specifications.
8. Кепилдик жана колдоо
For warranty information or technical support, please contact HONEY JOY customer service. Keep your purchase receipt as proof of purchase.
- Refer to the product packaging or the seller's webкепилдиктин конкреттүү шарттары жана байланыш маалыматтары үчүн сайтка кириңиз.
- When contacting support, please have your model number (B0B74K6JZP) and purchase date available.


