1. Киришүү
Thank you for choosing the Speaka Professional SP-TMS-200 Monitor Stand. This manual provides essential information for the safe and efficient installation, operation, and maintenance of your monitor stand. Please read these instructions carefully before assembly and retain them for future reference.
Коопсуздук маалыматы
- Монтаждоодон мурун бардык компоненттер бар экенин жана бузулбаганын текшериңиз.
- Do not exceed the maximum weight capacity or screen size specified for this stand.
- Always use appropriate tools and follow assembly steps precisely.
- Чогултуу учурунда балдарды жана үй жаныбарларын алыс кармаңыз.
- Эгерде кандайдыр бир кыйынчылыктарга туш болсоңуз, квалификациялуу адиске кайрылыңыз.
2. Продукциянын өзгөчөлүктөрү
The Speaka Professional SP-TMS-200 Monitor Stand offers enhanced ergonomics and organization for your workspace. Key features include:
- 10 Height Adjustments: Achieve optimal viewing height for improved comfort.
- 360° Rotatable VESA Plate: Allows for flexible screen orientation (landscape or portrait).
- Куралсыз жөндөө: Easily modify settings without additional tools.
- Anti-Slip Silicone Pads: Provides enhanced stability and protects your desk surface.
- Cable Clip: Organizes cables for a tidy and professional appearance.
3. Пакеттин мазмуну
Please verify that all parts are included in your package. Refer to the product packaging for a detailed list of components and hardware.

Сүрөт 1: Алдыңкы view of the Speaka Professional SP-TMS-200 Monitor Stand, showing the base, adjustable pole, and VESA mounting plate.
4. Орнотуу нускамалары
Follow these general steps to assemble your monitor stand. Specific hardware and detailed steps may vary; always refer to the included assembly guide for precise instructions.
- Компоненттерди таңгактан чыгаруу: Таңгактан кылдаттык менен бардык бөлүктөрүн чыгарып, таза, тегиз бетке жаткызыңыз.
- Базаны тиркөө: Secure the vertical pole to the base using the provided screws and tools. Ensure it is firmly tightened.
- Mount VESA Plate: Attach the VESA mounting plate to the back of your monitor using the appropriate screws for your display. Ensure the screws are not overtightened.
- Мониторду орнотуу: Carefully slide the monitor (with the attached VESA plate) onto the top of the vertical pole. Secure it in place according to the stand's design, typically with a locking screw or mechanism.
- Кабелдик башкаруу: Route your monitor cables through the integrated cable clip on the stand's pole for a neat setup.

Сүрөт 2: Бурчтуу view of the monitor stand, highlighting the height adjustment markings on the vertical pole.
5. Иштөө нускамалары
Once assembled, the monitor stand allows for various adjustments to optimize your viewтажрыйбасы.
Бийиктигин тууралоо
The stand features 10 height settings. To adjust the height, loosen the locking mechanism on the vertical pole, slide the monitor to your desired height, and then securely tighten the locking mechanism. Ensure the monitor is stable after adjustment.
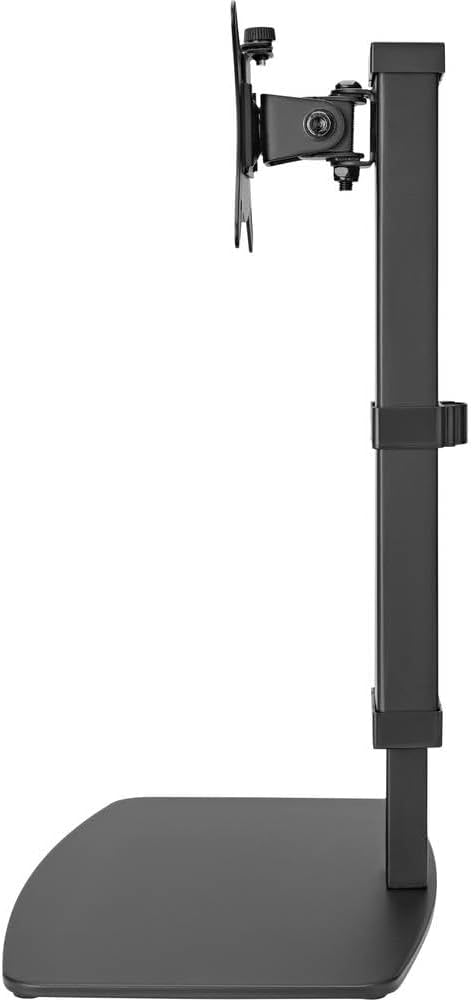
Сүрөт 3: Каптал view of the monitor stand, illustrating the range of height adjustment possible with the vertical pole.
Tilt and Swivel Adjustment
The VESA plate allows for tilting and swiveling your monitor. Gently adjust the monitor to your preferred angle. The 360° rotation feature enables easy switching between landscape and portrait orientations.
Кабель башкаруу
Utilize the integrated cable clip on the rear of the stand's pole to route and secure your monitor and power cables. This helps maintain a clean and organized workspace.
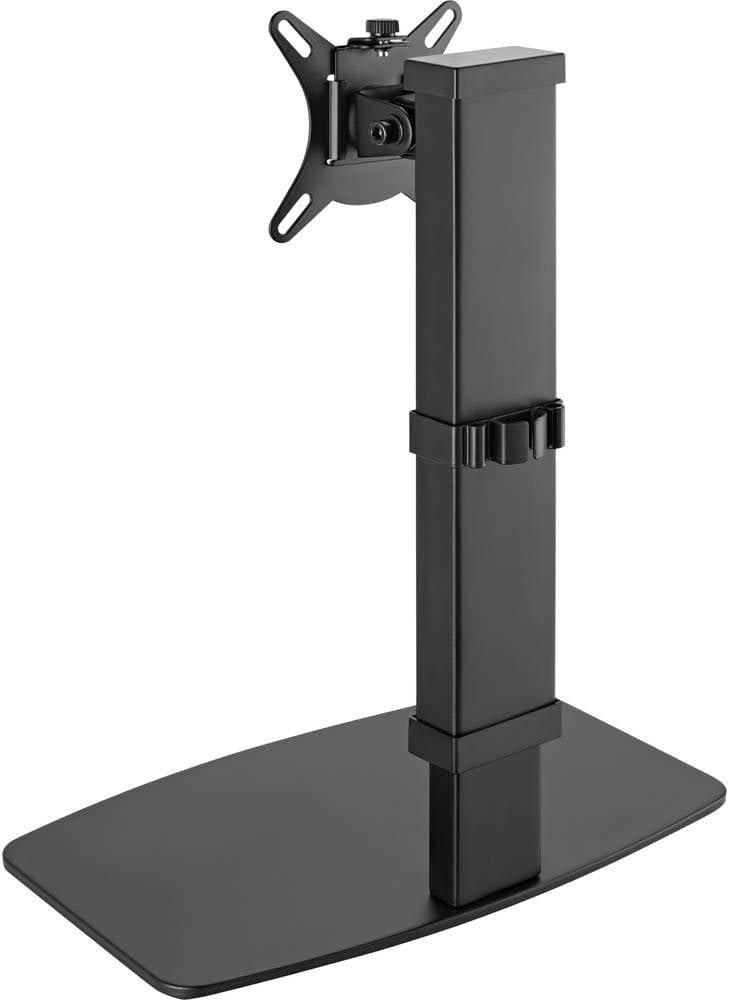
Сүрөт 4: Арткы view of the monitor stand, showing the cable management clip on the vertical pole.
6. Техникалык тейлөө
Үзгүлтүксүз техникалык тейлөө мониторуңуздун узак мөөнөттүү иштешин жана оптималдуу иштешин камсыз кылат.
- Тазалоо: Стендди жумшак, кургак чүпүрөк менен сүртүңүз. өжөр белгилери үчүн, бир аз гamp cloth with mild soap can be used, followed by drying. Avoid abrasive cleaners or solvents.
- Текшерүүлөр: Мезгил-мезгили менен бардык бурамалар менен байланыштарды текшерип туруңуз, алар бекем бойдон калууда. Керек болсо кайра тартыңыз.
- Кыймыл: Ensure the height adjustment mechanism moves smoothly. Do not force any adjustments.
7. Кыйынчылыктарды
If you encounter issues with your monitor stand, consider the following common solutions:
- Стенд туруксуз: Ensure all assembly screws are securely tightened. Verify the monitor's weight and size are within the stand's specifications. Check that the anti-slip pads on the base are intact and making full contact with the surface.
- Бийиктикти тууралоодогу кыйынчылык: Ensure the height locking mechanism is fully disengaged before attempting to adjust. Do not apply excessive force. Check for any obstructions.
- Monitor not level: Check that the VESA plate is securely attached to both the monitor and the stand. Adjust the tilt mechanism if necessary.
Эгер көйгөйлөр чечилбесе, кардарларды колдоо кызматына кайрылыңыз.
8. Техникалык шарттар
| Бренд | Speaka Professional |
| Модель номери | SP-10092880 |
| Шайкеш түзмөктөр | Monitors (17" to 32") |
| Бийиктигин тууралоо | 10 орнотуулар |
| VESA Plate Rotation | 360° |
| Түс | Various (typically black) |
9. Кепилдик жана колдоо
This Speaka Professional product comes with a 1 жылдык кепилдик for spare parts, as per the manufacturer's terms.
For technical support, warranty claims, or further assistance, please refer to the contact information provided with your purchase or visit the official Speaka Professional webсайт.


