1. Киришүү
This manual provides detailed instructions for the setup, operation, and maintenance of your KOORUI 27E6QCA 27-inch Curved QHD 180Hz Gaming Monitor. Please read this manual thoroughly before using the product to ensure proper functionality and to prevent damage.
2. Пакеттин мазмуну
Төмөндө тизмеленген нерселердин баары сиздин продукт таңгагыңызда бар экенин текшериңиз:
- 1 x KOORUI 27E6QCA Monitor
- 1 x Кубат кабели
- 1 x DisplayPort (DP) кабели
- 1 x User Manual
- 1 х кубат адаптери
- 1 x Монитор стенди
- 1 x Монитор базасы

Сүрөт: алдыңкы view of the KOORUI 27E6QCA Curved Gaming Monitor, showcasing its 27-inch curved display and sleek design.
3. Продукт бүтүп калдыview
The KOORUI 27E6QCA is a 27-inch curved gaming monitor designed for an immersive visual experience. Key features include:
- Дисплей: 27-inch VA Panel with 1500R curvature.
- Чечим: QHD (2560x1440) for clear and detailed images.
- Жаңыртуу ылдамдыгы: 180Hz for smooth motion.
- Жооп убактысы: 1ms (MPRT) to minimize motion blur.
- Түс гаммасы: 85% DCI-P3 for rich and accurate colors.
- Адаптивдүү синхрондоштуруу: Compatible with Adaptive Sync technology to reduce screen tearing and stuttering.
- Көздү коргоо: Features like blue light filter and flicker-free technology for reduced eye strain.
- Байланыш: Multiple HDMI and DisplayPort inputs.
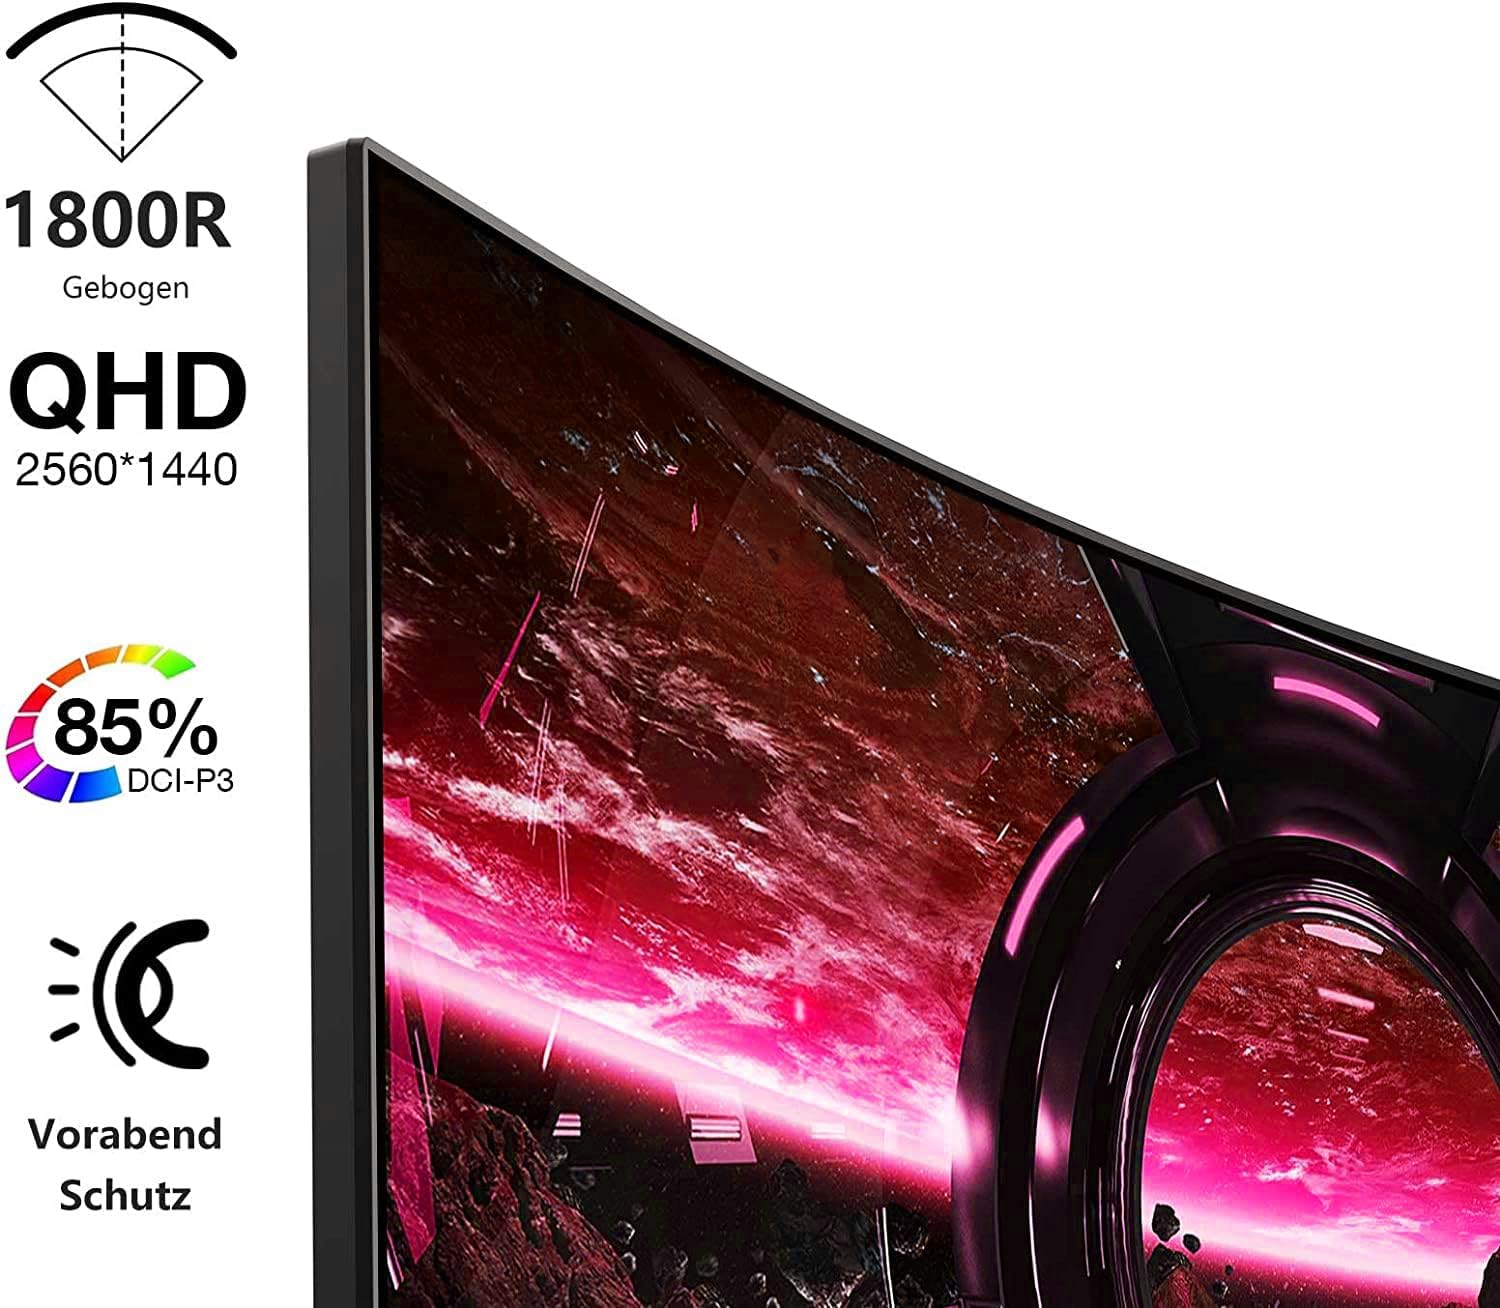
Image: Visual representation of the monitor's key features, including its 1500R curvature, QHD resolution (2560x1440), 85% DCI-P3 color coverage, and eye protection technology.
4. Орнотуу нускамалары
4.1 Стендди чогултуу
- Carefully remove the monitor, stand, and base from the packaging.
- Attach the stand to the base, ensuring it clicks securely into place or is fastened with the provided screw.
- Attach the assembled stand to the back of the monitor. Ensure the connection is firm.

Сүрөт: Арткы view of the KOORUI 27E6QCA monitor, showing the attachment point for the stand and the overall back panel design.
4.2 Түзмөккө туташуу
The monitor supports HDMI and DisplayPort connections. Use the appropriate cable for your device.
- DisplayPort (DP): Connect one end of the DP cable to the DisplayPort output on your computer's graphics card and the other end to the DisplayPort input on the monitor. This connection is recommended for achieving the full 180Hz refresh rate and QHD resolution.
- HDMI: Connect one end of an HDMI cable (version 1.4 or higher recommended) to the HDMI output on your device and the other end to one of the HDMI inputs on the monitor.
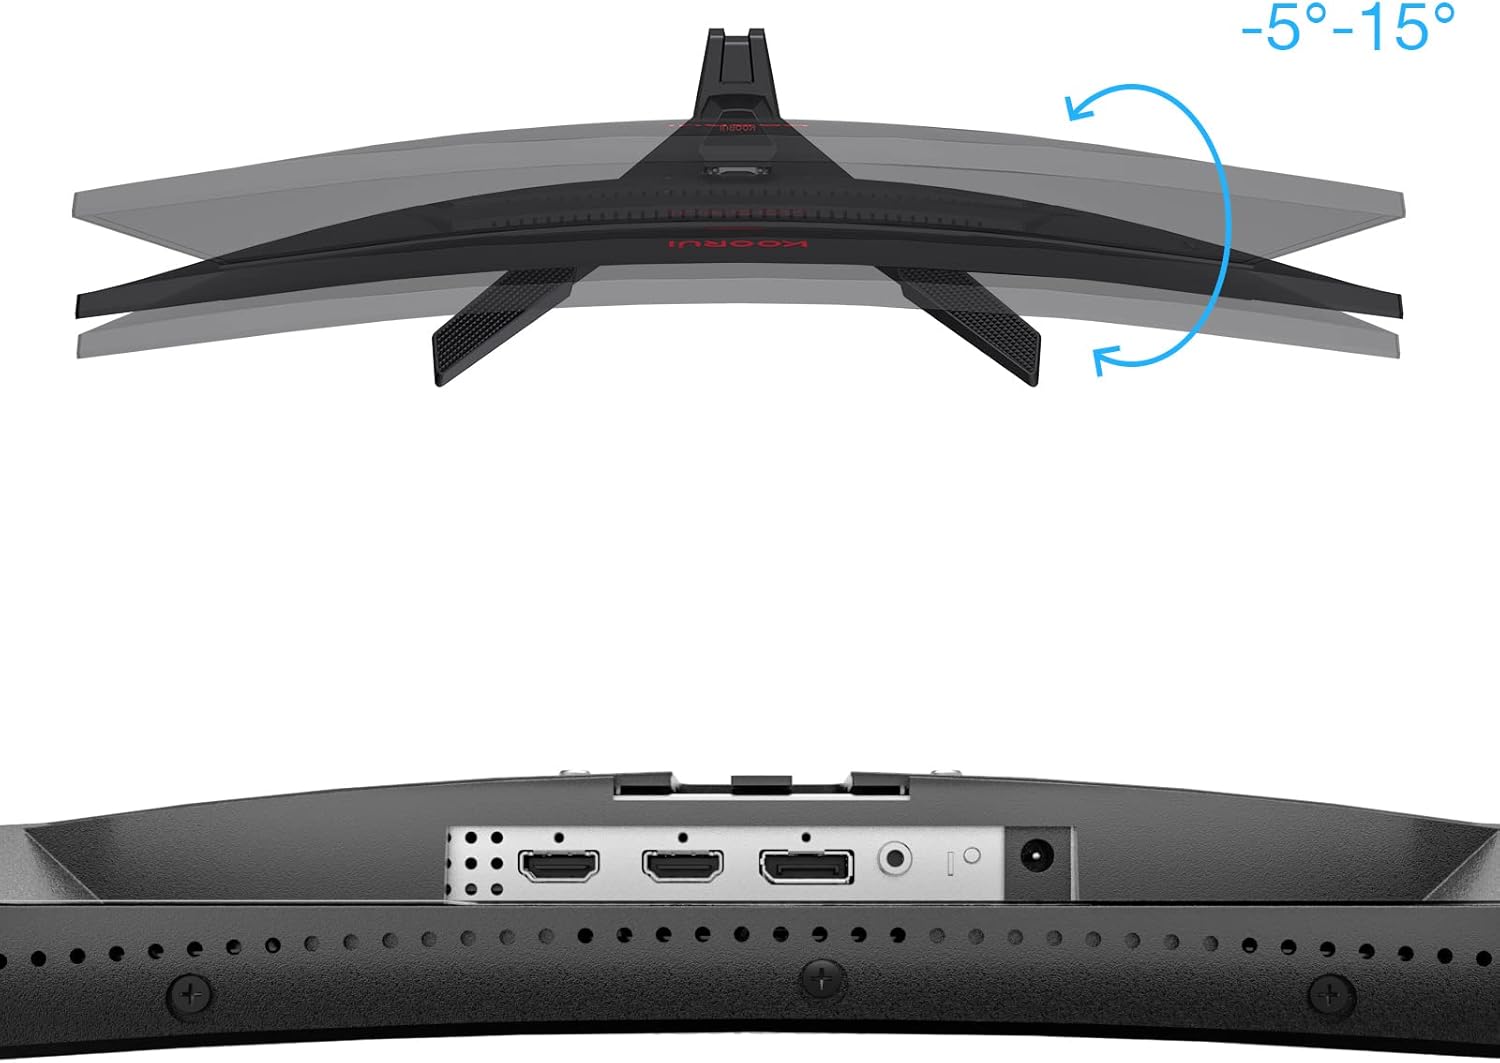
Сүрөт: Жакын план view of the monitor's rear ports, including HDMI and DisplayPort inputs, along with an illustration of the monitor's tilt adjustment range (-5° to 15°).

Image: Diagram illustrating the monitor's compatibility with various devices such as PS5, Xbox, Laptops, and Nintendo Switch via its multiple connection interfaces.
4.3 Кубат туташтыруу
- Кубат адаптерин монитордун кубат киргизүүсүнө туташтырыңыз.
- Plug the power cable into the power adapter, then plug the other end of the power cable into a wall outlet.
5. Иштөө нускамалары
5.1 Күйгүзүү/өчүрүү
- Күйгүзүү: Short press the multi-function joystick button located on the back of the monitor.
- Өчүрүү: Long press the multi-function joystick button for a few seconds.
5.2 Меню Навигациясы
The monitor features a single multi-function joystick button for navigating the On-Screen Display (OSD) menu.
- Access OSD: Short press the joystick button when the monitor is on.
- Чабыттоо: Push the joystick left/right/up/down to move through menu options.
- Ырастоо: Press the joystick button to confirm a selection.
- Кайтуу: Push the joystick up to go back to the previous menu or exit the OSD.

Image: Diagram illustrating the functions of the multi-function joystick button on the rear of the monitor: long press for power off, short press for power on, push left for minus, push right for plus, push up for return, and press for confirm.
5.3 Дисплей орнотуулары
Adjust various display settings through the OSD menu:
- Жарыктык/Контраст: Adjust image luminance and distinction.
- Түс жөндөөлөрү: Modify color temperature, gamma, and saturation.
- Сүрөт режими: Select from preset modes (e.g., Standard, Game, Movie, Text).
- Оюн орнотуулары:
- Адаптивдүү синхрондоштуруу: Enable this feature to synchronize the monitor's refresh rate with your graphics card, reducing screen tearing and stuttering. Ensure your graphics card supports Adaptive Sync.
- Response Time (Overdrive): Adjust for faster pixel response, reducing ghosting.
- Оюн режимдери: Specific modes like RTS, FPS, Reticle, and Timer are available to optimize visuals for different game genres.
- Киргизүү булагы: HDMI жана DisplayPort киргизүүлөрүнүн ортосунда кол менен тандаңыз.
For optimal gaming performance, ensure your operating system's display settings are configured to the monitor's native resolution (2560x1440) and highest refresh rate (180Hz).
6. Техникалык тейлөө
Мониторду туура тейлөө анын узак мөөнөттүү иштешин жана жакшы иштешин камсыз кылат.
- Экранды тазалоо:
- Тазалоодон мурун ар дайым мониторду өчүрүп, электр кабелин сууруп коюңуз.
- Бир аз жумшак, түксүз кездемени колдонуңуз dampсуу же атайын экран тазалоочу менен бүткөрүлөт.
- Тазалоочу каражатты түз экранга чачпаңыз.
- Абразивдүү тазалагычтарды, спирт же аммиак негизиндеги эритмелерди колдонуудан алыс болуңуз.
- Тазалоо Casing: Мониторду сүртүү үчүн жумшак, кургак чүпүрөктү колдонуңуз casing.
- Вентиляция: Ашыкча ысып кетүүнүн алдын алуу үчүн монитордун желдетүү тешиктери жабылбагандыгын текшериңиз.
7. Кыйынчылыктарды
Эгерде сиз мониторуңузда көйгөйлөргө туш болсоңуз, төмөнкү жалпы көйгөйлөрдү чечүү кадамдарын караңыз:
7.1 Күч жок
- Кубат кабелинин мониторго жана розеткага бекем туташтырылганын текшериңиз.
- Башка аспапка сайып, розетка иштеп жатканын текшериңиз.
- Кубат адаптери туура туташтырылганын текшериңиз.
7.2 Сигнал жок / Бош экран
- Confirm that the video cable (DP or HDMI) is securely connected to both the monitor and your computer/device.
- Монитордун OSD менюсунда туура киргизүү булагы тандалганын текшериңиз.
- Check if your computer/device is powered on and not in sleep mode.
- Башка видео кабелин же мүмкүн болсо, портту колдонуп көрүңүз.
7.3 Image Flickering or Tearing
- Enable Adaptive Sync in the monitor's OSD menu and ensure it is enabled in your graphics card settings.
- Verify that your graphics drivers are up to date.
- Check the refresh rate setting in your operating system's display settings. It should be set to 180Hz.
7.4 Ghosting or Motion Blur
- Adjust the "Response Time" or "Overdrive" setting in the OSD menu. Experiment with different levels to find the optimal balance.
- Ensure Adaptive Sync is enabled.
7.5 Incorrect Resolution or Refresh Rate
- Go to your operating system's display settings and set the resolution to 2560x1440 and the refresh rate to 180Hz.
- Ensure you are using a DisplayPort cable or an HDMI cable that supports these specifications.
8. Техникалык шарттар
| Өзгөчөлүк | Спецификация |
|---|---|
| Бренд | KOORUI |
| Модель номери | 27E6QCA |
| Screen Size | 27 дюйм |
| Панел түрү | VA |
| Ийрилик | 1500R |
| Резолюция | QHD (2560 x 1440 пиксел) |
| Аспект катышы | 16:9 |
| Жаңыртуу ылдамдыгы | 180 Гц |
| Жооп убактысы | 1 millisecond (MPRT) |
| Түс гаммасы | 85% DCI-P3 |
| Контраст катышы | 2000:1 |
| Байланыш | HDMI (x1), DisplayPort (x1) |
| Тилтти тууралоо | -5°тан 15°ка чейин |
| Энергияны керектөө | 78 Ватт |
| Өлчөмдөрү (L x W x Y) | 61.2 x 45.2 x 18.5 см |
| Салмагы | 5.1 килограмм |
| Өзгөчөлүктөр | Blue Light Filter, Curved, Flicker-Free, Adaptive Sync |

Image: Diagram showing the approximate dimensions of the KOORUI 27E6QCA monitor, including height (40cm), width (50cm), and depth (30cm).
9. Кепилдик жана колдоо
For warranty information and technical support, please refer to the warranty card included in your product package or visit the official KOORUI webсайт. Сатып алуу квитанциясын кепилдик дооматтары үчүн сатып алуунун далили катары сактаңыз.


