1. Киришүү
This manual provides detailed instructions for the installation, operation, and maintenance of your Mi-Heat Mi-300S RF Wireless Programmable Thermostat. Please read this manual carefully before installation and use to ensure proper function and safety. Keep this manual for future reference.
2. Коопсуздук маалыматы
- Installation should be performed by a qualified electrician or heating technician.
- Always disconnect power to the heating system before installing or servicing the receiver unit.
- Термостатты же кабыл алгычты сууга же ашыкча нымдуулукка дуушар кылбаңыз.
- Ensure correct battery polarity when inserting batteries into the transmitter unit.
- Түзмөктү өз алдынча оңдоого же өзгөртүүгө аракет кылбаңыз. Тейлөө үчүн квалификациялуу адистерге кайрылыңыз.
3. Пакеттин мазмуну
The Mi-Heat Mi-300S RF Wireless Programmable Thermostat kit includes the following components:
- 1x Mi-300S RF Wireless Thermostat (Transmitter)
- 1x Wireless Receiver Unit
- 1x Table Stand for Thermostat
- Mounting Material (screws, wall plugs)
- User Manual

Image 1: Mi-Heat Mi-300S RF Wireless Programmable Thermostat (left) and Receiver (right).
4. Продукт бүтүп калдыview
4.1. Thermostat (Transmitter) Features
- Large LCD display for clear temperature and time indication.
- Wireless communication at 433 MHz with a range of up to 20 meters.
- Daily and weekly programming with 4 adjustable switching times.
- Multiple operating modes: Comfort, Eco, and Holiday.
- Switchable between heating and cooling modes.
- Суукка каршы функция.
- Battery-powered (2x AAA batteries).

Image 2: Key features of the Mi-300S RF Thermostat.
4.2. Thermostat Button Functions
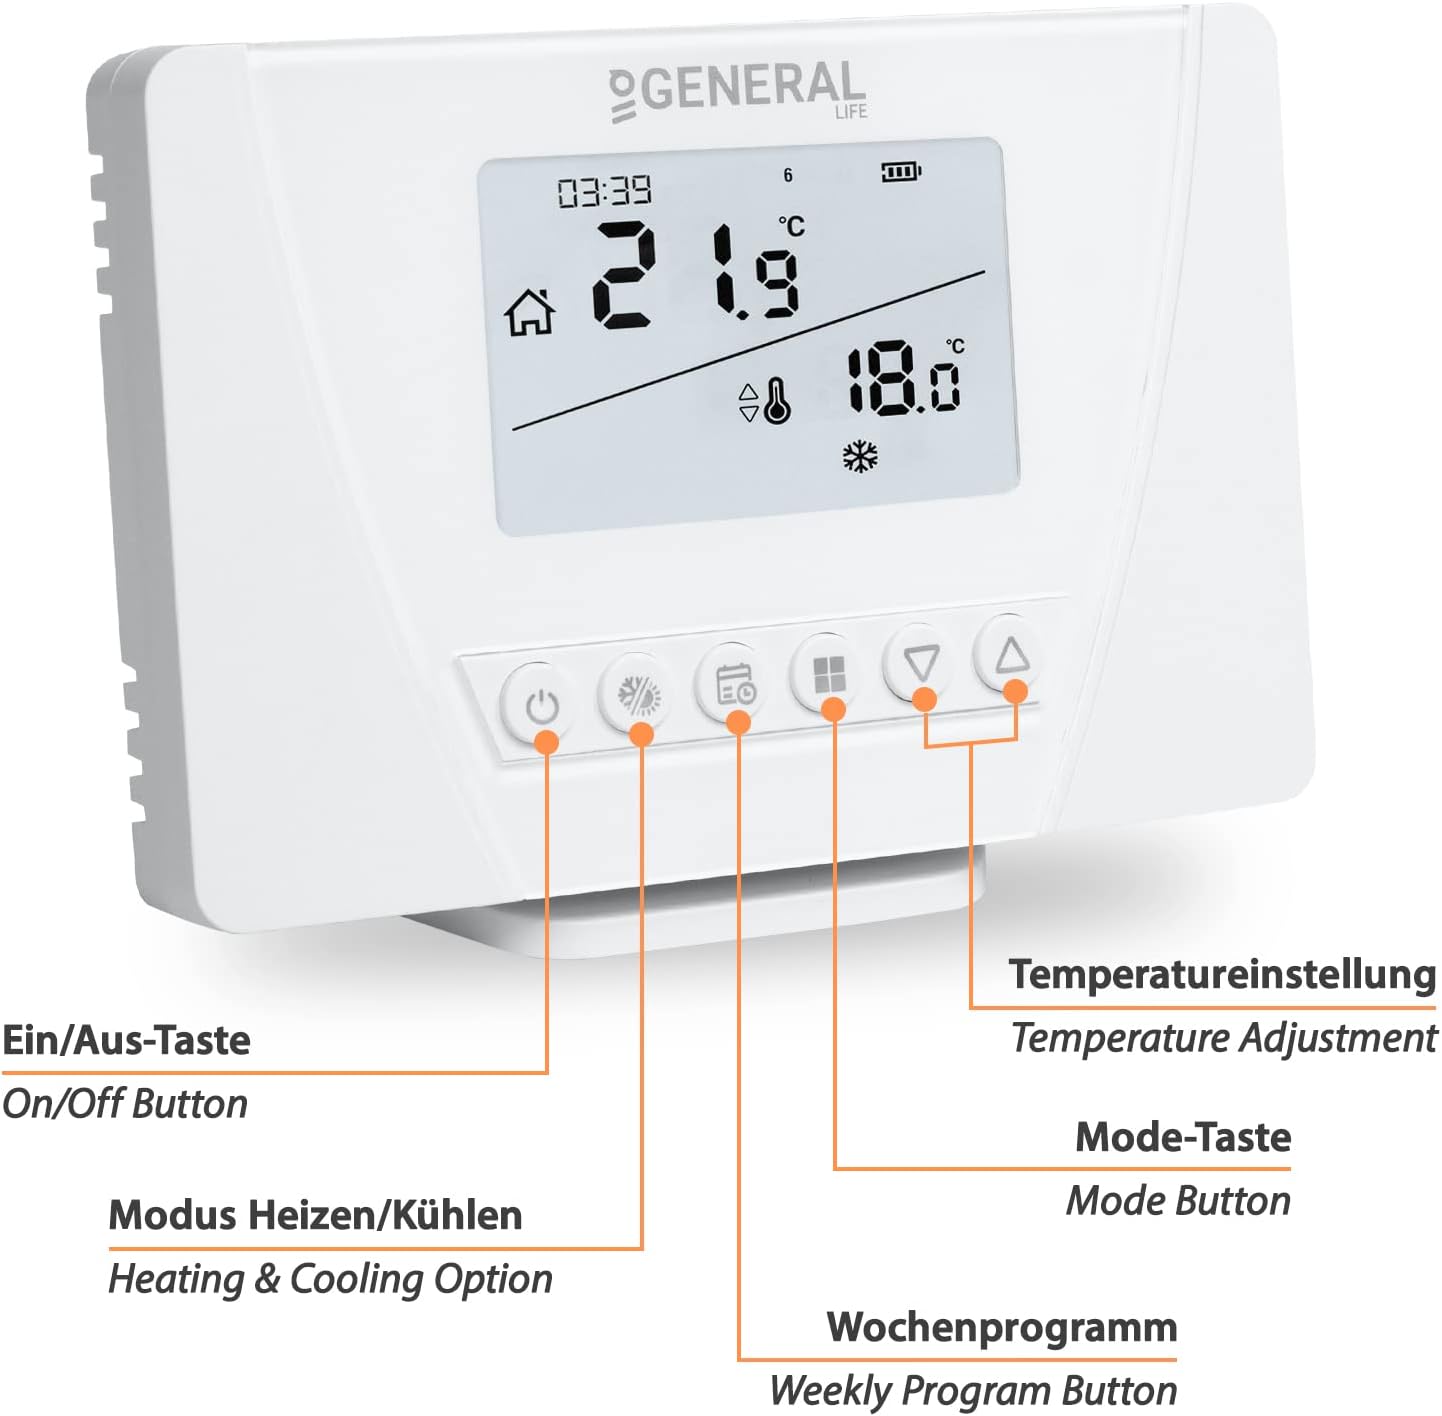
Сүрөт 3: Алдыңкы view of the thermostat with labeled buttons.
- Күйгүзүү/өчүрүү баскычы: Термостатты күйгүзөт же өчүрөт.
- Heating & Cooling Option Button: Toggles between heating and cooling modes.
- Апталык программа баскычы: Accesses and sets weekly programming schedules.
- Режим баскычы: Cycles through Comfort, Eco, and Holiday modes.
- Температураны жөндөө баскычтары (өйдө/ылдый): Коюлган температураны тууралайт.
4.3. Receiver Unit Features
- Receives wireless signals from the thermostat.
- Potential-free switching contact with a maximum switching capacity of 7A.
- Mains-powered (230V/50Hz).
- Manual operation button for temporary control.
- Pairing button for establishing wireless connection.
- LED indicator for operational status.

Image 4: Receiver unit with labeled connections and buttons.
5. Орнотуу
5.1. Thermostat Battery Installation
- Термостаттын артындагы батарея бөлүкчөсүн ачыңыз.
- Insert 2x AAA batteries, ensuring correct polarity (+/-).
- Close the battery compartment. The thermostat display should power on.
5.2. Кабылдагычтын зымдары
ЭСКЕРТҮҮ: Disconnect main power supply before performing any wiring. Incorrect wiring can cause damage to the device or heating system and poses an electrical hazard.
The receiver unit connects to your heating system. The wiring configuration depends on your specific heating application (e.g., underfloor heating, boiler, electric heating).

Сүрөт 5: Мисample wiring diagrams for various heating systems.
- Электр камсыздоо: Connect the receiver to a 230V/50Hz mains power supply. Use the "Receiver Power Cable Input" terminals (L and N).
- Heating System Connection: Connect your heating device (e.g., boiler, actuator, electric heater) to the "Heating/Cooling Unit Connection Cable Input" terminals. This is a potential-free switching contact.
Consult a qualified electrician if you are unsure about the wiring process for your specific heating system.
5.3. Pairing the Thermostat and Receiver
The thermostat and receiver are typically pre-paired from the factory. If they are not communicating or if you are setting up a new unit, follow these steps:
- Ensure both the thermostat (with batteries) and the receiver (powered) are on.
- On the receiver unit, press and hold the Жупташтыруу баскычы (often marked with a link icon) until the LED indicator starts flashing.
- On the thermostat, access the pairing menu (refer to the specific instructions in your full manual for the exact button sequence, usually involving holding a mode or program button).
- Once pairing is successful, the receiver's LED will stop flashing and remain solid, or turn off, indicating a successful connection.
- Test the connection by adjusting the temperature on the thermostat and observing if the receiver activates the heating system.

Image 6: Wireless communication between the thermostat and receiver.
5.4. Монтаждоо параметрлери
The thermostat can be mounted in two ways:
- Дубалга орнотуу: Use the provided mounting material (screws and wall plugs) to secure the thermostat to a wall at an appropriate height, away from direct sunlight or drafts.
- Стол стенди: Place the thermostat on a flat surface using the included table stand. This allows for flexible placement within the wireless range.

Image 7: Illustration of the thermostat's wireless range and flexible placement.
6. Иштөө нускамалары
6.1. Негизги операция
- Күйгүзүү/өчүрүү: Press the On/Off button to turn the thermostat on or off.
- Температураны жөндөө: Use the Up/Down arrow buttons to manually set the desired temperature. The display will show the current room temperature and the set temperature.
6.2. Режимди тандоо
басыңыз Режим баскычы to cycle through the available operating modes:
- Комфорт режими: Maintains a higher, comfortable temperature.
- Эко режими: Maintains a lower, energy-saving temperature.
- Майрам режими: Sets a constant, usually lower, temperature for an extended period, overriding programmed schedules.
басыңыз Heating & Cooling Option Button to switch between heating and cooling functions, if your system supports both.
6.3. Programming Weekly Schedules
The Mi-300S RF allows for daily and weekly programming with up to 4 switching times per day. This feature helps optimize energy consumption by adjusting temperatures based on your schedule.
- басыңыз Апталык программа баскычы программалоо режимине кирүү үчүн.
- Use the Up/Down buttons to navigate through days (Monday-Sunday) and time slots (e.g., P1, P2, P3, P4).
- For each time slot, set the desired start time and target temperature using the adjustment buttons.
- Confirm each setting to move to the next.
- Exit programming mode by pressing the Weekly Program Button again or waiting for a timeout.
Refer to the detailed programming section in the complete user manual for specific steps and advanced options.
6.4. Үшүктөн коргоо
The thermostat includes a frost protection feature. When activated, the thermostat will automatically turn on the heating if the room temperature drops below a pre-set minimum (typically around 5-7°C) to prevent pipes from freezing. This function is usually active in all modes, especially Holiday mode.
7. Техникалык тейлөө
- Тазалоо: Термостатты жана кабыл алгычты жумшак, кургак чүпүрөк менен сүртүңүз. Абразивдүү тазалоочу каражаттарды же эриткичтерди колдонбоңуз.
- Батареяны алмаштыруу: When the low battery indicator appears on the thermostat display, replace the 2x AAA batteries promptly to ensure continuous operation.
- Программалык камсыздоонун жаңыртуулары: There are no user-serviceable firmware updates for this device.
8. Кыйынчылыктарды
| Көйгөй | Мүмкүн себеп | Чечим |
|---|---|---|
| Термостаттын дисплейи бош. | Өлгөн батареялар. | Replace the 2x AAA batteries. |
| Heating system not responding to thermostat. | No power to receiver; Receiver not paired; Out of wireless range; Wiring issue. | Check receiver power; Re-pair thermostat and receiver; Move thermostat closer to receiver; Verify wiring connections. |
| Температура көрсөткүчтөрү так эмес окшойт. | Thermostat placed in direct sunlight or near a heat source/draft. | Relocate the thermostat to a more central location, away from external influences. |
| Cannot set weekly program. | Incorrect button sequence; Thermostat in a different mode. | Refer to the "Programming Weekly Schedules" section or the full manual for detailed steps. Ensure the thermostat is in the correct mode for programming. |
9. Техникалык шарттар
| Өзгөчөлүк | Деталь |
|---|---|
| Бренд | Mi-Heat |
| Модель номери | 1510-004 |
| Product Dimensions (Thermostat) | 12.5 x 8.5 x 2 см (L x W x Y) |
| Продукциянын өлчөмдөрү (алуучу) | 9 x 9 x 2.5 см (L x W x Y) |
| Термостаттын энергия булагы | 2x AAA Batteries (3V) |
| Кабылдагычтын кубат булагы | 230V / 50Hz (Mains Powered) |
| Байланыш технологиясы | RF (Радио жыштыгы) |
| RF жыштыгы | 433 МГц |
| Зымсыз диапазон | 20 метрге чейин (тоскоолдуксуз) |
| Switching Capacity (Receiver) | Max. 7A (Potential-free contact) |
| Өзгөчөлүктөр | Frost Protection, Weekly Programming, Heating/Cooling Mode |
| Материал | Пластик |
| Элемент Салмагы | 400 grams (total kit) |

Image 8: Dimensions of the Mi-300S RF Thermostat.

Image 9: Dimensions of the Mi-300S RF Receiver.
10. Кепилдик жана колдоо
This product comes with a standard manufacturer's warranty. For specific warranty terms and conditions, please refer to the documentation included with your purchase or contact Mi-Heat customer support.
For technical assistance, troubleshooting, or spare parts inquiries, please contact Mi-Heat customer service through their official channels. Information regarding spare parts availability is currently not provided.


