Introduction
Сатып алганыңыз үчүн рахматasing the GRAUGEAR M.2 NVMe/SATA SSD Docking Station. This device is designed to provide a high-speed, tool-free solution for accessing M.2 NVMe and SATA SSDs. Featuring a built-in cooling fan and USB 3.2 Gen 2 (10Gbps) connectivity, it ensures stable and efficient data transfer while maintaining optimal operating temperatures for your SSDs. This manual provides detailed instructions for setup, operation, maintenance, and troubleshooting.

Figure 1: GRAUGEAR M.2 NVMe/SATA SSD Docking Station and accessories.
Коопсуздук маалыматы
- Аппаратты суудан, оттон жана жогорку температурадан алыс кармаңыз.
- Аппаратты ажыратууга же өзгөртүүгө аракет кылбаңыз.
- Иштеп жаткан учурда аппараттын айланасында туура желдетүүнү камсыз кылыңыз.
- Берилген кабелдерди жана аксессуарларды гана колдонуңуз.
- Аппаратты түшүрүүдөн же катуу таасирлерден сактаныңыз.
- Unplug the device from the power source when not in use or during cleaning.
Пакеттин мазмуну
Сураныч, пакеттин мазмунун текшерип, бардык буюмдар бар экенин текшериңиз:
- GRAUGEAR M.2 SSD Docking Station
- USB Type-A to Type-C Cable (x1)
- USB Type-C to Type-C Cable (x1)
- Thermal Pad (x1)
- Aluminum Heatsink (x1)
- SSD Fixing Rubber Pins (x2)
- User Manual
- Кепилдик картасы

2-сүрөт: Продукциянын таңгагына кирген бардык буюмдар.
Жайгашуу
1. SSD Compatibility
This docking station supports both M.2 NVMe and M.2 SATA SSDs. It is compatible with various M.2 SSD sizes: 2230, 2242, 2260, 2280, and 22110. It also accommodates M.2 SSDs with pre-installed heatsinks.
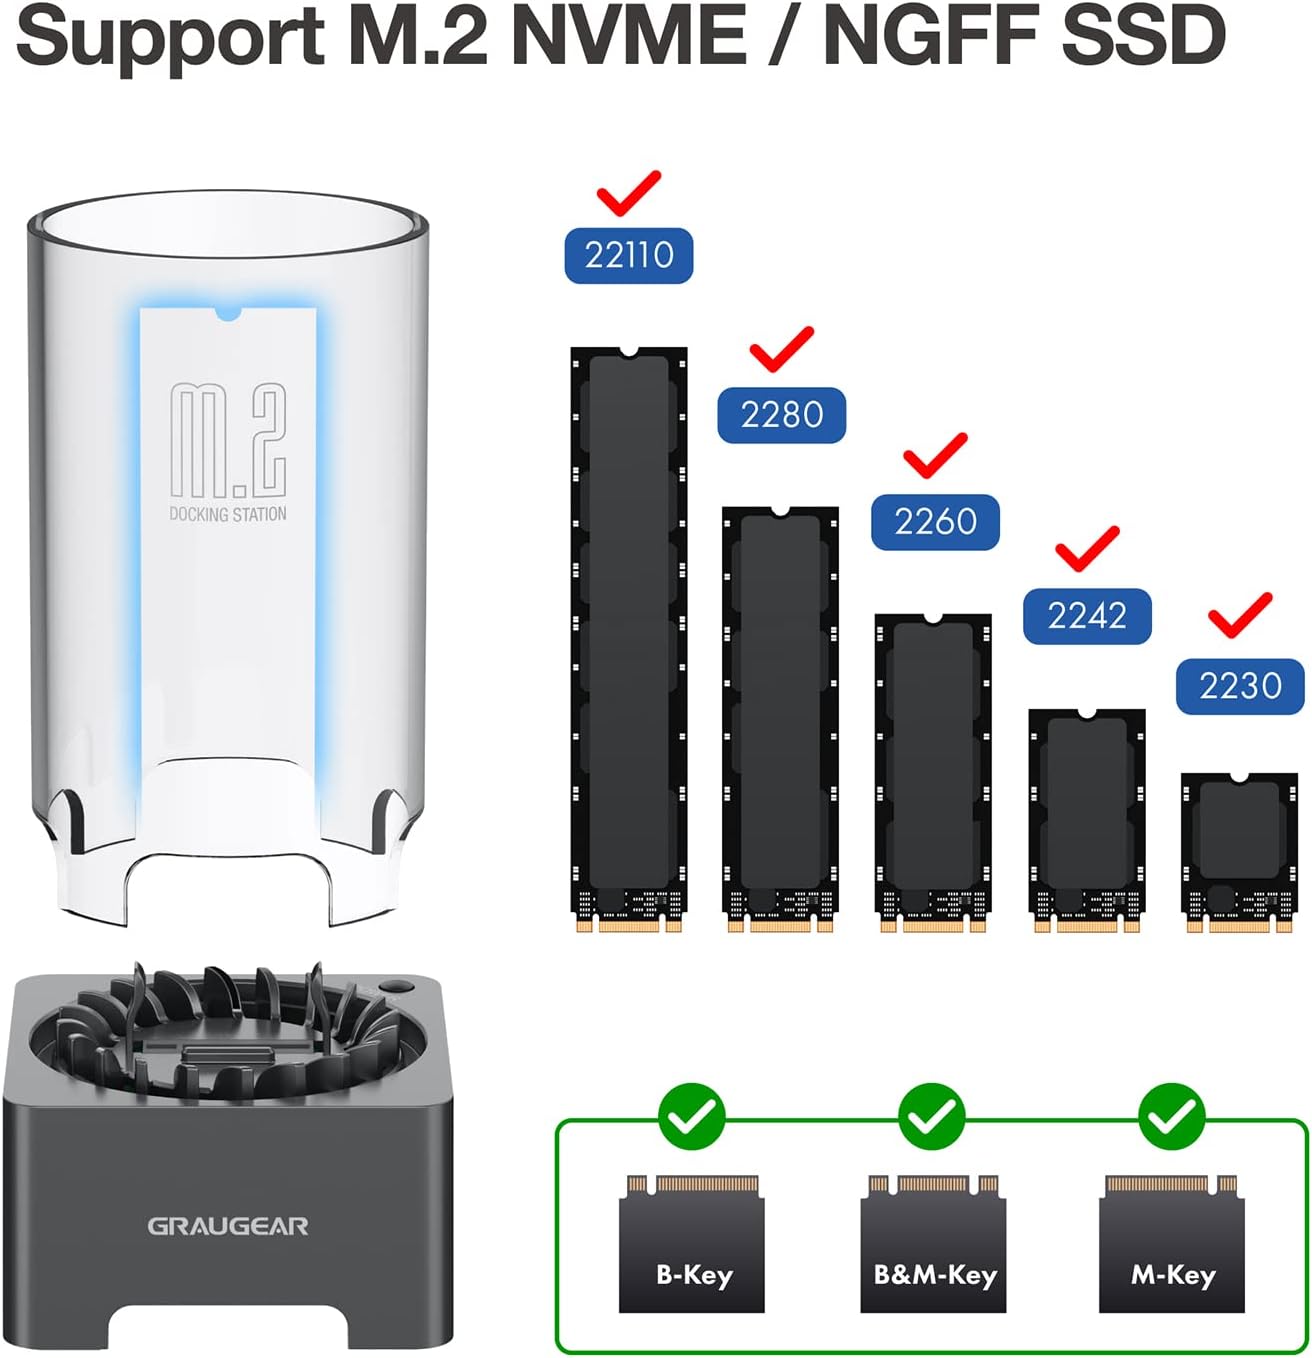
Figure 3: Supported M.2 SSD form factors and key types.

Figure 4: The docking station is designed to accommodate M.2 SSDs with various integrated heatsinks.
2. SSD Installation (Tool-Free)
The GRAUGEAR docking station features a tool-free design for easy SSD installation.
- If your M.2 SSD does not have a heatsink, you may install the provided thermal pad and aluminum heatsink onto your M.2 SSD.
- Insert the M.2 SSD into the slot on the docking station. Ensure the SSD is fully seated and secured by the internal fixing bracket. The SSD fixing rubber pins help stabilize the SSD.
- Place the transparent protective tube over the SSD and onto the docking station base.
- Connect the docking station to your computer using one of the provided USB cables (Type-A to Type-C or Type-C to Type-C).
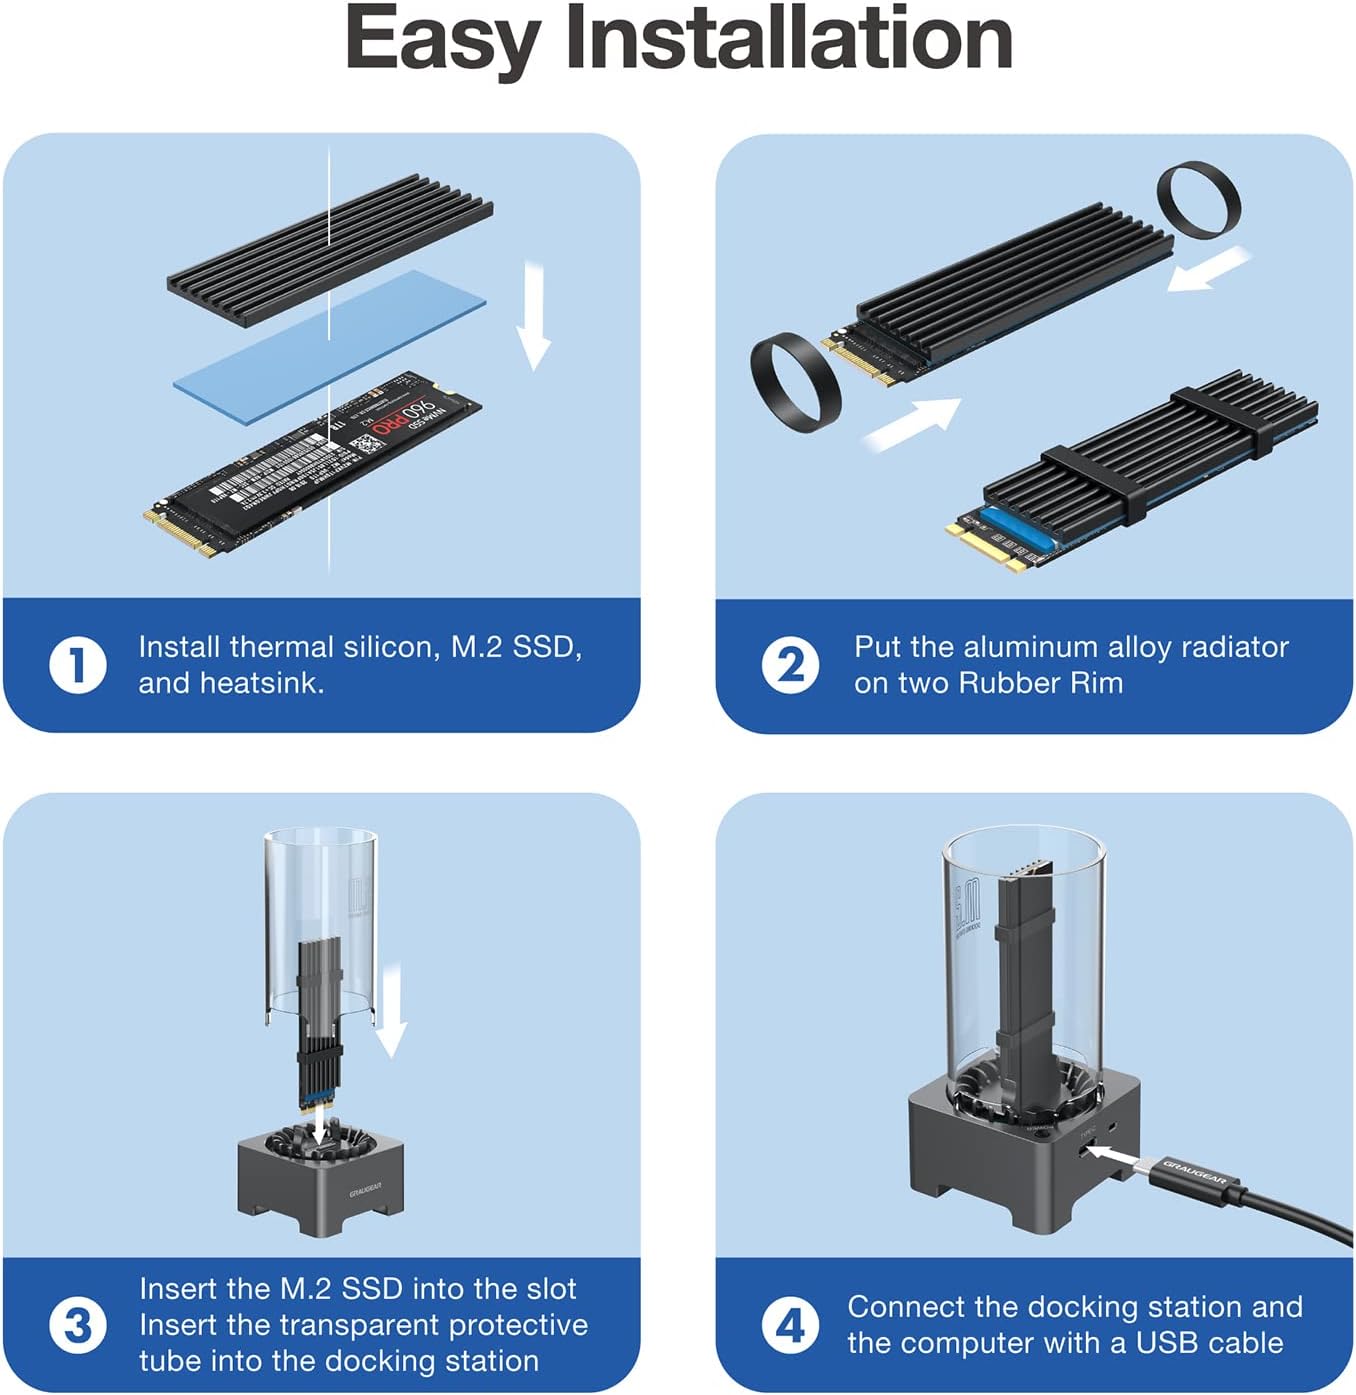
Figure 5: Easy installation steps for the M.2 SSD.
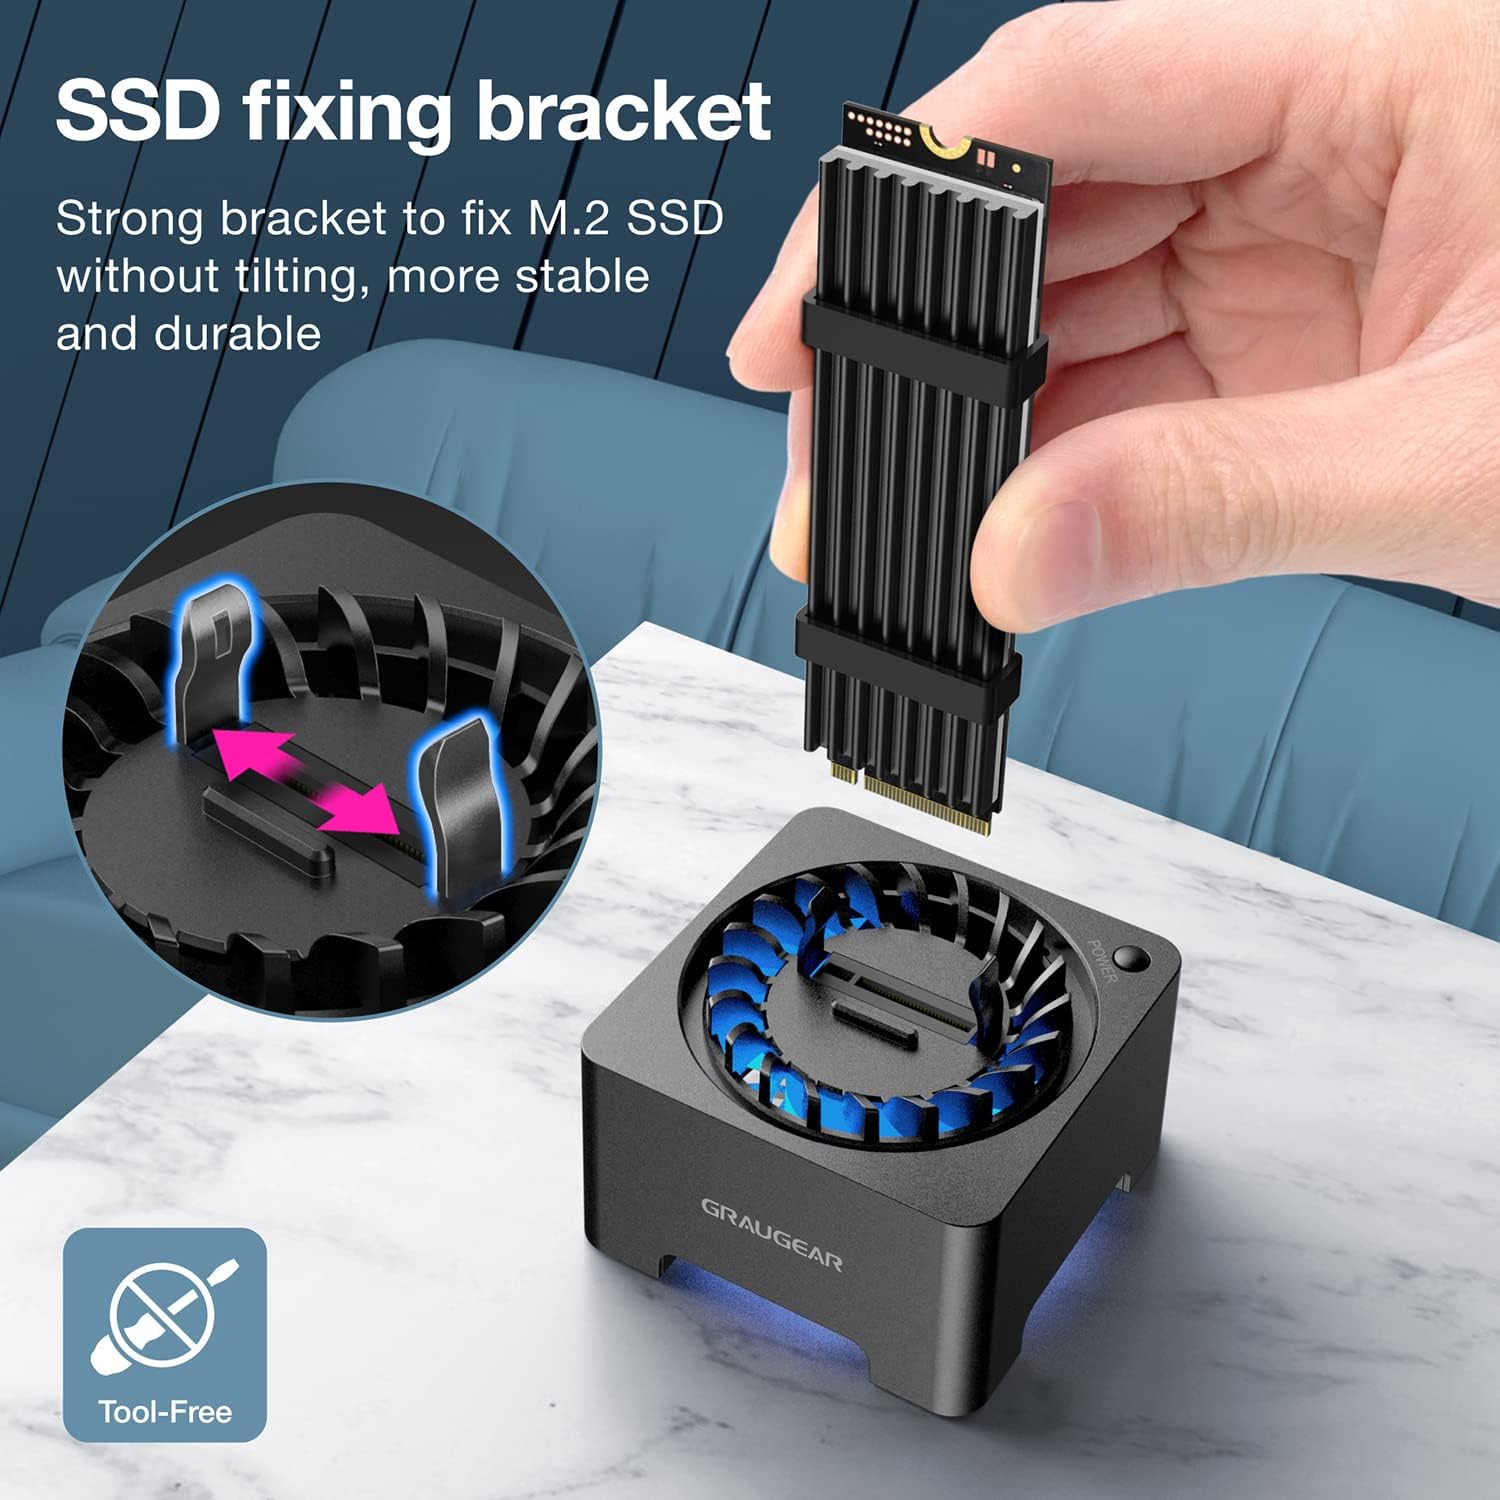
Figure 6: The internal SSD fixing bracket ensures stability.
Эскертүү: If you are using a brand new SSD, it may need to be initialized and partitioned before it can be recognized by your operating system. Please refer to your operating system's documentation for instructions on disk management.
Иштөө нускамалары
1. Күйгүзүү/өчүрүү
The docking station features a manual power switch. Press the power button located on the side of the unit to turn it on. The blue LED indicator will illuminate, and the cooling fan will activate. To turn off the device, press the power button again.
2. Маалыматтарды өткөрүү
The docking station supports USB 3.2 Gen 2, offering data transfer speeds of up to 10Gbps. For optimal performance, connect the device to a USB 3.2 Gen 2 compatible port on your computer. When using a SATA protocol SSD, the maximum theoretical transfer speed is 6Gbps.

7-сүрөт: Жогорку ылдамдыктагы маалыматтарды берүү мүмкүнчүлүктөрү.
3. Cooling Fan Operation
The built-in 50mm cooling fan automatically adjusts its speed to optimize cooling performance and minimize noise. This active cooling system helps reduce SSD temperatures by up to 60%, preventing thermal throttling and extending the lifespan of your M.2 SSD.

Figure 8: The integrated cooling fan actively dissipates heat from the SSD.
Техникалык тейлөө
- To clean the device, gently wipe the exterior with a soft, dry cloth.
- Суюк тазалагычтарды же абразивдүү материалдарды колдонуудан алыс болуңуз.
- Periodically check the fan area for dust accumulation and clean it carefully with compressed air if necessary to maintain optimal cooling performance.
- Ensure the transparent protective tube is free of dust to allow for proper airflow and visibility.
Проблемаларды чечүү
| Көйгөй | Мүмкүн себеп | Чечим |
|---|---|---|
| SSD компьютер тарабынан таанылган жок. |
|
|
| Жай маалымат берүү ылдамдыгы. |
|
|
| Cooling fan not spinning or making unusual noise. |
|
|
| "USB surge" or power error messages. |
|
|
Техникалык шарттар
| Өзгөчөлүк | Description |
|---|---|
| Модель номери | G-M2DK-AC-10G |
| Бренд | GRAUGEAR |
| Шайкеш түзмөктөр | M.2 NVMe/SATA SSD (B-Key, B+M Key, M-Key) |
| Колдоого алынган SSD өлчөмдөрү | 2230, 2242, 2260, 2280, 22110 |
| Макс сактоо сыйымдуулугу | 8 ТБ чейин |
| Маалыматтарды өткөрүү ылдамдыгы | 10 Гбит/сек чейин (USB 3.2 2-муун) |
| Чипсет | Realtek RTL9210B |
| Муздатуу системасы | Built-in 50mm automatic speed control fan |
| Интерфейс | USB Type-C |
| Материал | Пластик |
| Продукциянын өлчөмдөрү | 5.7 x 5.7 x 11.3 см (2.2 x 2.2 x 4.5 дюйм) |
| Продукт Салмагы | 10 грамм (0.35 унция) |
| Колдоого алынган OS | Windows, macOS, Linux, Android |
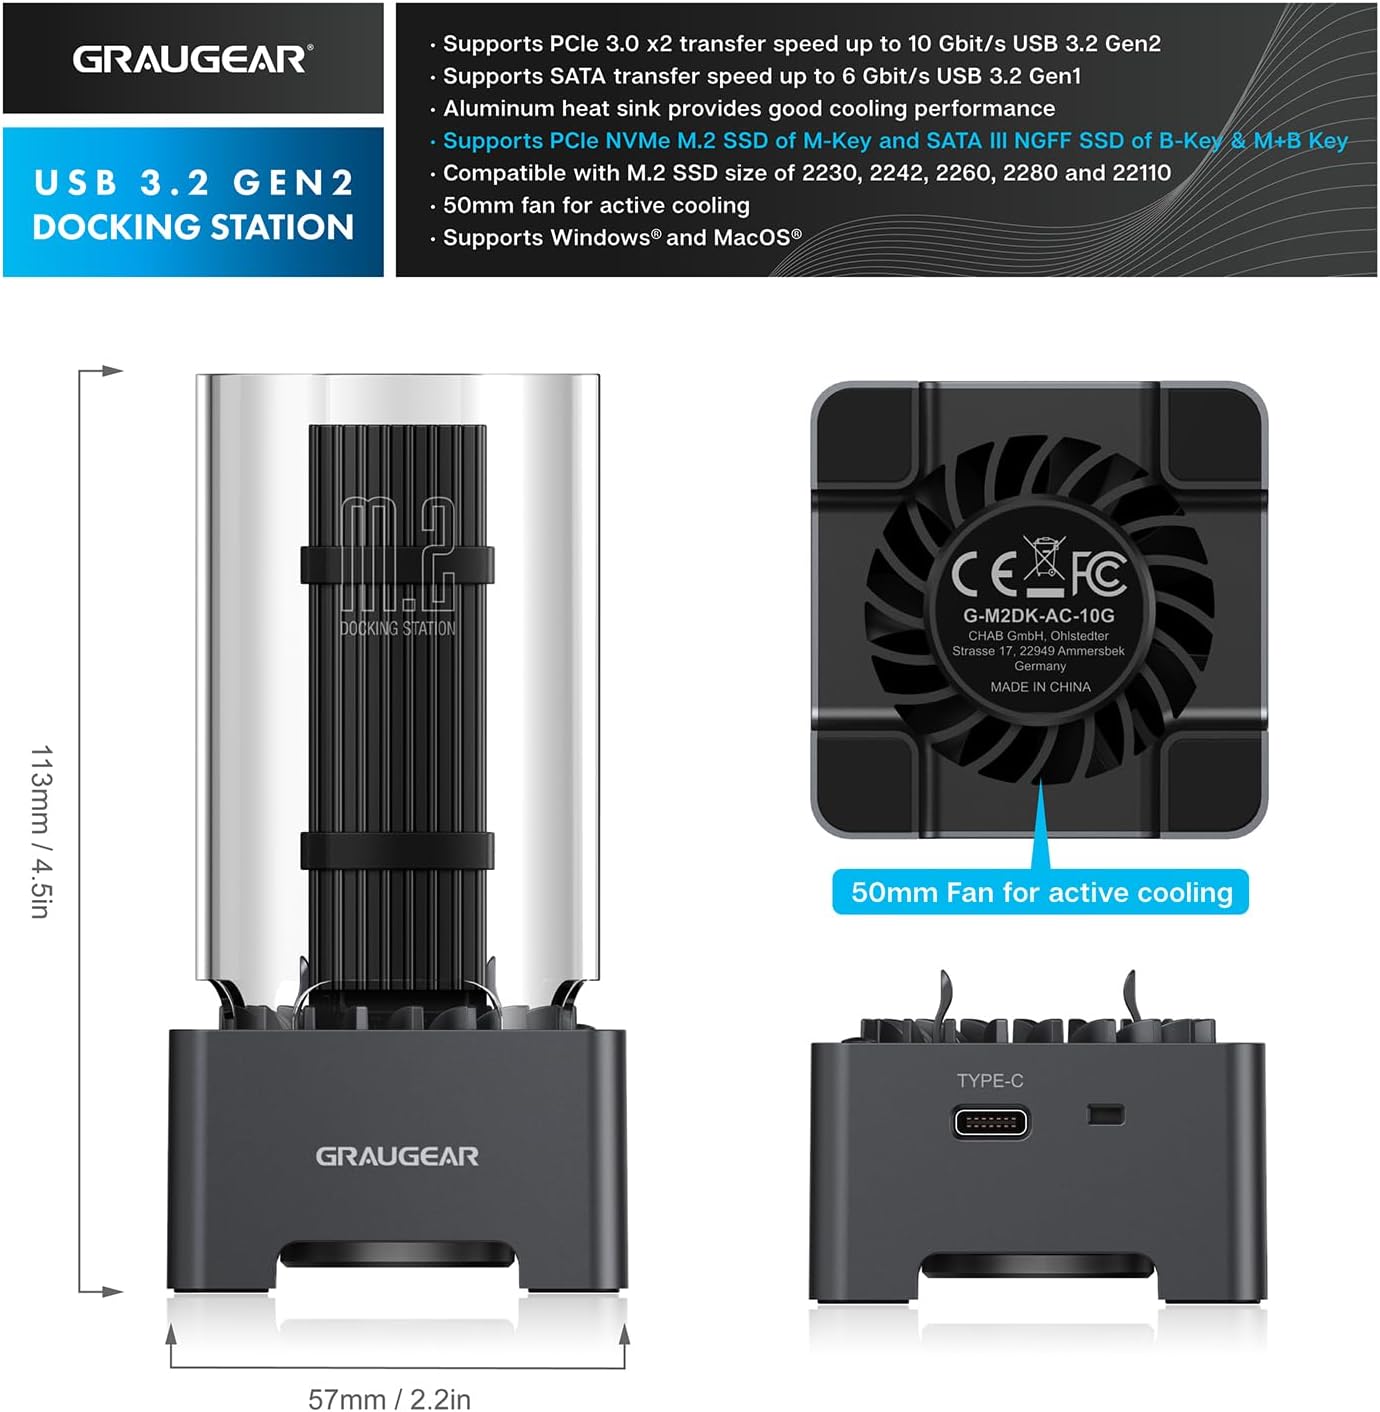
Сүрөт 9: Продукциянын өлчөмдөрү жана негизги өзгөчөлүктөрү.
Кепилдик жана колдоо
GRAUGEAR products come with a standard warranty. Please refer to the included Guarantee Card for specific warranty terms and conditions.
Кардарларды колдоо
If you encounter any issues or have questions regarding your GRAUGEAR M.2 SSD Docking Station, please contact our customer support team.
- For the fastest support, please visit the official GRAUGEAR webКөп берилүүчү суроолор жана байланыш маалыматы үчүн сайт.
- When contacting support, please have your product model number (G-M2DK-AC-10G) and purchase details ready.


