1. Киришүү
This manual provides essential information for the safe and effective operation, setup, maintenance, and troubleshooting of your YESWELDER 205A MMA/Lift TIG Arc Welder. Please read this manual thoroughly before operating the machine to ensure proper use and to prevent injury or damage.

Сүрөт 1.1: Алдыңкы view of the YESWELDER 205A MMA/Lift TIG Arc Welder, showcasing анын компакттуу конструкциясы жана башкаруу панели.
2. Коопсуздук маалыматы
Welding operations involve significant risks. Always prioritize safety to prevent electric shock, burns, fire, and other hazards. Adhere to all local and national safety regulations.
Жалпы коопсуздук чаралары:
- Wear appropriate personal protective equipment (PPE), including a welding helmet with proper shade, flame-resistant clothing, welding gloves, and safety shoes.
- Ensure the welding area is well-ventilated to avoid inhaling fumes.
- Күйүүчү материалдарды ширетүүчү жерден алыс кармаңыз.
- Always disconnect power before performing maintenance or adjustments.
- Do not operate the welder in damp же нымдуу шарттар.
Интегралдык коопсуздук өзгөчөлүктөрү:
The YESWELDER 205A is equipped with several safety mechanisms:
- Automatic Voltage Fluctuation Compensation: Helps maintain stable welding performance despite input power variations.
- Ашыкча ток коргоо: Automatically shuts down the machine if current exceeds safe limits.
- Ашыкча жүктөн коргоо: Ашыкча жүктөн улам келип чыккан зыяндын алдын алат.
- Температураны көзөмөлдөө: Monitors internal temperature and initiates automatic shutdown if overheating occurs.
- IP21 Protection Standard: Provides protection against solid objects over 12mm and vertically falling water drops.
- Electrostatic Coating: Unique coating designed to prevent shock transfer.

Сүрөт 2.1: Бүттүview of the YESWELDER 205A's built-in safety features.
3. Продукт бүтүп калдыview
The YESWELDER 205A is a versatile 2-in-1 welding machine offering both Stick (MMA) and Lift TIG welding capabilities. It features an advanced IGBT inverter technology for stable arc performance and a user-friendly interface.
Негизги өзгөчөлүктөрү:
- Dual Welding Modes: Supports Stick (MMA) and Lift TIG welding.
- Жогорку чыгаруу: 205ге чейин amperes, suitable for various welding tasks.
- Өркүндөтүлгөн функциялар: Includes Hot Start, Arc Force, and Anti-Stick for improved arc ignition and stability.
- Чоң LED дисплей: Provides clear visibility of current, electrode size, and welding mode.
- Портативдик дизайн: Оңой ташуу үчүн болжол менен 3.8 кг (8.4 фунт) салмакта.
- Туруктуу курулуш: Features an additional plastic casing for enhanced protection.
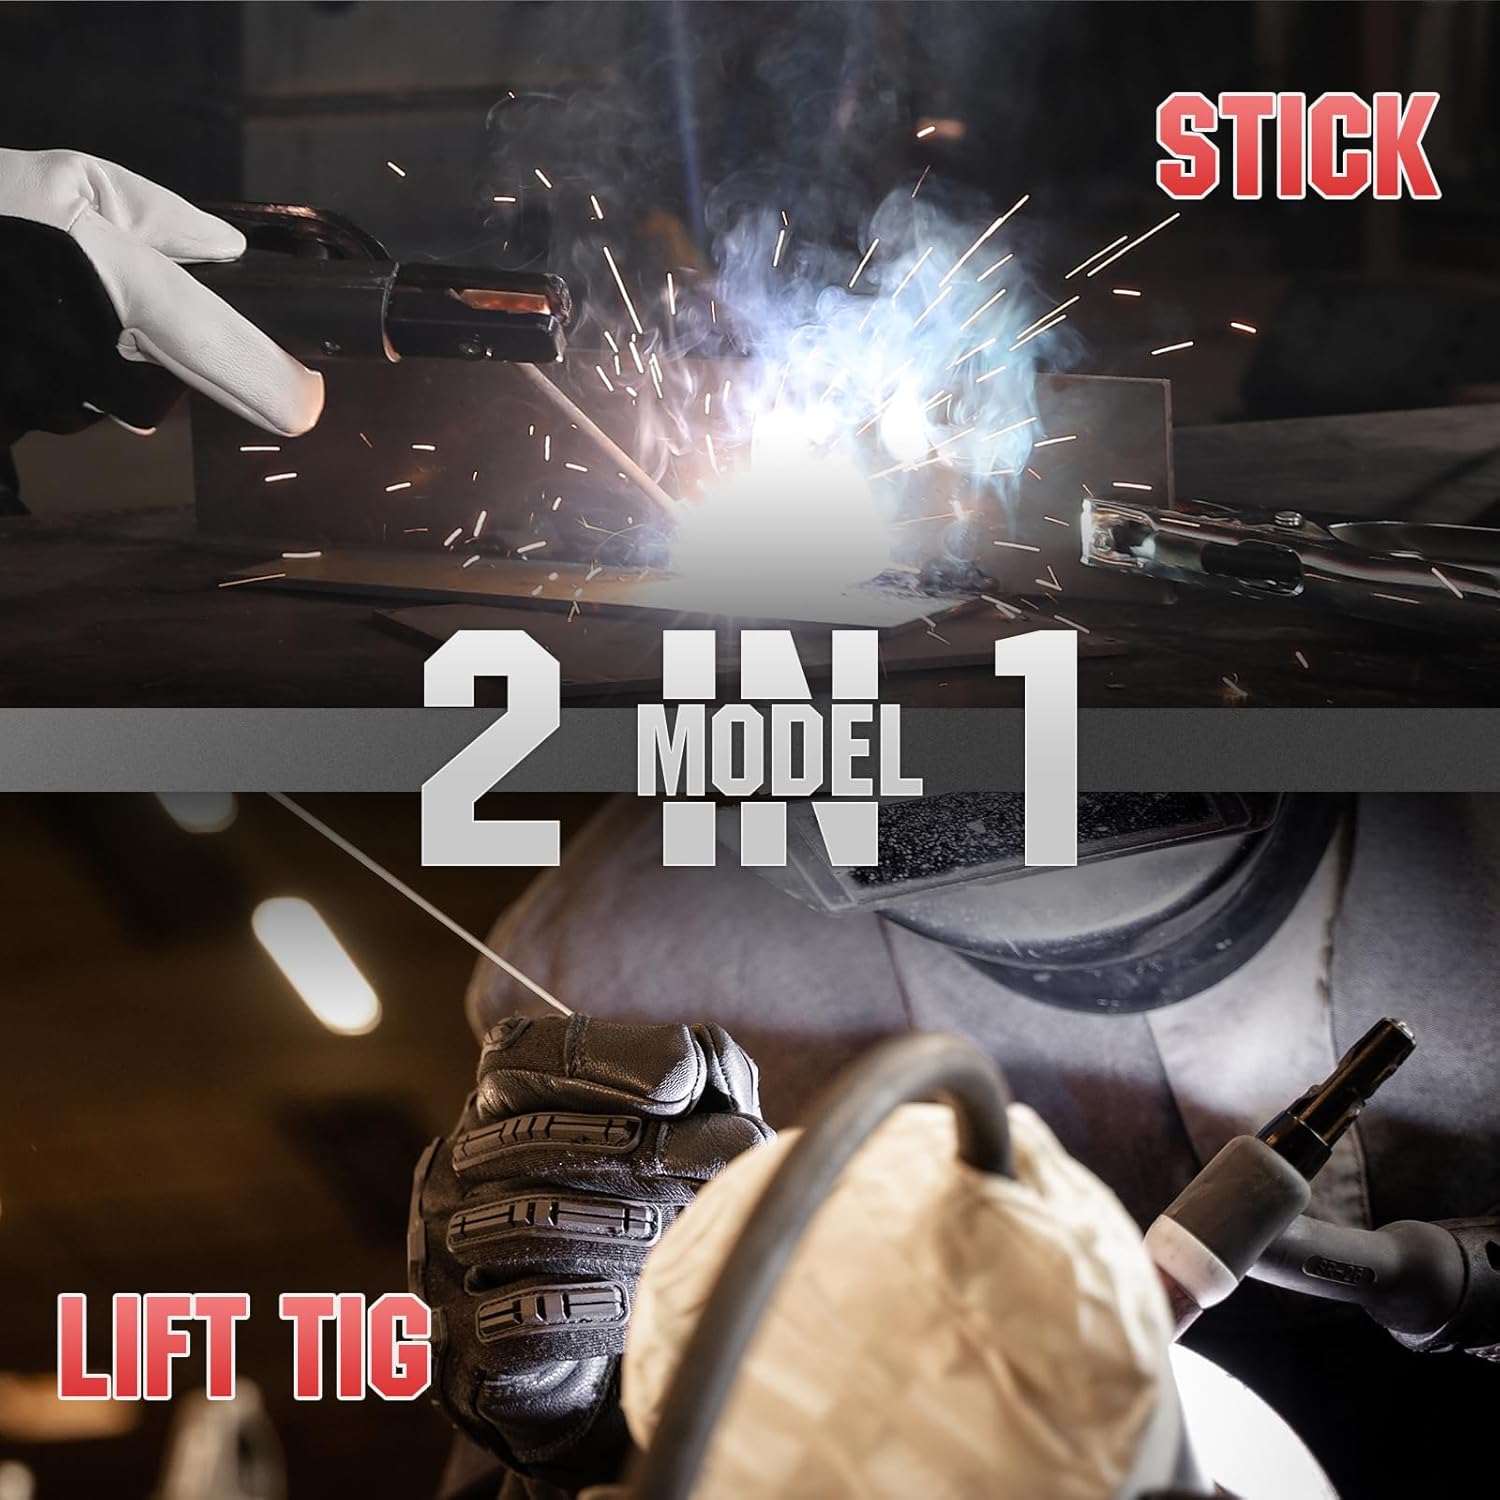
Image 3.1: The YESWELDER 205A supports both Stick (MMA) and Lift TIG welding modes.
Башкаруу панелине киришүү:
Familiarize yourself with the control panel components for efficient operation.
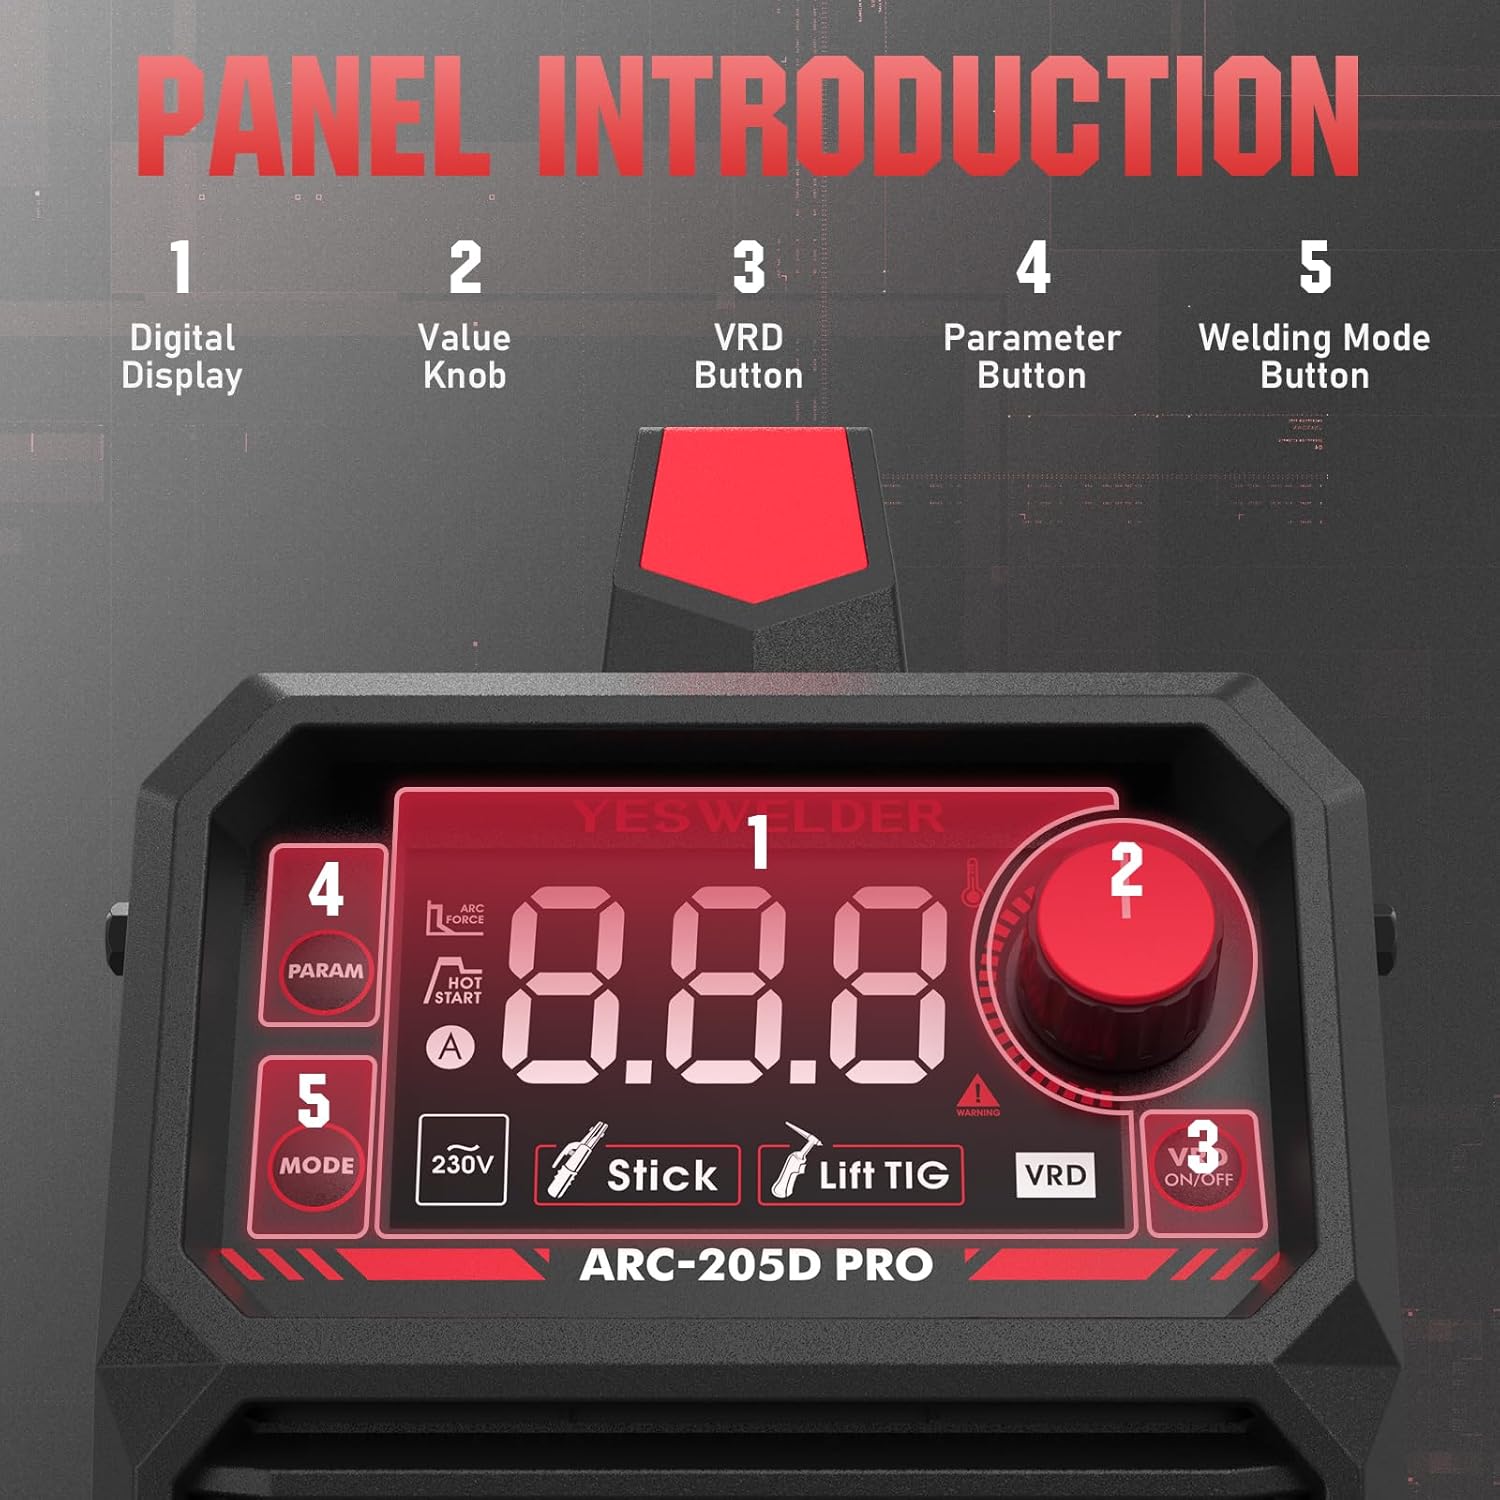
Сүрөт 3.2: Детальдуу view of the control panel, indicating the digital display, value knob, VRD button, parameter button, and welding mode button.
- Санариптик дисплей: Shows welding parameters such as current, electrode size, and selected mode.
- Value Knob: Adjusts welding current and other parameters.
- VRD Button: Activates or deactivates Voltage Reduction Device for enhanced safety in certain environments.
- Parameter Button: Cycles through adjustable parameters (e.g., Hot Start, Arc Force).
- Welding Mode Button: Selects between Stick (MMA) and Lift TIG welding modes.

Image 3.3: The upgraded large LED display provides clear and comprehensive information during operation.
4. Орнотуу
Proper setup is crucial for safe and effective welding. Follow these steps carefully.
4.1 Таңгактан чыгаруу жана текшерүү:
- Remove the welder and all accessories from the packaging.
- Ар кандай жеткирүү зыянын текшериңиз. Эгер зыян табылса, дароо камсыздоочу менен байланышыңыз.
- Таңгактоо тизмесинде саналган бардык компоненттердин бар экенин текшериңиз.
4.2 Connecting Accessories:

Image 4.1: Electrode holder and ground clamp байланыштар.
- Ground Clamp Байланыш: Жерди туташтырыңыз clamp cable to the negative (-) output terminal on the welder. Securely attach the ground clamp жакшы электрдик байланышты камсыз кылуу үчүн, жумуш бөлүгүнө же ширетүүчү үстөлгө бекитиңиз.
- Electrode Holder Connection (for MMA/Stick): Connect the electrode holder cable to the positive (+) output terminal on the welder. Insert the welding electrode into the holder.
- TIG Torch Connection (for Lift TIG - torch sold separately): If performing Lift TIG welding, connect the TIG torch cable to the negative (-) output terminal. Connect the gas hose from the TIG torch to your argon gas regulator.
4.3 Кубат туташуу:
- Ширетүүчүнүн кубат которгучу ӨЧҮРҮЛГӨН абалда экенин текшериңиз.
- Connect the power input cable to a suitable 230V power outlet. Verify that the power source meets the welder's requirements.
5. Иштөө нускамалары
The YESWELDER 205A offers two primary welding modes: Stick (MMA) and Lift TIG.
5.1 Starting the Welder:
- After connecting all cables and ensuring safety, turn the power switch to the ON position.
- The LED display will illuminate, showing the default welding mode and current.
5.2 Stick (MMA) Welding:

Image 5.1: Visual representation of Stick welding (left) and Lift TIG welding (right).
- Режимди тандоо: Press the 'Welding Mode Button' until 'Stick' (MMA) is indicated on the display.
- Токту коюу: Use the 'Value Knob' to adjust the welding current (amperes) according to the electrode type and material thickness. The machine supports up to 205A.
- Adjust Parameters (Optional): Press the 'Parameter Button' to cycle through Hot Start and Arc Force settings. Adjust these using the 'Value Knob' as needed for optimal arc ignition and stability.
- Ширетүүнү баштоо: Strike the arc by lightly touching the electrode to the workpiece and quickly lifting it slightly. Maintain a consistent arc length and travel speed.
5.3 Lift TIG Welding:
For Lift TIG welding, a TIG torch with a gas valve is required (not included).
- Режимди тандоо: Press the 'Welding Mode Button' until 'Lift TIG' is indicated on the display.
- Токту коюу: Use the 'Value Knob' to adjust the welding current (amperes) based on the material and tungsten electrode size.
- Газ агымы: Open the gas valve on the TIG torch to establish argon gas flow.
- Arc баштоо: Gently touch the tungsten electrode to the workpiece and then lift it slightly (1-2mm) to initiate the arc. The arc will start at a low current and ramp up to the set current.
- Perform Weld: Maintain a short arc length and feed filler rod manually if required.
6. Техникалык тейлөө
Үзгүлтүксүз техникалык тейлөө ширетүүчүнүн узак мөөнөттүү жана оптималдуу иштешин камсыздайт.
6.1 Күнүмдүк тейлөө:
- Clean the exterior of the machine with a dry, soft cloth.
- Inspect all cables and connections for damage or loose fittings.
- Check the electrode holder and ground clamp кийүү үчүн.
6.2 Periodic Maintenance (Monthly/Quarterly):
- Ички тазалоо: Disconnect power. Open the machine casing and use compressed air to blow out dust and debris from the cooling fins and internal components. Ensure no moisture enters.
- Fan Check: Verify that the cooling fan operates freely and is not obstructed.
- Терминалдык текшерүү: Check all power terminals for corrosion or looseness. Tighten if necessary.
Caution: Only qualified personnel should perform internal maintenance. Always disconnect power before opening the machine.
7. Кыйынчылыктарды
Жалпы көйгөйлөр жана аларды чечүү жолдору үчүн төмөнкү таблицага кайрылыңыз.
| Көйгөй | Мүмкүн себеп | Чечим |
|---|---|---|
| Ширетүүчү күйбөйт | No power from outlet; Power switch off; Internal fuse blown | Check power supply; Turn power switch ON; Contact service for fuse replacement |
| Жаа же алсыз жаа жок | Жерге туташуу начар; Токтун туура эмес жөндөөсү; Суу же эски электроддор; Бузулган кабелдер | Ensure good ground contact; Adjust current; Use dry electrodes; Inspect and replace cables |
| Ашыкча ысып кетүү көрсөткүчү күйүк | Exceeded duty cycle; Insufficient ventilation; Fan malfunction | Allow machine to cool down; Ensure clear airflow; Check fan operation |
| Туруксуз жаа | Туура эмес ток/томtage; Contaminated workpiece; Improper electrode angle | Adjust settings; Clean workpiece; Correct electrode technique |
8. Техникалык шарттар
Technical specifications for the YESWELDER ARC-205D-EU model.

Image 8.1: Detailed technical specifications for the ARC-205D model.
| Спецификация | Нарк |
|---|---|
| Модель номери | ARC-205D-EU |
| Киргизүү көлөмүtage (U1) | 230V |
| Max Input Current (I1 max) | 29A |
| Effective Input Current (I1 eff) | 22.4A |
| Output Current (I2) | 205A (MMA), 158A (TIG) |
| Output Voltage (U2) | 18.2V (MMA), 16.3V (TIG) at 60% duty cycle |
| No-Load Voltage (U0) | 65V |
| Duty Cycle (X) | 60Ада 205%, 100Ада 158% |
| Өлчөмдөрү (L x W x Y) | 31.5 x 12 x 20.8 см |
| Салмагы | 3.8 кг (8.4 фунт) |
| Муздатуу ыкмасы | Желдетүүчү муздатуу |
| Жылуулоо даражасы | F |
| Коргоо классы | IP21S |
9. Кепилдик жана колдоо
For warranty information, technical support, or service inquiries, please contact YESWELDER customer service. Keep your purchase receipt as proof of purchase.
For further assistance, visit the official YESWELDER webсайтына же алардын ыйгарым укуктуу тейлөө борборлоруна кайрылыңыз.


