1. Киришүү
This manual provides detailed instructions for the installation, operation, and maintenance of your SV3C Dual-Lens 4MP Outdoor Security Camera. Please read this manual thoroughly before use to ensure proper functionality and safety. This camera features advanced technology including 4MP high-resolution video, dual-band 2.4G/5G WiFi connectivity, Pan-Tilt-Zoom (PTZ) capabilities, AI human detection with auto-tracking, multiple night vision modes, two-way audio, and IP66 weatherproofing.
2. Продукциянын өзгөчөлүктөрү
- 4MP High Resolution & Three Night Vision Modes: The camera offers 4-megapixel high-definition video, providing clear and detailed images. It features four infrared lights for night vision up to 25 meters and supports three night vision modes (Infrared, Color, Smart) for clear color recording even in dark environments.
- PTZ Rotation Function: Control the camera's horizontal rotation from 0° to 180° and vertical rotation from 0° to 90° via the app, allowing for comprehensive monitoring of your surroundings.
- AI Human Detection & Auto-Tracking: Equipped with human detection and auto-tracking functions. When a human shape is detected in the monitoring area, an alarm is triggered, and the camera automatically tracks the movement, continuing to record. Motion detection sensitivity, range, and time can be adjusted via the app. The dual-lens system (8mm and 2.8mm lenses) automatically switches to zoom in on detected human movement for clearer identification.
- Recording Functions & 128GB Micro SD Card Support: Supports 24-hour recording and scheduled recording. Recordings are saved to a Micro SD card (up to 128GB, not included). When the storage is full, older footage is automatically overwritten. New image compression technology saves 1/3 to 1/4 of storage space, allowing for longer recording times.
- Alarm Linkage: When an alarm is triggered, notifications are sent to your email and app. Photos and motion detection recordings are saved to FTP and the Micro SD card.
- Two-Way Audio & IP66 Waterproof: Built-in high-quality speaker and microphone enable two-way communication. You can check your home's status, warn intruders, or communicate directly with family members. With IP66 waterproof and dustproof rating, it operates reliably in temperatures from -10℃ to +55℃, withstanding harsh weather conditions like typhoons, heavy rain, and snow. Suitable for outdoor installation at entrances, gardens, parking lots, and shops.
- Family Sharing & Connectivity: This network camera supports both wired and wireless connections. It features an AP mode, allowing use even without WiFi. Live viewing, recording playback, and settings can be managed via the smartphone app. Multiple 4MP cameras can be connected simultaneously, and the family sharing function allows real-time viewing by multiple users. Remote monitoring is possible when away from home, enabling you to watch over elderly family members or children's safety.
- Кош тилкелүү WiFi: Compatible with both 2.4Ghz and 5Ghz WiFi networks.
3. Пакеттин мазмуну
Пакет, адатта, төмөнкү нерселерди камтыйт:
- SV3C Dual-Lens 4MP Outdoor Security Camera
- Кубат адаптери (3 м)
- LAN кабели
- Суу өткөрбөйт туташтыргыч
- Mounting Sticker/Template
- Антенна
- Кронштейн орнотуу
- Бурамалар жана дубал сайгычтары
- Hex Wrench
- Quick Start Guide
- Колдонуучунун колдонмосу (жапонча)

Image: Package contents of the SV3C camera.
4. Орнотуу колдонмосу
4.1 Физикалык орнотуу
Follow these steps to physically install your camera:
- Жайгашкан жерди тандаңыз: Каалаган нерсени камсыз кылган ачык жерди тандаңыз viewing angle and is within range of your WiFi network or can be connected via LAN cable. Avoid direct sunlight, reflections from glass, and areas with extreme light/dark contrast.
- Attach Mounting Sticker: Place the mounting sticker on the wall at your desired installation point.
- Бургулоо тешиктери: Use a drill to create appropriate pilot holes according to the marks on the sticker.
- Дубалга сайгычтарды салуу: Gently tap the wall plugs into the drilled holes using a hammer.
- Коопсуз кашаа: Align the mounting bracket with the holes and secure it to the wall using screws. Ensure the angled side of the bracket faces downwards.
- Камераны тиркөө: Mount the camera onto the secured bracket and tighten the remaining screws to fix it in place.
- Антенналарды орнотуу: Screw the 5DB antennas onto the camera's antenna ports.
Video: Demonstrates how to insert a Micro SD card and install the camera.
4.2 Micro SD картаны киргизүү
Micro SD картаны салуу үчүн:
- Камераны өчүрүңүз.
- Locate the Micro SD card slot, usually under a protective cover on the camera body.
- Carefully insert the Micro SD card into the slot until it clicks into place.
- Replace the protective cover to ensure waterproofing.
4.3 Тармактык туташуу
The camera supports both WiFi and wired LAN connections.
- WiFi туташуусу: Ensure your camera is within range of your 2.4Ghz or 5Ghz WiFi router.
- LAN Cable Connection: Connect a LAN cable from your router to the camera's LAN port.

Image: WiFi and LAN cable connection options.
4.4 App Setup (CamHiPro)
Download the CamHiPro app from your smartphone's app store (iOS/Android).
- Колдонмону ишке киргизүү: Open the CamHiPro app.
- Камера кошуу: Жаңы түзмөк кошуу үчүн '+' сүрөтчөсүн таптаңыз.
- Select IP Camera: Choose 'IP Camera' from the device type options.
- Издөө Камера: The app will search for cameras within your LAN. Select your camera from the list.
- Configure Wireless: Enter your WiFi network details (SSID and password) if connecting wirelessly.
- Set Device Name: Assign a name to your camera (e.g., 'Front Door', 'Garden').
- Толук орнотуу: Follow any remaining on-screen prompts to complete the setup.
Video: Initial camera setup using Bluetooth.
Video: Demonstrates adding a camera via the CamHiPro app.
5. Иштөө нускамалары
5.1 PTZ Control
Use the directional controls within the CamHiPro app to pan (horizontal) and tilt (vertical) the camera to adjust its viewбурч.
Video: Demonstrates PTZ (Pan-Tilt-Zoom) functionality.

Image: PTZ (Pan-Tilt-Zoom) functionality with auto-tracking.
5.2 Түнкү көрүү режимдери
Камера үч түнкү көрүү режимин сунуш кылат:
- Infrared режими: Black and white video using infrared lights.
- Түс режими: Full-color video using built-in spotlights.
- Smart Mode: Automatically switches from infrared to color night vision when human motion is detected.

Image: Different night vision modes (Black & White, Color, Smart).
Video: Demonstrates color and monochrome night vision.
5.3 Эки тараптуу аудио
Use the microphone and speaker icons in the app to engage in two-way conversations with people near the camera.

Image: Two-way audio communication.
Video: Demonstrates two-way audio functionality.
5.4 Жаздыруу жана ойнотуу
Жазылган footage via the CamHiPro app. You can view 24-hour recordings, scheduled recordings, or event-triggered recordings saved on the Micro SD card.

Image: SD card recording and playback via the app.
Видео: Бүттүview of app features including recording and playback.
5.5 Кыймылды аныктоо жана эскертүүлөр
Configure motion detection zones and sensitivity in the app. When motion is detected, the camera will trigger alarms, send notifications, and begin auto-tracking.
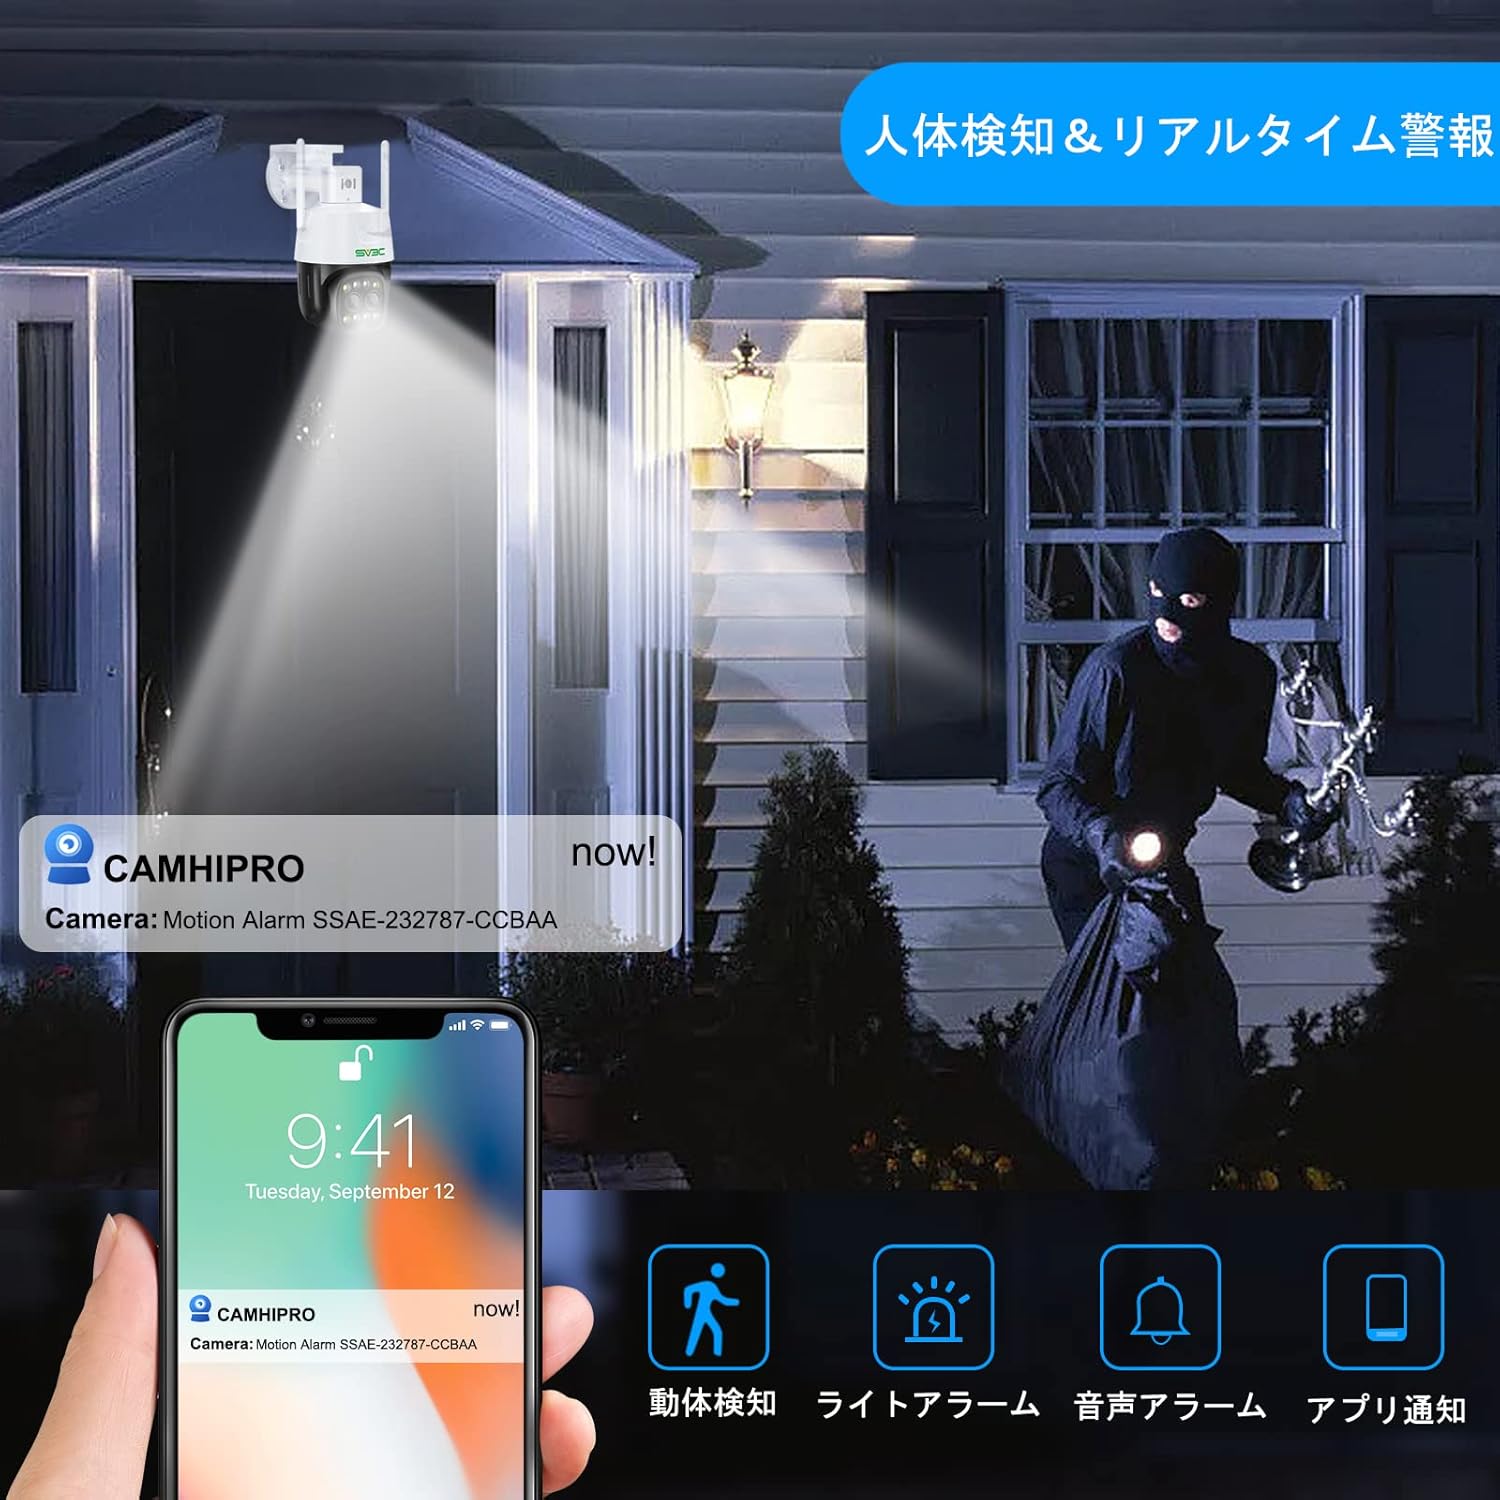
Image: AI human detection and real-time alerts.
Video: Demonstrates the auto-tracking feature.
Video: Demonstrates human detection and auto-tracking.
6. Техникалык тейлөө
- үзгүлтүксүз тазалоо: Сүрөттүн сапатын так камсыз кылуу үчүн камеранын линзасын мезгил-мезгили менен жумшак, кургак чүпүрөк менен тазалап туруңуз.
- Программалык камсыздоонун жаңыртуулары: Check the CamHiPro app regularly for firmware updates to ensure optimal performance and security.
- Кабелдик текшерүү: Inspect all cables and connections for any signs of wear or damage, especially for outdoor installations.
7. Кыйынчылыктарды
- Кубат жок: Кубат адаптери туура туташтырылганын жана розетканын иштеп турганын текшериңиз.
- Тармак туташуусу жок: Verify your WiFi password is correct. Ensure the camera is within WiFi range or the LAN cable is securely connected. Try restarting your router and camera.
- Сүрөттүн сапаты начар: Clean the camera lens. Check your network speed. Ensure the camera is not facing direct sunlight or extreme light sources.
- Кыймылды аныктоо иштебей жатат: Check motion detection settings in the app (sensitivity, detection zones). Ensure the auto-tracking feature is enabled if desired.
- Аудио жок: Check microphone and speaker settings in the app. Ensure volume is not muted.
- SD карта жаздырылбай жатат: Ensure the Micro SD card is correctly inserted and formatted. Check if the card is full or damaged.
8. Техникалык шарттар
| Өзгөчөлүк | Спецификация |
|---|---|
| Видео тартуунун резолюциясы | 1440p (4MP) |
| Connectivity Protocol | Wi-Fi (2.4Ghz/5Ghz) |
| Шайкеш түзмөктөр | Smartphones (iOS/Android) |
| Колдонуу чөйрөсү | Сыртта |
| Өзгөчөлүктөр | PTZ Technology, Night Vision (Infrared, Color, Smart), AI Human Detection, Auto-Tracking, Two-Way Audio, IP66 Waterproof |
| Монтаж түрү | Screw mount (ceiling/wall) |
| Масштабды көбөйтүү | 4x Digital Zoom |
| Продукт Салмагы | 780 г |
| Пакеттин өлчөмдөрү | 22.7 x 21.1 x 14.1 см |
9. Кепилдик жана колдоо
SV3C surveillance cameras come with a 12-month quality guarantee from the date of purchase. If you have any issues or questions about the product, please feel free to contact the seller via email. Please note that a Micro SD card is not included with the product.


