1. Киришүү
The ASUS ROG Strix Z790-I Gaming WiFi is a high-performance Mini-ITX motherboard designed for compact PC builds. It features robust power delivery, advanced thermal solutions, and extensive connectivity options, making it suitable for demanding gaming and computing tasks. This manual provides essential information for the proper installation, operation, and maintenance of your motherboard.
2. Кутуда эмне бар
Пакетиңизде бардык буюмдар бар экенин текшериңиз:
- ROG Strix Z790-I Gaming WiFi Motherboard
- WiFi 6E антеннасы
- Manual
- ROG стикерлери жана ыраазычылык билдирүү картасы
- ROG Strix Hive (Hybrid audio and USB hub)
- USB Type-C Power Connection Cable
- SATA кабелдери
- Кабель байламталары

3. Орнотуу колдонмосу
3.1. CPU орнотуу
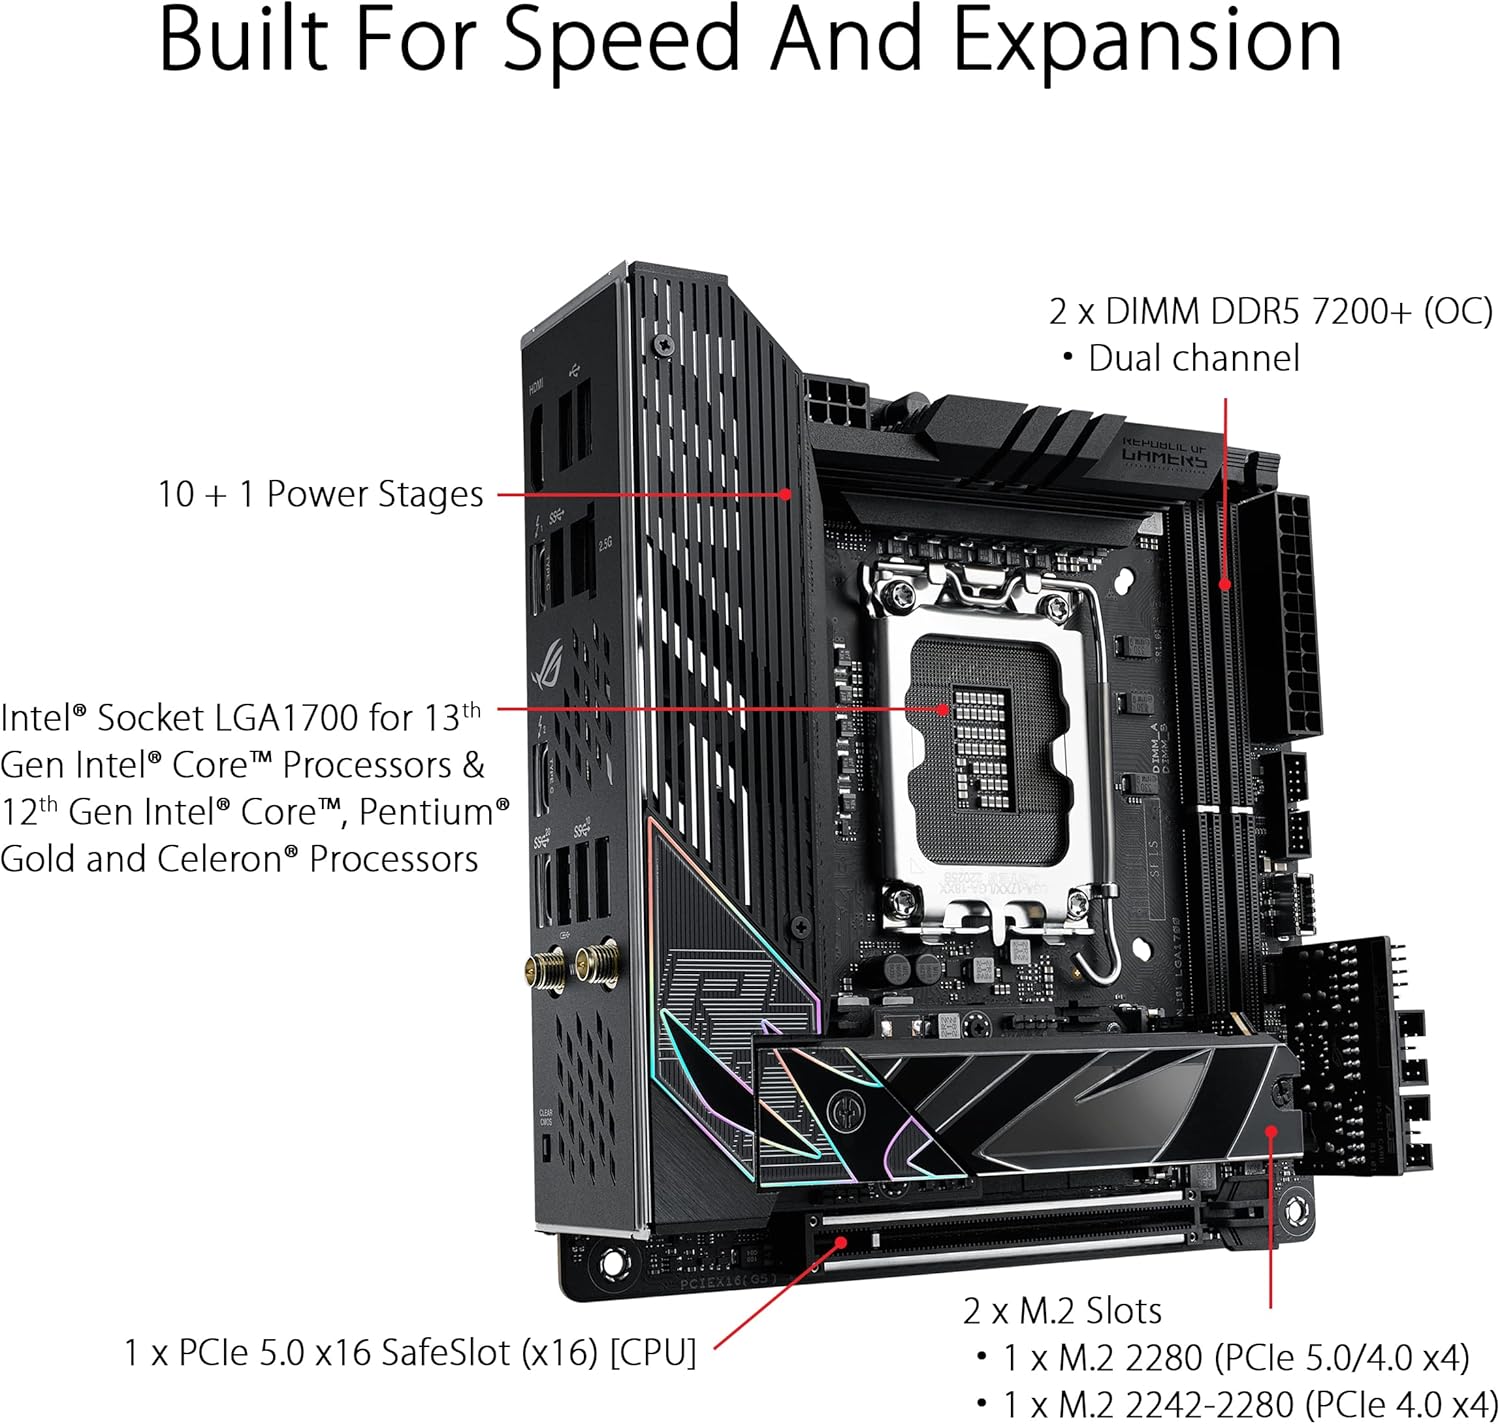
This motherboard supports Intel LGA 1700 socket processors (13th Gen Intel Core, Pentium Gold, and Celeron Processors). Ensure the CPU is correctly oriented before placing it into the socket. Refer to your CPU manual for specific installation instructions.
3.2. Эстутум (RAM) орнотуу
The board features 2 x DIMM DDR5 dual-channel slots, supporting up to 7200+ (OC) MHz. Install DDR5 memory modules into the designated slots, ensuring they are fully seated until the clips lock into place.
3.3. Сактоочу жайды орнотуу
The motherboard includes 2 x M.2 slots for high-speed NVMe SSDs (1 x M.2 2280 PCIe 5.0/4.0 x4 and 1 x M.2 2242-2280 PCIe 4.0 x4). Additionally, 2 x SATA 6Gb/s ports are available for traditional SATA drives.
3.4. Графикалык картаны орнотуу
Insert your graphics card into the 1 x PCIe 5.0 x16 SafeSlot. Ensure it is securely latched. This slot is directly connected to the CPU for maximum performance.
3.5. Электр байланыштары
Connect the 24-pin ATX power connector and the 8-pin CPU power connector from your power supply to the motherboard. Ensure all connections are firm.
3.6. Муздатуу системасы
The motherboard features comprehensive cooling solutions, including a VRM heatsink, M.2 heatsink with backplate, AIO Pump Header, and 4-pin PWM Fan Headers. Connect your CPU cooler and case fans to the appropriate headers for optimal thermal management.

3.7. Connectivity and I/O
Connect your peripherals to the rear I/O panel. This includes HDMI, various USB ports (including USB 3.2 Gen 2x2 Type-C and Thunderbolt 4), 2.5G Ethernet, and Wi-Fi 6E antenna connectors. The ROG Strix Hive provides additional audio and USB connectivity.

4. Иштөө нускамалары
4.1. Биринчи жүктөө жана BIOS орнотуу
Upon first power-on, the system will enter the BIOS (Basic Input/Output System). Here, you can configure boot order, system time, and other essential settings. Save changes and exit to proceed with operating system installation.
4.2. Операциялық системаны орнотуу
Insert your operating system installation media (USB drive or DVD) and follow the on-screen prompts to install your preferred OS. Ensure all necessary drivers are installed after the OS is set up for full functionality.
4.3. ROG Strix Hive Functionality
The ROG Strix Hive acts as a hybrid audio and USB hub. It features a volume control dial, USB 3.2 Gen 2 port (USB Type-C), USB 2.0 port with BIOS FlashBack, headphone jack with microphone input, optical S/PDIF output, AI Overclocking button, and FlexKey button. Utilize these features for enhanced control and convenience.
4.4. Аудио өзгөчөлүктөрү
Experience immersive audio with SupremeFX ALC4050 CODEC + ESS SABRE9260Q DAC, ROG Hyper-Grounding Technology, and Sonic Studio Virtual Mixer. These features provide high-quality audio output and input, along with advanced sound customization options.

5. Техникалык тейлөө
5.1. Драйвер жаңыртуулары
Regularly update your motherboard drivers (chipset, audio, LAN, Wi-Fi, etc.) from the ASUS support website to ensure optimal performance and compatibility. ASUS Armoury Crate software can assist with driver management.
5.2. BIOS жаңыртуулары
Periodically check for BIOS updates on the ASUS support website. BIOS updates can improve system stability, add support for new hardware, and enhance performance. Use the BIOS FlashBack feature for convenient updates without a CPU or RAM installed.
5.3. Тазалоо
Keep your motherboard and PC case clean from dust. Use compressed air to gently remove dust from fans, heatsinks, and other components. Ensure the system is powered off and unplugged before cleaning.
6. Кыйынчылыктарды
6.1. No Display/POST Issues
- Check all power connections (24-pin ATX, 8-pin CPU, graphics card).
- Reseat RAM modules in their slots. Try booting with only one RAM stick.
- Ensure the CPU is correctly installed and the cooler is properly seated.
- If using a dedicated graphics card, ensure your monitor is connected to it, not the motherboard's integrated graphics ports.
- Use the Clear CMOS button on the rear I/O panel to reset BIOS settings to default.
6.2. Connectivity Problems (Wi-Fi/Ethernet)
- Wi-Fi антенналарынын бекем туташтырылганын текшериңиз.
- Verify Ethernet cable is properly connected to both the motherboard and router/modem.
- Install the latest Wi-Fi and Ethernet drivers from the ASUS support webсайт.
- Операциялык системаңыздагы тармак жөндөөлөрүн текшериңиз.
6.3. Системанын туруксуздугу/кыйроолору
- Бардык айдоочулар жаңыртылганын текшериңиз.
- Ашыкча ысып кетүүнүн алдын алуу үчүн CPU жана GPU температураларын көзөмөлдөңүз.
- RAM бузулганын текшерүү үчүн эстутум диагностикалык куралдарын иштетиңиз.
- Verify power supply is sufficient for all components.
7. Техникалык шарттар
| Өзгөчөлүк | Деталь |
|---|---|
| Бренд | ASUS |
| Сериялар | ROG STRIX Z790-I GAMING WIFI |
| Элемент моделинин номери | 90MB1CM0-M0EAY0 |
| CPU розетка | LGA 1700 |
| Шайкеш процессорлор | Intel Celeron, Intel Pentium Gold |
| Чипсет түрү | Intel Z790 |
| RAM эс технологиясы | DDR5 |
| Memory Speed | 7600 МГц |
| Компьютердин эс тутумунун түрү | DIMM'лер |
| Зымсыз түрү | 802.11ax (Wi-Fi 6E) |
| USB 2.0 порттордун саны | 2 |
| Продукциянын өлчөмдөрү | 6.69 x 6.69 x 1.97 дюйм |
| Элемент Салмагы | 3.3 фунт |
| Платформа | Windows 11 |
8. Кепилдик жана колдоо
8.1. Кепилдик маалыматы
This ASUS product comes with a limited manufacturer's warranty. Please refer to the 'MB Europe Warranty Card' included in your package or visit the official ASUS support website for detailed terms and conditions, including warranty duration and coverage specific to your region.
8.2. Техникалык колдоо
For technical assistance, driver downloads, and further product information, please visit the official ASUS support webсайт. Кошумча жардам алуу үчүн сиз көп берилүүчү суроолорду жана коомчулук форумдарын да таба аласыз.
Расмий ASUS колдоосу: https://www.asus.com/support/