1. Киришүү
The Geek Airocook Digix 30L Electric Air Fryer Oven is a versatile kitchen appliance designed for multiple cooking functions including air frying, baking, grilling, toasting, rotisserie, dehydration, and reheating. This 1700W appliance features a digital display and intuitive spin control knob for precise temperature and time settings. Its 30-liter capacity is suitable for preparing meals for families.

Image 1: The Geek Airocook Digix 30L Electric Air Fryer Oven, a multi-functional kitchen appliance.
2. Маанилүү коопсуздук нускамалары
Сураныч, шайманды колдонуудан мурун бардык нускамаларды кылдат окуп чыгыңыз. Бул нускамаларды аткарбоо электр шокуна, өрткө же олуттуу жаракатка алып келиши мүмкүн.
- Туура вентиляцияны камсыз кылуу үчүн шайманды ар дайым туруктуу, ысыкка чыдамдуу бетке, дубалдардан жана башка шаймандардан алыс коюңуз.
- Шайманды, шнурду же сууга же башка суюктуктарга батырбаңыз.
- Шайман колдонулуп жатканда балдарды кылдаттык менен көзөмөлдөңүз.
- Колдонулбай турганда жана тазалоодон мурун розеткадан сууруп коюңуз. Тетиктерди кармоодон мурун муздаганча күтүңүз.
- Эч кандай шайманды зымы же сайы бузулган, же шайман иштебей калгандан кийин же кандайдыр бир түрдө бузулгандан кийин иштетпеңиз.
- Өндүрүүчү сунуш кылбаган аксессуарларды колдонбоңуз, анткени бул жаракатка алып келиши мүмкүн.
- Шайманды ысык газ же электр оттуктарынын жанына же ысытылган мешке койбоңуз.
- Курамында ысык май же башка ысык суюктуктар бар шайманды жылдырууда өтө этият болуңуз.
- Always ensure the crumb tray is in place before operation to catch drips and crumbs.
- Колдонуу учурунда шаймандын сырткы беттери ысып кетиши мүмкүн. Ысык тетиктерди кармаганда меш колдорун колдонуңуз.
3. Продукт бүтүп калдыview жана компоненттер
The Geek Airocook Digix comes with several accessories to enhance your cooking experience.
3.1 Негизги блок
The main unit houses the heating elements, fan, digital control panel, and oven cavity. It features a durable stainless steel body and a tempered glass door for viewтамак бышыруу учурунда тамакты жеш.
3.2 Аксессуарлар
- Чакан табак: Оңой тазалоо үчүн күкүмдөрдү жана тамчыларды чогултат.
- Аба кууруучу торчо себет: Ideal for air frying, allowing 360° hot air circulation around food.
- Меш текчеси: Бышыруу, кууруу жана жалпы духовкада колдонуу үчүн.
- Бышыруучу табак: Бышыруу жана тамчылатып чогултуу үчүн.
- Духовка үчүн кол кап: Ысык аксессуарларды коопсуз иштетүү үчүн.
- Текчени алуу: Tool for safely removing hot racks and trays.
- Rotisserie Rod: Бүтүн тоокторду же куурулган тоокторду грилде бышыруу үчүн.

Image 2: The Geek Airocook Digix oven shown with its included accessories: crumb tray, air fryer mesh basket, oven rack, baking tray, oven mitt, fetch rack, and rotisserie rod.
3.3 Башкаруу панели
The digital control panel features an LED display and two spin control knobs for easy operation.
- Digital LCD дисплей: Shows current temperature, time, and selected function.
- Функция баскычы: Used to select from 12 preset cooking functions (e.g., Fries, Roast, Fish, Prawns, Chicken, Rotisserie, Cake/Bake, Cookies, Toast, Pizza, Grill, Dehydrate).
- Температура/убакыт баскычы: Adjusts cooking temperature and time. Press to toggle between temperature and time adjustment.
- Баштоо/токтотуу баскычы: Бышыруу процессин баштайт же токтотот/токтотот.
- Ылдамдык баскычы: Adjusts fan speed for certain functions.
- Жарык баскычы: Turns the internal oven light on or off.
- Rotisserie Rotation On/Off: Activates or deactivates the rotisserie function.

Image 3: Close-up of the digital control panel with LCD display, function knob, temperature/time knob, and various control buttons.
4. Орнотуу жана биринчи колдонуу
- Пакеттен чыгаруу: Carefully remove all packaging materials, stickers, and labels from the appliance and accessories.
- Тазалоо: Мештин сыртын d менен сүртүңүзamp cloth. Wash all accessories (crumb tray, air fryer basket, racks, baking tray, rotisserie rod) with warm, soapy water. Rinse thoroughly and dry completely.
- Жайгашкан жери: Place the oven on a flat, stable, heat-resistant surface. Ensure there is at least 15 cm (6 inches) of clear space on all sides and above the oven for proper ventilation.
- Crumb лотокту салыңыз: Slide the crumb tray into the lowest slot at the bottom of the oven cavity. This tray must always be in place during operation.
- Кубат туташуу: Электр шнурын жерге туташтырылган электр розеткасына сайыңыз. Дисплей күйөт.
- Баштапкы күйгүзүү: Before first use with food, operate the oven empty for approximately 15 minutes at 200°C (390°F) to burn off any manufacturing residues. A slight odor or smoke is normal during this process. Ensure good ventilation.
5. Иштөө нускамалары
5.1 Жалпы операция
- Күйгүзүү: Press the START/STOP button to turn on the oven.
- Функцияны тандоо: Turn the Function Knob to select your desired cooking preset (e.g., Air Fry, Bake, Grill). The corresponding icon will light up on the display.
- Убакытты/Температураны тууралоо: Press the TIME/TEMP button to toggle between adjusting time and temperature. Turn the Temperature/Time Knob to set the desired values.
- Даярдоону баштоо: Бышырып баштоо үчүн START/STOP баскычын басыңыз.
- Пауза/Резюме: During cooking, press the START/STOP button once to pause. Press again to resume.
- Даярдоону токтотуу: Press and hold the START/STOP button for a few seconds to stop the cooking cycle completely.
- Автоматтык түрдө өчүрүү: The oven features an auto shut-off function that activates once the cooking cycle is complete.
5.2 Бышыруунун өзгөчө функциялары
The oven utilizes 360° hot air circulation technology for even cooking and crispy results with minimal oil.

Image 4: Diagram illustrating the 360° hot air circulation technology within the oven cavity, ensuring even cooking.
- Air Fry: Use the air fryer mesh basket for best results. This function is ideal for achieving crispy textures with significantly less oil than traditional frying.
- Бышыруу: Use the baking tray or oven rack. Suitable for cakes, cookies, bread, and other baked goods.
- Гриль: Place food on the oven rack or baking tray. Ideal for grilling meats, vegetables, and other items.
- Rotisserie: Attach food securely to the rotisserie rod. Insert the rod into the designated slots in the oven and activate the rotisserie rotation.
- Дегидратация: Use the mesh basket or oven rack for dehydrating fruits, vegetables, or jerky.
- тост: Use the oven rack for toasting bread to your desired level.

Сүрөт 5: Мисample of food being prepared using the Air Fry function, resulting in crispy dishes.

Сүрөт 6: Мисample of food being prepared using the Bake function, such as cakes and pizzas.

Сүрөт 7: Мисample of food being prepared using the Grill function, suitable for barbecue-style cooking.

Сүрөт 8: Мисample of bread being toasted using the Toast function, with various browning levels shown.
6. Тазалоо жана тейлөө
Үзгүлтүксүз тазалоо оптималдуу иштешин камсыз кылат жана шайманыңыздын иштөө мөөнөтүн узартат.
- Ажыратып, муздатуу: Тазалоодон мурун ар дайым мешти розеткадан сууруп, аны толугу менен муздатыңыз.
- Таза ички: Жарнама менен ички дубалдарды сүртүңүзamp cloth and mild detergent. For stubborn stains, use a non-abrasive cleaner. Ensure the interior is dry before next use.
- Таза сырткы: Сырткы беттерин жумшак менен сүртүңүз, гamp кездеме. Абразивдүү тазалагычтарды же тазалоочу жайларды колдонбоңуз.
- Таза аксессуарлар: Wash the crumb tray, air fryer basket, oven racks, baking tray, and rotisserie rod in warm, soapy water. Rinse and dry thoroughly. These accessories are generally dishwasher safe, but hand washing is recommended for longevity.
- Чакан табак: Empty and clean the crumb tray after each use to prevent grease buildup and potential fire hazards.
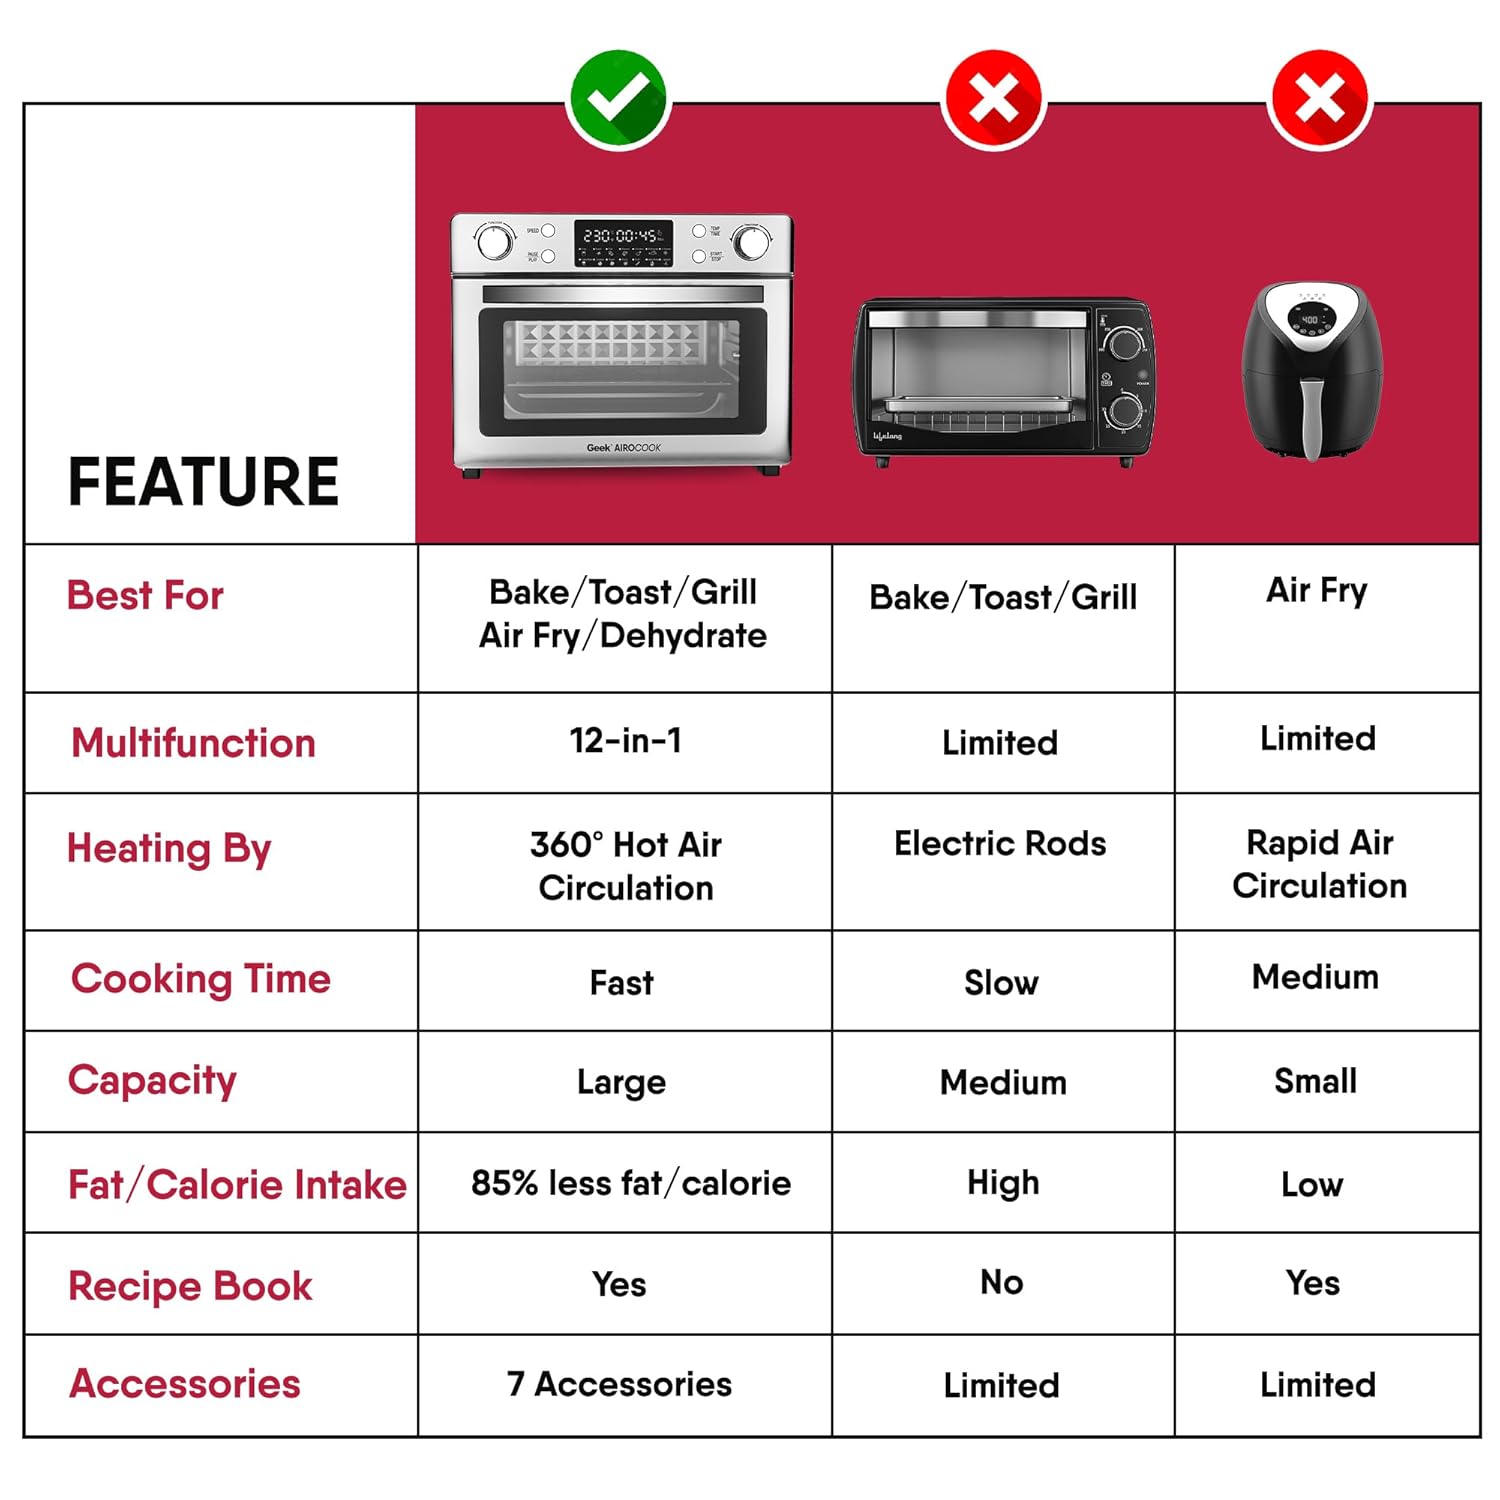
Image 9: A hand cleaning the interior of the oven with a cloth, demonstrating the easy-to-clean design with a detachable crumb tray.
7. Кыйынчылыктарды
| Көйгөй | Мүмкүн себеп | Чечим |
|---|---|---|
| Шайман күйбөйт. | Not plugged in; power outlet malfunction; START/STOP button not pressed. | Ensure the power cord is securely plugged into a working outlet. Press the START/STOP button. |
| Тамак бир калыпта бышпайт. | Overcrowding the basket/tray; incorrect temperature/time settings. | Do not overcrowd the cooking area. Ensure food is in a single layer. Adjust temperature and time as needed. Flip or shake food halfway through cooking. |
| Мештен ак түтүн чыгып жатат. | Grease/oil residue from previous use; fatty food cooking. | Clean the crumb tray and interior thoroughly. For fatty foods, ensure proper ventilation and consider using less oil. |
| Тамак кытырак эмес. | Too much moisture in food; not enough oil (for air frying); incorrect temperature. | Pat food dry before cooking. For air frying, a small amount of oil can help. Increase temperature or cooking time slightly. |
8. Техникалык шарттар
- Бренд: Geek
- Модель аты: AiroCook
- Сыйымдуулугу: 30 литр
- Ватtage: 1700 Ватт
- Башкаруу түрү: Knob (Digital)
- Материал: Stainless Steel (exterior), Tempered Glass (door)
- Продукциянын өлчөмдөрү: 40.5D x 42.5W x 34H Сантиметр
- Элемент Салмагы: 10 кг 400 г
- Камтылган компоненттер: 1x AirFryer Oven, Crumb tray, Air fryer Mesh Basket, Oven Rack, Baking Tray, Oven Mitt, Fetch Rack, Rotisserie Rod
9. Кепилдик жана колдоо
For warranty information, product registration, or technical support, please refer to the warranty card included with your purchase or visit the official Geek webсайт. Сатып алуу квитанциясын кепилдик дооматтары үчүн сатып алуунун далили катары сактаңыз.