Introduction
Сатып алганыңыз үчүн рахматasing the Nedis Alarm Clock with Wireless Charger. This device combines a digital alarm clock with a Qi-certified wireless charging pad, a USB-A charging port, a dimmable display, dual alarm settings, and a color-changing night light. This manual provides essential information for safe and efficient use of your new device.
Коопсуздук маалыматы
- Колдонуудан мурун бардык нускамаларды кунт коюп окуп чыгыңыз.
- Аппаратты суудан, нымдан жана экстремалдык температурадан алыс кармаңыз.
- Аппаратты өз алдынча бөлүүгө же оңдоого аракет кылбаңыз. Бардык тейлөөлөрдү квалификациялуу кызматкерлерге тапшырыңыз.
- Ensure the power adapter used is compatible with the device's power requirements. For fast charging, a QC3.0 power adapter (not included) is recommended.
- Avoid placing metal objects on the wireless charging pad, as this may interfere with charging or cause overheating.
Пакеттин мазмуну
- Nedis Alarm Clock with Wireless Charger (Model WCACQ30WT)
- Power Adapter (if included, otherwise sold separately)
- User Manual
Продукт бүттүview
Familiarize yourself with the various components of your alarm clock:

Сүрөт 1: Алдыңкы View. This image displays the front of the alarm clock, featuring the large digital time display and the touch-sensitive control buttons located above it. The buttons include controls for display brightness, time setting, and alarm adjustments.
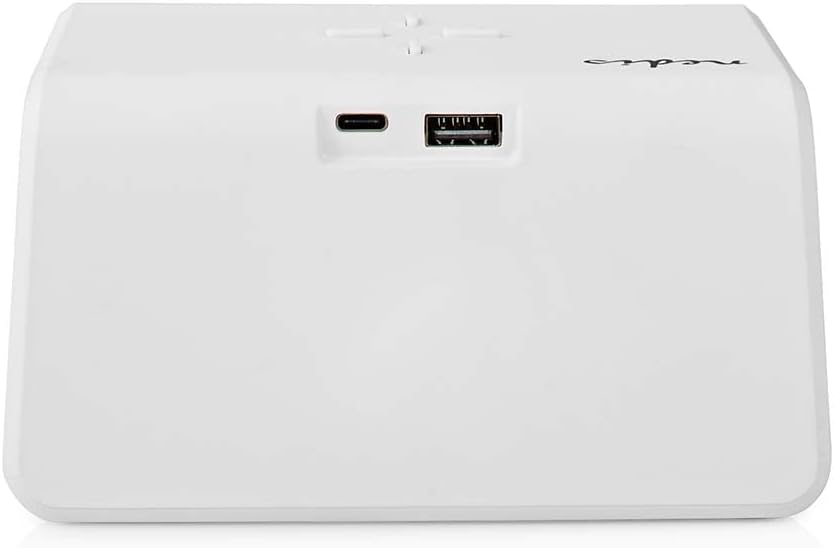
Сүрөт 2: Арткы View. The back of the alarm clock is shown, highlighting the USB-C port for power input and a standard USB-A port for charging external devices.
- Санариптик дисплей: Убакытты, ойготкучтун абалын жана башка көрсөткүчтөрдү көрсөтөт.
- Башкаруу баскычтары: (Located on top)
- Light Button: Controls night light.
- Time/Alarm Set Button: For setting time and alarms.
- +/- Buttons: Adjust values.
- Зымсыз заряддоо аянтчасы: (Top surface) For Qi-compatible devices.
- USB-C киргизүү: (Rear) For connecting the power adapter.
- USB-A чыгаруу: (Rear) For charging other devices via cable.
- Night Light Panel: (Side/Rear) Emits ambient light.
Жайгашуу
- Туташуу кубаты: Plug the provided power adapter into the USB-C input port on the back of the alarm clock. Connect the other end to a wall outlet. The display will light up.
- Баштапкы убакыт жөндөөсү: The clock may display a default time. Proceed to the 'Operating Instructions' section to set the correct time.
Иштөө нускамалары
1. Убакытты белгилөө
- басып, кармап туруңуз Time/Alarm Set button (usually marked with a clock icon) until the hour digits start flashing.
- колдонуу + or - саатты тууралоо үчүн баскычтар.
- басыңыз Time/Alarm Set мүнөт жөндөөсүнө өтүү үчүн кайра баскычын басыңыз. Мүнөт сандары күйөт.
- колдонуу + or - мүнөттөрдү тууралоо үчүн баскычтар.
- басыңыз Time/Alarm Set ырастоо жана убакыт орнотуу режиминен чыгуу үчүн дагы бир жолу басыңыз.
2. Ойготкучтарды орнотуу (ойготкуч 1 жана Ойготкуч 2)
This device supports two independent alarm times.
- басыңыз Time/Alarm Set button once to enter Alarm 1 setting mode. The alarm icon and hour digits for Alarm 1 will flash.
- колдонуу + or - Ойготкуч 1 үчүн саатты тууралоо үчүн баскычтар.
- басыңыз Time/Alarm Set button again to switch to minute adjustment for Alarm 1.
- колдонуу + or - buttons to adjust the minutes for Alarm 1.
- басыңыз Time/Alarm Set button again to confirm Alarm 1 and move to Alarm 2 setting mode (if applicable). Repeat steps 2-4 for Alarm 2.
- After setting Alarm 2, press the Time/Alarm Set ойготкучту орнотуу режимин ырастоо жана чыгуу үчүн баскычты басыңыз.
- Ойготкучту жандыруу/өчүрүү үчүн, баскычын кыска басыңыз Time/Alarm Set button until the desired alarm icon (e.g., 'AL1' or 'AL2') appears or disappears on the display.
3. Тындырма функциясы
When an alarm sounds, press any button (except the alarm off button, if present) to activate the snooze function. The alarm will temporarily stop and sound again after a few minutes (typically 5-10 minutes, refer to specific model details if available). To turn off the alarm completely, press the designated alarm off button or follow the instructions for deactivating the alarm.
4. Wireless Charging (Qi)
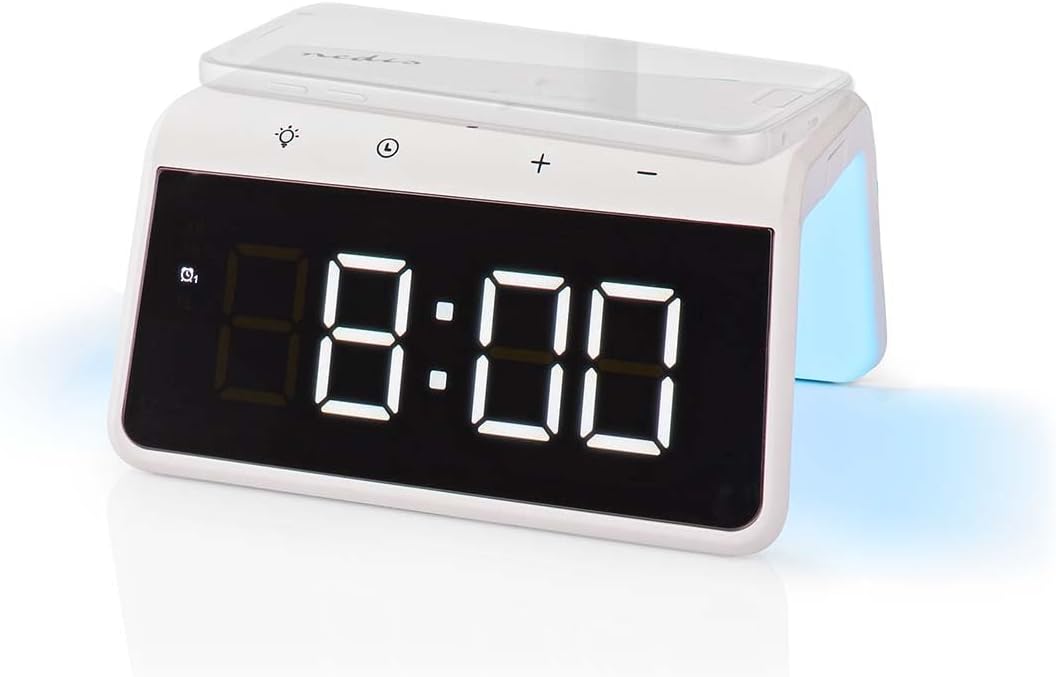
Image 3: Wireless Charging. A smartphone is shown resting on the top surface of the alarm clock, which functions as a Qi wireless charging pad.
- Place your Qi-compatible smartphone or device directly onto the wireless charging pad located on the top surface of the alarm clock.
- Ensure the device is centered on the charging pad for optimal performance.
- A charging indicator (e.g., an icon on the display or an LED light) will typically illuminate to confirm that charging has begun.
- The charger supports 5W, 7.5W, 10W, and 15W output, automatically adjusting to your device's requirements. For 15W fast charging, a QC3.0 power adapter (not included) is required.
5. USB-A Charging Output
The alarm clock features an additional USB-A port for charging devices that are not Qi-compatible or for simultaneous charging.
- Connect your device's USB charging cable to the USB-A output port on the back of the alarm clock.
- Кабелдин экинчи учун шайманга туташтырыңыз.
- Заряддоо автоматтык түрдө башталат.
6. Түнкү жарык функциясы

Image 4: Night Light. This image shows the side of the alarm clock with its integrated night light emitting a soft glow.
- басыңыз Жарык button (usually marked with a light bulb icon) to turn the night light on or off.
- кайра-кайра басыңыз Жарык button to cycle through different color modes or to set a specific color. The night light can display a diverse changing color palette.
- The night light can be set to remain on or to be manually activated as needed.
7. Дисплейдин жарыктыгын жөндөө
The digital display features dimmable backlighting for comfortable viewар кандай жарык шарттарында.
- Look for a dedicated brightness button or a combination of buttons (e.g., a short press of the Light button or +/- buttons when not in setting mode) to adjust the display brightness.
- Cycle through available brightness levels (e.g., high, medium, low, off).
Техникалык тейлөө
- Тазалоо: Аппаратты жумшак, кургак же бир аз сүртүңүз damp кездеме. Абразивдүү тазалагычтарды же эриткичтерди колдонбоңуз.
- Сактагыч: Узак мөөнөткө колдонулбаганда, аппаратты розеткадан сууруп, салкын, кургак жерде сактаңыз.
Проблемаларды чечүү
- Түзмөк күйбөй жатат: Ensure the power adapter is securely connected to both the alarm clock and a working power outlet.
- Зымсыз кубаттоо иштебей жатат:
- Түзмөгүңүз Qi менен шайкеш келерин текшериңиз.
- Ensure your device is centered on the charging pad.
- Remove any thick phone cases or metal objects between the phone and the charging pad.
- USB-A charging not working: Check the USB cable for damage and ensure it is properly connected to both the alarm clock and your device.
- Сигнал чыкпай жатат: Ensure the alarm is activated (check for the alarm icon on the display) and the volume is not set to zero (if adjustable).
- Display too dim/bright: Adjust the display brightness using the dedicated controls.
Техникалык шарттар
| Өзгөчөлүк | Спецификация |
|---|---|
| Модель номери | WCACQ30WT |
| Бренд | NEDIS |
| Продукциянын өлчөмдөрү | 14 x 3.81 x 7 см |
| Элемент Салмагы | 242 грамм |
| Зымсыз кубаттоо чыгышы | 5W / 7.5W / 10W / 15W (Qi Certified) |
| USB-A чыгаруу | Ооба |
| Дисплей түрү | Санарип |
| Өзгөчөлүктөр | Alarm, Charging Port, Dimmable Display, Night Light (Color Changing) |
| Power Source | Электр зымдары |
| Түс | Ак |
Кепилдик жана колдоо
Nedis products are manufactured to high quality standards. In the unlikely event of a defect during the warranty period, please contact your retailer for support. The warranty period is subject to the terms and conditions of the retailer and local consumer laws.
For further assistance or technical support, please refer to the official Nedis webсайтка же түздөн-түз кардарларды тейлөөгө кайрылыңыз. Сатып алганыңыздын далили катары сатып алуу дүмүрчөгүңүздү сактаңыз.


