1. Киришүү
The LUXBIRD LB-2SC Digital Heating Mat Thermostat Controller is designed to precisely control the temperature of heating mats and other heating devices. Featuring dual independent outlets and two temperature probes, it allows for simultaneous control of two separate heating environments. This controller is ideal for a variety of applications including seedling germination, reptile habitats, home brewing, breeding, incubation, and greenhouse temperature management. Its user-friendly interface and advanced alarm functions ensure optimal conditions and safety for your specific needs.
2. Коопсуздук маалыматы
- Колдонуудан мурун бардык нускамаларды кунт коюп окуп чыгыңыз.
- Do not immerse the controller unit in water or expose it to excessive moisture.
- жалпы ват камсыз кылууtage of connected devices does not exceed 250W per outlet or 500W total.
- Балдар жана үй жаныбарлары жетпеген жерде сактаңыз.
- Тазалоодон же оңдоодон мурун блокту розеткадан сууруп алыңыз.
- Do not use if the power cord, probes, or unit itself is damaged.
- Үй ичинде гана колдонуу үчүн.
3. Пакеттин мазмуну
- 1 x LUXBIRD LB-2SC Digital Heating Mat Thermostat Controller
- 2 x Temperature Probes with Suction Cups
- 1 х Колдонуучунун колдонмосу (бул документ)
4. Продукт бүтүп калдыview
The LUXBIRD LB-2SC controller features a clear LCD display and intuitive buttons for easy operation. It includes two independent probe inputs (P1, P2) and two corresponding power outlets (WORK1, WORK2).

Figure 4.1: LUXBIRD LB-2SC Digital Heating Mat Thermostat Controller with its two temperature probes.
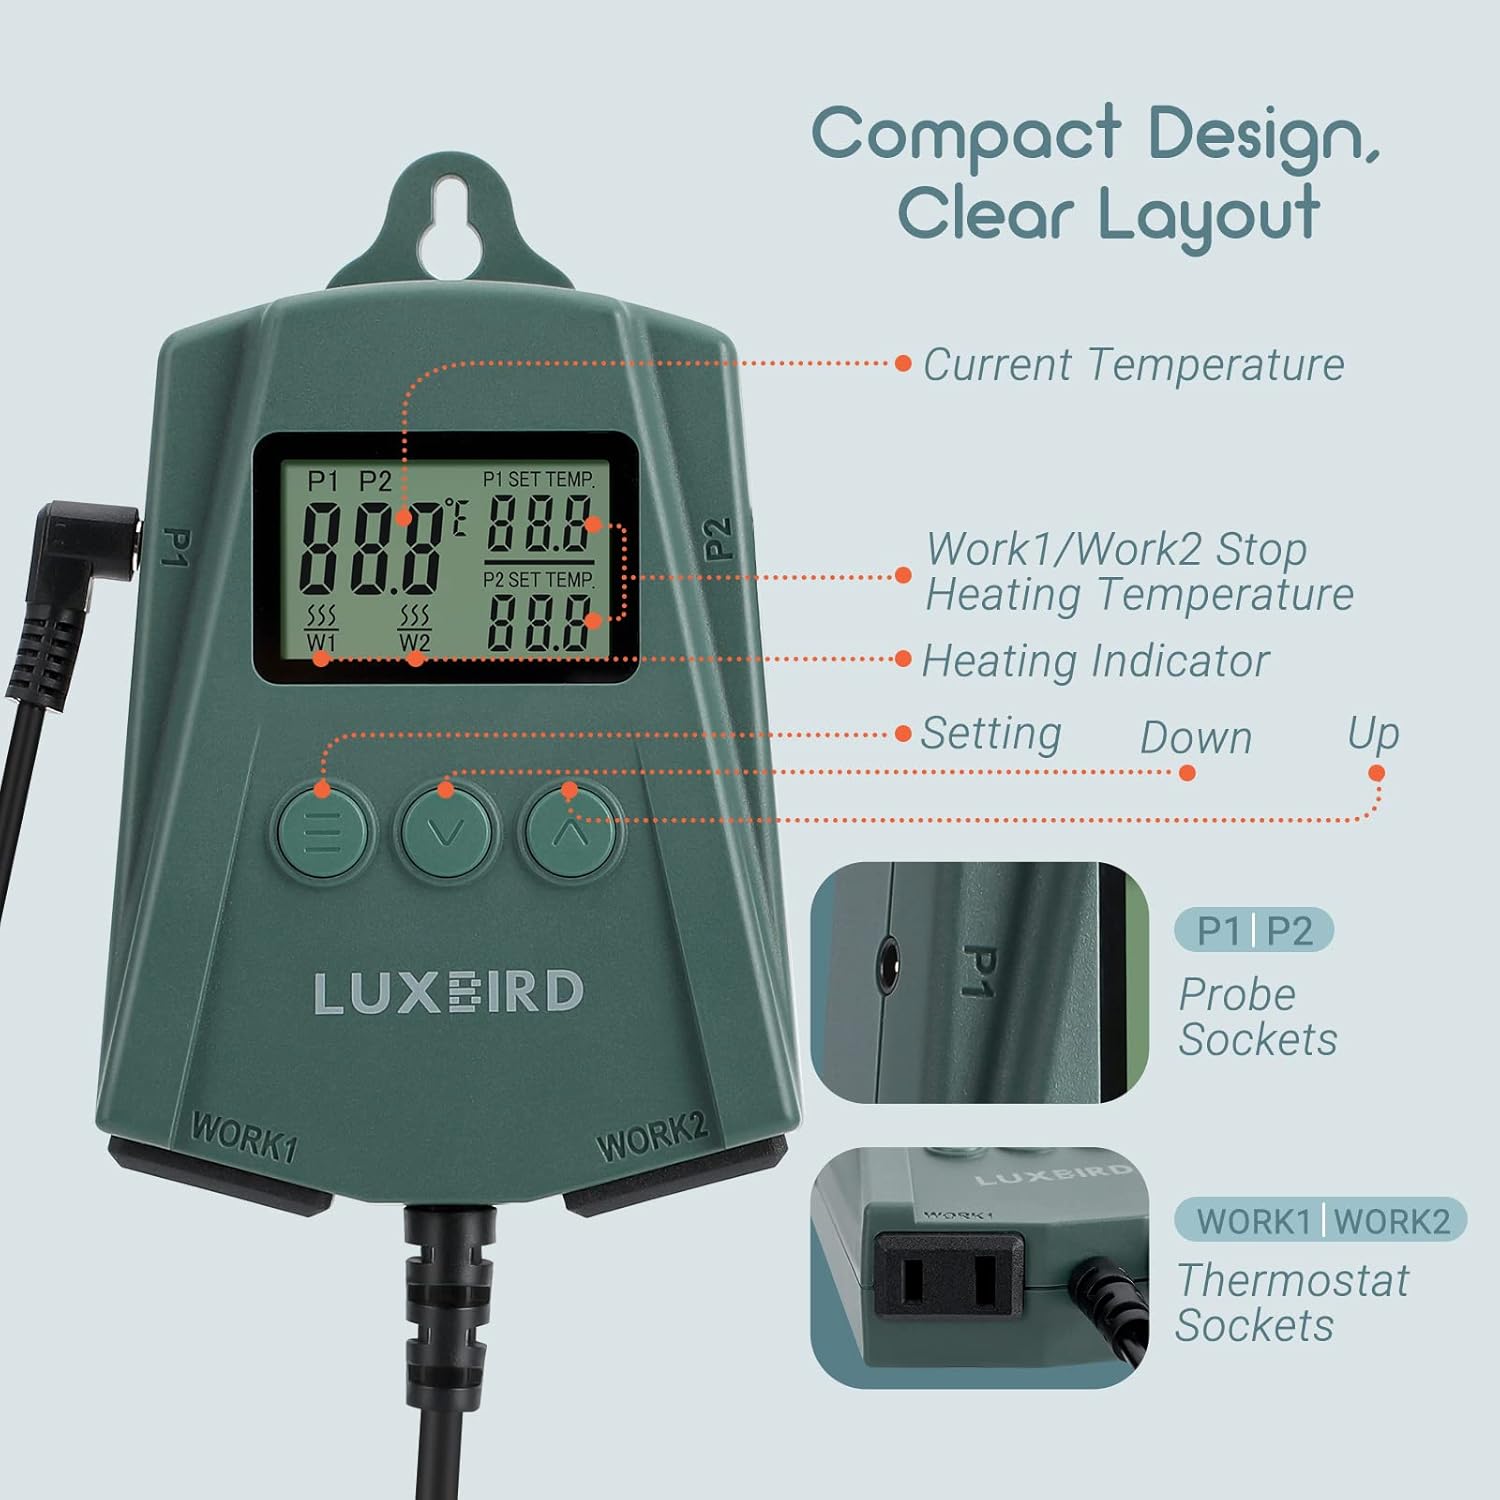
Figure 4.2: Detailed diagram of the controller's display and connection points.
Негизги компоненттер:
- LCD дисплей: Shows current temperature, set temperature, and heating status for both P1 and P2.
- Меню баскычы (≡): Used to access settings and confirm selections.
- Down Button (∨): Decreases values or navigates menu options.
- Up Button (∧): Increases values or navigates menu options.
- P1/P2 Probe Sockets: Connect the temperature probes.
- WORK1/WORK2 Thermostat Sockets: Connect heating devices (e.g., heating mats).
- Асылып турган өтмөк: For convenient mounting of the unit.
5. Орнотуу
- Жайгашкан жери: Choose a suitable location for the controller. It has a hanging tab for easy mounting. Ensure it is away from direct heat sources or excessive moisture.
- Зонддорду туташтыруу: Insert the two temperature probes into the P1 and P2 sockets on the sides of the controller. Place the probe tips in the desired temperature monitoring locations (e.g., soil for seedlings, inside a reptile enclosure). Use the included suction cups to secure the probes if needed.
- Connect Heating Devices: Plug your heating mats or other heating devices into the WORK1 and WORK2 outlets at the bottom of the controller. Ensure the total wattage for each outlet does not exceed 250W, and the combined total does not exceed 500W.
- Күйгүзүү: Plug the controller's power cord into a standard 100-240VAC, 50/60Hz electrical outlet. The LCD display will light up.

5.1-сүрөт: Мисample setup showing the controller connected to heating mats for plants.

Figure 5.2: The controller's hanging tab allows for flexible placement.
6. Иштөө нускамалары
6.1. Setting Target Temperature (P1/P2)
- басыңыз Меню (≡) button once. The P1 set temperature will flash.
- колдонуу Up (∧) or Төмөн (∨) buttons to adjust the desired target temperature for P1.
- басыңыз Меню (≡) button again to confirm P1 setting and move to P2. The P2 set temperature will flash.
- колдонуу Up (∧) or Төмөн (∨) buttons to adjust the desired target temperature for P2.
- басыңыз Меню (≡) button a third time to confirm P2 setting and exit the setting mode.

Figure 6.1: The controller supports a wide temperature control range.
6.2. Температураны өлчөө бирдиктерин которуу (°C/°F)
Фаренгейт (°F) жана Цельсий (°C) ортосунда которулуу үчүн:
- With the unit in normal operating mode (not in setting mode), press and hold the Up (∧) button for approximately 3 seconds. The display will switch units. Repeat to switch back.

Figure 6.2: Easily switch between Fahrenheit and Celsius units.
6.3. Жогорку/Төмөнкү температура сигнализациялары
The controller features audible alarms to alert you if the detected temperature falls outside your desired range or if a probe abnormality occurs.
- When the temperature exceeds the set high limit or drops below the set low limit, the alarm will sound.
- If a probe is disconnected or faulty, an alarm will also sound.
- Ойготкучтун үнүн басуу үчүн каалаган баскычты басыңыз.

Figure 6.3: The controller provides high/low temperature and probe abnormality alarms.
6.4. Real-Time Temperature Monitoring
The informative LCD display allows you to view the current temperature measured by each probe (P1 and P2), their respective target temperatures, and the heating status (indicated by a heating icon) at a glance.
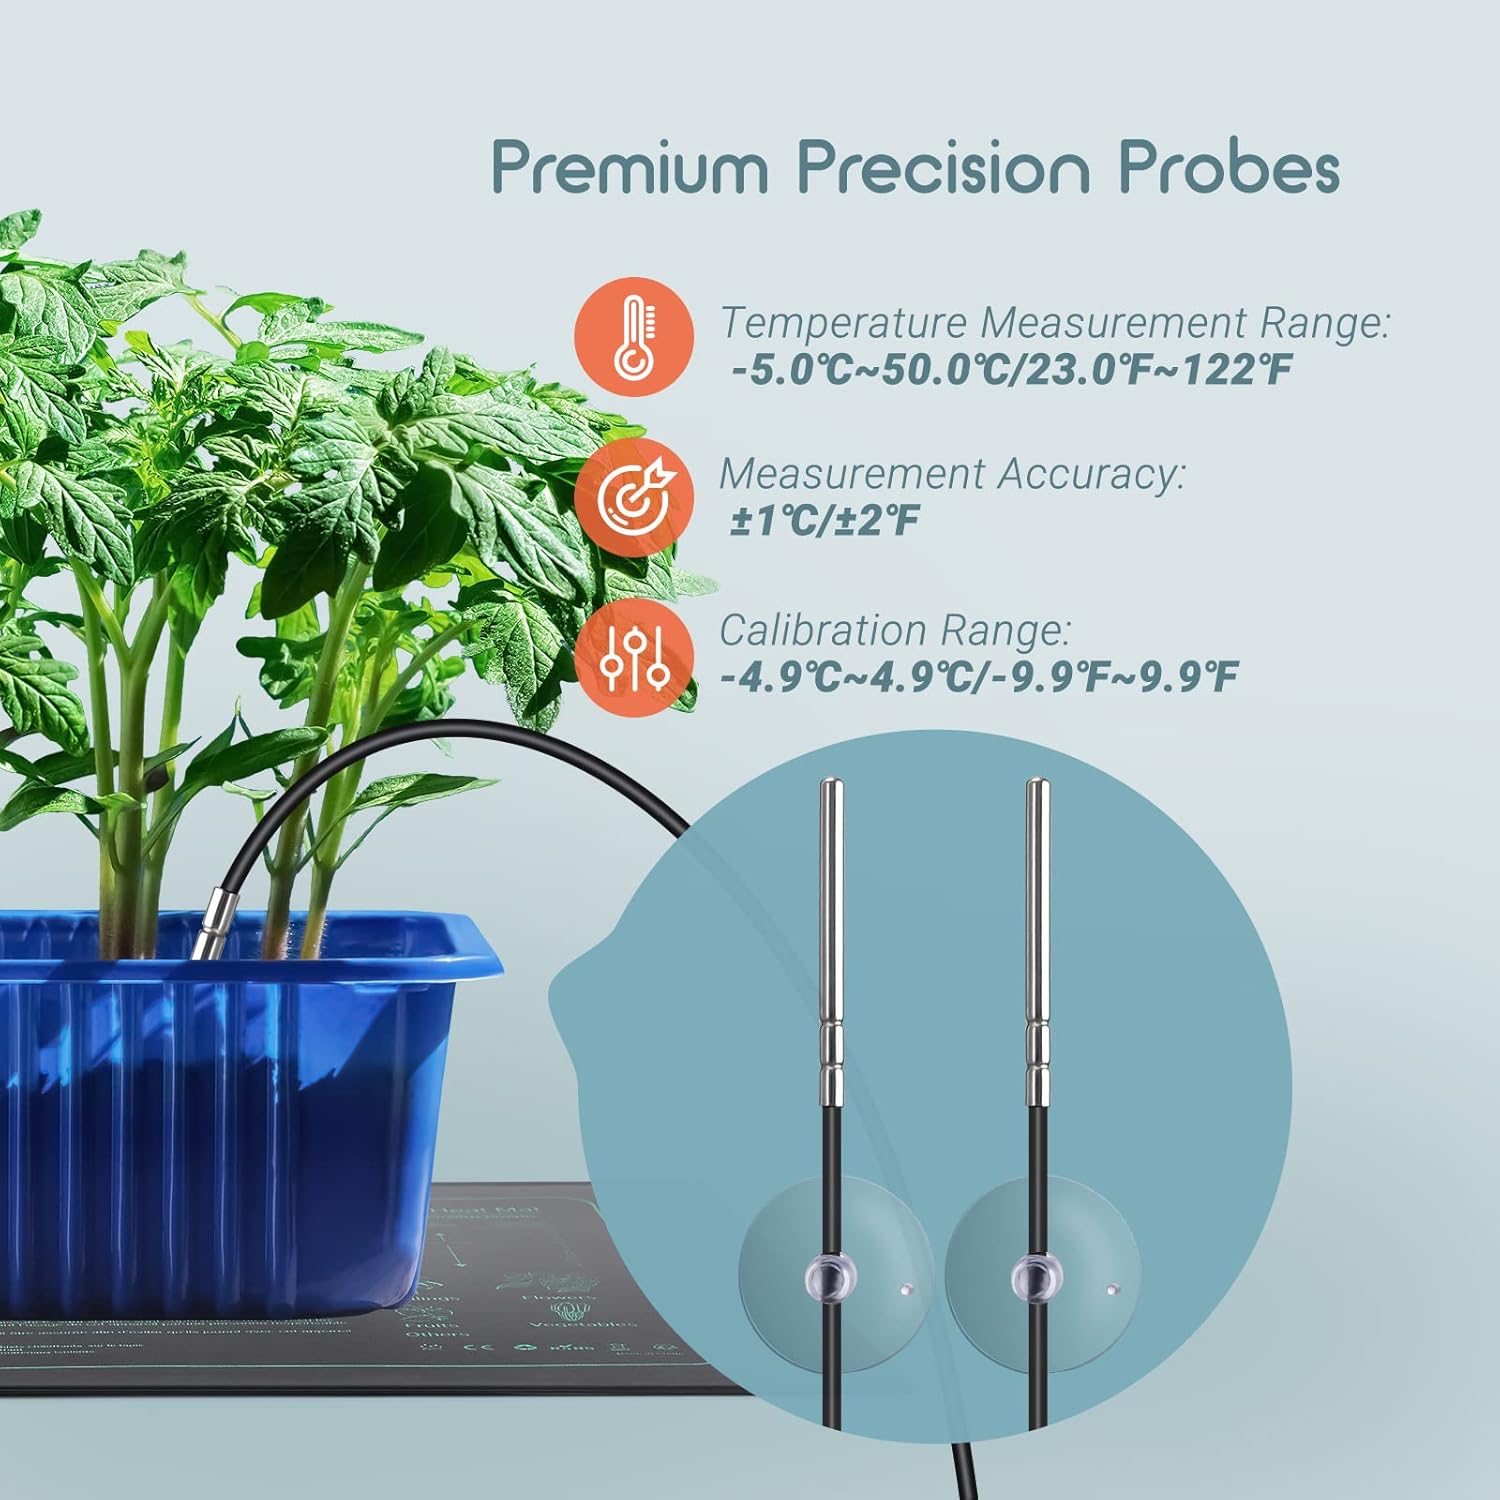
Figure 6.4: The included premium precision probes ensure accurate temperature readings.
7. Техникалык тейлөө
- Тазалоо: Disconnect the controller from the power outlet. Wipe the unit and probes with a soft, damp кездеме. Абразивдүү тазалагычтарды колдонбоңуз же аппаратты сууга салбаңыз.
- Сактагыч: When not in use for extended periods, store the controller in a cool, dry place, away from direct sunlight and extreme temperatures.
- Пробка кам көрүү: Handle probes carefully. Avoid bending or kinking the cables. Clean probe tips regularly to ensure accurate readings.
8. Кыйынчылыктарды
| Көйгөй | Мүмкүн себеп | Чечим |
|---|---|---|
| Дисплей бош | No power; unit damaged. | Check power connection. Ensure outlet is functional. If still blank, contact support. |
| Heating device not turning on/off | Incorrect temperature settings; device not properly plugged in; device faulty. | Verify set temperatures. Ensure heating device is securely plugged into the correct outlet (WORK1/WORK2). Test heating device independently. |
| Температураны көрсөтүү туура эмес | Probe not properly placed; probe faulty; calibration needed. | Ensure probe tip is fully immersed or in direct contact with the medium. Check probe connection. Refer to the full user manual for calibration instructions if necessary. |
| Сигнализация тез-тезден үнү чыгат | Temperature outside set range; probe abnormality. | Adjust temperature settings to a wider range if fluctuations are normal for your application. Check probe connections. |
9. Техникалык шарттар
| Өзгөчөлүк | Деталь |
|---|---|
| Модель түрү | LB-2SC |
| Киргизүү көлөмүtage | 100-240VAC, 50/60Гц |
| Output (Max Load) | 500W Max (250W per outlet) |
| Температураны көзөмөлдөө диапазону | 0.0℃ ~ 45.0℃ (32℉ ~ 113℉) |
| Температураны өлчөө диапазону | -5.0℃ ~ 50.0℃ (23.0℉ ~ 122℉) |
| Өлчөө тактыгы | ±1℃ / ±2℉ |
| Дисплей түрү | LCD |
| Башкаруу түрү | Control Button |
| Материал | Акрилонитрил бутадиен стирол (ABS) |
| Түс | Жашыл |
| Продукциянын өлчөмдөрү | 3"D x 4"W x 7"H |
| Элемент Салмагы | 13.4 унция |
10. Кепилдик жана колдоо
For detailed warranty information, technical support, or further assistance, please refer to the official user manual PDF provided by Luxbird or visit the Luxbird webсайт.
Колдонуучунун толук нускамасына (PDF) кире аласыз бул жерде.


