1. Киришүү
Thank you for choosing the Fral DryDigit 13C.ECO Dehumidifier. This appliance is designed to efficiently remove excess moisture from the air, creating a more comfortable and healthier environment in your home, basement, apartment, or garage. Please read this manual carefully before operating the unit to ensure safe and optimal performance. Keep this manual for future reference.
2. Коопсуздук нускамалары
Өрт, электр шок жана жаракат алуу коркунучун азайтуу үчүн электр шаймандарын колдонууда ар дайым негизги коопсуздук чараларын сактаңыз.
- кубат менен камсыз кылуу Voltage specified on the rating label of the dehumidifier.
- Шнуру же сайгычы бузулган абалда шайманды иштетпеңиз. Эгерде шнуру бузулган болсо, коркунучту болтурбоо үчүн аны өндүрүүчү, анын тейлөө агенти же ушул сыяктуу квалификациялуу адамдар алмаштырышы керек.
- Do not block the air inlet or outlet. Maintain at least 20 cm (8 inches) clearance around the unit for proper airflow.
- Аба желдеткичтерине нерселерди салбаңыз.
- Always place the unit on a stable, level surface to prevent water spillage.
- Нымдандыргычты тазалоодон, техникалык тейлөөдөн өткөрүүдөн мурун же узак убакыт бою колдонбогондо розеткадан сууруп коюңуз.
- Бул шайман физикалык, сенсордук же акыл-эс жөндөмү начар же тажрыйбасы жана билими жок адамдар (анын ичинде балдар) тарабынан колдонууга арналбайт, эгерде алардын коопсуздугуна жооптуу адам тарабынан шайманды колдонуу боюнча көрсөтмө болбосо .
- Шайманды тез күйүүчү суюктуктар же газдар сакталган жерлерде колдонбоңуз.
- Агрегатты сыртта колдонбоңуз.
3. Продукциянын компоненттери
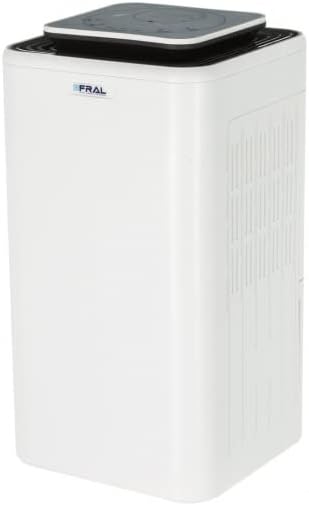
3.1-сүрөт: Жалпысынан View of the Fral DryDigit 13C.ECO Dehumidifier. This image displays the complete dehumidifier unit, showcasing its compact and modern design with the control panel visible on top.

Figure 3.2: Close-up of the Control Panel. This image highlights the digital display and touch buttons for setting humidity, timer, fan speed, and power.

Figure 3.3: Air Filter Access. This image shows the side panel opened, revealing the integrated dust and carbon filter for easy removal and cleaning.
Негизги компоненттер:
- Башкаруу панели: Санарип дисплей жана иштөө үчүн сенсордук баскычтар.
- Аба кирүүсү: Located on the rear/sides, where humid air enters.
- Аба чыгаруу: Located on the top, where dry air is discharged.
- Суу багы: Конденсацияланган сууну чогултуу үчүн алынуучу резервуар.
- Дренаждык розетка: For continuous drainage option.
- Аба чыпкасы: Integrated dust and carbon filter for air purification.
- Электр кабели: Электр розеткасына туташтыруу үчүн.
4. Орнотуу
4.1 Пакеттен чыгаруу
- Кургаткычты анын таңгагынан кылдаттык менен алып салыңыз.
- Бардык таңгактоочу материалдарды алып салыңыз жана эч бир компоненттин жоголуп кетпегенин же бузулуп калбаганын текшериңиз.
- Retain the packaging for future storage or transportation.
4.2 Орнотуу
- Ным кургаткычты суу багы толуп турганда анын салмагын көтөрө ала турган бекем, түз жерге кой.
- Ensure there is at least 20 cm (8 inches) of free space around the unit (especially the air inlet and outlet) to allow for proper air circulation.
- Avoid placing the unit near heat sources, in direct sunlight, or in areas exposed to splashing water.
- Оптималдуу иштеши үчүн, кургаткыч иштеп жаткан бөлмөдөгү эшиктерди жана терезелерди жабыңыз.
4.3 Кубат туташтыруу
- Plug the power cord into a grounded electrical outlet (230V/50Hz).
- Узарткычтарды же адаптер сайгычтарды колдонбоңуз.
4.4 Дренаждын параметрлери
The Fral DryDigit 13C.ECO offers two drainage methods:
- Кол менен дренаж (Суу багы): Condensed water collects in the removable 2-liter water tank. When the tank is full, the unit will automatically shut off, and an indicator light will illuminate. Empty the tank and reinsert it to resume operation.
- Үзгүлтүксүз дренаж: For continuous operation without needing to empty the tank, connect a suitable drain hose (not included) to the continuous drainage outlet on the unit. Ensure the hose is sloped downwards to allow water to drain by gravity into a floor drain or larger container.
5. Иштөө нускамалары
5.1 Күйгүзүү/өчүрүү
- басыңыз КҮЧ башкаруу панелиндеги баскычты басып, түзмөктү күйгүзүңүз же өчүрүңүз.
5.2 Каалаган нымдуулукту орнотуу
- басыңыз HUM SET button repeatedly to cycle through desired humidity levels (e.g., 40%, 50%, 60%, 70%, 80% RH). The digital display will show the set humidity.
- The unit will operate until the room humidity reaches the set level, then it will cycle off. It will restart when the humidity rises above the set level.
5.3 Continuous Dehumidification (CONT)
- басыңыз УЛАНДЫ button to activate continuous dehumidification mode. In this mode, the unit will run continuously regardless of the ambient humidity level. This is useful for very damp environments or for drying clothes.
5.4 Таймер функциясы
- басыңыз ТАЙМЕР button to set the operating duration (e.g., 2, 4, 8 hours). The unit will automatically turn off after the set time has elapsed.
5.5 Желдетүүчү ылдамдык
- басыңыз ЫЛДАМ button to adjust the fan speed (e.g., Low, High). Higher fan speed results in faster dehumidification but may produce more noise.
5.6 Full Water Tank Indicator
- Суу резервуар толгондо ТОЛУК indicator light will illuminate, and the unit will automatically stop operating. Empty the water tank and reinsert it correctly to resume operation.
5.7 Автоматтык эритүү
- The unit is equipped with an electronic defrost control system. If frost builds up on the evaporator coils, the unit will automatically enter defrost mode to melt the ice. During this time, the dehumidification function will pause, and the fan may continue to run. This is normal operation.
6. Техникалык тейлөө
Нымдандыргычыңыздын үзгүлтүксүз техникалык тейлөөсү анын узак мөөнөттүү иштешин жана натыйжалуулугун камсыз кылат.
6.1 Аба чыпкасын тазалоо
The integrated dust and carbon filter should be cleaned regularly (every 2-4 weeks, depending on usage and air quality).
- Агрегатты өчүрүп, розеткадан сууруп алыңыз.
- Open the filter cover on the side of the unit (refer to Figure 3.3).
- аба чыпкасын кылдаттык менен алып салыңыз.
- Clean the filter using a vacuum cleaner to remove dust. For heavier dirt, wash it gently with lukewarm water and a mild detergent. Rinse thoroughly.
- Фильтрди кайра салуудан мурун аны толугу менен абада кургатууга уруксат бериңиз. Аны күн нуруна же катуу ысыкка калтырбаңыз.
- Кургак чыпканы кайра салып, капкагын жабыңыз.
6.2 Суу багын бошотуу
- When the FULL indicator illuminates, carefully pull out the water tank.
- Чогулган сууну бошотуңуз.
- Clean the tank periodically with mild detergent and water to prevent mold and mildew growth. Rinse thoroughly.
- Reinsert the empty tank firmly into the unit. Ensure it is properly seated to allow the unit to resume operation.
6.3 Сырты тазалоо
- Агрегаттын сыртын жумшак менен сүртүңүз, гamp кездеме.
- Катуу химиялык заттарды, абразивдүү тазалоочу каражаттарды же эриткичтерди колдонбоңуз, анткени алар бетке зыян келтириши мүмкүн.
6.4 Сактоо
- If storing the unit for an extended period, ensure the water tank is empty and clean, and the air filter is clean and dry.
- Агрегатты розеткадан сууруп, кубат шнурын тыкан ороп алыңыз.
- Store the dehumidifier in an upright position in a cool, dry place, preferably in its original packaging.
7. Кыйынчылыктарды
Кардарларды колдоо кызматына кайрылуудан мурун, жалпы көйгөйлөр үчүн төмөнкү көйгөйлөрдү чечүү боюнча колдонмону караңыз.
| Көйгөй | Мүмкүн себеп | Чечим |
|---|---|---|
| Түзмөк күйбөйт. | Электр энергиясы жок. Суу сактагыч толуп калган же туура эмес орнотулган. | Check if the unit is plugged in and the outlet is working. Empty the water tank and ensure it is correctly seated. |
| Нымдандыргыч суу топтобой жатат. | Бөлмөнүн температурасы өтө төмөн. Нымдуулуктун деңгээли мурунтан эле төмөн. Аба чыпкасы бүтүп калган. Эшиктер/терезелер ачык. | The unit operates best between 5°C and 35°C. Check the current humidity level. The unit will stop if the set humidity is reached. Аба чыпкасын тазалаңыз. Бөлмөдөгү бардык эшик-терезелерди жабыңыз. |
| Агрегат ызы-чуу. | Агрегат түз жерде эмес. Аба чыпкасы бүтүп калган. | Агрегатты тегиз, туруктуу жерге коюңуз. Аба чыпкасын тазалаңыз. |
| Катушкаларда үшүк пайда болот. | Normal operation in low temperatures. | The unit has an automatic defrost function. Allow it to complete the defrost cycle. |
| FULL indicator is on, but tank is not full. | Water tank is not properly inserted. | Суу резервуарын чыгарып, кайра салыңыз. |
8. Техникалык шарттар
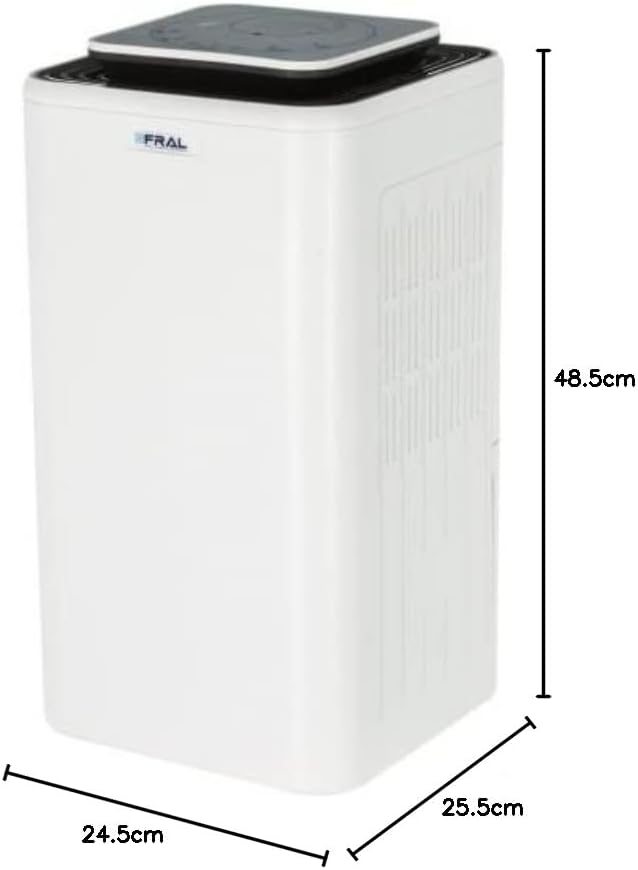
Figure 8.1: Dehumidifier Dimensions. This image illustrates the physical dimensions of the Fral DryDigit 13C.ECO, showing its height, width, and depth.
| Өзгөчөлүк | Спецификация |
|---|---|
| Бренд | Fral |
| Модел | DryDigit 13C.ECO |
| Dehumidification Capacity (30°C, 80% RH) | 12 л/24 саат |
| Dehumidification Capacity (27°C, 60% RH) | 6.5 л/24 саат |
| Power Consumption (Avg. 27°C, 60% RH) | 145 Вт / 0.9 А. |
| Power Consumption (Max. 30°C, 80% RH) | 175 Вт / 1 А. |
| Электр камсыздоо | 230 В / 50 Гц |
| Аба агымы | 130 м³/саат |
| Noise Level (at 3 meters) | 45 дБ(А) |
| Суу резервуарынын сыйымдуулугу | 2 литр |
| Иштөө температурасы диапазону | 5°Cден 35°Cге чейин |
| Relative Humidity Setting Range | 40% - 80% |
| Салыштырмалуу нымдуулуктун иштөө диапазону | 35% - 99% |
| Өлчөмдөр (D x W x H) | 25.5 см х 24.5 см х 48.5 см |
| Салмагы | 10.5 кг |
| Өзгөчөлүктөр | Electronic defrost control, quiet operation, integrated dust and carbon filter, permanent drainage option, full tank alarm/indicator. |
9. Кепилдик жана колдоо
This Fral DryDigit 13C.ECO Dehumidifier comes with a standard manufacturer's warranty. Please refer to the warranty card included with your purchase for specific terms and conditions.
For technical assistance, troubleshooting beyond this manual, or warranty claims, please contact your retailer or the authorized Fral service center. Ensure you have your purchase receipt and product model information available when contacting support.


