1. Продукт бүтүп калдыview
The Landy Attachments 72-inch Skid Steer Hydraulic Heavy Duty Brush Mower Cutter is designed for efficient and robust vegetation management. This attachment is ideal for clearing dense brush, tall grasses, and small trees up to 4 inches in diameter. Its hydraulic direct drive motor ensures powerful performance, making it suitable for various land clearing applications.
It features a universal skid steer connection, allowing compatibility with a wide range of machinery including New Holland, Bobcat Skid Steer, and Kubota tractors. The design prioritizes durability and effective cutting, providing a reliable solution for demanding tasks.

Сүрөт 1.1: Алдыңкы view of the Landy 72-inch Skid Steer Hydraulic Heavy Duty Brush Mower Cutter.
2. Коопсуздук маалыматы
ЭСКЕРТҮҮ: Бул коопсуздук көрсөтмөлөрүн аткарбоо олуттуу жаракатка же өлүмгө алып келиши мүмкүн.
- Always read and understand the entire manual before operating the brush mower.
- Ensure all safety guards and shields are in place and properly secured before operation.
- Wear appropriate personal protective equipment (PPE), including safety glasses, hearing protection, and heavy-duty gloves.
- Keep all bystanders, especially children and pets, at a safe distance (minimum 100 feet) from the operating area.
- Inspect the work area for hidden obstacles such as rocks, stumps, metal debris, or wires that could be thrown by the blades. Clear the area of such hazards.
- Never operate the brush mower on excessively steep slopes where stability is compromised.
- Ensure the skid steer's hydraulic system is compatible with the brush mower's requirements (20-30 GPM flow, 21 Mpa pressure).
- Turn off the skid steer engine and relieve hydraulic pressure before performing any maintenance, adjustments, or clearing blockages.
- Do not attempt to clear brush larger than the recommended 4-inch diameter.
- Regularly check all hydraulic lines and connections for leaks or damage. Replace damaged components immediately.
- Be aware of the "DANGER STAY BACK" warning on the unit, indicating the hazard zone during operation.

2.1-сүрөт: Каптал view showing the "DANGER STAY BACK" warning on the brush mower.
3. Продукттун спецификациялары
| Өзгөчөлүк | Спецификация |
|---|---|
| Бренд | ЛЭНДИ |
| Power Source | Гидротехникалык |
| Материал | Эритме болот |
| Түс | Кара |
| Элемент Салмагы | 999 фунт |
| Кесүү туурасы | 60 дюйм |
| Продукциянын өлчөмдөрү (D x W x Y) | 73.5" x 73.5" x 23.5" |
| Гидравликалык басым | 21 Мпа |
| Гидравликалык агым | 20-30 GPM |
| Макс кесүү диаметри | 4 inches (brush) |
| Камтылган аксессуарлар | Two sets of blades, 48" universal mount plate |

Figure 3.1: Dimensional diagram of the brush mower, illustrating its overall size.
4. Орнотуу жана орнотуу
4.1 Пакеттен чыгаруу
Carefully unpack all components from the shipping crate. Inspect for any damage that may have occurred during transit. Retain all packaging materials until the unit is fully assembled and tested.
4.2 Universal Mount Plate Verification
The brush mower comes with a 48-inch universal mount plate designed for compatibility with most skid steers, loaders, and tractors. Before proceeding, verify that your machine's quick attach system is compatible with the provided 48-inch universal skid steer style quick connect.

Figure 4.1: Diagram illustrating the dimensions of the universal mount plate. Ensure compatibility with your machine's quick attach system before installation.
4.3 Attaching to Skid Steer
- Position the skid steer on a flat, stable surface.
- Align the universal mount plate of the brush mower with the skid steer's quick attach mechanism.
- Slowly raise the skid steer arms and tilt the quick attach forward until the top edge of the mount plate engages with the top hooks of the quick attach.
- Curl the quick attach back to lift the brush mower and ensure the bottom pins align with the lower holes on the mount plate.
- Engage the locking pins or levers on the skid steer's quick attach to secure the brush mower firmly in place. Verify that both sides are fully locked.
4.4 Гидротехникалык байланыштар
- Before connecting, ensure the skid steer's hydraulic system is turned off and pressure is relieved.
- Connect the hydraulic hoses from the brush mower to the corresponding hydraulic couplers on the skid steer. Ensure a secure and tight connection to prevent leaks.
- Verify that the hydraulic flow and pressure of your skid steer meet the requirements of the brush mower (20-30 GPM flow, 21 Mpa pressure). Insufficient flow or pressure can lead to poor performance or damage.
5. Иштөө нускамалары
5.1 Операцияга чейинки текшерүү тизмеси
- Бардык коопсуздук коргоочуларынын ордунда экенин текшериңиз.
- Check hydraulic fluid levels in the skid steer.
- Inspect blades for sharpness and damage. Replace or sharpen as needed.
- Бардык гайкалар жана болттор бекемделгенин текшериңиз.
- Clear the work area of large debris, rocks, or anything that could damage the blades or be thrown.
5.2 Starting the Brush Mower
- Start the skid steer engine and allow it to warm up.
- Engage the auxiliary hydraulics to power the brush mower. The blades will begin to spin.
- Allow the blades to reach full operating speed before engaging vegetation.
5.3 Mowing and Cutting Techniques
- Approach vegetation slowly and steadily. Avoid sudden movements.
- For dense brush, take smaller passes to prevent overloading the hydraulic system.
- Maintain a consistent ground speed to ensure an even cut and prevent stalling.
- The brush mower is capable of cutting small brush up to 4 inches in diameter and mowing areas with a working diameter of 60 inches.
- When cutting thicker material, raise the attachment slightly and then lower it into the material to allow the blades to gain momentum.
- Avoid operating the mower in reverse over cut material, as this can cause clogging or damage.
Video 5.1: Demonstration of the Landy 72-inch Skid Steer Hydraulic Heavy Duty Brush Mower Cutter in operation, clearing dense vegetation. This video illustrates effective cutting techniques and the power of the hydraulic system.

Figure 5.1: The Landy brush mower attached to a skid steer, demonstrating its integration and operational stance during land clearing.
6. Техникалык тейлөө
Regular maintenance is crucial for the longevity and optimal performance of your Landy brush mower. Always ensure the unit is disconnected from the skid steer and hydraulic pressure is relieved before performing any maintenance.
6.1 Күнүмдүк тейлөө
- Бирдигин тазалоо: Remove debris, dirt, and vegetation from the mower deck, blades, and hydraulic lines.
- Бычактарды текшерүү: Check for wear, damage, or dullness. Sharpen or replace blades as necessary. The product includes two sets of blades for convenience.
- бекиткичтерди текшерүү: Ensure all nuts, bolts, and pins are tight and secure. Tighten any loose fasteners.
- Гидротехникалык шлангдар: Inspect hydraulic hoses and fittings for leaks, cracks, or abrasions. Replace any damaged hoses immediately.
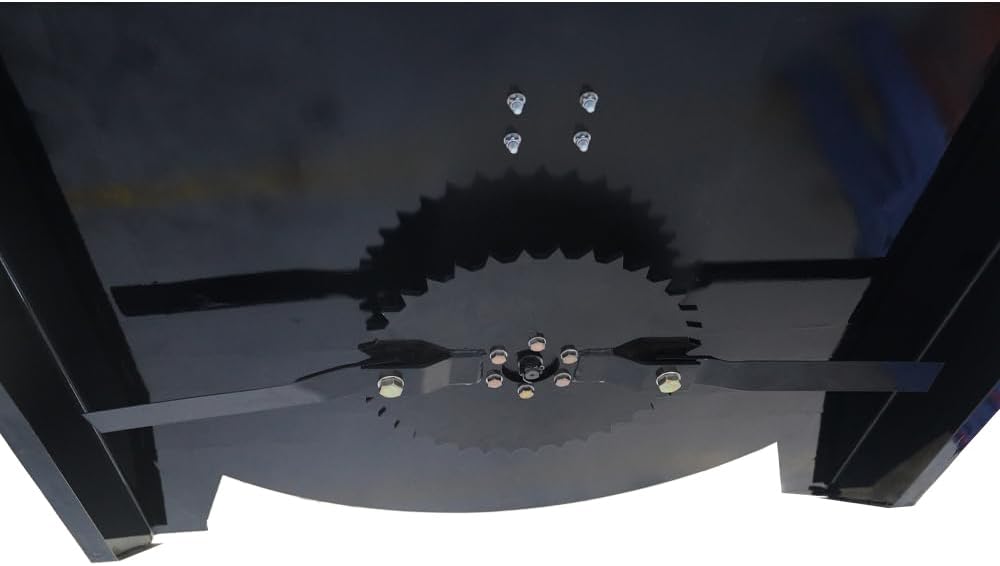
6.1-сүрөт: астыңкы жагы view of the brush mower, highlighting the cutting blades and their mounting points for inspection and maintenance.
6.2 Periodic Maintenance (Weekly/Monthly)
- Майлоо: Grease all moving parts and pivot points as indicated in the product diagram (if available, otherwise general points).
- Gearbox Oil: Check the gearbox oil level and top up if necessary. Refer to the gearbox manufacturer's recommendations for oil type and change intervals.
- Blade балансы: If blades are removed for sharpening, ensure they are properly balanced before reinstallation to prevent vibration and premature wear.
- Структуралык бүтүндүк: Inspect the frame and welds for any signs of stress cracks or damage. Repair as needed by a qualified technician.
7. Кыйынчылыктарды
This section provides solutions to common issues you might encounter with your Landy brush mower. For problems not listed here, or if solutions do not resolve the issue, contact customer support.
| Көйгөй | Мүмкүн себеп | Чечим |
|---|---|---|
| Mower not cutting effectively or stalling frequently. |
|
|
| Иш учурунда ашыкча титирөө. |
|
|
| Hydraulic fluid leaks. |
|
|
| Mower not engaging or slow to start. |
|
|
8. Кепилдик жана колдоо
8.1 Кепилдик маалыматы
Landy Industries stands behind the quality of its products. For specific warranty terms and conditions, please refer to the warranty card included with your purchase or visit the official Landy Industries website. The warranty typically covers defects in materials and workmanship under normal use and service.
8.2 Кардарларды колдоо
If you require assistance with setup, operation, maintenance, or troubleshooting, please contact Landy Industries customer support. Have your product model and purchase date ready when contacting support to ensure efficient service.
кире аласыз Landy Store on Amazon көбүрөөк маалымат жана байланыш параметрлери үчүн.


