1. Киришүү
This manual provides detailed instructions for the operation and maintenance of your MakerHawk TC816 Digital Temperature Controller Thermostat Timer. This versatile device is designed for precise temperature and timing control across various applications, including reptile enclosures, incubators, terrariums, freezers, refrigerators, home brewing, and more. Please read this manual thoroughly before use to ensure safe and optimal performance.
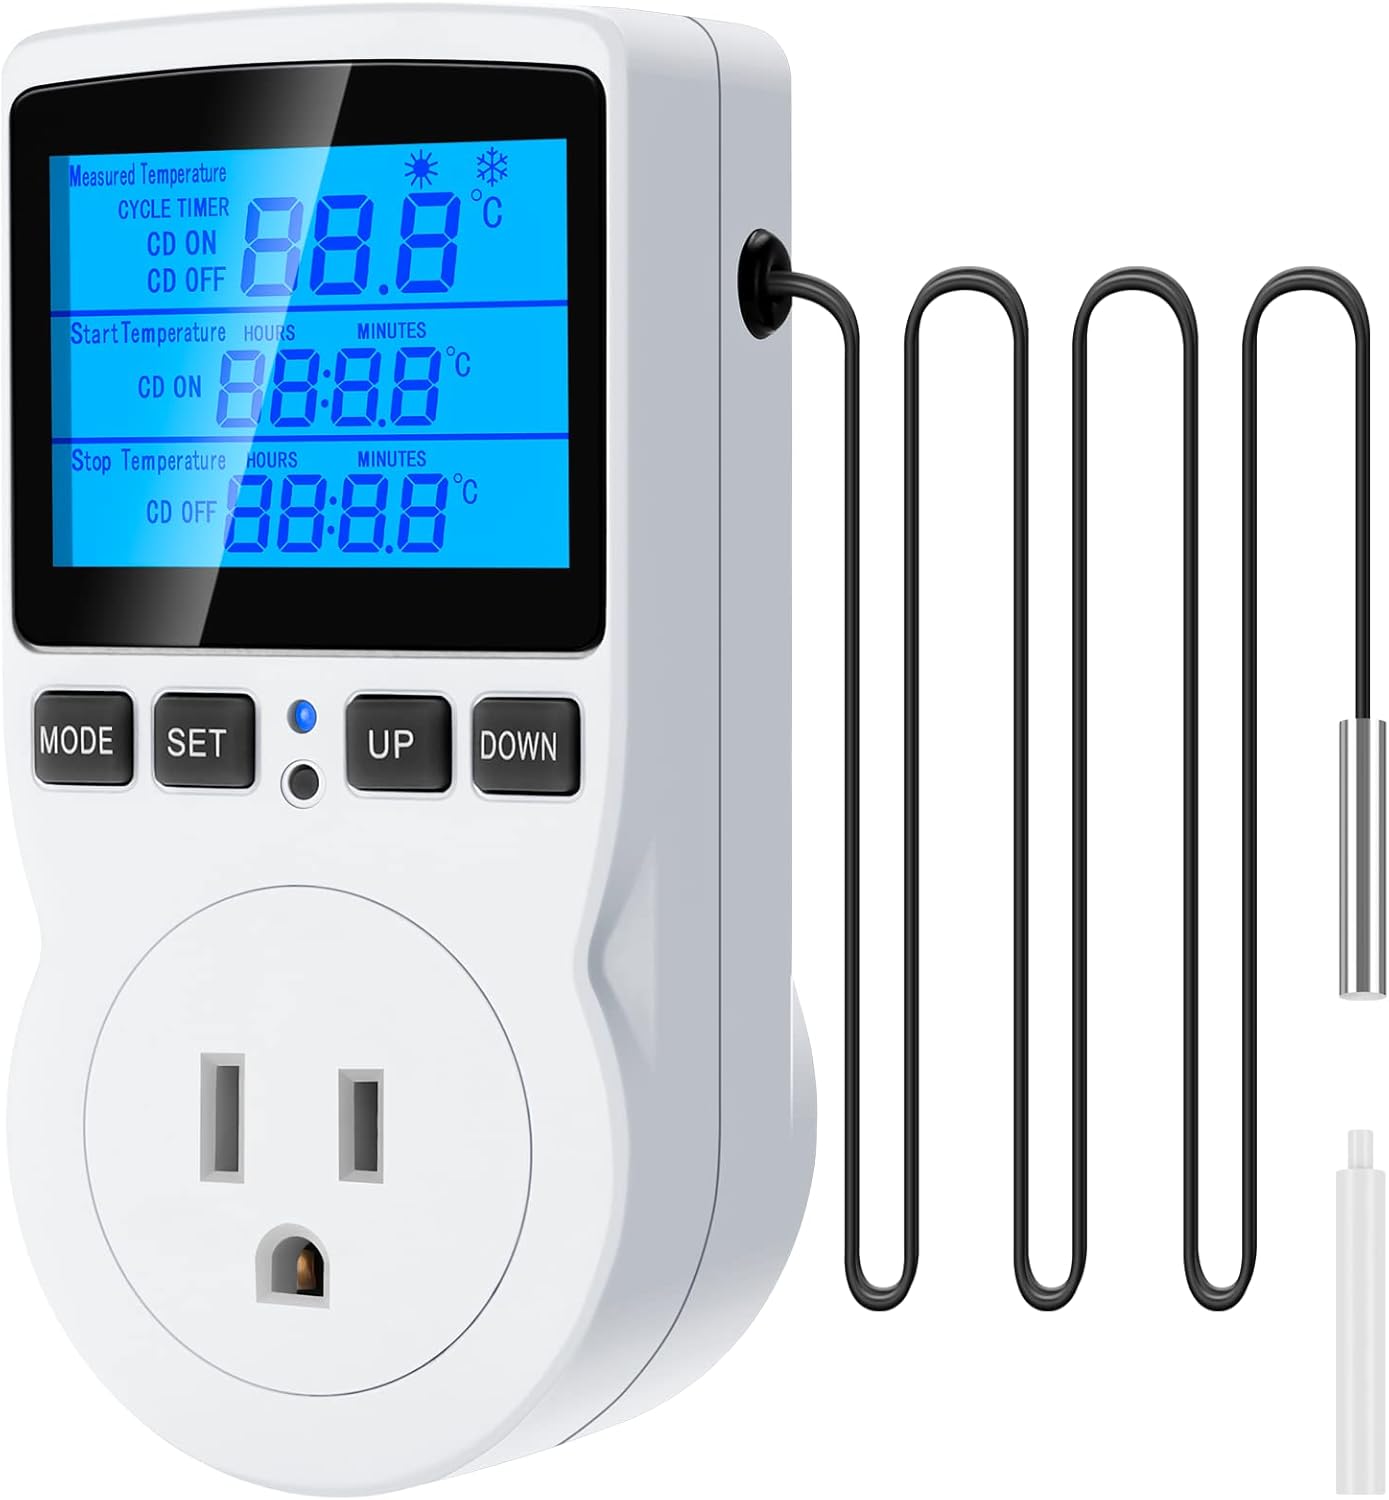
Figure 1: MakerHawk TC816 Digital Temperature Controller with sensor probe.
2. Коопсуздук маалыматы
Коопсуз иштөөнү камсыз кылуу жана зыяндын алдын алуу үчүн төмөнкү коопсуздук көрсөтмөлөрүн сактаңыз:
- Кубат булагы: Ensure the device is connected to a 120V AC power supply. The maximum load is 15A/1800W. Do not exceed these limits.
- Коопсуз туташуу: The plug features highly conductive copper plates for efficient power transfer and rust resistance. Ensure it is fully inserted into a compatible outlet.
- Балдардын коопсуздугу: The safety socket is designed to prevent accidental insertion by children. Keep the device out of reach of young children.
- Материалдык коопсуздук: Түзмөк casing is made from PC flame-retardant material, offering high-temperature flame resistance.
- Экологиялык шарттар: Түзмөктү өтө жогорку температурага, нымдуулукка же түздөн-түз сууга тийгизбеңиз.
- Зонддун жайгашуусу: Ensure the temperature sensor probe is correctly placed in the environment you wish to monitor and control.
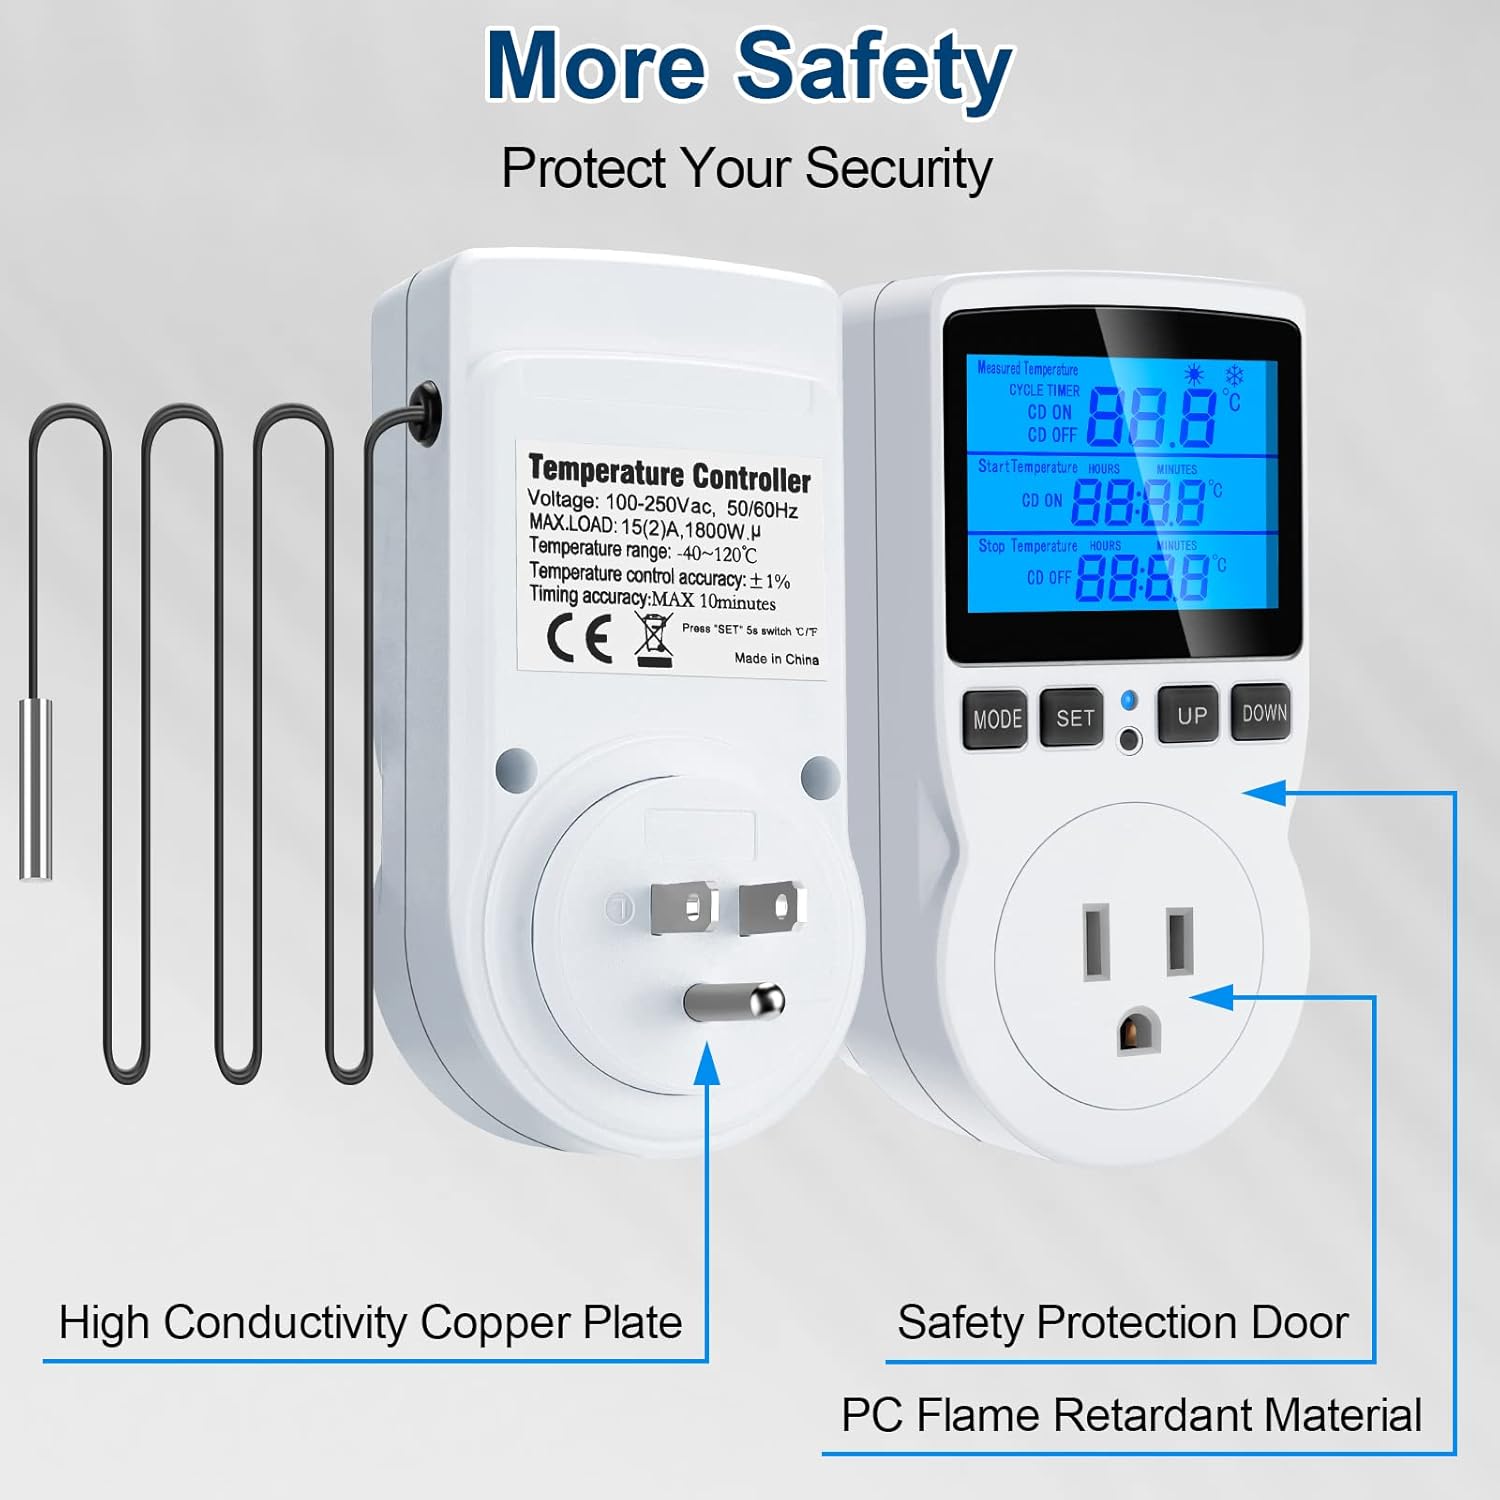
Figure 2: Illustration of safety features including high conductivity copper plate, safety protection door, and strong flame retardant material.
3. Продукт бүтүп калдыview
The MakerHawk TC816 features a clear LCD display and intuitive button controls for easy operation. Key components include:
- LCD дисплей: Shows measured temperature, set temperatures, and timer settings.
- Башкаруу баскычтары: MODE, SET, UP, DOWN for navigation and setting adjustments.
- Сенсордук зонд: 1.7m NTC temperature sensor for accurate readings.
- US Plug: Standard 3-prong plug for power input.
- Башкарылуучу розетка: For connecting heating or cooling devices.
- Калыбына келтирүү баскычы: Small button for factory reset (requires a tool).
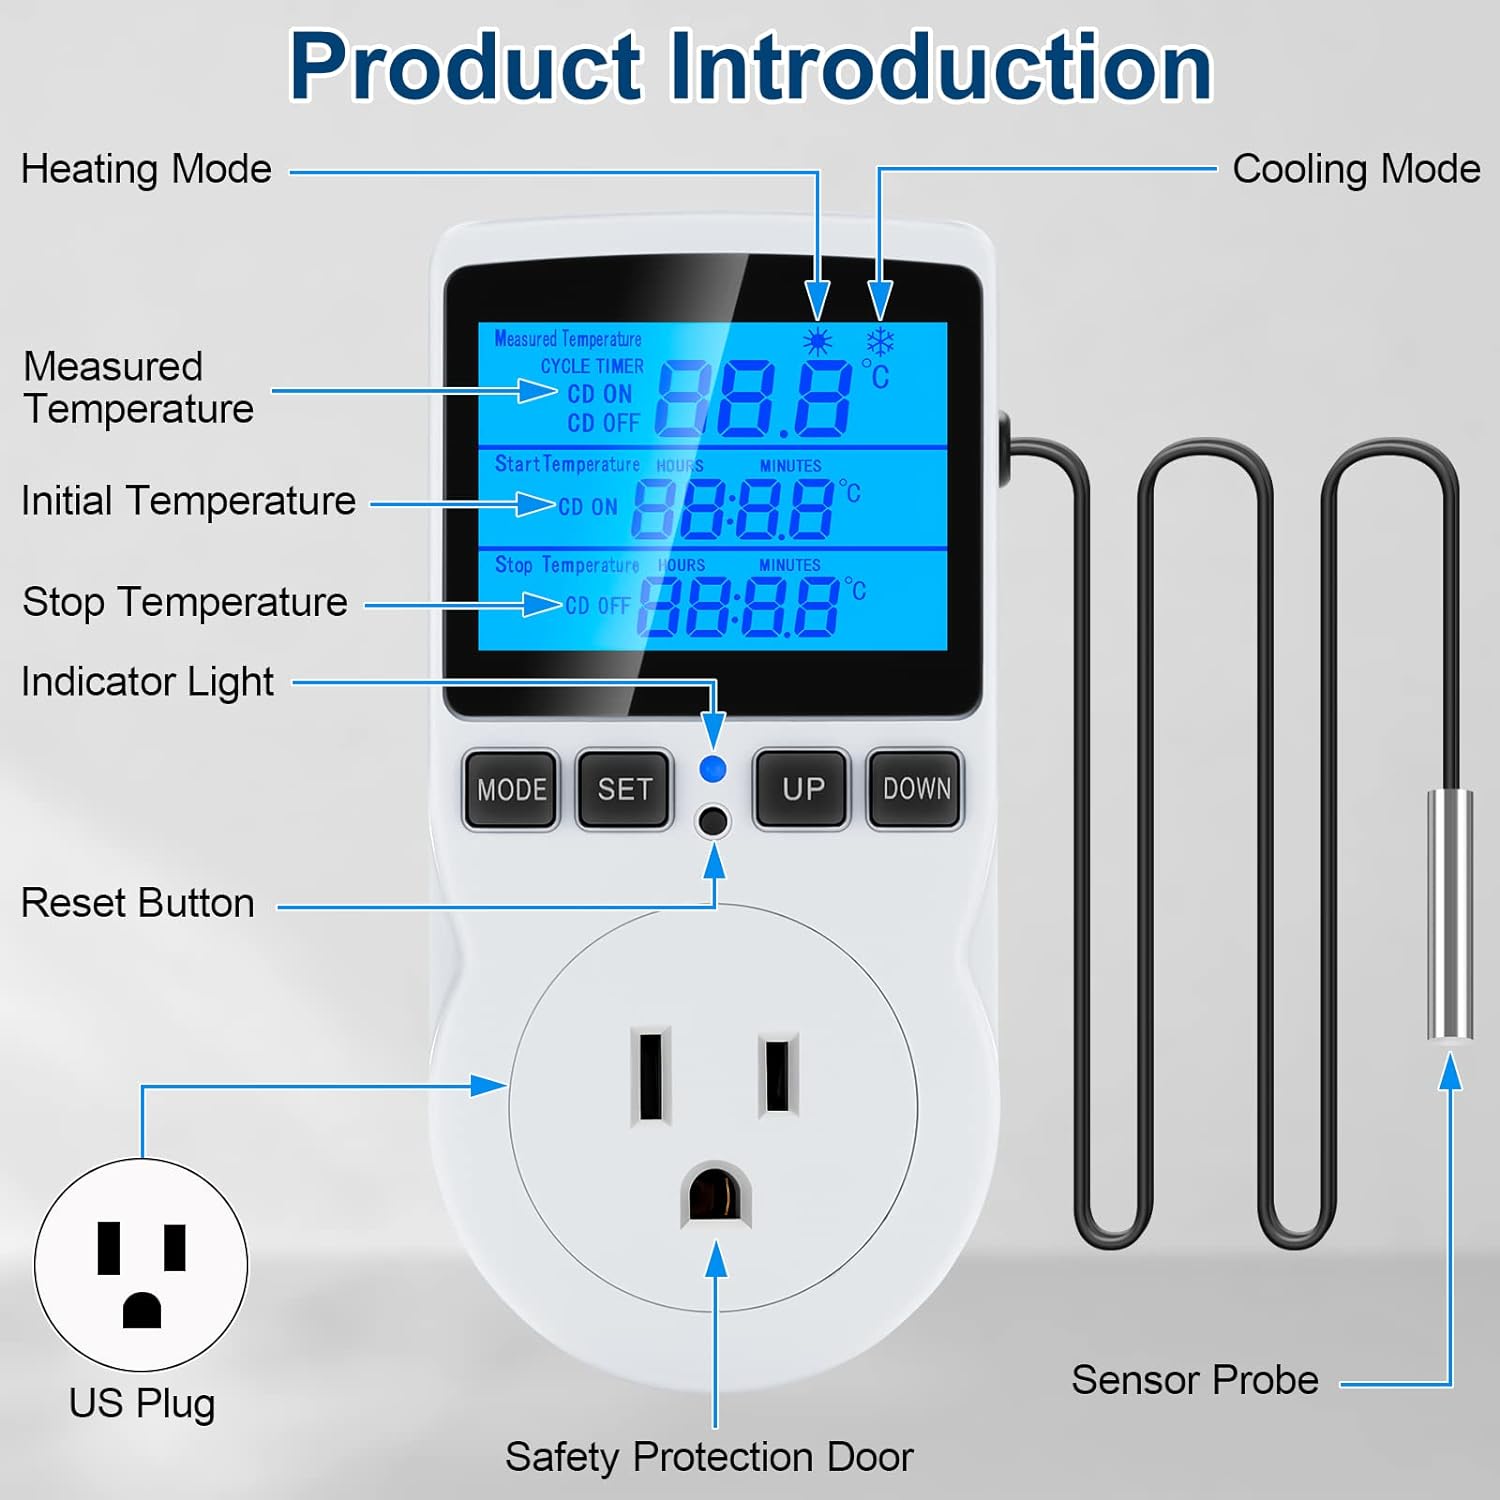
Figure 3: Detailed product diagram highlighting the display, buttons, sensor probe, and power outlet.
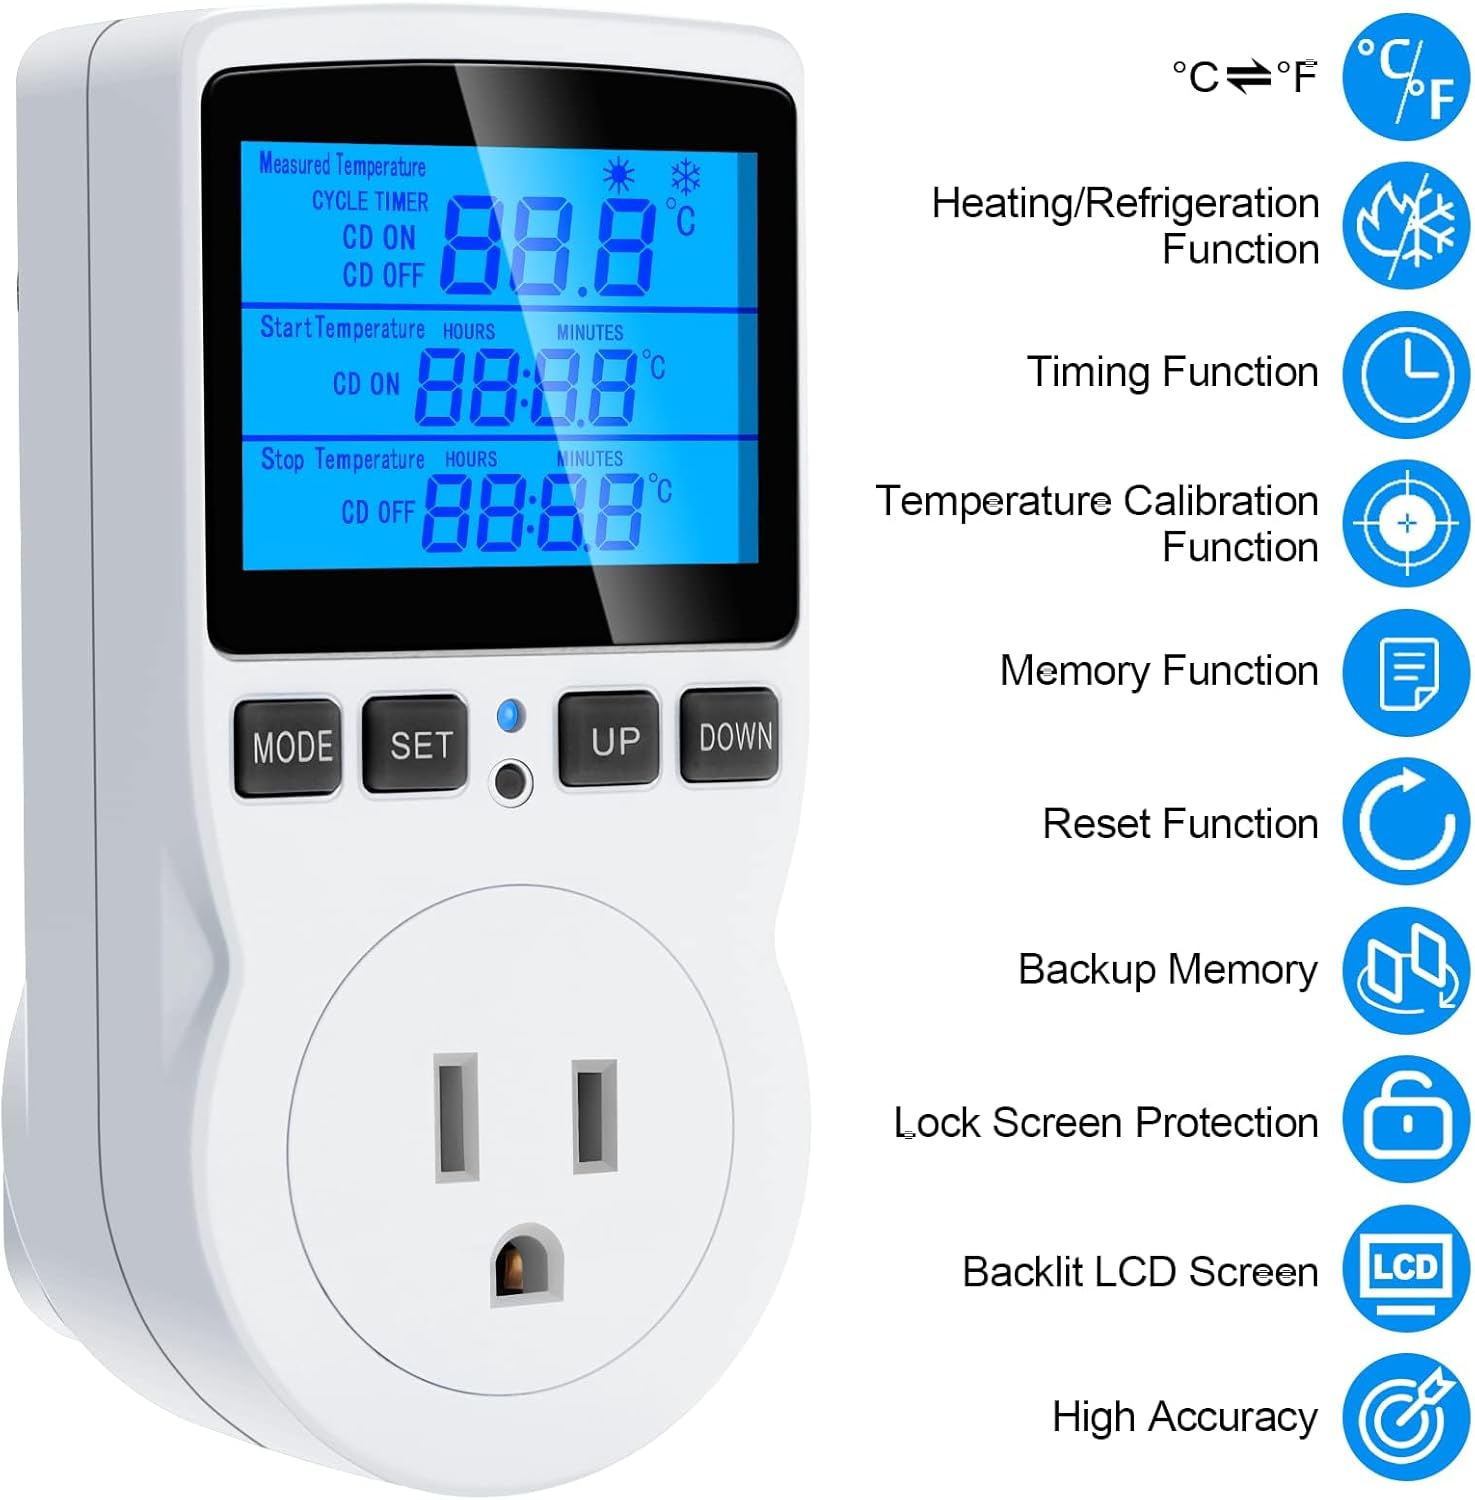
Figure 4: ашыкview of key features including heating/refrigeration, timing, temperature calibration, memory, reset, backup memory, lock screen, backlit LCD, and high accuracy.
4. Орнотуу
Follow these steps to set up your temperature controller:
- Таңылганын ачуу: Carefully remove the temperature controller and sensor probe from its packaging.
- Зондду туташтырыңыз: Ensure the sensor probe is securely connected to the designated port on the controller.
- Жайгашкан жери: Position the sensor probe in the area where you need to monitor and control the temperature (e.g., inside a terrarium, refrigerator, or greenhouse).
- Күйгүзүү: Plug the temperature controller into a standard 120V AC wall outlet. The display will illuminate.
- Түзмөктү туташтыруу: Plug your heating or cooling device (e.g., heater, fan, refrigerator) into the controlled outlet on the front of the thermostat.
Видео 1: Бүттүview of the MakerHawk TC816 Digital Temperature Controller, demonstrating its physical features and basic setup. This video shows the device from various angles, highlighting the display, buttons, and the length of the sensor cable (1.7m).
5. Иштөө нускамалары
5.1. Температураны өлчөө бирдиктерин которуу (Цельсий/Фаренгейт)
Цельсий (°C) менен Фаренгейттин (°F) ортосунда которулуу үчүн:
- Press and hold the "SET" button for approximately 2 seconds. The display will change the temperature unit.
5.2. Temperature Control Mode
This mode allows you to set a desired temperature range for heating or cooling.
- Press the "SET" button once to enter temperature control mode.
- Use the "UP" and "DOWN" buttons to adjust the "Start Temperature" (ON).
- Press "SET" again to move to the "Stop Temperature" (OFF).
- Use the "UP" and "DOWN" buttons to adjust the "Stop Temperature".
- Press "SET" once more to confirm and exit the setting.
Жылытуу операциясы: If "Start Temperature" is караганда аз "Stop Temperature", the device will operate in heating mode. The connected device will turn on when the temperature drops below the Start Temperature and turn off when it reaches the Stop Temperature.
Муздатуу операциясы: If "Start Temperature" is караганда чоңураак "Stop Temperature", the device will operate in cooling mode. The connected device will turn on when the temperature rises above the Start Temperature and turn off when it drops to the Stop Temperature.
Температураны көзөмөлдөө диапазону: -40 ° Cдан 120 ° Cка чейин (-72 ° F-176 ° F).
5.3. Timing Functions (F01, F02, F03, F04)
The controller offers four distinct timing modes. Press the "MODE" button to cycle through these functions (F01, F02, F03, F04).

Figure 5: Visual representation of the four timing modes (F01, F02, F03, F04) and temperature control mode.
- F01 Cycle Timer Mode: Sets a repeating ON/OFF cycle.
- Press "MODE" until F01 is displayed.
- Press "SET" to adjust ON time (hours and minutes).
- Press "SET" again to adjust OFF time (hours and minutes).
- Press "SET" to confirm.
- F02 Countdown On Mode: The device remains OFF for a set countdown period, then turns ON.
- Press "MODE" until F02 is displayed.
- Press "SET" to adjust the countdown ON time (hours and minutes).
- Press "SET" to confirm.
- F03 Countdown Off Mode: The device remains ON for a set countdown period, then turns OFF.
- Press "MODE" until F03 is displayed.
- Press "SET" to adjust the countdown OFF time (hours and minutes).
- Press "SET" to confirm.
- F04 Countdown On and Countdown Off Mode: The device turns ON for a set period, then OFF for another set period.
- Press "MODE" until F04 is displayed.
- Press "SET" to adjust the countdown ON time (hours and minutes).
- Press "SET" again to adjust the countdown OFF time (hours and minutes).
- Press "SET" to confirm.
Setting Range for Timing Modes: 0 to 99 hours and 59 minutes.
5.4. Температураны калибрлөө
If you need to fine-tune the temperature reading for accuracy:
- Plug in the device. Within 2 seconds of powering on, press and hold the "MODE" button for 2 seconds until "CALIBRATE" appears on the screen.
- Use the "UP" and "DOWN" buttons to adjust the temperature offset. The calibration range is -9.9°C to 9.9°C.
- Press and hold the "MODE" button for 2 seconds to save the calibration offset and exit. If you do not save, changes will not be applied.
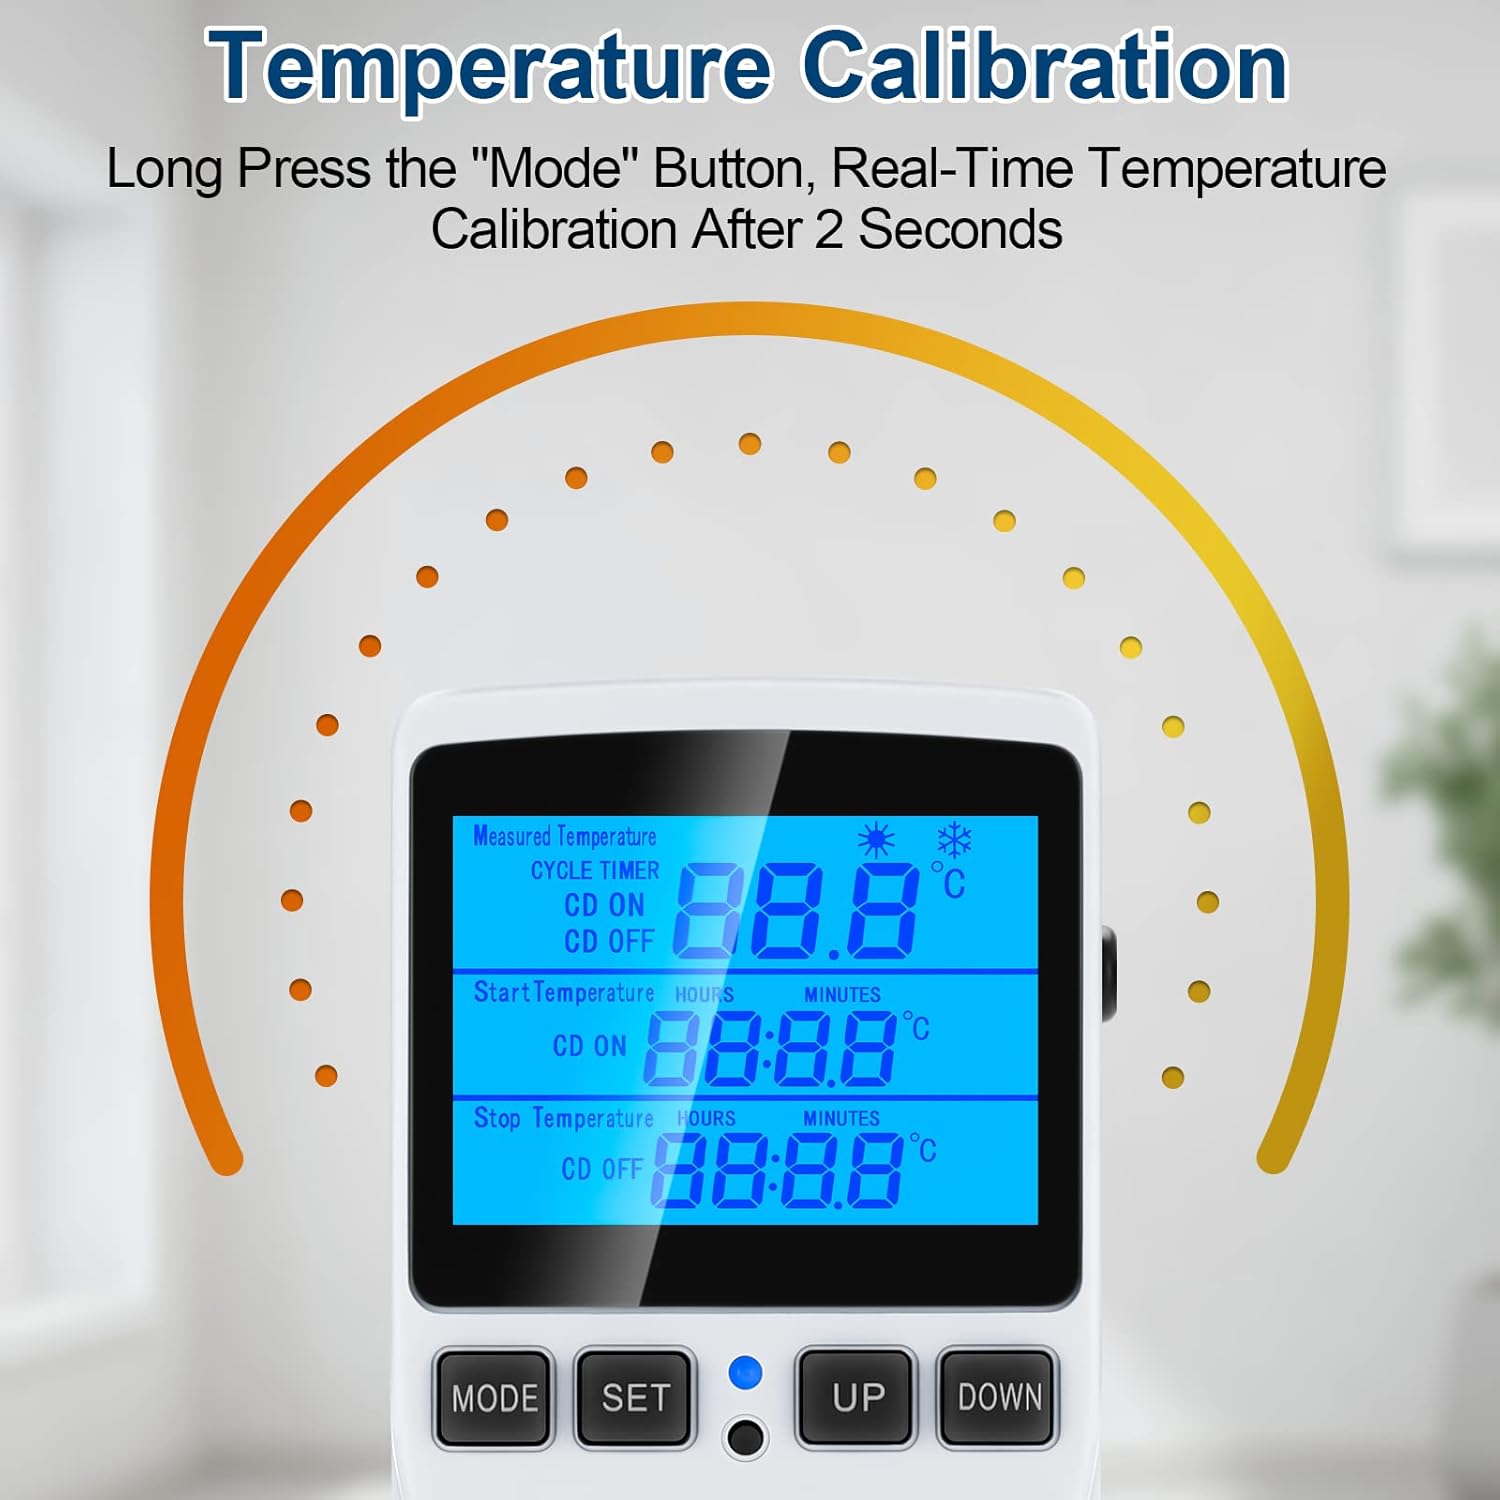
Figure 6: Visual guide for temperature calibration by long-pressing the MODE button.
5.5. Lock Screen Protection
Жөндөөлөрдүн кокусунан өзгөрүшүнүн алдын алуу үчүн:
- Press and hold the "MODE" and "SET" buttons simultaneously for 5 seconds to lock the thermostat.
- Repeat the process (press and hold "MODE" and "SET" simultaneously for 5 seconds) to unlock the device.
5.6. Backlight Timer Setting
Арткы жарыктын узактыгын тууралоо үчүн:
- Press and hold the "UP" and "DOWN" buttons simultaneously for 5 seconds.
- Use "UP" and "DOWN" to select the desired backlight duration:
- bL-0: 10 minutes
- bL-1: 1 Hour
- bL-2: 4 Hours
- bL-3: 8 Hours
- bL-4: Always On
- Press "MODE" to save the setting.
6. Техникалык тейлөө
Regular maintenance ensures the longevity and accuracy of your temperature controller:
- Тазалоо: Аппаратты жумшак, кургак чүпүрөк менен сүртүңүз. Абразивдүү тазалагычтарды колдонбоңуз же аппаратты сууга салбаңыз.
- Сенсорго кам көрүү: Keep the temperature sensor probe clean and free from debris. Avoid bending or damaging the probe cable.
- Сактагыч: Колдонулбаганда, аспапты түз күн нурунан жана өтө температурадан алыс салкын, кургак жерде сактаңыз.
- Маалыматтарды сактоо: The device has a data storage function that saves all set parameters even after power is off.
7. Кыйынчылыктарды
If you encounter issues with your MakerHawk TC816, refer to the following common problems and solutions:
| Көйгөй | Мүмкүн себеп | Чечим |
|---|---|---|
| Дисплей күйбөйт же бош турат. | Электр энергиясы жок, байланыш үзүлүп калган. | Ensure the device is securely plugged into a live 120V outlet. Check the outlet with another device. |
| Температураны өлчөө так эмес. | Sensor probe dirty or misplaced, calibration needed. | Clean the sensor probe. Ensure the probe is correctly positioned. Perform a temperature calibration (see Section 5.4). |
| Device not switching ON/OFF as expected. | Incorrect temperature settings, timing mode active, locked screen. | Verify your "Start Temperature" and "Stop Temperature" settings. Ensure you are in the correct operating mode (temperature control or timing). Check if the screen is locked (see Section 5.5). |
| Жөндөөлөрдү өзгөртүү мүмкүн эмес. | Экран кулпуланган. | Unlock the screen by pressing and holding "MODE" and "SET" simultaneously for 5 seconds. |
| Need to reset to factory settings. | Software glitch, incorrect settings. | Use the included reset tool (or a thin pin) to press the reset button located in the small hole on the device. This will restore all parameters to default. |
8. Техникалык шарттар
| Өзгөчөлүк | Деталь |
|---|---|
| Модель номери | TC816B |
| Бренд | MakerHawk |
| Тtage | 110В - 120В өзгөрмө ток, 50/60Гц |
| Максималдуу жүк | 15А / 1800 Вт |
| Температураны көзөмөлдөө диапазону | -40°Cден 120°Cге чейин (-72°Fтен 176°Fге чейин) |
| Температураны көзөмөлдөө тактыгы | ±1% |
| Убакыттын тактыгы | Макс 10 мүнөт |
| Сенсор түрү | NTC температура сенсору |
| Сенсор кабелинин узундугу | 1.7 метр (66.93 дюйм) |
| Дисплей түрү | Арткы жарык менен LCD |
| Продукциянын өлчөмдөрү | 4.72 x 2.95 x 2.36 дюйм |
| Элемент Салмагы | 6.7 унция |
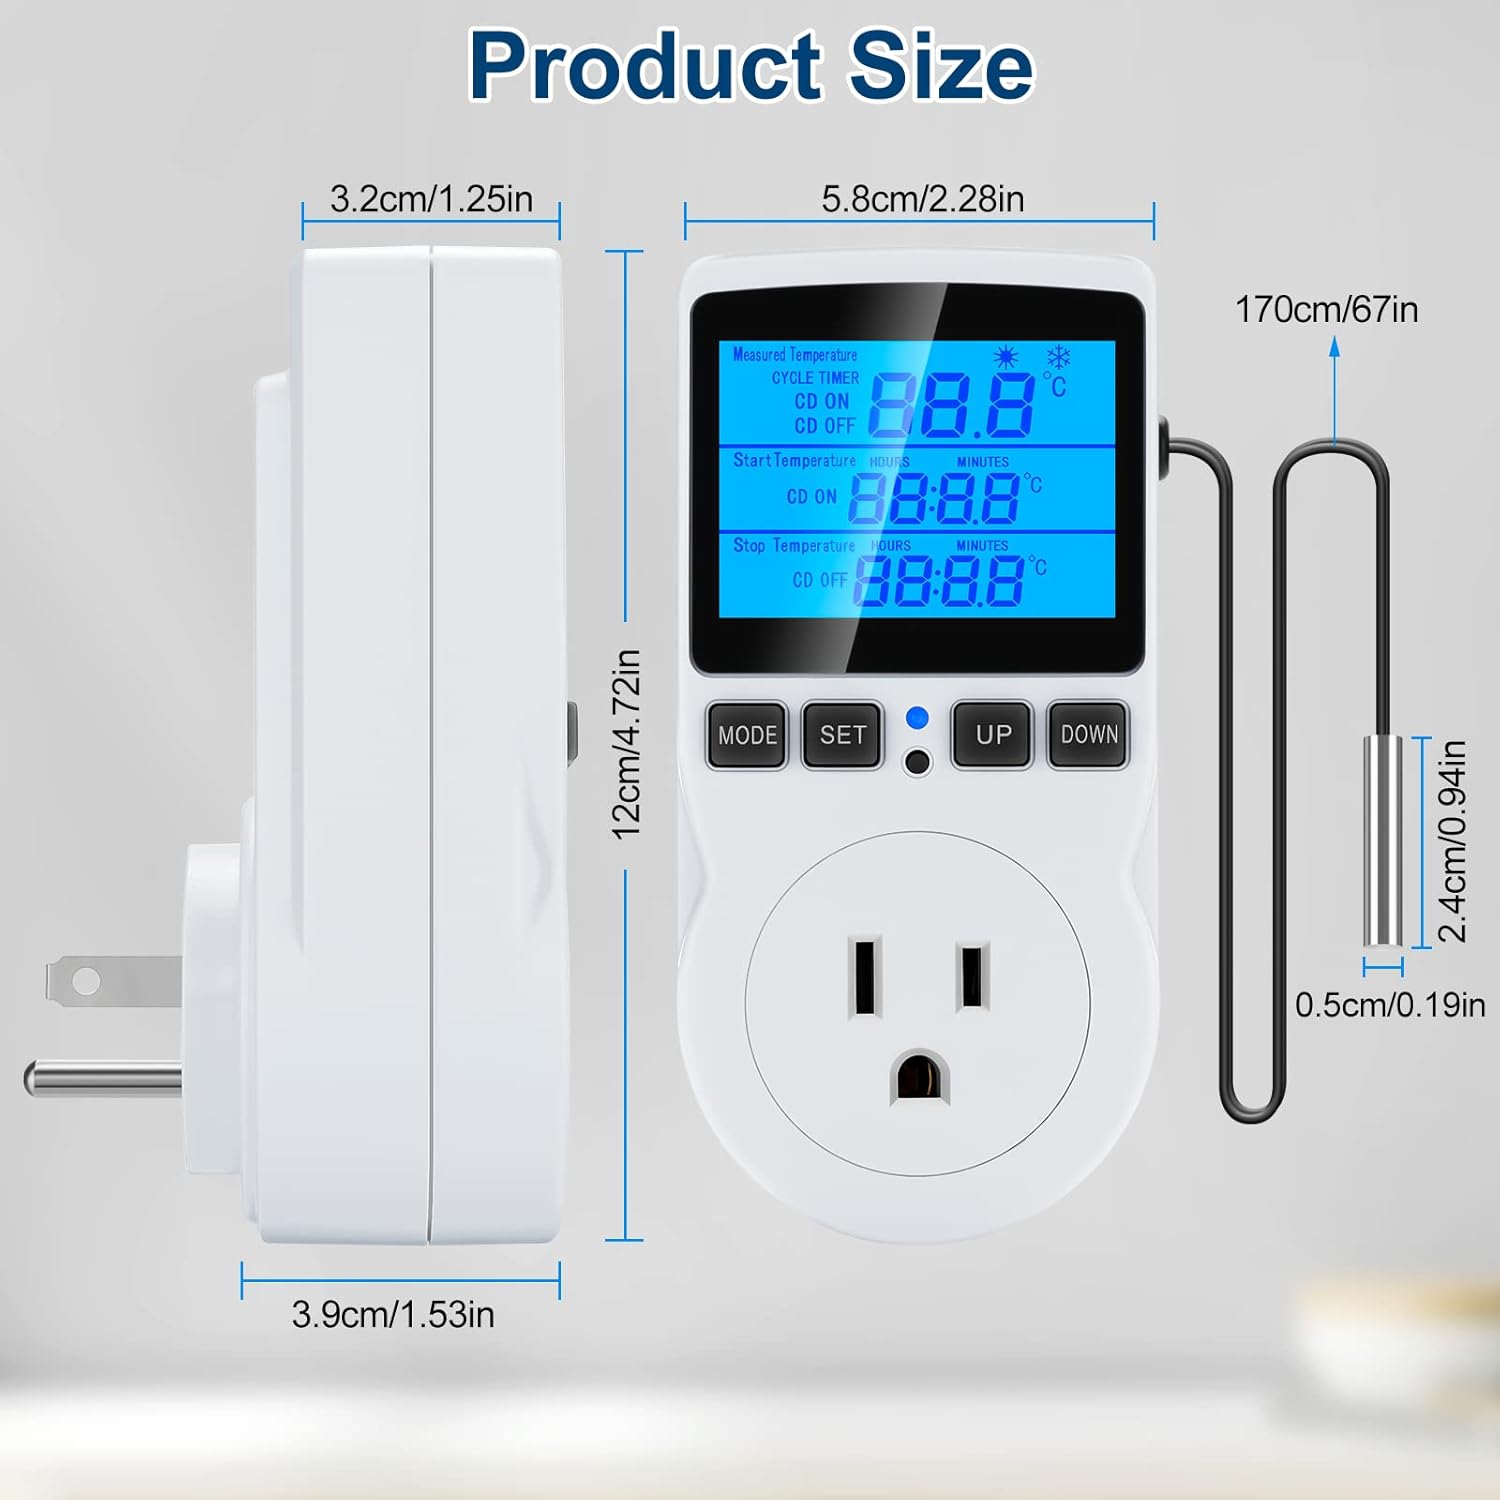
Figure 7: Detailed product dimensions in centimeters and inches.
9. Кепилдик жана колдоо
MakerHawk products are designed for reliability and performance. For warranty information or technical support, please contact MakerHawk customer service through their official website or the platform where you purchased the product. Please have your model number (TC816B) and purchase details ready when contacting support.
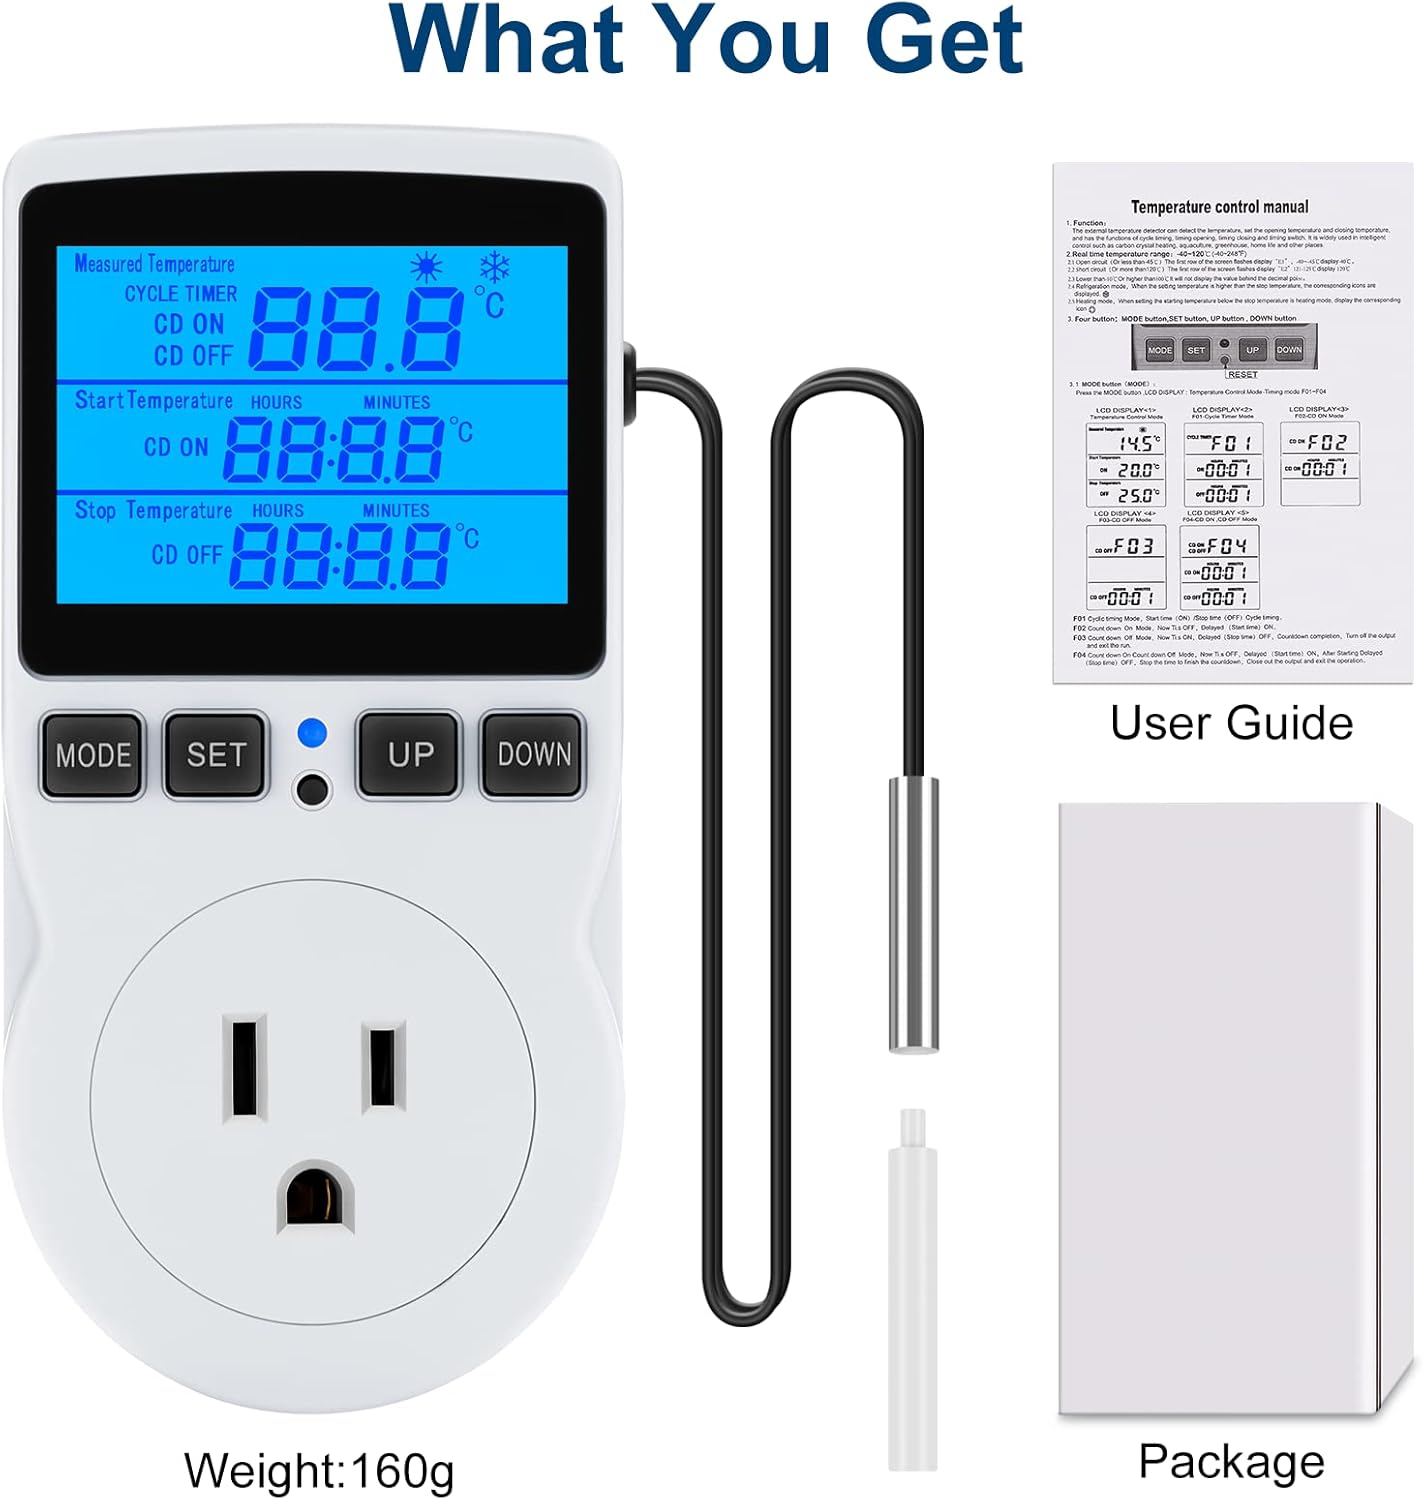
Figure 8: What is included in the package: the temperature controller, sensor probe, user guide, and packaging box.


