AVARRO 0E-HDMIMX4
AVARRO 0E-HDMIMX4 HDMI Switcher User Manual
Model: 0E-HDMIMX4
1. Киришүү
The AVARRO 0E-HDMIMX4 is a high-performance 4x4 HDMI matrix switcher designed to route any of four HDMI input sources to any of four HDMI output displays. It supports 4K Ultra HD resolutions, HDCP 2.2, and advanced features like Smart EDID Management and a built-in 4K-1080P downscaler. This manual provides detailed instructions for installation, operation, and troubleshooting to ensure optimal performance of your device.
2. Коопсуздук маалыматы
- Аппаратты иштетүүдөн мурун бардык нускамаларды кылдат окуп чыгыңыз.
- Бул түзүлүштү жамгырдын, нымдуулуктун же ашыкча нымдуулуктун таасирине дуушар кылбаңыз.
- Do not place any objects filled with liquids on the unit.
- Желдетүүчү тешиктерди жаппаңыз.
- Берилген кубат адаптерин гана колдонуңуз.
- Агрегатты өзүңүз тейлөөгө аракет кылбаңыз. Бардык тейлөөлөрдү квалификациялуу кызматкерлерге тапшырыңыз.
- Бардык туташтырылган жабдуулардын туура жерге туташтырылышын камсыз кылыңыз.
3. Пакеттин мазмуну
Verify that all items are present before installation:
- AVARRO 0E-HDMIMX4 HDMI Switcher Unit
- IR Remote Control
- DC 12V кубат адаптери
- Колдонуучунун Колдонмосу (бул документ)
- Mounting Brackets (if applicable, not explicitly mentioned but common for such devices)
4. Продукт бүтүп калдыview
4.1 алдыңкы панели

Сүрөт: алдыңкы view of the AVARRO 0E-HDMIMX4 HDMI Switcher, showing the IR receiver and output selector buttons.
- IR алуучу: Инфракызыл пульттан сигналдарды кабыл алат.
- Output Selectors (1-4): Buttons to select the input source for each corresponding HDMI output. Each output has its own set of source selection buttons (1, 2, 3, 4).
- LED көрсөткүчтөрү: Indicate the currently selected input for each output.
4.2 Арткы панель
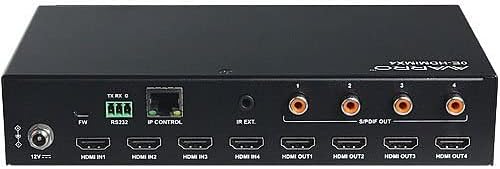
Сүрөт: Арткы view of the AVARRO 0E-HDMIMX4 HDMI Switcher, displaying all input/output ports and control interfaces.
- DC 12V IN: Кубат киргизүү порту.
- FW (Micro USB): Micro-USB port for firmware upgrades.
- 232: Serial port for control via RS232 commands.
- IP CONTROL (RJ45): Ethernet port for network control and Web UI кирүү.
- IR EXT: Port for connecting an external IR receiver.
- HDMI ИНИРҮҮСҮ (1-4): HDMI input ports for connecting source devices (e.g., Blu-ray player, game console).
- HDMI ЧЫГЫШЫ (1-4): HDMI output ports for connecting display devices (e.g., TV, projector).
- S/PDIF OUT (1-4): Digital audio output ports for each HDMI output, supporting PCM 2.0/5.1, Dolby Digital, and DTS up to 5.1 Channel.
5. Орнотуу жана туташуу
- Бардык түзмөктөрдү өчүрүү: Before making any connections, ensure all source devices, displays, and the switcher are powered off.
- HDMI булактарын туташтыруу: Connect your HDMI source devices (e.g., media players, gaming consoles) to the HDMI IN 1-4 ports on the switcher using high-quality HDMI cables.
- HDMI дисплейлерин туташтыруу: Connect your HDMI display devices (e.g., TVs, projectors) to the HDMI OUT 1-4 ports on the switcher using high-quality HDMI cables.
- Connect Audio Outputs (Optional): If desired, connect external audio systems to the S/PDIF OUT ports for digital audio extraction.
- Тармакка туташуу (милдеттүү эмес): For IP control and Web UI access, connect an Ethernet cable from your network router/switch to the IP CONTROL (RJ45) port.
- Туташуу кубаты: Connect the provided DC 12V power adapter to the DC 12V IN port on the switcher, then plug the adapter into a power outlet.
- Түзмөктөрдү күйгүзүү: Power on the switcher, then your display devices, and finally your source devices.
Эскертүү: For optimal performance with 4K content, use certified High-Speed HDMI cables.
6. Иштөө нускамалары
6.1 Алдыңкы панелди башкаруу
To switch an input source for a specific output:
- Locate the "SELECTOR" buttons for the desired OUTPUT (1-4).
- Press the corresponding "SOURCE" button (1, 2, 3, or 4) below the "SELECTOR" button to route the desired input to that output. The LED indicator will illuminate to show the active input.
6.2 IR алыстан башкаруу
The included IR remote control allows for convenient switching from a distance. Point the remote towards the IR receiver on the front panel of the switcher.
- Input Buttons (1-4): Киргизүү булагын тандайт.
- Output Buttons (A-D or 1-4): Selects the output to control.
- Матрицаны алмаштыруу: Typically, you would press an Output button, then an Input button to route that input to the selected output. Refer to the remote's specific layout for exact button functions.
6.3 Web UI Control
The Web UI provides a graphical interface for advanced control and configuration.
- Ensure the switcher is connected to your network via the IP CONTROL port.
- Obtain the IP address of the switcher (refer to network settings or device documentation for default IP or discovery method).
- ачуу а web бир тармакка туташкан компьютердеги браузер.
- Enter the switcher's IP address into the browser's address bar.
- Log in using the default credentials (if prompted, refer to device documentation for default username/password).
- колдонуу Web UI to manage input/output routing, EDID settings, and other advanced features.
6.4 RS232 Control
The RS232 port allows for integration with control systems using serial commands. Refer to the detailed RS232 command set documentation (usually available from the manufacturer's website) for specific protocols and commands.
7. Smart EDID Management
The 0E-HDMIMX4 features Smart EDID Management to ensure compatibility between source devices and displays. EDID (Extended Display Identification Data) communicates display capabilities to the source. The switcher can automatically manage EDID or allow manual configuration via the Web UI to optimize video and audio formats for connected devices.
8. Микропрограмманы жаңылоо
Firmware updates can improve performance, add new features, or resolve issues. The 0E-HDMIMX4 supports firmware upgrading via both the Micro-USB port and the Web UI.
- Микро-USB: Connect a computer to the FW (Micro USB) port and use the manufacturer's provided upgrade tool.
- Web UI: кирүү Web UI and navigate to the firmware upgrade section.
Always download the latest firmware and instructions from the official AVARRO website before attempting an upgrade.
9. Техникалык шарттар
| Өзгөчөлүк | Деталь |
|---|---|
| Модел | 0E-HDMIMX4 |
| Киргизүүлөр | 4 x HDMI IN |
| Чыгуулар | 4 x HDMI OUT, 4 x S/PDIF OUT (Digital) |
| Башкаруу порттору | 1 x RS232, 1 x IP CONTROL (RJ45), 1 x FW (Micro USB) |
| HDMI шайкештиги | 4K Ultra HD, HDCP 2.2 compliant |
| Video Resolution Support | VESA: 800x600 to 1920x1200; SMPTE: 720x576P to 4096x2160 |
| HDR колдоо | HDR 10, HLG, DOLBY VISION up to 4K60 444 |
| Кичирейтүүчү | Built-in 4K-1080P downscaler |
| Максималдуу маалымат ылдамдыгы | 18 Гбит/сек |
| Максималдуу пикселдик саат | 600 МГц |
| Аудио форматтары (HDMI) | PCM 2.0/5.1/7.1, Dolby TrueHD, Dolby Atmos, DTS HD Master Audio, DTS:X |
| Audio Formats (S/PDIF) | PCM 2.0/5.1, Dolby Digital, DTS up to 5.1 Channel |
| ESD коргоо | ±8кВ (Аба разряды) / ±4кВ (Байланыш разряды) |
| Тоскоолдуктан коргоо | Тtage: ±1 Kv |
| Электр камсыздоо | DC 12V 2A |
| Кубатты керектөө (максимум) | 10.8 Вт |
| Device Dimensions (L x W x H) | 8.46 "x 4.73" x 1.65 "(21.49 см x 12.01 см x 4.19 см) |
| Продукт Салмагы | 1.19 фунт (0.54 кг) |
10. Кыйынчылыктарды
Эгер көйгөйлөргө туш болсоңуз, төмөнкү жалпы көйгөйлөрдү жана чечимдерди караңыз:
- Видео/аудио чыгаруу жок:
- Бардык HDMI кабелдери коопсуз туташтырылганын текшериңиз.
- Verify the power adapter is correctly connected and the unit is powered on.
- Check that the correct input source is selected for the desired output.
- Test with different HDMI cables.
- Bypass the switcher to confirm source and display functionality.
- Check EDID settings, especially with mixed resolution displays.
- Үзүлгүс сигнал/жыбырттоо:
- Use high-quality, certified HDMI cables, especially for longer runs or 4K content.
- Ensure cables are not excessively bent or damaged.
- Check for potential electromagnetic interference from other devices.
- Алыстан башкаруу иштебейт:
- Ensure there are no obstructions between the remote and the switcher's IR receiver.
- Пульттун батарейкаларын алмаштырыңыз.
- Verify the remote is pointed directly at the IR receiver.
- Web UI/IP Control Issues:
- Confirm the Ethernet cable is properly connected.
- Verify the switcher's IP address and ensure your computer is on the same network subnet.
- Компьютериңиздеги же тармагыңыздагы брандмауэр жөндөөлөрүн текшериңиз.
11. Техникалык тейлөө
- Тазалоо: Агрегаттын сыртын тазалоо үчүн жумшак, кургак чүпүрөктү колдонуңуз. Суюк тазалагычтарды же аэрозолдорду колдонбоңуз.
- Вентиляция: Ensure the ventilation openings are clear and not obstructed to prevent overheating.
- Сактагыч: If storing the unit for an extended period, disconnect power and store in a cool, dry place.
12. Кепилдик жана колдоо
AVARRO products are designed for reliability and performance. For specific warranty information, please refer to the warranty card included with your product or visit the official AVARRO webсайты. Техникалык колдоо, продуктуну каттоо же эң акыркы драйверлерди жана микропрограмманы жүктөп алуу үчүн, сураныч, бул жерге кириңиз www.avarrus.com or contact AVARRO customer service.
Ask a question about this manual
Ask about setup, troubleshooting, compatibility, parts, safety, or missing instructions. Manuals+ will review the question and use this page’s manual context to help answer it.