1. Киришүү
This manual provides detailed instructions for the installation, operation, and maintenance of your DieseRC Wireless DC Motor Remote Control Switch (Model 1202M). This device is designed to wirelessly control the forward and reverse rotation of DC motors, offering stable and reliable performance. Please read this manual thoroughly before use to ensure proper function and safety.
2. Коопсуздук маалыматы
- электр менен жабдууну камсыз кылуу voltage matches the receiver's specified voltage диапазону (DC 12V-80V).
- Do not exceed the maximum resistive load of 10A (inductive load 5A) for the relay.
- Disconnect power before performing any wiring or maintenance to prevent electric shock.
- Түзмөктү суудан жана нымдуулугу жогору чөйрөлөрдөн алыс кармаңыз.
- Түзмөктү бөлүктөргө бөлүүгө же өзгөртүүгө аракет кылбаңыз, анткени бул кепилдикти жокко чыгарып, коопсуздукка коркунуч келтириши мүмкүн.
- This product is intended for use with DC motors only.
3. Продукт бүтүп калдыview
The DieseRC Wireless DC Motor Remote Control Switch system consists of a receiver module and two remote control transmitters. The receiver is designed for a wide voltage input range and features a learning button for programming different operating modes.
3.1 Компоненттер
- Алуучу модулу: Controls the DC motor's direction and stop function.
- Өткөргүчтөр (x2): Wireless remote controls for operating the receiver.
- Wiring Connectors: Коопсуз электр туташуулары үчүн.
3.2 Негизги өзгөчөлүктөрү
- 433Mhz RF wireless control.
- Controls DC motor forward and reverse rotation.
- High reception sensitivity (> -97dBm).
- Operating range: 20-50 meters (may vary based on environment).
- Three operating modes: Momentary, Toggle, and Latched.
- Supports up to 20 transmitters per receiver.
- Wide томtage input: DC 12V-80V.
- High-quality relay with over 100,000 operations.

Figure 1: DieseRC Wireless DC Motor Remote Control Switch and two remote transmitters.
4. Техникалык шарттар
| Өзгөчөлүк | Спецификация |
|---|---|
| Модель номери | 1202M |
| Киргизүү көлөмүtage | DC 12V-80V |
| Max Load (Resistive) | 10 Amps |
| Max Load (Inductive) | 5 Amps |
| Жыштык | 433 МГц |
| Иштөө режимдери | Убактылуу, Которгуч, Кулпуланган |
| Transmitter Storage | Up to 20 transmitters |
| Control Distance | 20-50 meters (open area) |
| Relay Lifespan | > 100,000 жолу |
| Элемент Салмагы | 4.2 унция |
| Пакеттин өлчөмдөрү | 4.02 x 3.74 x 1.57 дюйм |
| Батареялар | 2 x 12V батарейкалар (кошулган) |
5. Орнотуу жана зымдар
Before wiring, ensure all power sources are disconnected. The receiver is designed for simple integration with DC motors.
5.1 Электр өткөргүч схемасы
Connect the receiver to your DC power source and motor according to the diagram below. The input wires (red and black) connect to the DC power supply, and the output wires (red and black) connect to the DC motor. Ensure correct polarity.

Figure 2: Basic wiring diagram for the receiver and DC motor.
For applications like winches requiring a polarity reversal switch, refer to the specialized wiring diagram:

Figure 3: Wiring diagram for a winch application, including a winch solenoid relay.
5.2 Туташтыруучу зымдар
The receiver comes with pre-stripped wires for easy connection. Use appropriate connectors (such as the included quick connectors) to ensure a secure and insulated connection.

Figure 4: Quick connectors for secure wiring.

Figure 5: Receiver wires prepared for connection.
6. Иштөө режимдери жана программалоо
The receiver supports three operating modes: Momentary, Toggle, and Latched. The product is typically pre-programmed in Latched mode. You can change the mode by following the programming steps below.
6.1 Resetting the Receiver
To clear all programmed transmitters and reset the receiver to its default state, press the learning button on the receiver 8 times. The indicator light will flash to confirm the reset. After a reset, no remote controls will operate the receiver until they are re-programmed.

Figure 6: Resetting the receiver by pressing the learning button 8 times.
Video 1: Demonstration of wiring and display, including resetting the receiver. This video shows the product in action and how to perform a reset, which is useful for understanding the process.
6.2 Programming Operating Modes
After resetting or for initial setup, follow these steps to program your desired operating mode:
6.2.1 Momentary Mode (Mode 1)
In Momentary mode, the motor operates only while the transmitter button is pressed. Releasing баскычы моторду өчүрөт.
- Press the learning button on the receiver 1 жолу. The indicator light will flash once.
- Press the "Up" (▲) button on the transmitter. The indicator light will flash to confirm successful programming.

Figure 7: Programming the receiver for Momentary mode.
6.2.2 Toggle Mode (Mode 2)
In Toggle mode, pressing a button once starts the motor, and pressing the same button again stops it.
- Press the learning button on the receiver 2 жолу. The indicator light will flash twice.
- Press the "Up" (▲) button on the transmitter. The indicator light will flash to confirm successful programming.

Figure 8: Programming the receiver for Toggle mode.
6.2.3 Latched Mode (Mode 3)
In Latched mode, one button starts the motor in one direction, another button starts it in the reverse direction, and a third button stops it.
- Press the learning button on the receiver 3 жолу. The indicator light will flash three times.
- Press the "Up" (▲) button on the transmitter to program forward rotation.
- Press the "Down" (▼) button on the transmitter to program reverse rotation.
- Press the "Stop" (■) button on the transmitter to program the stop function. The indicator light will flash to confirm successful programming.

Figure 9: Programming the receiver for Latched mode.
Video 2: Detailed instructions on how to program the receiver for Momentary, Toggle, and Latched modes. This video is essential for understanding the programming process.
6.3 Changing Motor Direction (Advanced)
If the motor rotates in the opposite direction to what is desired for the "Up" and "Down" buttons, you can reverse the motor's polarity by pressing the learning button 7 times. This will swap the output polarity for the programmed functions.
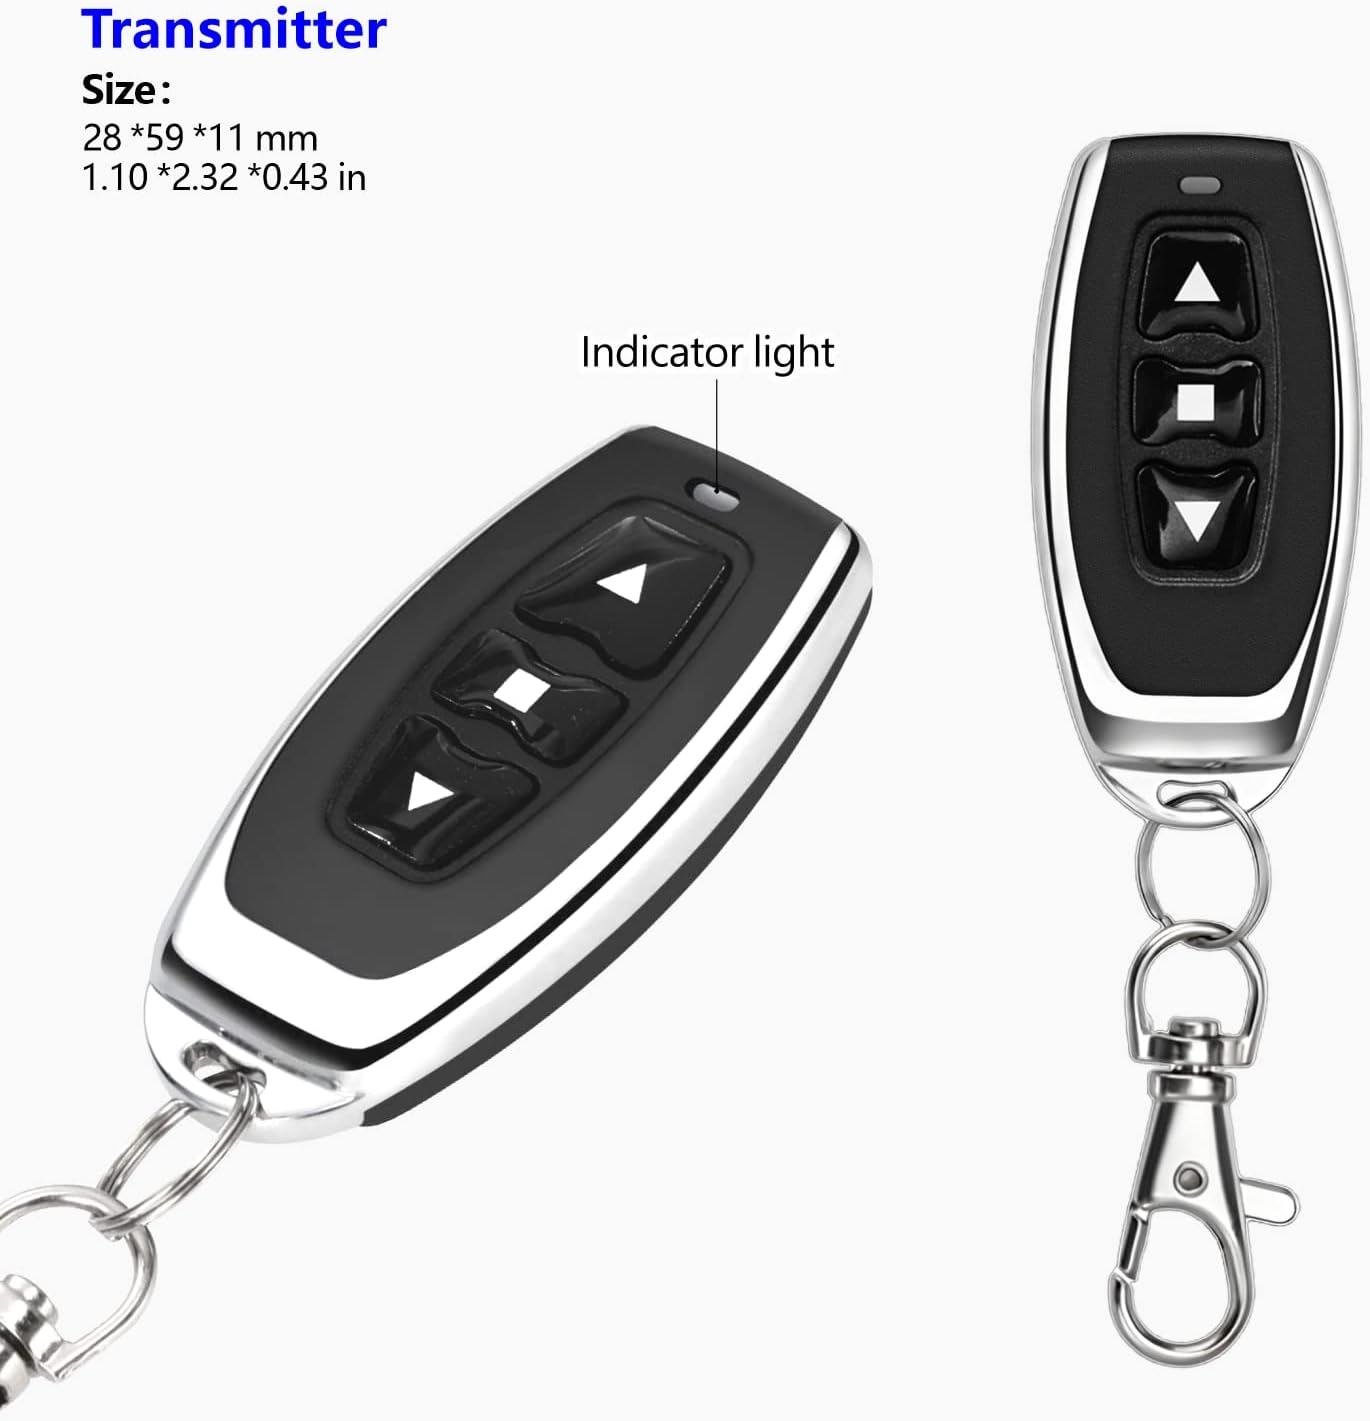
Figure 10: Changing the motor direction by pressing the learning button 7 times.
7. Техникалык тейлөө
- Keep the receiver and transmitters clean and dry.
- Regularly check wiring connections for looseness or corrosion.
- Replace transmitter batteries when the indicator light dims or range decreases. The transmitters use 12V batteries.
- Do not expose the devices to extreme temperatures or direct sunlight for prolonged periods.
8. Кыйынчылыктарды
| Көйгөй | Мүмкүн себеп | Чечим |
|---|---|---|
| Motor does not respond to remote. | No power to receiver; Transmitter batteries low/dead; Transmitter not programmed; Receiver reset. | Check power supply to receiver; Replace transmitter batteries; Re-program transmitter to receiver (see Section 6.2). |
| Motor operates in wrong direction. | Incorrect wiring; Motor polarity reversed. | Verify wiring connections (see Section 5.1); Use the motor direction change function (see Section 6.3). |
| Алыстан башкаруу пульту азайтылган. | Low transmitter battery; Environmental interference; Obstructions. | Replace transmitter batteries; Minimize interference sources; Ensure clear line of sight if possible. |
| Motor runs continuously or does not stop. | Incorrect operating mode programmed (e.g., momentary mode not stopping on release); Faulty transmitter button. | Verify and re-program the desired operating mode (see Section 6.2); Test with another transmitter if available. |
9. Кепилдик жана колдоо
DieseRC products are manufactured with quality and reliability in mind. For specific warranty details, please refer to the product packaging or contact DieseRC customer support.
Өндүрүүчү / Импорттоочу: Huizhou Wenqiao Electronic Technology Co., Ltd.
Дарек: Room 03, 12th Floor, Building T19, East Coast Garden, Fangzhilonghuwan, No. 27, Sanhuan South Road, Huicheng District, Huizhou City, Guangdong Province, China 516001
Кызмат электрондук почтасы: dieseelectronic@163.com
For further assistance or technical support, please contact the manufacturer directly via the provided email address.


