1. Киришүү
Thank you for choosing the VILTROX DC-550 Pro 5.5-inch LCD Monitor. This professional director monitor is designed for photography, studio, video, and TV production, offering high brightness, full HD resolution, and advanced monitoring features. This manual provides detailed instructions for setup, operation, maintenance, and troubleshooting to ensure optimal performance and longevity of your device.

The VILTROX DC-550 Pro monitor, shown with its detachable sunshade, mounted on a camera rig. The screen displays a clear image, demonstrating its high brightness and wide viewбурч.
2. Продукт бүтүп калдыview
2.1 Негизги өзгөчөлүктөрү
- High Brightness Display: 1200 Nits high-brightness 5.5-inch screen for clear visibility in various lighting conditions.
- Full HD токтому: 1920x1080 pixels, 1200:1 contrast ratio, ensuring detailed and accurate image reproduction.
- Wide Viewбурч: 178° ultra-wide angle design for consistent image quality from different perspectives.
- Professional Monitoring Software: Includes features like Parade waveform, vector graph, brightness histogram, auxiliary focus, audio column, image flip, false color, and more.
- Custom 3D LUTs: Supports importing 3D LUTs via SD card for creative post-production styles and camera Log mode monitoring.
- Image Zoom Function: Touch screen mode allows double-finger drag for detailed viewing; button mode controls image size.
- REC.709 Color Calibration: Built-in 3D LUT for precise color reproduction, adhering to international color standards.
- HDMI киргизүү/чыгыш: HDMI 1.4 signal input and output, supporting up to 4K30HZ (3840x2160) and 4K24HZ (4096x2160).
2.2 Пакеттин мазмуну
Кутудан чыгарылганда бардык буюмдар бар экенин текшериңиз:
- 1 x VILTROX DC-550 Pro Monitor
- Other accessories (e.g., sunshade, mounting bracket) may be included depending on the specific package.
3. Орнотуу
3.1 Мониторду кубаттоо
The DC-550 Pro monitor can be powered by two methods:
- Батарея кубаттуулугу: Insert a compatible NP-F series battery (NP-F550/F570/F750/F770/F960/F970) into the battery slot on the rear of the monitor. Ensure the battery is securely latched.
- Тышкы күч: Connect a DC 12V-18V / 2A power adapter to the DC power interface, or use a Type-C interface with ≥5V / 3A power supply.
3.2 Камерага туташуу
Use an HDMI cable to connect your camera or video source to the HDMI 1.4 input port on the monitor. If you need to loop out the signal to another display, connect an HDMI cable from the monitor's HDMI 1.4 output port to the secondary display.

This image demonstrates the monitor's 4K HDMI input and loop-out capabilities. The monitor displays a high-definition image from a camera, and the same signal is shown on a larger external display, highlighting its use in professional video workflows.
3.3 Мониторду орнотуу
Attach the monitor to your camera rig or stand using the provided mounting bracket. Ensure the monitor is securely fastened to prevent accidental drops.
4. Иштөө нускамалары
4.1 Күйгүзүү/өчүрүү
Press and hold the power button (usually located on the side or top) for a few seconds to turn the monitor on or off.
4.2 Меню Навигациясы
The DC-550 Pro features both touch screen and physical button controls for menu navigation:
- Сенсордук экран: Tap on screen elements to select options, swipe to navigate menus, and use pinch-to-zoom gestures for image magnification.
- Buttons/Knobs: Use the physical buttons and rotary knob (typically on the side) to navigate through menu options, confirm selections, and adjust parameters.

This visual comparison highlights the operational differences between the DC-550 and DC-550 Pro models. The DC-550 uses physical buttons and knobs for settings, while the DC-550 Pro features a full touch screen interface for intuitive control and detailed viewing.
4.3 Тил орнотуулары
If the monitor's menu is not in your preferred language, navigate to the system settings menu (often represented by a gear icon). Locate the 'Language' option and select 'English' or your desired language.
4.4 Кесиптик мониторинг функциялары
The DC-550 Pro offers a suite of professional tools accessible through the menu:
- 3D LUT: Import custom 3D LUTs via SD card to apply specific color looks or convert Log footage to Rec.709 for accurate monitoring.
- Парад толкунунун формасы: Displays the luminance and chrominance levels of your video signal, aiding in exposure and color balance.
- Вектордук график: Visualizes the color saturation and hue of your video signal.
- Жарыктык гистограммасы: Shows the distribution of brightness levels in your image, helping to avoid clipping highlights or crushing shadows.
- Көмөкчү фокус (фокустун чокусу): Highlights in-focus areas with a colored overlay to assist with critical focusing.
- Аудио тилке: Displays audio levels to monitor sound input.
- Сүрөттү которуу: Flips the image horizontally or vertically, useful for various mounting orientations.
- Жалган түс: Uses a spectrum of colors to represent different exposure levels, aiding in precise exposure setting.
- Чоңойтуу функциясы: Magnify parts of the image for critical focus and detail inspection. On the Pro model, use a double-finger touch gesture.

An SD card is being inserted into the monitor, indicating its use for firmware upgrades or importing 3D LUTs. Surrounding the monitor are icons representing its advanced monitoring features, including 3D LUT, audio column, safe area, mark ratio, image flip, full waveform, zoom, gridlines, color temperature, false color, focus peaking, exposure, histogram, vectorscope, and pixel to pixel.
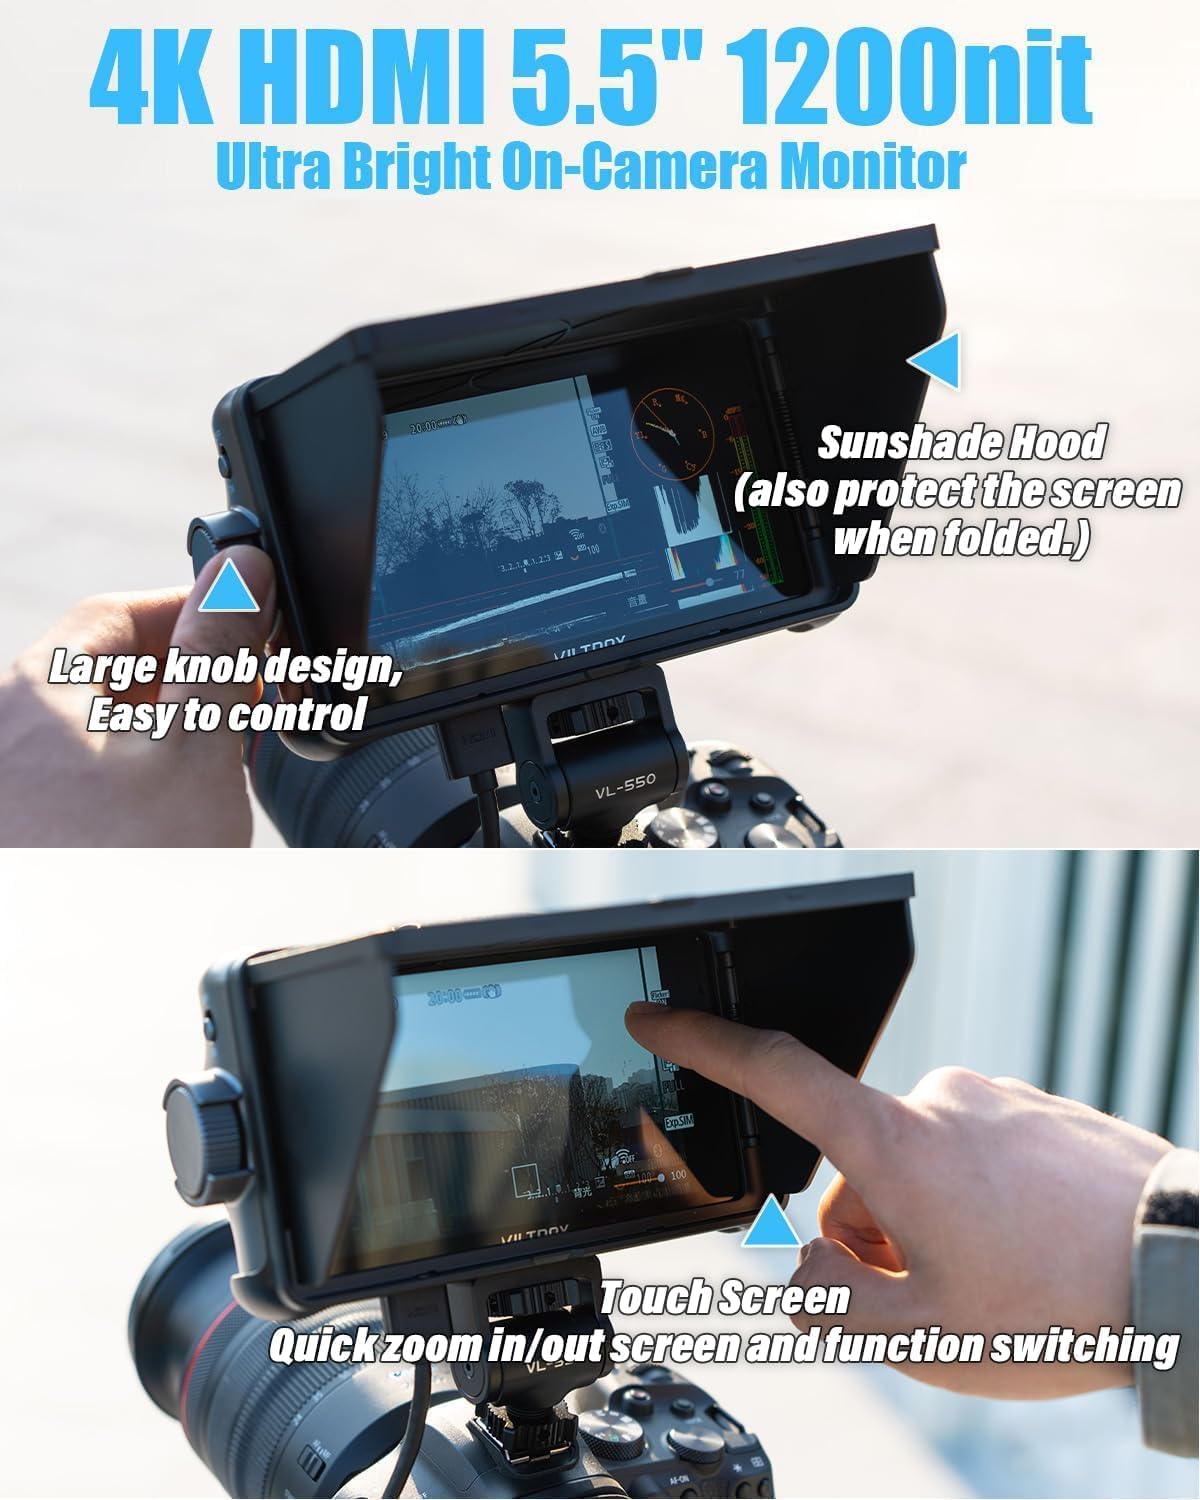
The top part of the image showcases the monitor's sunshade hood, which also protects the screen when folded, and a large control knob for easy adjustments. The bottom part demonstrates the touch screen functionality, allowing for quick zoom in/out and function switching.
5. Техникалык тейлөө
5.1 Мониторду тазалоо
To clean the screen, use a soft, lint-free cloth specifically designed for electronics. For stubborn smudges, lightly dampen the cloth with a screen cleaning solution. Avoid using harsh chemicals or abrasive materials.
5.2 Сактоо
When not in use, store the monitor in a dry, cool place, away from direct sunlight and extreme temperatures. Use the sunshade or a protective case to prevent scratches and dust accumulation.
5.3 Микропрограмма жаңыртуулары
Periodically check the VILTROX official website for firmware updates. Updates can be installed via an SD card, improving performance and adding new features. Follow the instructions provided with the firmware update carefully.
6. Кыйынчылыктарды
- Монитор күйбөйт:
- Ensure the battery is fully charged and correctly inserted, or the external power adapter is properly connected and supplying adequate power.
- Кубат баскычын кандайдыр бир зыяндын бар-жоктугун текшериңиз.
- Сигнал көрсөтүлгөн жок:
- Verify that the HDMI cable is securely connected to both the camera/source and the monitor.
- Confirm that the camera/source is outputting a signal and is set to the correct resolution/frame rate compatible with the monitor.
- Башка HDMI кабелин колдонуп көрүңүз.
- Image is distorted or incorrect colors:
- Check the monitor's color settings and ensure they are calibrated correctly (e.g., Rec.709).
- If using 3D LUTs, ensure the correct LUT is applied and is compatible with your footage.
- Verify the HDMI cable is not damaged.
- Touch screen is unresponsive:
- Мониторду өчүрүп-күйгүзүңүз.
- Экран таза жана таштанды же ным жок экенин текшериңиз.
- If the issue persists, use the physical buttons for navigation and consider a firmware update.
7. Техникалык шарттар
| Өзгөчөлүк | Спецификация |
|---|---|
| LED экран өлчөмү | 5.5 дюймдук |
| Резолюция | 1920 x 1080 pixels (FHD 1080p) |
| Жарыктык | 1200 cd/m² (Nits) |
| Контраст катышы | 1200:1 |
| Viewбурч | 178° |
| Input Signal Interface | HDMI 1.4 |
| Output Signal Interface | HDMI 1.4 |
| Max Supported HDMI Size | 4K30HZ (3840x2160), 4K24HZ (4096x2160) |
| Аудио чыгаруу | 3.5 мм гарнитура уячасы |
| Микропрограмманы жаңыртуу | SD картаны жаңыртуу |
| Power Interface | DC 12V-18V — 2A, Type-C interface ≥5V — 3A |
| Колдонулуучу батарея | NP-F550/F570/F750/F770/F960/F970 |
| Өлчөмдөр | 165 x 91 x 28.5mm (Product), 5.91 x 3.94 x 3.94 inches (Packaged) |
| Элемент Салмагы | 1.1 фунт |
| Колдоого алынган тилдер | Англис, жөнөкөйлөтүлгөн кытай |
| Screen Surface Description | Жылтырак |
| Аспект катышы | 16:9 |

The monitor is shown in use, mounted on a camera, displaying a video feed. Below the monitor, a diagram illustrates the Rec.709 color space, emphasizing the monitor's color accuracy and adherence to industry standards.

Two individuals are shown in a studio setting, using the VILTROX monitor as part of their video production setup. The image emphasizes the monitor's professional color adjustment and true color rendering, adhering to the REC.709 international color standard, as further explained by the accompanying color gamut diagram.
8. Кепилдик жана колдоо
VILTROX products typically come with a limited warranty. Please refer to the warranty card included with your product or visit the official VILTROX website for detailed warranty terms and conditions. For technical support, service, or inquiries, please contact VILTROX customer service through their official channels.


