Introduction
This manual provides comprehensive instructions for the installation, operation, and maintenance of your Natec Cabassu G2 Midi Tower PC Case. Please read this manual thoroughly before beginning installation to ensure proper setup and optimal performance.
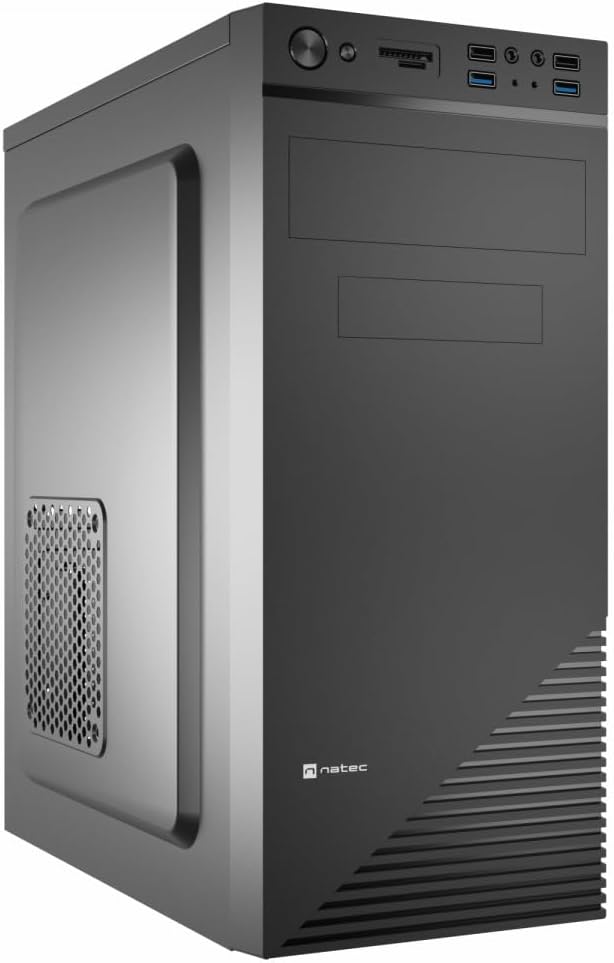
Figure 1: Natec Cabassu G2 Midi Tower PC Case. This image shows the front and left side of the black PC case, highlighting its sleek design and front panel layout.
Коопсуздук маалыматы
- Компоненттерди орнотуудан же алып салуудан мурун ар дайым кубат менен жабдууну розеткадан ажыратыңыз.
- Статикалык электр энергиясынан улам зыян келтирбөө үчүн компоненттерди этияттык менен кармаңыз.
- Keep the case away from water, moisture, and extreme temperatures.
- Ашыкча ысып кетүүнүн алдын алуу үчүн туура желдетүүнү камсыз кылыңыз.
- Do not attempt to open the power supply unit.
Пакеттин мазмуну
Пакетте бардык буюмдар бар экенин текшериңиз:
- Natec Cabassu G2 Midi Tower PC Case
- Accessory kit (screws, standoffs, cable ties)
- Колдонуучунун Колдонмосу (бул документ)
Setup and Component Installation
1. Ишти даярдоо
- Корпусту тегиз, туруктуу бетке коюңуз.
- Remove the side panels by unscrewing the thumbscrews at the rear and sliding the panels backward.

2-сүрөт: Интерьер view of the Natec Cabassu G2 case with the side panel removed, illustrating the internal layout for component installation.
2. Motherboard орнотуу
- Киргизүү/чыгаруу калканчын корпустун арткы тешигине орнотуңуз.
- Align the motherboard with the pre-installed standoffs. The Cabassu G2 supports Mini ITX, Micro ATX, and ATX motherboards.
- Берилген бурамалар менен энелик тактаны бекитиңиз.
3. Электр энергиясы менен жабдууну орнотуу
- The power supply mounts at the bottom of the case.
- Slide the power supply into its designated bay from the rear of the case.
- Secure it with screws from the rear.
4. Сактоочу дискти орнотуу
- 2.5" Drives (SSDs/HDDs): The case features 3 x 2.5" drive bays. Mount drives using the provided screws in the designated locations.
- 3.5" Drives (HDDs): The case also supports 3.5" drives.
5. Кеңейтүү картасын орнотуу
- Remove the necessary expansion slot covers from the rear of the case (7 expansion slots available).
- Insert your graphics card or other expansion cards into the motherboard's PCIe slots.
- Карталарды бурамалар менен бекитиңиз.

3-сүрөт: Арткы view of the Natec Cabassu G2 case, detailing the I/O shield cutout, power supply opening, and seven expansion slots.
6. Кабелдик башкаруу
Route cables behind the motherboard tray where possible to improve airflow and aesthetics. Use the included cable ties to secure bundles.
7. Алдыңкы панелдин кабелдерин туташтыруу
Connect the front panel cables (USB 2.0, USB 3.0, audio, power switch, reset switch, HDD LED, power LED) to the corresponding headers on your motherboard. Refer to your motherboard manual for exact pin assignments.

Figure 4: Close-up of the Natec Cabassu G2 front panel, showing 2x USB 2.0 ports, 2x USB 3.0 ports, audio jacks, and power/reset buttons.
Иштөө нускамалары
Күйгүзүү/өчүрүү
- Күйгүзүү: Алдыңкы панелде жайгашкан кубат баскычын басыңыз.
- Өчүрүү: Initiate shutdown through your operating system. For a forced shutdown, press and hold the power button for several seconds.
- Кайтаруу: Press the reset button on the front panel to restart the system.
Using Front Panel Ports
The front panel provides convenient access to:
- 2 x USB 2.0 порттору
- 2 x USB 3.0 порттору
- Audio input (microphone) and output (headphone) jacks
Connect compatible devices to these ports as needed.
Техникалык тейлөө
Тазалоо
- Корпустун сыртын жумшак, d чүпүрөк менен үзгүлтүксүз тазалап туруңузamp кездеме. Абразивдүү тазалагычтардан алыс болуңуз.
- Use compressed air to remove dust from fan filters and internal components. Ensure the system is powered off and unplugged before cleaning.
Чаң чыпкалары
The case may include removable dust filters. Periodically remove and clean these filters to maintain optimal airflow and cooling performance.
Проблемаларды чечүү
| Көйгөй | Мүмкүн себеп | Чечим |
|---|---|---|
| Система күйбөйт. | Power cables not connected properly. Faulty power supply. | Check all power connections (motherboard, CPU, GPU, power supply to wall). Ensure power supply switch is ON. |
| Алдыңкы панелдеги USB порттору иштебей жатат. | Front panel USB cables not connected to motherboard. | Verify that the USB 2.0 and USB 3.0 headers are correctly connected to the motherboard. |
| Excessive fan noise. | Dust accumulation. Loose fan. | Clean dust from fans and filters. Ensure all fans are securely mounted. |
Техникалык шарттар
| Өзгөчөлүк | Деталь |
|---|---|
| Модель аты | Cabassu G2 |
| Элемент моделинин номери | S5624687 |
| Иштин түрү | Миди мунарасы |
| Өлчөмдөрү (LxWxH) | 19.69 x 19.69 x 11.02 дюйм (50 x 50 x 28 см) |
| Салмагы | 7.04 фунт (3.19 кг) |
| Материал | Акрилонитрил бутадиен стиролу (ABS), болоттон жасалган эритме |
| Motherboard шайкештиги | Mini ITX, Micro ATX, ATX |
| 2.5" Айдоочу булуңдар | 3 |
| Кеңейтүү уячалары | 7 |
| Алдыңкы I / O порттору | 2 x USB 2.0, 2 x USB 3.0, Аудио киргизүү/чыгаруу |
| Күйөрмандардын колдоосу | 120mm (rear, pre-installed if applicable) |
| Муздатуу ыкмасы | Аба |
| Электр менен жабдууну орнотуу | Төмөнкү тоо |
Кепилдик маалымат
Natec products are covered by a manufacturer's warranty. Specific warranty terms and conditions may vary by region and retailer. Please refer to the warranty card included with your product or visit the official Natec webкепилдик камтуу жана дооматтар тууралуу толук маалымат алуу үчүн сайт.
Колдоо
For technical assistance, troubleshooting, or further inquiries, please visit the official Natec support webсайтка же кардарларды тейлөө бөлүмүнө кайрылыңыз. Байланыш маалыматы, адатта, продуктунун таңгагынан же расмий брендинен тапса болот webсайт.
Webсайт: www.natec-zone.com (Чыгampшилтеме, чыныгы шилтеме ар кандай болушу мүмкүн)


