Introduction
This manual provides detailed instructions for the safe installation, operation, and maintenance of your Parrot Uncle 60-inch black ceiling fan with integrated LED lighting and remote control. Please read all instructions carefully before beginning installation and retain this manual for future reference.
This ceiling fan is designed for both indoor and outdoor (covered patio) use, featuring a powerful DC motor, reversible blades, and dimmable LED light with adjustable color temperature.

Image: The Parrot Uncle 60-inch black ceiling fan with its remote control, installed in a modern living space.
Коопсуздук маалыматы
ЭСКЕРТҮҮ: Өрт, электр шок же жеке жаракат алуу коркунучун азайтуу үчүн ар дайым төмөнкү негизги сактык чараларын аткарыңыз:
- Желдеткичти орнотуудан мурун бардык нускамаларды жана коопсуздук маалыматын окуп чыгыңыз жана бул нускамаларды сактаңыз.
- All wiring must be in accordance with national and local electrical codes. Consult a qualified electrician if you are unsure about wiring.
- Before installation, disconnect power by turning off the circuit breakers at the main fuse box or circuit panel.
- Ensure the installation site allows the fan blades to rotate without obstruction and that the blades are at least 7 feet (2.1 meters) from the floor.
- The outlet box and support structure must be securely mounted and capable of reliably supporting a minimum of 35 lbs (15.9 kg). Use only UL/ETL listed outlet boxes marked 'FOR FAN SUPPORT'.
- Вентиляторду бузулган электр шнурлары же сайгычтары менен иштетпеңиз.
- Бычактардын жолуна объекттерди коюудан алыс болуңуз.
- Шып желдеткичтери үчүн атайын иштелип чыкпаган күңүрттөөчү которгуч менен желдеткичти колдонбоңуз.
Пакеттин мазмуну
Төмөндө саналып өткөн бардык компоненттер пакетиңизге камтылганын текшериңиз:
- Шыпка желдеткич мотор корпусу
- Вентилятор бычактары (6 даана)
- Интеграцияланган LED жарык комплекти
- Алыстан башкаруу
- Төмөнкү таякчалар (4 дюймдук жана 10 дюймдук варианттар)
- Кронштейн орнотуу
- Аппараттык пакет (буроолор, зым гайкалар, шайбалар)
- Instruction Manual
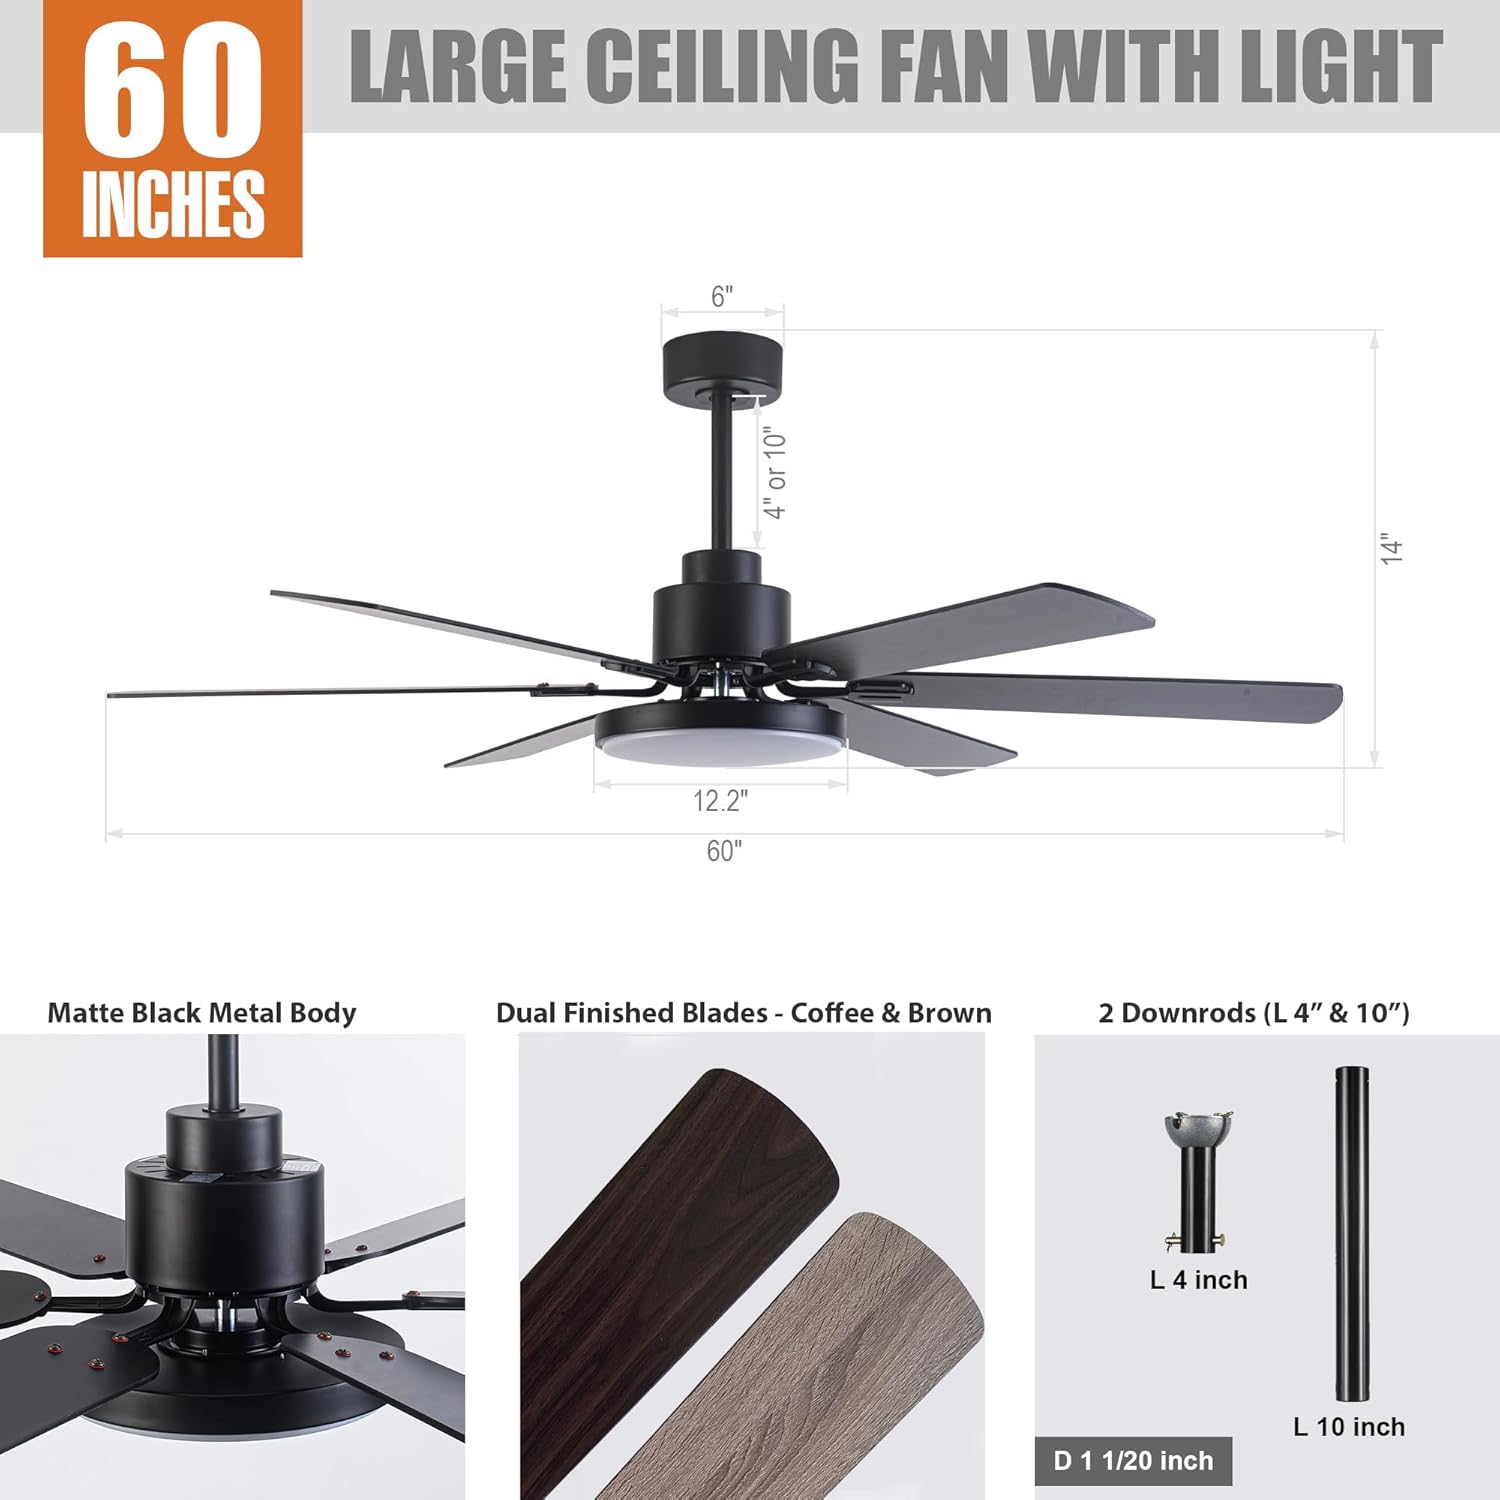
Image: A detailed diagram illustrating the fan's dimensions (60" diameter, 14" height) and key components such as the matte black metal body, dual-finished blades (coffee/brown), and the two included downrods (4" and 10").
Техникалык шарттар
| Өзгөчөлүк | Спецификация |
|---|---|
| Модель номери | F8252 |
| Бренд | Тоту куш байке |
| Өлчөмү | 60 дюйм (диаметр) |
| Продукциянын өлчөмдөрү | 60"L x 60"W x 14"H |
| Түс | Кара |
| Материал | Engineered Wood (Blades), Iron (Housing) |
| Мотор түрү | DC Motor |
| Жарык булагы түрү | Интегралдык LED |
| LED Wattage | Макс 24 Ватт |
| Жарыктык | 1500 Lumen |
| Түс температурасы | 3000K (Warm), 4000K (Natural), 5700K (Bright) |
| Башкаруу ыкмасы | Алыстан башкаруу |
| Күйөрмандардын ылдамдыгы | 6 деңгээл |
| Өзгөчөлүктөр | Dimmable Light, Adjustable Color Temperature, Reversible Motor, Timer Function |
| Ички/тышкы колдонуу | Indoor, Outdoor (Covered Patio) |
| Орнотуу түрү | Төмөнкү тоо |
| Тtage | 120 вольт |
| Сертификаттар | ETL тизмеленген |
Орнотуу
1. Орнотууга чейинки текшерүүлөр
- Электр өчүргүчтө электр энергиясы өчүрүлгөнүн текшериңиз.
- Confirm the ceiling outlet box is rated for fan support (minimum 35 lbs).
- Бардык керектүү шаймандарды чогултуңуз: бурагыч, зым чечкич, электр лентасы, тепкич.
2. Кронштейнди орнотуу
Attach the mounting bracket to the ceiling outlet box using the screws provided with the outlet box. Ensure the bracket is securely fastened.
3. Төмөнкү штанганы жана желдеткич моторун чогултуу
Select either the 4-inch or 10-inch downrod based on your ceiling height and preference. Feed the fan wires through the downrod. Secure the downrod to the fan motor housing according to the diagrams in the separate installation guide (not included in this manual).

Image: This diagram shows various downrod mounting configurations, including standard downrod mount, extended downrod mount, and sloped ceiling mount (up to 15 degrees), indicating the fan's adaptability to different ceiling types.
4. Желдеткичти илип коюу
Carefully lift the fan assembly and hang it from the mounting bracket. This typically involves placing the downrod ball into the bracket's opening.
5. Зымдарды туташтыруу
Connect the fan's electrical wires to the household wiring according to the color codes (typically black to black, white to white, and green/bare copper to ground). Ensure all connections are secure with wire nuts and electrical tape. The remote receiver will also need to be wired in line with the fan's power supply.
6. Вентилятор калактарын бекитүү
Ар бир желдеткичтин калагын берилген бурамалар менен мотордун корпусуна бекитиңиз. Бардык бурамалар бекем бекитилгенин текшериңиз.
7. Installing the LED Light Kit
Connect the LED light kit wires to the fan motor's light wires. Secure the LED light kit to the bottom of the fan housing. Some models use magnetic attachment for ease of installation.

Сүрөт: жакын план view of the integrated LED light module, highlighting its sleek design and how it integrates with the fan's body.
Иштөө нускамалары
Your Parrot Uncle ceiling fan is operated using the included remote control. Ensure the remote has two LR03/AAA 1.5 Volt batteries installed (not included).

Image: The remote control for the fan, showing buttons for fan ON/OFF, light ON/OFF, 6-level fan speed, forward/reverse rotation, light dimmer, light color temperature options (3000K/4000K/5700K), and timer settings (30 min/2 hours).
1. Желдетүүчү операция
- Желдеткич КҮЙГҮЗҮҮ/ӨЧҮРҮҮ: Желдеткичти күйгүзүү же өчүрүү үчүн желдеткичтин сүрөтчөсүн басыңыз.
- желдеткич ылдамдыгы: Use buttons 1-6 to select desired fan speed, with 6 being the highest.
- Reversible мотор: Press the forward/reverse button to change the direction of blade rotation. This feature allows for downdraft (cooling) in summer and updraft (warm air circulation) in winter.
- Таймер функциясы: Press the '30 min' or '2H' button to set the fan to automatically shut off after 30 minutes or 2 hours.

Image: This graphic demonstrates the reversible motor's function, showing clockwise rotation for warm air circulation in winter and counter-clockwise rotation for cooling in summer.
2. Жеңил операция
- Жарык КҮЙГҮЗҮҮ/ӨЧҮРҮҮ: Жарыкты күйгүзүү же өчүрүү үчүн лампочканын сүрөтчөсүнүн баскычын басыңыз.
- Жарык күңүртөтүүчү: Use the up/down arrow buttons to adjust the light brightness from 1% to 100%.
- Түс температурасын жөндөө: Press the '3000K', '4000K', or '5700K' buttons to switch between Warm White, Natural White, and Bright White light color temperatures.

Image: This image displays the fan's integrated LED light capabilities, demonstrating the adjustable color temperature settings from 3000 Kelvin (warm light) to 5700 Kelvin (bright light), and its dimmable range from 1% to 100% brightness.
Техникалык тейлөө
Үзгүлтүксүз тейлөө оптималдуу иштешин камсыз кылат жана шыптын желдеткичиңиздин иштөө мөөнөтүн узартат.
- Тазалоо: Вентиляторду тазалоо үчүн, жумшак, d менен сүртүңүзamp Абразивдүү тазалоочу каражаттарды же эриткичтерди колдонбоңуз, анткени алар каптоого же электрдик компоненттерге зыян келтириши мүмкүн.
- Бычакты тазалоо: Dust the fan blades regularly to prevent dust buildup, which can affect fan balance and air circulation.
- Катуу бурамалар: Periodically check all screws on the fan and mounting hardware to ensure they are tight. Loose screws can cause noise or wobble.
- Майлоонун кереги жок: Вентилятордун мотору дайыма майланып турат жана майлоонун кажети жок.
Проблемаларды чечүү
Эгер күйөрманыңыз менен көйгөйлөргө туш болсоңуз, төмөнкү жалпы көйгөйлөрдү жана чечимдерди караңыз:
| Көйгөй | Мүмкүн себеп | Чечим |
|---|---|---|
| Күйөрман иштебейт | желдеткичке кубат жок; Бошоң зым байланыштары; Алыстан башкаруунун батареясы аз же жупташкан эмес. | өчүргүчтү текшерүү; Бардык зым байланыштары коопсуз экендигин текшериңиз; Алыскы батареяны алмаштырыңыз же пультту кайра жупташтырыңыз. |
| Күйөрман солкулдайт | Loose blade screws; Loose mounting bracket; Unbalanced blades. | Tighten all blade screws; Ensure mounting bracket is secure; Use a balancing kit (not included) if necessary. |
| Жарык иштебейт | Жарык топтомуна зым туташуусу бошоп калган; LED модулу бузулган. | Check light kit wiring; Contact customer support for LED module replacement if faulty. |
| Пульт иштебей жатат | Dead batteries; Remote not paired with receiver; Obstruction between remote and receiver. | Replace batteries; Follow pairing instructions (refer to separate remote manual); Ensure clear line of sight. |
| Желдетүүчү ызы-чуу | Loose screws; Motor noise; Blades hitting an obstruction. | Tighten all screws; Ensure no obstructions; If motor noise persists, contact customer support. |

Image: This graphic highlights the fan's whisper-quiet operation, rated at 35dB, which is comparable to library learning, ensuring minimal disturbance for sleep or daily activities.
Кепилдик жана колдоо
Parrot Uncle offers a comprehensive warranty and customer support for your ceiling fan:
- 30-Day Free Return and Exchange: Эгерде сиз сатып алган товарга канааттанбасаңыз, аны 30 күндүн ичинде кайтарып бере аласыз же алмаштыра аласыз.
- One-Year Free Replacement Parts Service: Enjoy one year of free replacement parts service for any manufacturing defects.
- Lifetime Professional Customer Service: For any questions or assistance, please do not hesitate to reach out to Parrot Uncle's professional customer service team.
Колдоо үчүн, кириңиз Parrot Uncle Store on Amazon же түздөн-түз кардарларды тейлөө менен байланышыңыз.


