1. Киришүү
This manual provides detailed instructions for the installation, operation, and maintenance of your Roca VICTORIA PLUS A5A2J18C00 Thermostatic Bath-Shower Column. Please read this manual thoroughly before installation and use to ensure proper function and safety. Keep this manual for future reference.

Figure 1: Roca VICTORIA PLUS A5A2J18C00 Thermostatic Bath-Shower Column
2. Коопсуздук маалыматы
- Орнотууну баштоодон мурун бардык суу менен камсыздоо линиялары өчүрүлгөнүн текшериңиз.
- Орнотуу процессинин кандайдыр бир бөлүгүнө ишенбесеңиз, квалификациялуу сантехникке кайрылыңыз.
- Do not use abrasive cleaners or harsh chemicals on the product, as this may damage the finish.
- Суунун агып кетишине жол бербөө үчүн дайыма агып кетүүлөрдү текшерип, аларды өз убагында оңдоп туруңуз.
- The thermostatic mixer is designed to maintain a constant water temperature. Do not tamper with the factory settings unless necessary and with caution.
3. Пакеттин мазмуну
Орнотуудан мурун бардык компоненттердин бар экендигин жана бузулбагандыгын текшериңиз:
- Термостатикалык аралаштыргыч
- Adjustable height shower column (1295 mm to 1670 mm)
- Overhead shower head (ø 245 mm)
- Hand shower (ø 100 mm, 3 functions)
- 1.7 m metallic flexible hose
- Shower column mounting kit
4. Техникалык шарттар
| Өзгөчөлүк | Спецификация |
|---|---|
| Модель номери | A5A2J18C00 |
| Бренд | Roca |
| Материал | Металл |
| Түс/Финиш | Chrome |
| Монтаж түрү | Дубалга орнотуу |
| Жөнгө салынуучу бийиктик | 1295 ммден 1670 ммге чейин |
| үстүнкү душ диаметри | ø 245 мм |
| Кол менен жуунуучу душтун диаметри | ø 100 mm (3 functions) |
| Шлангдын узундугу | 1.7 м |
| Туткалардын саны | 1 |
| Продукциянын өлчөмдөрү | 128.5 x 53.5 x 137 см |
| Продукт Салмагы | 6.16 кг |
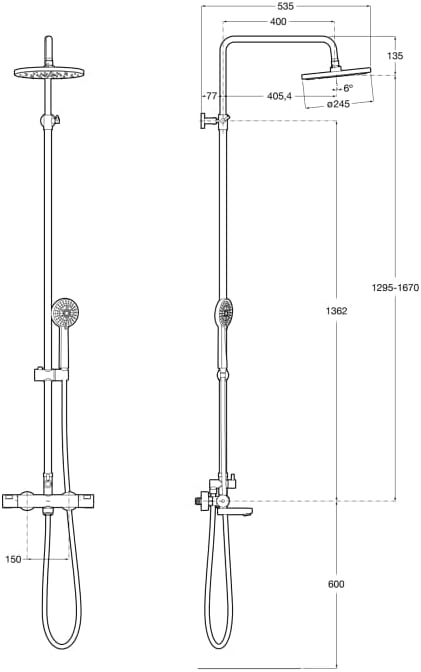
Figure 2: Technical drawing with key dimensions for installation.
5. Орнотуу
Professional installation is recommended. Ensure you have all necessary tools and safety equipment before proceeding.
5.1. Орнотуу аянтын даярдаңыз
- Turn off the main water supply to your bathroom.
- Remove any existing shower fixtures.
- Clean the wall surface where the shower column will be mounted.
5.2. Mount the Thermostatic Mixer
- Install the eccentric connectors into the wall water outlets. Ensure they are securely tightened and properly aligned.
- Attach the decorative escutcheons over the eccentric connectors.
- Connect the thermostatic mixer to the eccentric connectors. Ensure the hot water inlet (marked red) and cold water inlet (marked blue) are correctly aligned. Tighten the nuts using a wrench, protecting the finish with a cloth.
5.3. Install the Shower Column
- Attach the lower part of the shower column to the top outlet of the thermostatic mixer.
- Assemble the adjustable height mechanism onto the main column.
- Mark the position for the upper wall bracket on the wall, ensuring the column is vertical and at the desired height.
- Drill holes at the marked positions, insert wall plugs, and secure the upper wall bracket.
- Secure the shower column to the upper wall bracket using the provided screws and Allen key.
5.4. Attach Shower Components
- Screw the overhead shower head onto the shower arm. Ensure a watertight seal.
- Connect the metallic flexible hose to the hand shower and the outlet on the thermostatic mixer.
- Place the hand shower into its adjustable holder on the column.
6. Операция
6.1. Thermostatic Mixer
- Температураны көзөмөлдөө: The right handle controls the water temperature. Push the safety button and turn to adjust above 38°C.
- Агымды башкаруу: The left handle controls the water flow and diverts water between the overhead shower, hand shower, and bath filler (if applicable).
6.2. Hand Shower Functions
The hand shower features 3 spray functions. Rotate the shower head face to switch between spray patterns.
6.3. Adjustable Height and Angle
- The hand shower holder can be adjusted up or down the column and tilted to your preferred angle.
- The overhead shower head can be tilted and swiveled to adjust the spray direction.
7. Техникалык тейлөө
7.1. Тазалоо
- Clean the chrome surfaces regularly with a soft cloth and mild soap or a non-abrasive cleaner specifically designed for bathroom fixtures.
- Абразивдүү губкаларды, кыргыч губкаларды же катуу химиялык тазалоочу каражаттарды колдонуудан алыс болуңуз, анткени алар бетке зыян келтириши мүмкүн.
- For shower heads, periodically rub the silicone nozzles to dislodge any limescale buildup.
7.2. Limescale Removal
In hard water areas, limescale can build up. Use a descaling solution suitable for bathroom fixtures, following the manufacturer's instructions. Rinse thoroughly after cleaning.
8. Кыйынчылыктарды
| Көйгөй | Мүмкүн себеп | Чечим |
|---|---|---|
| Суу агымы жок же басымы төмөн | Water supply off, clogged filters, kinked hose | Check water supply, clean filters in the mixer, straighten hose. |
| Суунун температурасы өзгөрүп турат | Inconsistent hot/cold water supply, thermostatic cartridge issue | Check water heater, consult a professional for cartridge inspection. |
| Байланыштардан агып кетүүлөр | Loose connections, damaged seals | Tighten connections, replace seals/washers if damaged. |
| Shower head/hand shower spray uneven | Соплодо акиташтын пайда болушу | Clean nozzles by rubbing or using a descaling solution. |
9. Кепилдик жана колдоо
For warranty information and customer support, please refer to the documentation provided with your purchase or visit the official Roca webсайт. Кепилдик дооматтар үчүн сатып алганыңыздын далилин сактаңыз.


