1. Киришүү
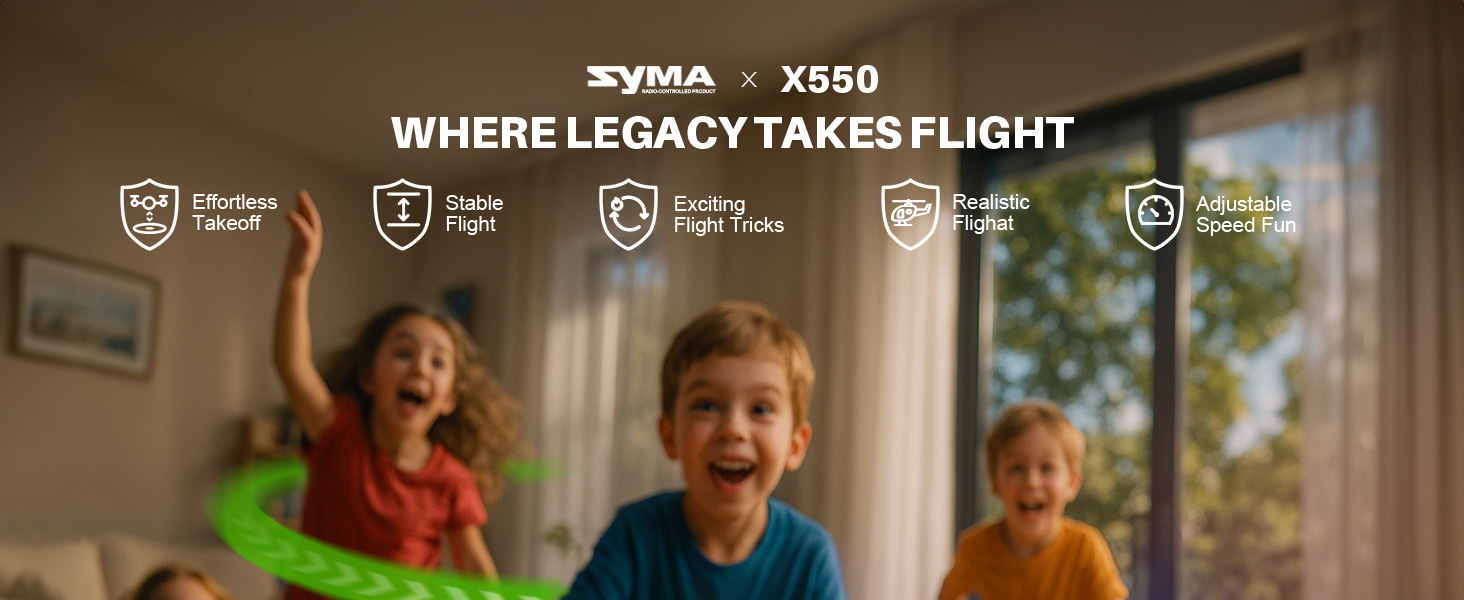
The SYMA X550 Military RC Helicopter is a 4-channel remote control aircraft designed for both beginners and experienced pilots. Inspired by military helicopters, it offers a lifelike flying experience with features such as high/low-speed control, multiple stunt flying capabilities, and altitude hold. This manual provides essential information for safe operation, setup, and maintenance of your SYMA X550.

Image 1.1: SYMA X550 Military RC Helicopter and Remote Control.
2. Коопсуздук чаралары
- Keep small parts of the aircraft out of reach of children to prevent accidents.
- After the flight, turn off the remote control first, then turn off the aircraft's power.
- Do not place the battery in high-temperature or heated areas (such as fire or near heating devices).
- Maintain a distance of 2-3 meters between the aircraft during flight and users or other people to avoid collisions during takeoff and landing.
- Children operating the aircraft should be guided by an adult, ensuring the aircraft remains within the operator's (or supervisor's) line of sight for easy control.
- Non-rechargeable batteries should not be charged. Do not mix new and old or different types of batteries.
- Электр терминалдары кыска туташуу болбошу керек.
- If the battery is not used for more than 10 days, store it at 40%-50% capacity to extend the battery's lifespan.
- Maintain a safe distance from rapidly rotating propellers to avoid the risk of injury.
- To meet electromagnetic environment requirements of aviation radio stations, the use of all types of model remote controllers is prohibited within a radius of 5000m centered on the airport runway.
- During the period and in areas where relevant authorities issue radio control orders, model remote control use should be stopped as required.
- Only use recommended transformers for the model; transformers are not models. Disconnect the model from the transformer or charger before cleaning with a liquid. Regularly check the transformer's wires, plugs, casing, and other parts for damage. If damage is found, stop using it until it is repaired.
- Turn off the remote control and aircraft power when not in use, and remove the batteries from the remote control.
- Important information is included in the packaging or manual and should be retained.
- Avoid direct exposure to laser radiation beams.
3. Пакеттин мазмуну
Пакетте бардык буюмдар бар экенин текшериңиз:
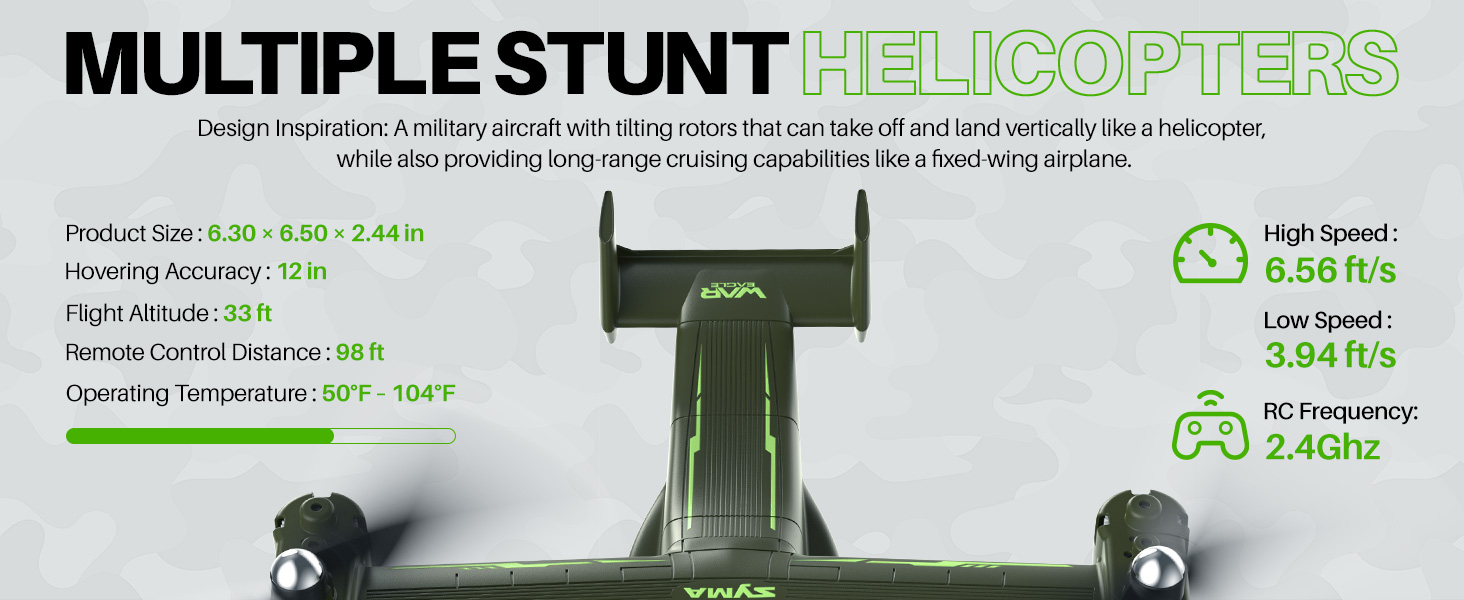
Image 3.1: All components included in the SYMA X550 package.
- Army Helicopter x 1
- 2.4GHz Controller x 1
- USB кабели x 1
- Колдонуучунун колдонмосу x 1
- X 1 бурагыч
- Spare Wind Blade x 4
- Fan Blade Hat x 4
- Spare Blade Screw x 8
- Protection Frame x 4
- X 1 кашаа
4. Components Overview
4.1 Дрондун үстүнөн учууview
The SYMA X550 features a military-inspired design with tilting rotors, allowing for vertical takeoff and landing like a helicopter, and long-range cruising like a fixed-wing airplane. It is equipped with LED lights for visibility and a built-in battery.

Image 4.1: The SYMA X550 drone in flight, showcasing анын дизайны.
4.2 Алыстан башкарууview
The 2.4GHz remote controller provides intuitive control over the drone's functions. It features dual joysticks for movement and rotation, along with dedicated buttons for stunts, speed control, and one-key takeoff/landing.

Image 4.2: Remote control layout with labeled functions.
- Сол джойстик: Controls ascend/descend and rotation (left/right). Long press for fine-tuning adjustment, release to exit. Press and hold + Power button for fine-tuning reset.
- Оң Джойстик: Controls forward/backward and sideways flight (left/right). Short press for high/low-speed switch.
- Кубат баскычы: Пультту күйгүзөт/өчүрөт.
- Бир баскычтуу учуп-конуу баскычы: Автоматтык түрдө учуп же конууну баштайт.
- Өтүү баскычы: Performs stunt jumps.
- Fly in Circles Button: Initiates circular flight patterns.
- Rotate and Ascend Button: Performs combined rotation and ascent.
5. Орнотуу
5.1 Алыстан башкаруунун батареясын орнотуу
- Use a screwdriver to remove the screw on the battery cover at the back of the remote control.
- Туура полярдуулукту камсыз кылуу менен, 4 AAA батарейканы батарейка бөлүмүнө салыңыз.
- Батарейканын капкагын ордуна коюп, бурамасын бекемдеңиз.
5.2 Drone Charging
The SYMA X550 features a built-in rechargeable battery. Use the provided USB-C charging cable.
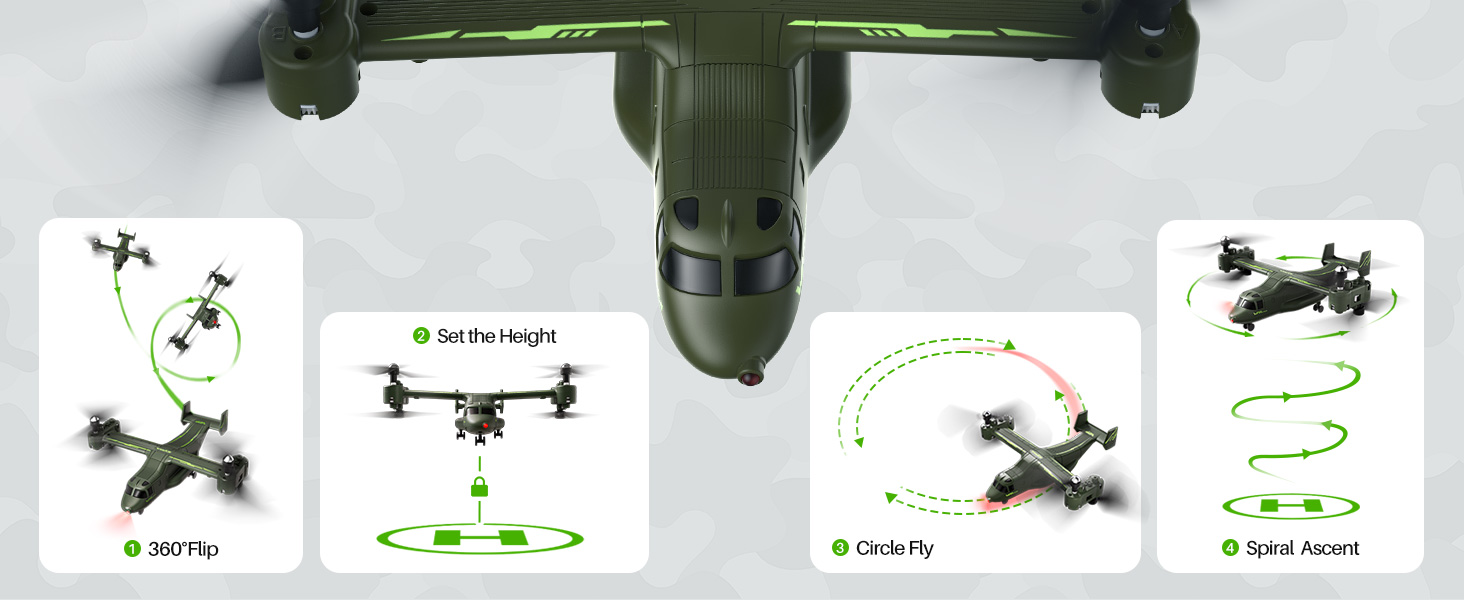
Image 5.1: Drone charging via USB-C port.
- Ensure the drone's power switch is in the OFF state before charging.
- Connect the USB charging cable to the drone's Type-C charging port.
- Plug the other end of the USB charging cable into a compatible USB power adapter (not included) or a computer's USB port.
- During charging, a red indicator light on the drone will be on.
- The indicator light will turn off when the drone is fully charged.
5.3 Propeller and Propeller Guard Installation
The propellers are marked A, B, C, and D and must be installed on the corresponding shafts. The propeller guards provide protection during flight.
- Match each propeller (A, B, C, D) to its corresponding shaft on the drone.
- Secure each propeller with the provided screws using the screwdriver.
- Place the propeller nut caps on top of the secured propellers.
- Attach the propeller guards by inserting them into the designated slots around each propeller assembly.
6. Иштөө нускамалары
6.1 Pairing and Frequency Matching
- Turn on the drone's power switch (located at the bottom). The drone's lights will start flickering.
- Turn on the remote control's power switch. The remote's indicator light will start blinking.
- Raise the left joystick (throttle) to its highest point, then return it to the lowest point. The indicator light on the drone will change from fast flashing to steady, indicating successful pairing.
6.2 Горизонталдык калибрлөө
If the drone drifts during flight, perform a horizontal calibration:
- Дронду тегиз, тегиз жерге орнотуңуз.
- Simultaneously push both the left and right joysticks on the remote control to the lower-right corner for about 3 seconds.
- The indicator light on the drone will flash quickly and then stay steady, indicating successful calibration.
- Эскертүү: Horizontal calibration cannot be performed if the aircraft's tilt angle is greater than 10 degrees.
6.3 Учуу жана конуу
Method 1: Manual Takeoff/Landing
- Учуп чыгуу: After successful pairing, push the left joystick (throttle) upward. All blades will begin to rotate. Push the left joystick upward again, and the helicopter will take off.
- Конуу: Push the left joystick (throttle) downward. The helicopter will descend and land.
Метод 2: Бир ачкыч менен учуу/конуу
- Учуп чыгуу: After successful pairing, press the One-Key Takeoff/Landing button. The helicopter will automatically take off and hover at a certain height.
- Конуу: Press the One-Key Takeoff/Landing button again. The helicopter will automatically land.

Image 6.1: Easy flight features including one-key takeoff/landing and altitude hold.
6.4 Учууну башкаруунун негизги каражаттары
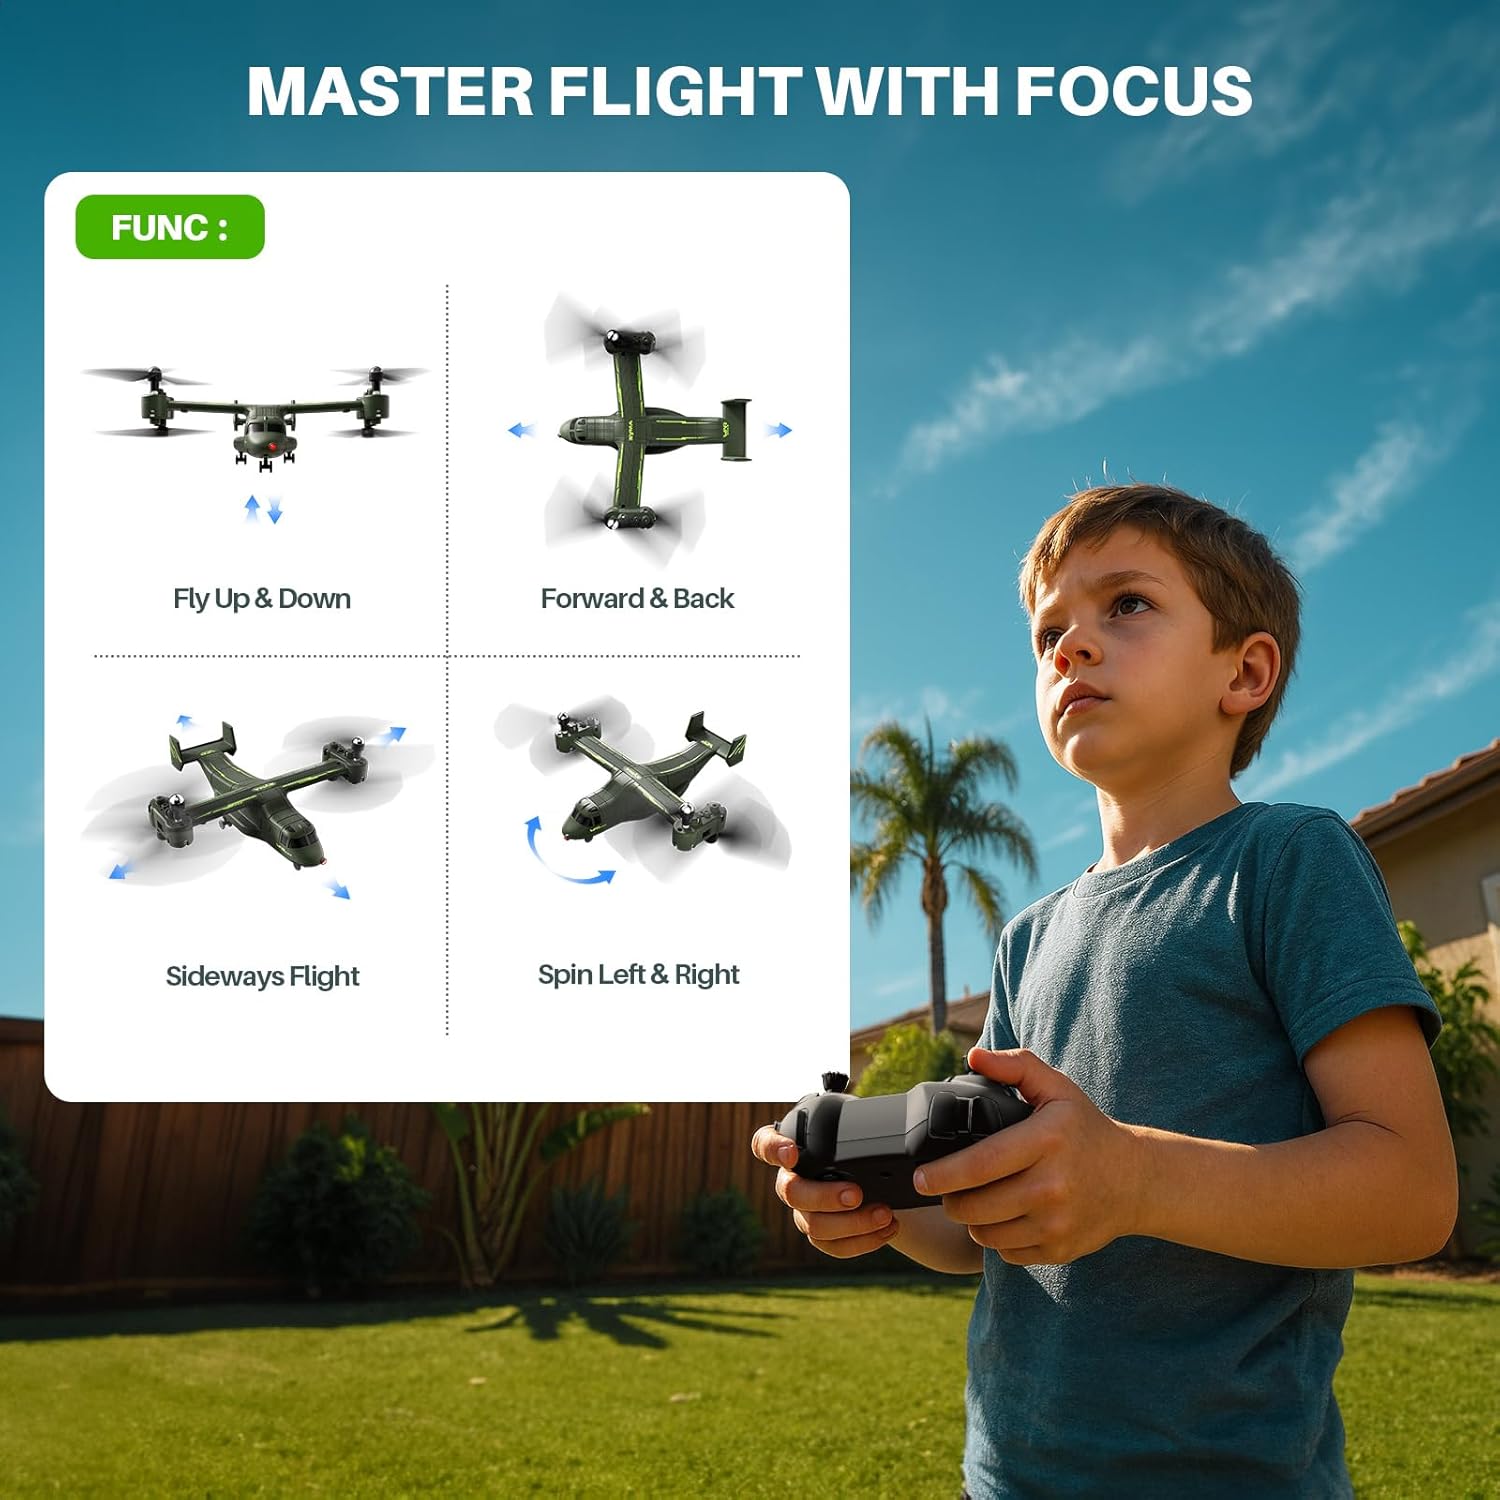
Image 6.2: Visual guide to basic flight controls.
- Өтүү/Төмөн: Өйдө көтөрүлүү үчүн сол джойстикти басыңыз, ылдый түшүү үчүн ылдый тартыңыз.
- Айлантуу: Солго айландыруу үчүн сол джойстикти солго басыңыз, оңго айландыруу үчүн оңго басыңыз.
- Алдыга артка: Push the right joystick up to move forward, pull down to move backward.
- Каптал учуу: Солго учуу үчүн оң джойстикти солго басыңыз, оңго учуу үчүн оңго басыңыз.
6.5 Speed Control (High & Low Speed)
The drone offers two-speed modes for different flying environments and skill levels.
- Short press the right control stick (vertically downward, do not pull down) to switch between quick (Fast Mode) and slow (Slow Mode) flight.
- The remote controller emits two "beeps" for fast mode and one "beep" for slow mode.
6.6 Stunt Flying
Perform various aerial maneuvers with ease.
Сүрөт 6.3: Мисamples of stunt maneuvers.
- 360° айлануу: Press the upper-left jump button while simultaneously pushing the right control stick upward. The drone will perform three up-and-down jumps.
- Айланма учуу: Press the upper-right circle button while simultaneously pushing the right control stick to the left or right. The drone will fly in a circular pattern.
6.7 Бийиктикте кармоо
The built-in altitude hold function ensures steady hovering at a set height, making control easier for all skill levels.
6.8 Drone Shutdown
Method 1: Manual Shutdown
- Push the left control stick (throttle) to the lowest point and then return it to the center.
- Turn off the drone's power switch.
- Turn off the remote control's power switch.
Method 2: Figure-Eight Motion Shutdown
- Press the left and right control sticks inward in a 'figure-eight' motion for about 2 seconds.
- Turn off the drone's power switch.
- Turn off the remote control's power switch.
Method 3: One-Key Shutdown
- Press the one-key takeoff/landing button. The drone will land and shut down.
- Turn off the drone's power switch.
- Turn off the remote control's power switch.
6.9 Official Instruction Videos
SYMA X550 Drone Setup Tutorial
Video 6.4: A detailed tutorial on setting up the SYMA X550 drone, including battery installation, charging, and propeller assembly.
SYMA X550 First Flying Video Instruction
Video 6.5: A beginner's guide to the first flight of the SYMA X550, demonstrating basic controls and maneuvers.
7. Техникалык тейлөө
- Regularly inspect propellers for damage. Replace any broken or bent blades immediately.
- Keep the drone and remote control clean and free from dust and debris. Use a soft, dry cloth for cleaning.
- Store the drone and its accessories in a cool, dry place away from direct sunlight and extreme temperatures.
- Ensure the battery is charged to 40-50% capacity before long-term storage.
8. Кыйынчылыктарды
| Көйгөй | Мүмкүн себеп | Чечим |
|---|---|---|
| Дрон пультка жооп бербейт. | Not paired successfully. | Жупташтыруу процессин кайталаңыз (6.1-бөлүм). |
| Учуу учурунда учкучсуз учат. | Калибрлөө керек. | Perform horizontal calibration (Section 6.2). |
| Дрон учпайт. | Low battery or propellers not rotating. | Charge the drone's battery. Check for obstructions around propellers. Ensure pairing is successful. |
| Кыска учуу убактысы. | Батарея толук заряддала элек же эскирип калган. | Ensure full charge. Consider replacing the battery if performance degrades significantly. |
| Пропеллер бузулган. | Collision or wear and tear. | Replace damaged propellers with spare parts (Section 5.3). |
9. Техникалык шарттар
- Модель номери: X550
- Бренд: SYMA
- Элемент Салмагы: 13.4 унция
- Пакеттин өлчөмдөрү: 12.76 x 8.15 x 3.9 дюйм
- Батареялар: 1 Литий Полимердик батарейка талап кылынат (камтылган)
- Hovering Accuracy: Болжол менен 12 дюйм
- Учуу бийиктиги: 33 метрге чейин
- Алыстан башкаруу Расстояние: 98 метрге чейин
- Иштөө температурасы: 50°F - 104°F
- RC Frequency: 2.4 ГГц

Image 9.1: SYMA X550 drone on display with key dimensions.
10. Кепилдик жана колдоо
For warranty information and customer support, please refer to the contact details provided on the product packaging or visit the official SYMA webсайт. Сатып алганыңыздын далили катары сатып алуу дүмүрчөгүңүздү сактаңыз.


