1. Introduction and Overview
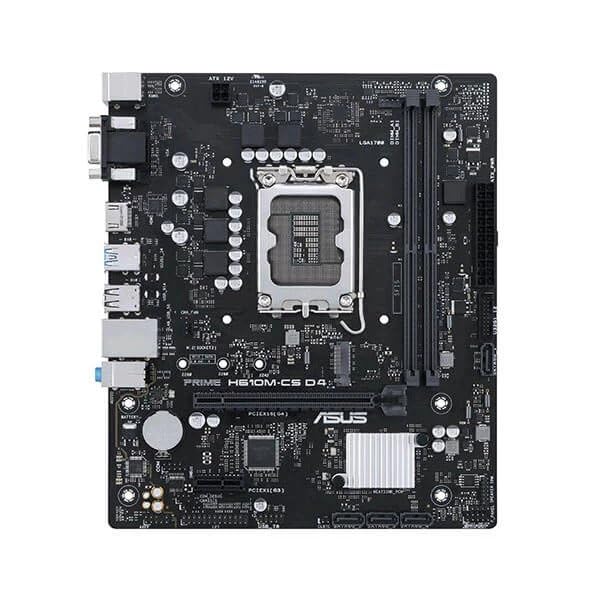
This manual provides detailed instructions for the installation, operation, and maintenance of your ASUS Prime H610M-CS D4 motherboard. Designed for Intel 12th Gen processors, this motherboard features an LGA1700 socket and supports DDR4 memory, offering a stable foundation for your personal computer build.
Негизги өзгөчөлүктөрү:
- Intel LGA 1700 розеткасы: Ready for 12th Gen Intel processors.
- Комплекстүү муздатуу: Features a PCH heatsink for efficient heat dissipation.
- Өтө тез байланыш: Includes a 32Gbps M.2 slot, Realtek 1 Gb Ethernet, and USB 3.2 Gen 1 ports.
- 5X коргоо III: Multiple hardware safeguards ensure all-round protection and durability.
- Luminous anti-moisture coating: Protects key components from moisture and corrosion, enhancing longevity.
2. Орнотуу жана орнотуу
Орнотууну баштоодон мурун, тутумуңуздун өчүрүлгөнүн жана розеткадан ажыратылганын текшериңиз. Статикалык разрядды болтурбоо үчүн, энелик платаны четтеринен кармаңыз.
2.1. CPU орнотуу
- Motherboard LGA1700 розеткасын табыңыз.
- CPU розеткасынын рычагын ачып, жүктөө пластинасын көтөрүңүз.
- Carefully align the Intel 12th Gen processor with the socket, ensuring the triangular mark on the CPU matches the mark on the socket. Do not force the CPU into the socket.
- Жүктөө пластинасын түшүрүп, аны рычаг менен бекитиңиз.
2.2. Эстутум (RAM) орнотуу
- DDR4 эс тутум уячаларынын эки учундагы клиптерди ачыңыз.
- DDR4 эстутум модулундагы оюкту DIMM уячасындагы оюк менен тегиздеңиз.
- Эстутум модулунун эки учуна кысылганчалар орнотулганга чейин катуу басыңыз.
2.3. Cooler and Graphics Card Installation
- CPU муздаткычыңызды өндүрүүчүнүн көрсөтмөлөрүнө ылайык орнотуңуз.
- Insert your graphics card into the primary PCIe x16 slot, ensuring it is fully seated and secured with the retention clip.
2.4. Электр байланыштары
- 24 пин ATX кубат туташтыргычын кубат булагыңыздан энелик платага туташтырыңыз.
- 8-пиндүү (же 4-пиндүү) ATX 12V кубат туташтыргычын энелик платага туташтырыңыз.
2.5. Case Mounting and Front Panel Connections
- Mount the motherboard into your PC case using the appropriate standoffs and screws.
- Connect the front panel headers (power button, reset button, USB ports, audio jacks) to their respective pins on the motherboard. Refer to the motherboard's detailed diagram for exact pin locations.

3. Иштөө нускамалары
3.1. Биринчи жүктөө жана BIOS орнотуу
- Бардык компоненттер орнотулуп жана туташтырылгандан кийин, системаңызды күйгүзүңүз.
- басыңыз DEL or F2 BIOS/UEFI орнотуунун утилитасына кирүү үчүн иштетүү учурунда кайра-кайра баскычын басыңыз.
- Жүктөө тартибин, системанын убактысын жана башка керектүү орнотууларды конфигурациялаңыз. Өзгөртүүлөрдү сактоо жана чыгуу.
3.2. Драйверди орнотуу
After installing your operating system, install the latest drivers for the motherboard chipset, audio, LAN, and any other integrated components. These can typically be found on the ASUS support webсиздин белгилүү бир энелик плата моделиңиз үчүн сайт.
3.3. Байланыш
- M.2 Slot: Utilize the 32Gbps M.2 slot for high-speed NVMe SSDs.
- Ethernet: Connect to your network using the Realtek 1 Gb Ethernet port.
- USB порттору: Use the available USB 3.2 Gen 1 ports for high-speed peripheral connections.
4. Техникалык тейлөө
4.1. Тазалоо
- Кысылган абаны колдонуп, компьютериңиздин корпусундагы жана аналык плата компоненттеринин чаңын дайыма тазалаңыз. Тазалоодон мурун системанын өчүрүлгөнүн жана розеткадан ажыратылганын текшериңиз.
- Avoid using liquid cleaners directly on motherboard components.
4.2. BIOS/UEFI Жаңыртуулары
Мезгил-мезгили менен ASUS колдоосун текшерип туруңуз website for BIOS/UEFI updates. Updates can improve system stability, compatibility, and performance. Follow the instructions provided by ASUS carefully when performing a BIOS update.
4.3. Moisture Protection
The motherboard features a luminous anti-moisture coating designed to protect key components. While this coating provides enhanced durability, it is still recommended to operate the system in a dry, well-ventilated environment to prevent moisture buildup.
5. Кыйынчылыктарды
Эгерде сиз эне платаңызда көйгөйлөргө туш болсоңуз, анда төмөнкү жалпы көйгөйлөрдү чечүү кадамдарын караңыз.
5.1. Кубат жок / Жүктөө жок
- Бардык кубат кабелдери (24-пин ATX, 8-пин ATX 12V) энелик платага жана кубат булагына бекем туташтырылганын текшериңиз.
- Verify that the power supply switch is in the ON position.
- Алдыңкы панелдеги кубат баскычынын энелик платага туташуусун текшериңиз.
- Мүмкүн болсо, башка кубат менен сынап көрүңүз.
5.2. Дисплейдин чыгышы жок
- Ensure your monitor is connected to the graphics card (if installed) or the motherboard's integrated graphics port (HDMI/VGA).
- Графикалык картаны жана эстутум модулдарын кайра орнотуңуз.
- Clear CMOS settings (refer to your motherboard's full manual for jumper location).
5.3. Компонент аныкталган жок
- Check that the component (e.g., M.2 SSD, RAM, PCIe card) is correctly installed and seated.
- Бул компоненттин энелик плата менен шайкештигин текшериңиз.
- BIOS/UEFI акыркы версиясына жаңыртыңыз.
6. Техникалык шарттар
| Өзгөчөлүк | Деталь |
|---|---|
| Бренд | ASUS |
| Сериялар | Prime |
| Модель номери | Asus Prime H610M-Cs |
| CPU розетка | LGA1700 |
| Шайкеш процессорлор | 12-муундагы Intel Core |
| Эс тутум технологиясы | DDR4 |
| Максималдуу эс тутум колдоого алынат | 1 GB (Note: This value from source data may be a typo, typical motherboards support much higher RAM capacities.) |
| Memory Clock Speed | 1600 МГц (Note: This value from source data may be a typo or base speed, actual supported speeds are typically higher for DDR4.) |
| Графикалык карта интерфейси | Интеграцияланган |
| Байланыш түрү | Wi-Fi (Note: While "Wi-Fi" is listed, the feature bullets mention "Realtek 1 Gb Ethernet", implying wired LAN. Wi-Fi capability might require an add-in card or be an error in the source data.) |
| HDMI портторунун саны | 1 |
| Ethernet портторунун саны | 1 |
| Продукциянын өлчөмдөрү (LxWxH) | 26.5 x 6 x 27 см |
| Элемент Салмагы | 770 г |
| Келип чыккан өлкө | Кытай |
Note: Specifications are subject to change without notice. For the most up-to-date information, please refer to the official ASUS product page. Some values from the source data (e.g., Maximum Memory Supported, Memory Clock Speed, Connectivity Type) appear to be inconsistent with typical motherboard specifications and may be data entry errors.
7. Кепилдик жана колдоо
7.1. Кепилдик маалыматы
Your ASUS Prime H610M-CS D4 motherboard is covered by a limited warranty provided by ASUS. The specific terms and duration of the warranty may vary by region and retailer. Please retain your proof of purchase for warranty claims. For detailed warranty information, visit the official ASUS support webсайт.
7.2. Техникалык колдоо
Техникалык жардам, драйверлерди жүктөп алуу, BIOS жаңыртуулары жана өнүм жөнүндө кошумча маалымат алуу үчүн, ASUS расмий колдоо кызматына кайрылыңыз webсайт: www.asus.com/support/. You may also contact ASUS customer service directly for personalized support.


