Introduction
This manual provides detailed instructions for the setup, operation, and maintenance of your HOMVILLA Digital Mirror Alarm Clock, Model 8821. Please read this manual thoroughly before using the product to ensure proper function and longevity.
Пакеттин мазмуну
Төмөндө тизмеленген нерселердин баары пакетиңизге камтылганын текшериңиз:
- HOMVILLA санариптик ойготкуч саат
- USB кубат кабели
- Кубаттуу адаптер
- CR2032 Battery (for memory backup)
- User Manual

Image: Package contents including the alarm clock, USB cable, adapter, CR2032 battery, and user manual.
Продукт бүттүview
The HOMVILLA Digital Mirror Alarm Clock features a large LED display with a mirror surface, dual alarms, multiple alarm schedules, adjustable brightness, and dual USB charging ports.
Негизги өзгөчөлүктөрү:
- Чоң LED күзгү дисплейи: 6.6 x 3 inch screen for clear time and day display.
- Dual Alarms with 3 Schedules: Set two independent alarms with options for daily, weekday, or weekend activation.
- Жөнгө салынуучу жарыктык: 6 levels of manual dimming for optimal viewсооронуч.
- Кош USB заряддоо порттору: Conveniently charge other electronic devices.
- Чырым Function: Кошумча 5 мүнөттүк уйкуну камсыз кылат.
- 12H/24H Time Format: Switch between preferred time display.
- Кубат булагы: AC powered with battery backup for settings.
Компоненттин идентификациясы:

Сүрөт: Жогорку view of the alarm clock with labels for ALARM 1, ALARM 2, TIME SET, SNOOZE, BRIGHTNESS, UP, and DOWN buttons. Dimensions are also indicated.
- Убакытты коюу баскычы: Убакытты орнотуу режимине өтүү үчүн басыңыз.
- Ойготкуч 1 баскычы: Press to set Alarm 1.
- Ойготкуч 2 баскычы: Press to set Alarm 2.
- Тындырма баскычы: Ойготкуч чыкканда тындыруу функциясын иштетет.
- Жарык баскычы: Дисплей жарыктыгын тууралайт.
- UP баскычы: Орнотуу учурунда маанилерди жогорулатат.
- ТӨМӨН баскычы: Орнотуу учурунда маанилерди азайтат.
- USB кубаттоо порттору: Located on the right side for device charging.
Жайгашуу
1. Кубат туташуу:
The alarm clock requires continuous AC power to operate. Connect the provided USB power cable to the clock and then to the power adapter. Plug the adapter into a standard wall outlet.
Note: The included CR2032 battery is for memory backup only. It preserves time and alarm settings during a power outage but does not power the display or alarm functions.

Image: The alarm clock is shown powered by a USB cable connected to a wall adapter, emphasizing that it requires continuous power.
2. Battery Installation (Memory Backup):
Open the battery compartment on the back of the clock and insert the CR2032 battery, ensuring correct polarity. This battery maintains your settings in case of a power interruption.
3. Base Installation (Optional):
The clock can be placed on a flat surface using the detachable base or mounted on a wall using the hanging hole on the back. To install the base, align it with the slot at the bottom of the clock and slide it into place.

Image: Step-by-step visual guide for installing the base, inserting the CR2032 battery, and connecting the power cable to the alarm clock.
Иштөө нускамалары
1. Убакытты коюу:
- басып, кармап туруңуз УБАКЫТТЫ ОРНОТУУ button (usually marked with a clock icon) until the hour digits flash.
- колдонуу UP жана ылдый саатты тууралоо үчүн баскычтар.
- Басыңыз УБАКЫТТЫ ОРНОТУУ Саатты ырастоо жана мүнөт жөндөөсүнө өтүү үчүн кайрадан басыңыз.
- колдонуу UP жана ылдый мүнөттөрдү тууралоо үчүн баскычтар.
- Басыңыз УБАКЫТТЫ ОРНОТУУ дагы бир жолу ырастоо жана убакыт орнотуу режиминен чыгуу.
- To switch between 12-hour and 24-hour format, briefly press the УБАКЫТТЫ ОРНОТУУ Орнотуу режиминде эмес кезде баскычын басыңыз.

Image: The alarm clock display showing both 12-hour (8:20 AM) and 24-hour (20:30) time formats, illustrating the switch function.
2. Ойготкучтарды коюу (1-ойготкуч жана 2-ойготкуч):
The clock supports two independent alarms (Alarm 1 and Alarm 2) with three scheduling options.
- басып, кармап туруңуз 1-ДАБЛ or 2-ДАБЛ баскычын сааттын цифралары жарк этмейинче басыңыз.
- колдонуу UP жана ылдый ойготкуч саатын тууралоо үчүн баскычтар.
- Тиешелүү баскычты басыңыз АЛАРМ Саатты ырастоо жана мүнөт жөндөөсүнө өтүү үчүн баскычын кайра басыңыз.
- колдонуу UP жана ылдый ойготкуч мүнөттөрдү тууралоо үчүн баскычтар.
- басыңыз АЛАРМ button again to confirm minutes and select the alarm schedule:
- 1-5: Дүйшөмбүдөн жумага чейин
- 6-7: Ишембиден жекшембиге чейин
- 1-7: Monday to Sunday (Daily)
- басыңыз АЛАРМ button one more time to confirm the schedule and exit alarm setting mode.
- Ойготкучту иштетүү/өчүрүү үчүн, баскычын кыскача басыңыз 1-ДАБЛ or 2-ДАБЛ button when not in setting mode. An alarm icon will appear/disappear on the display.

Image: The alarm clock showing different alarm schedules (1-5, 6-7, 1-7) for weekdays, weekends, and daily alarms.
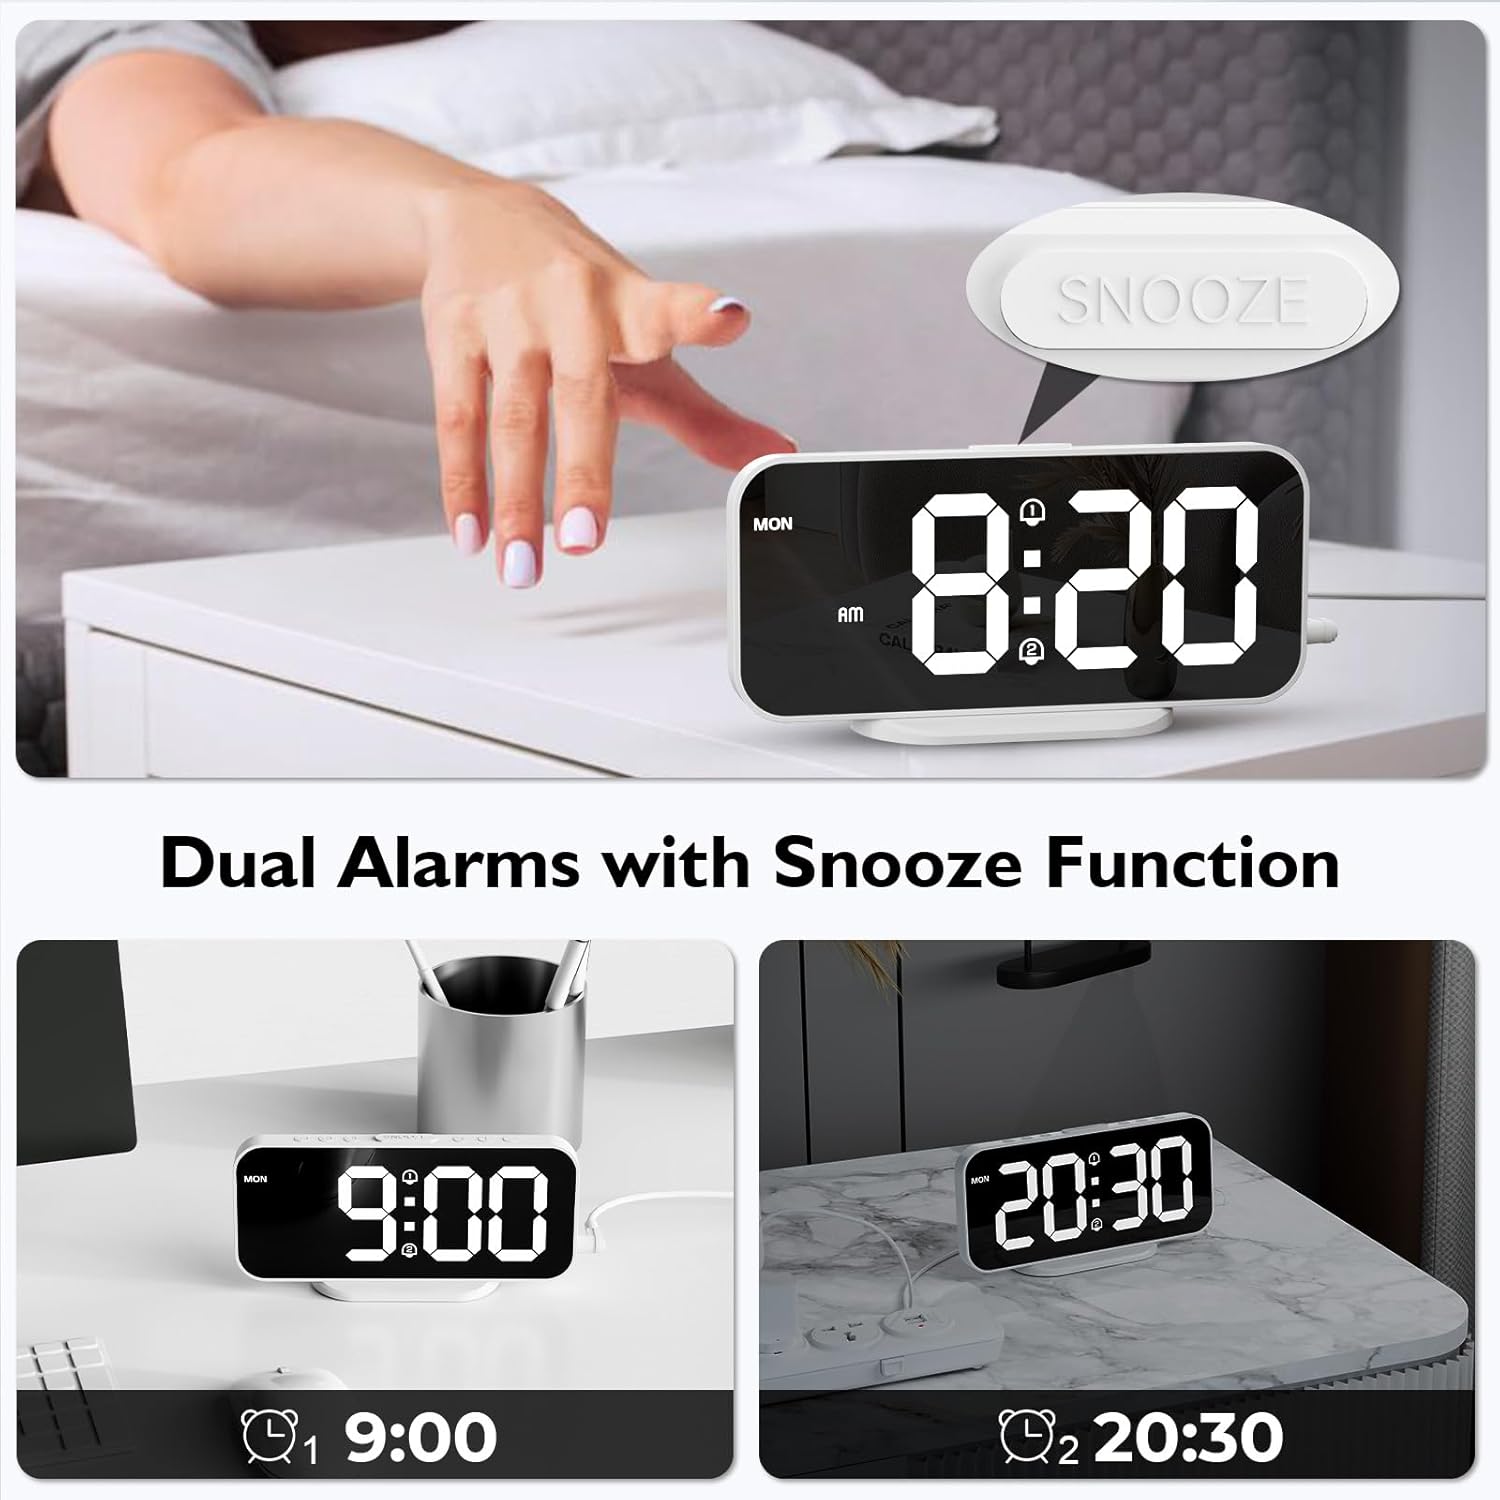
Image: The alarm clock displaying two separate alarm times (9:00 and 20:30), indicating the dual alarm functionality.
3. Тындыруу функциясы:
Ойготкуч чыкканда чоң баскычты басыңыз СОЮЗ button located on the top of the clock. The alarm will pause for 5 minutes and then sound again. To turn off the alarm completely, press any other button.

Image: A hand pressing the SNOOZE button on the alarm clock, illustrating the 5-minute snooze feature.
4. Жарыктыкты жөндөө:
The display has 6 levels of brightness. Briefly press the ЖАРЫКТЫК button (usually marked with a sun icon) to cycle through the brightness levels, from brightest to dimmest, and then off.

Image: A visual representation of the alarm clock's display at six different brightness levels, from off to maximum brightness.
5. USB кубаттоо порттору:
The two USB ports on the right side of the clock can be used to charge other electronic devices (e.g., smartphones, earbuds). Connect your device's USB charging cable to one of these ports. The output is 5V/1A.

Image: The alarm clock with a smartphone and wireless earbuds connected to its dual USB charging ports, demonstrating their use.
Техникалык тейлөө
- Тазалоо: Саатты жумшак, кургак чүпүрөк менен сүртүңүз. Абразивдүү тазалагычтарды же эриткичтерди колдонбоңуз.
- Күзгү бети: Handle the mirror surface carefully to avoid scratches.
- Күч: Always disconnect the power adapter before cleaning or if the clock will not be used for an extended period.
- Батарея: Replace the CR2032 backup battery annually or if settings are not retained during power outages.
Проблемаларды чечүү
| Көйгөй | Мүмкүн себеп | Чечим |
|---|---|---|
| Display is off or blank. | Электр байланышы жок. | Ensure the USB power cable and adapter are securely connected to the clock and a working power outlet. The clock requires continuous AC power. |
| Жөндөөлөр өчүрүлгөндөн кийин жоголотtage. | CR2032 камдык батареясы түгөнгөн же жок. | Replace the CR2032 battery in the battery compartment. Ensure correct polarity. |
| Ойготкуч угулбайт. | Alarm is not activated or incorrect alarm schedule. | Ensure the alarm icon is displayed, indicating activation. Check the alarm schedule (daily, weekday, weekend). |
| USB заряддоо порттору иштебей жатат. | Clock not powered. Device cable faulty. Device incompatible. | Ensure the alarm clock is powered. Try a different USB cable or device. |
| Дисплей өтө күңүрт же өтө жарык. | Жарыктык деңгээлин тууралоо керек. | басыңыз ЖАРЫКТЫК 6 жарыктык деңгээлин алмаштыруу үчүн баскычты басыңыз. |
Техникалык шарттар
| Бренд | HOMVILLA |
| Модель номери | 8821 |
| Түс | Ак |
| Өлчөмдөрү (L x W x Y) | 16.8 см x 7.6 см x 3.81 см (6.61 дюйм x 2.99 дюйм x 1.5 дюйм) |
| Салмагы | 105 грамм (0.23 фунт) |
| Дисплей түрү | Digital LED with Mirror Surface |
| Power Source | AC Powered (USB Cable & Adapter included) |
| Камдык батарея | 1 x CR2032 (included, for memory backup only) |
| USB чыгышы | 2 ports, 5V/1A each |
| Өзгөчөлүктөр | Dual Alarms, Snooze Function, 6 Brightness Levels, 12/24H Format, Wall Mountable |
Кепилдик жана колдоо
For warranty information or technical support, please refer to the contact details provided in the original product packaging or visit the official HOMVILLA webсайт. Кепилдик дооматтары үчүн сатып алганыңыздын далилин сактап коюңуз.
If you encounter any issues not covered in this manual, please contact HOMVILLA customer service for assistance.


