1. Киришүү
Thank you for choosing the Nureva NPSi-1 Home Theatre Projector. This manual provides essential information for the safe and efficient operation of your projector. Please read it thoroughly before use and retain it for future reference. The NPSi-1 is designed to deliver a high-quality viewing experience with Full HD 1080p resolution and versatile connectivity options.
2. Коопсуздук боюнча маанилүү маалымат
- Электр коопсуздугу: Always connect the projector to a grounded power outlet. Do not expose the projector to rain or moisture. Disconnect power during lightning storms or when unused for long periods.
- Жылуулук жана желдетүү: Ensure adequate ventilation around the projector. Do not block ventilation openings. Avoid placing the projector on soft surfaces that may block airflow.
- Lamp Коопсуздук: Проектор лamp operates at high temperatures. Allow the projector to cool down before moving it or performing maintenance. Never look directly into the projector lens when the lamp is on, as it can cause eye damage.
- Колдонуу: Проекторду этияттык менен колдонуңуз. Аны түшүрүүдөн же катуу таасирлерге дуушар кылуудан алыс болуңуз.
- Тазалоо: Use a soft, dry cloth for cleaning. For the lens, use a lens cleaning cloth and solution specifically designed for optical surfaces.
3. Пакеттин мазмуну
Сураныч, бардык буюмдар бар экенин жана жакшы абалда экендигин текшериңиз:
- Nureva NPSi-1 Projector
- Алыстан башкаруу
- HDMI кабели
- Электр кабели
- Колдонуучунун Колдонмосу (бул документ)
4. Продукт бүтүп калдыview
4.1 Алдыңкы жана үстү View

4.1-сүрөт: Жогорку view of the Nureva NPSi-1 projector, showing the lens assembly on the left and the integrated control panel on the top surface. The control panel includes navigation buttons and indicator lights.

4.2-сүрөт: Фронт view of the Nureva NPSi-1 projector, highlighting the projection lens. This view shows the primary output component of the projector.
The top surface features an intuitive control panel for direct operation, including power, menu navigation, and input selection buttons. The front houses the projection lens, which can be adjusted for focus and zoom.
4.2 Арткы панель жана туташуу
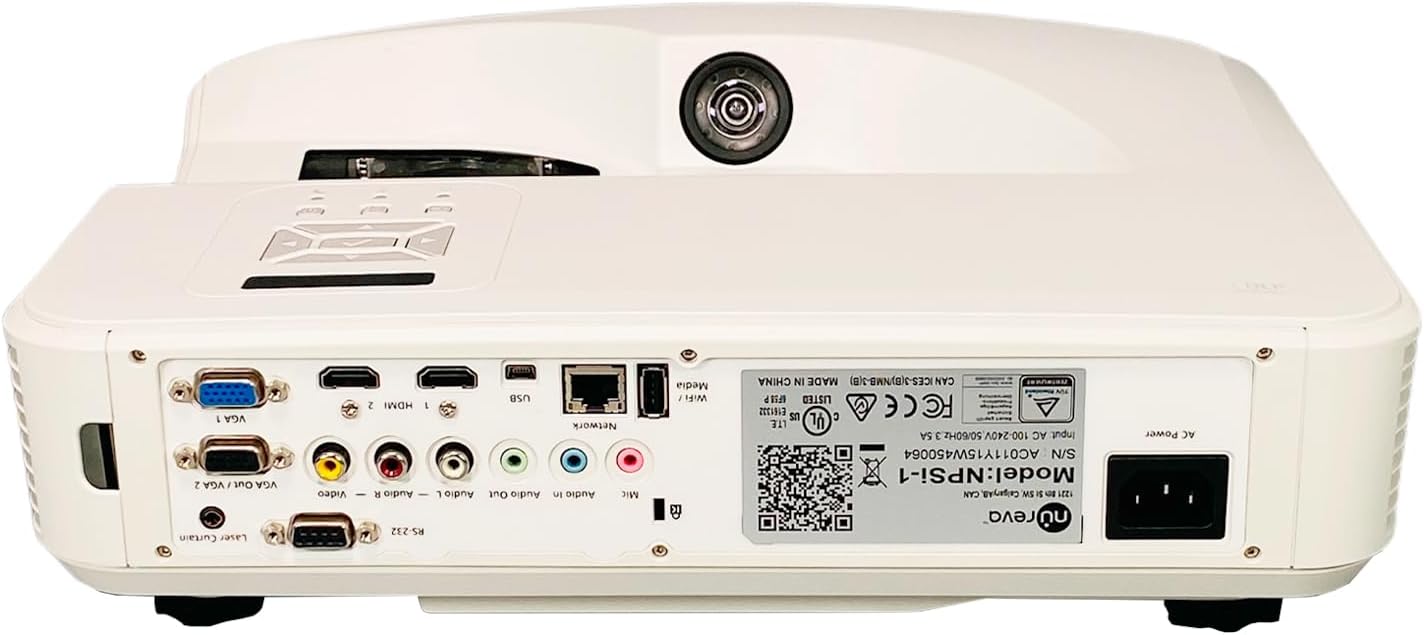
4.3-сүрөт: Rear panel of the Nureva NPSi-1 projector, displaying a comprehensive array of connectivity ports including HDMI, VGA, USB, audio inputs/outputs, and network connections.

4.4-сүрөт: Detailed close-up of the Nureva NPSi-1 projector's rear connectivity panel, showing individual ports such as VGA 1, HDMI 1, HDMI 2, USB, Network (RJ45), Audio In/Out, Composite Video, and RS-232.
The rear panel provides extensive connectivity options for various devices:
- HDMI 1 / HDMI 2: For connecting high-definition digital sources like Blu-ray players, gaming consoles, or computers.
- VGA 1 / VGA Out / VGA 2: For connecting computers or other analog video sources.
- USB: Медиа ойнотуу же микропрограмманы жаңыртуу үчүн.
- Тармак (RJ45): Тармакты көзөмөлдөө жана көзөмөлдөө үчүн.
- Audio In / Audio Out: Тышкы аудио түзүлүштөрдү туташтыруу үчүн.
- Композиттик видео (RCA): Стандарттык аныктамалуу видео булактары үчүн.
- RS-232: Сериялык башкаруу үчүн.
- AC кубаттуулугу: Электр шнурын туташтыруу үчүн.
4.3 Продукт этикеткасы

4.5-сүрөт: Жакын план view of the product label on the Nureva NPSi-1 projector, showing the model number (NPSi-1), serial number (AC011Y15W450064), and input power requirements (AC 100-240V, 50/60Hz, 3.5A). This label also includes regulatory compliance marks.
The product label, typically located on the underside or rear of the projector, contains important information such as the model number, serial number, and electrical specifications. For support, please refer to the model number NPSi-1 and serial number AC011Y15W450064.
4.4 Каптал жана астыңкы бөлүгү Views

4.6-сүрөт: Side view of the Nureva NPSi-1 projector, showing the extensive ventilation grilles necessary for heat dissipation during operation.
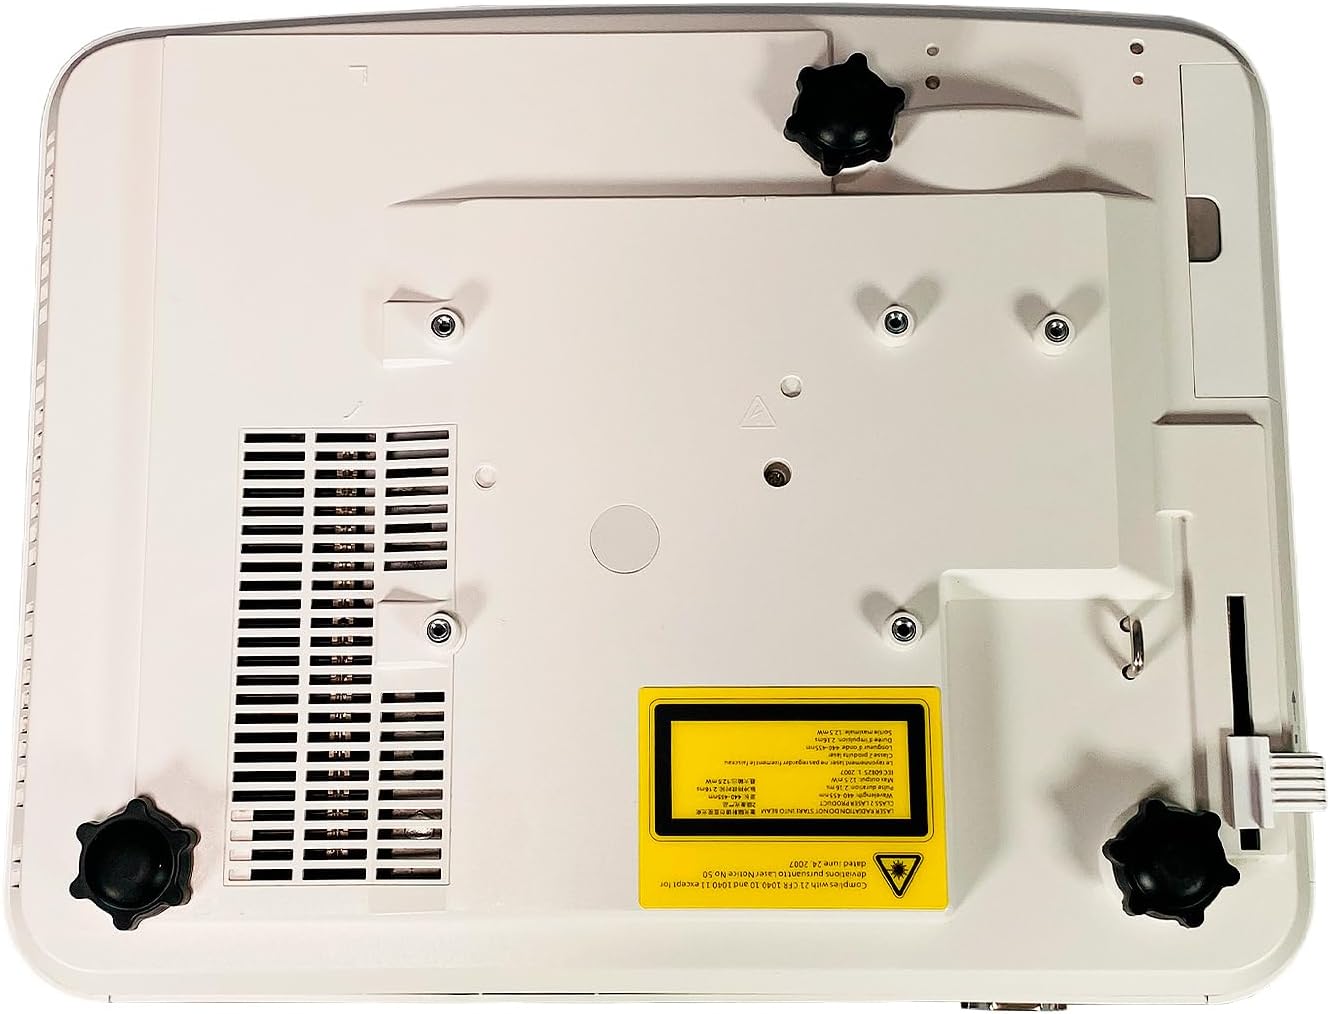
4.7-сүрөт: Төмөнкү view of the Nureva NPSi-1 projector, featuring adjustable feet for leveling and stability, along with mounting points for ceiling installation.
The sides of the projector feature ventilation grilles to ensure proper airflow and prevent overheating. The bottom panel includes adjustable feet for precise leveling and mounting points for ceiling or rear projection setups.
5. Орнотуу
5.1 Орнотуу
Consider the following when placing your projector:
- Проекциянын бети: Project onto a flat, white, or light-colored surface for best results. A dedicated projector screen is recommended.
- Аралык: Adjust the projector's distance from the screen to achieve the desired image size. Refer to the projection distance chart (not provided, consult product specifications for typical throw ratios).
- Бурч: Position the projector as perpendicular to the screen as possible to minimize keystone distortion.
- Вентиляция: Ensure at least 30 cm (12 inches) of clear space around the projector's ventilation openings.
- Монтаждоо: The projector supports Table Top, Ceiling Projection, and Rear Projection. Use appropriate mounting hardware for ceiling installations.
5.2 Кубатты туташтыруу
- Connect the supplied power cord to the AC Power inlet on the rear of the projector.
- Электр шнурунун экинчи учун жерге туташтырылган электр розеткасына сайыңыз.
5.3 Киргизүү булактарын туташтыруу
Connect your video and audio sources to the appropriate ports on the rear panel (refer to Figure 4.3 and 4.4).
- HDMI: Use the provided HDMI cable to connect your source device (e.g., Blu-ray player, laptop) to either HDMI 1 or HDMI 2 port.
- VGA: Connect a computer to the VGA 1 or VGA 2 port using a VGA cable.
- USB: Insert a USB drive for media playback into the USB port.
- Аудио: If using analog video inputs (VGA, Composite), connect separate audio cables to the Audio In ports. Use Audio Out to connect to external speakers.
6. Иштөө нускамалары
6.1 Күйгүзүү/өчүрүү
- Күйгүзүү үчүн, басыңыз Күч проектордун башкаруу панелиндеги же пульттагы баскычты басыңыз. Кубат индикаторунун жарыгы өзгөрөт.
- Өчүрүү үчүн, басыңыз Күч button again. A confirmation message may appear. Confirm to shut down. Allow the projector to cool down before unplugging.
6.2 Сүрөттү тууралоо
- Фокус шакеги: Сүрөттү курчутуу үчүн фокустук шакекти линзага айландырыңыз.
- Масштабдуу шакек: Rotate the zoom ring (if available) to adjust the image size without moving the projector.
- Негизги ташты оңдоо: Эгерде сүрөт трапеция формасында көрүнсө, сүрөттү төрт бурчтуу кылуу үчүн keystone коррекция функциясын (адатта OSD менюсунда же пульттагы атайын баскычтар аркылуу табылат) колдонуңуз.
- Projection Tilt: Use the adjustable feet on the bottom of the projector to fine-tune the vertical angle.
- Түстү оңдоо: Access the OSD menu to adjust color settings such as brightness, contrast, saturation, and color temperature.
6.3 Киргизүү булагын тандоо
басыңыз Булак or Киргизүү button on the projector or remote control to cycle through available input sources (HDMI 1, HDMI 2, VGA 1, VGA 2, USB, Composite Video, etc.).
6.4 Экрандагы дисплей (OSD) менюсу
басыңыз Меню button on the projector or remote to access the OSD menu. Use the navigation buttons (up, down, left, right) to browse options and the OK or Кириңиз тандоо үчүн баскычын басыңыз. Меню кайра же Чыгыңыз менюну жабуу үчүн.
7. Техникалык тейлөө
7.1 Проекторду тазалоо
- Сырткы: Проекторду сүртүңүз casing with a soft, lint-free cloth. For stubborn marks, dampen the cloth slightly with water, then wipe dry. Avoid abrasive cleaners or solvents.
- Объектив: Gently clean the lens with a professional lens cleaning cloth and lens cleaning fluid. Do not use abrasive materials or excessive force, as this can scratch the lens.
- Аба желдеткичтери: Use a soft brush or a can of compressed air to remove dust from the air intake and exhaust vents. Ensure the projector is off and unplugged before cleaning vents.
7.2 Лamp Алмаштыруу
Проектор лamp чектүү өмүрү бар. Качан лamp life indicator appears or the image brightness significantly decreases, the lamp may need replacement. Refer to the specific lamp алмаштыруу боюнча көрсөтмөлөр алмаштыруу l менен берилгенamp or consult a qualified service technician. Always ensure the projector is unplugged and completely cooled down before attempting lamp алмаштыруу.
8. Кыйынчылыктарды
| Көйгөй | Мүмкүн себеп | Чечим |
|---|---|---|
| Экранда сүрөт жок |
|
|
| Сүрөт бүдөмүк |
|
|
| Сүрөт трапеция формасында (кейстоун эффектиси) |
|
|
| Аудио жок |
|
|
9. Техникалык шарттар
| Өзгөчөлүк | Деталь |
|---|---|
| Бренд | Нурева |
| Модел | NPSi-1 |
| Жарыктык | 3000 ANSI челинин |
| Контраст катышы | 1800:1 |
| Native Resolution | 1920x720 (Full HD 1080p compatible) |
| Байланыш технологиясы | HDMI, USB, VGA In (Dsub-15pin), Composite (RCA), RS232 (DB-9pin), USB B, Composite video, RS232C, RJ45, LAN |
| Өзгөчөлүктөр | Built-in Speakers, Ceiling Projection, Color Correction, HD Ready, Projection Tilt, Rear Projection, Table Top Projection, Portable |
| Сунушталган Колдонуулар | Үй кинотеатры |
| Киргизүү күчү | AC 100-240V, 50/60Hz, 3.5A |
10. Кепилдик жана колдоо
For warranty information, technical support, or service inquiries, please refer to the documentation provided at the time of purchase or visit the official Nureva website. When contacting support, please have your model number (NPSi-1) and serial number (AC011Y15W450064) readily available.
You can find more information about Nureva products and support at www.nureva.com


