1. Киришүү
This manual provides comprehensive instructions for the setup, operation, and maintenance of your Xprinter XP-Q801K Thermal Receipt Printer. This printer is designed for efficient and reliable receipt printing in various business environments, featuring high-speed direct thermal printing and a USB interface for easy connectivity.

Сүрөт 1: Алдыңкы view of the Xprinter XP-Q801K Thermal Receipt Printer, showing the paper output slot and control buttons.
2. Орнотуу
2.1 Пакеттен чыгаруу
Carefully remove the printer and all accessories from the packaging. Verify that all components are present:
- Xprinter XP-Q801K Thermal Receipt Printer
- Кубаттуу адаптер
- USB кабели
- Paper Roll (starter)
- Колдонуучунун Колдонмосу (бул документ)
2.2 Принтерди туташтыруу
Before connecting, ensure the printer is powered off. Locate the ports on the rear of the printer.
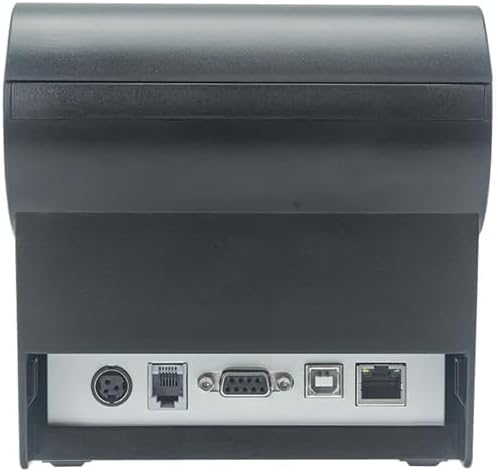
2-сүрөт: Арткы view of the printer, highlighting the power, USB, and other interface ports.
- Туташуу кубаты: Insert the power adapter cable into the printer's power input port (DC 24V/2.5A) and plug the adapter into a suitable electrical outlet (AC 100-240V, 50-60Hz).
- USB туташтыруу: Connect one end of the provided USB cable to the USB port on the printer and the other end to an available USB port on your computer.
- Cash Drawer (Optional): If using a cash drawer, connect its cable to the cash drawer port (DC 24V/1A) on the printer.
2.3 Loading the Paper Roll
The printer uses 80mm wide thermal paper rolls.
- Open the paper cover by pushing the cover open button (usually located on the side or front).
- Термикалык кагаз түрмөгүн басып чыгаруучу бетти басып чыгаруу башына каратып салыңыз. Рулондун кагаз бөлүкчөсүнө туура жайгаштырылышын текшериңиз.
- Кескичтин жанынан бир аз кагазды тартыңыз.
- Кагаз капкагын чыкылдагыча бекем жабыңыз.
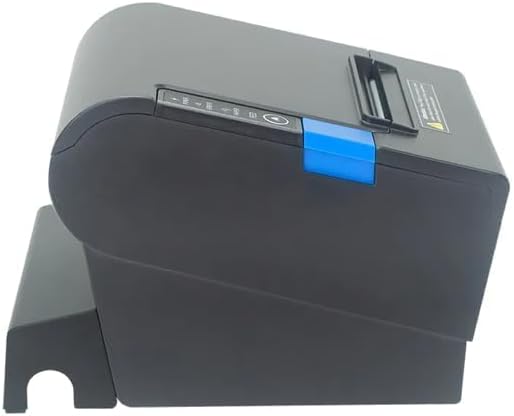
3-сүрөт: Каптал view of the printer, illustrating the paper cover mechanism.
2.4 Драйверди орнотуу
The printer requires a driver to communicate with your computer. Drivers are typically available for Windows, Linux, Android, and Mac operating systems.
- For Windows users, the printer often supports plug-and-play installation or requires a specific Windows driver.
- For Linux, Android, and Mac, SDKs (Software Development Kits) are usually provided for integration.
Өндүрүүчүгө кайрылыңыз website or the included driver CD/USB drive for the latest drivers and installation instructions specific to your operating system.
3. Принтерди иштетүү
3.1 Күйгүзүү/өчүрүү
Locate the power switch on the side or rear of the printer. Flip the switch to the 'ON' position to power on the printer. The 'POWER' indicator light will illuminate. Flip to 'OFF' to power down.
3.2 Indicator Lights and Buttons
The front panel typically features several indicator lights and buttons:
- КҮЧ: Принтердин күйүп турганын көрсөтөт.
- КАТА: Illuminates or flashes to indicate an error condition (e.g., paper out, print head overheating, cutter error).
- КАГАЗ: Indicates that the paper roll is low or out.
- FEED баскычы: Press to manually feed paper. Hold to perform a self-test print (if supported by model).
3.3 Негизги басып чыгаруу
Once the printer is connected and drivers are installed, you can print receipts from your POS software or application. Ensure the printer is selected as the default or active printer in your system settings.
The printer supports various print speeds up to 300 mm/s and automatic paper cutting after each print job.
4. Техникалык тейлөө
Үзгүлтүксүз тейлөө оптималдуу иштешин камсыз кылат жана принтериңиздин иштөө мөөнөтүн узартат.
4.1 Басып чыгаруу башын тазалоо
The print head should be cleaned regularly, especially if print quality degrades.
- Принтерди өчүрүп, электр кабелин ажыратыңыз.
- Кагаз капкагын ачыңыз.
- Кебезди жеңил колдонуңуз dampened with isopropyl alcohol (ethanol) to gently wipe the thermal elements of the print head.
- Капкакты жаап, кубатту кайра туташтырардан мурун басып чыгаруу башынын толук кургашына жол бериңиз.
4.2 Cleaning the Cutter
Paper dust can accumulate around the cutter blade, affecting its performance.
- Принтерди өчүрүп, электр кабелин ажыратыңыз.
- Carefully remove any visible paper dust or debris from around the cutter blade using a soft brush or compressed air.
- Do not use liquids on the cutter.
4.3 Жалпы тазалоо
Принтердин сыртын жумшак менен сүртүңүз, damp кездеме. Катуу химиялык заттарды же абразивдүү тазалагычтарды колдонуудан алыс болуңуз.
5. Кыйынчылыктарды
Бул бөлүмдө принтериңизге байланыштуу жалпы көйгөйлөр каралат.
| Көйгөй | Мүмкүн себеп | Чечим |
|---|---|---|
| Принтер күйбөй жатат. | Power cable not connected; Power outlet faulty; Power switch off. | Ensure power cable is securely connected. Test power outlet. Turn power switch to 'ON'. |
| No printing. | Paper out; Paper loaded incorrectly; Driver not installed or incorrect; USB cable loose; Printer not selected. | Load new paper roll. Re-load paper correctly. Install/reinstall correct driver. Check USB connection. Select printer in software. |
| ERROR light is on/flashing. | Paper out; Paper jam; Print head overheating; Cutter error. | Load paper. Clear paper jam. Allow printer to cool down. Check cutter for obstructions. |
| Басып чыгаруу сапаты начар. | Dirty print head; Low quality paper; Old paper roll. | Clean the print head (see Section 4.1). Use high-quality thermal paper. Replace old paper rolls. |
Бул чечимдерди колдонуу аракетинен кийин көйгөй чечилбесе, кардарларды колдоо кызматына кайрылыңыз.
6. Техникалык шарттар
| Өзгөчөлүк | Деталь |
|---|---|
| Басып чыгаруу ыкмасы | Түз жылуулук |
| Paper Width | 80 мм |
| Басып чыгаруу ылдамдыгы | 230 мм/с, 260 мм/с, 300 мм/с |
| Интерфейс | USB |
| Сап аралыгы | 3.75 mm (adjustable by commands) |
| Character Size (ANK) | Font A: 1.5 × 3.0 mm (12 × 24 dots) Font B: 1.1 × 2.1 mm (9 × 17 dots) |
| Character Size (Chinese/Traditional Chinese) | 3.0 × 3.0 mm (24 × 24 dots) |
| Штрих-код түрлөрү | UPC-A / UPC-E / JAN13 (EAN13) / JAN8 (EAN8) / CODE39 / ITF / CODABAR / CODE93 / CODE128 |
| 2D штрих-код | QR Code / PDF417 |
| NV Flash Memory | 256 KB |
| Киргизүү күчү | AC 100-240V, 50-60Гц |
| Чыгуу күчү | DC 24V/2.5A |
| Накталай акча тартмасынын чыгышы | DC 24V/1A |
| Салмагы | 1.0 кг |
| Өлчөмдөрү (D × W × H) | 194.5 × 145 × 146.4 мм |
| Иштөө температурасы | 0~45°C |
| Иштөө нымдуулугу | 10~80% RH |
| Cutter Life | 1.5 миллион кыскартуу |
| Print Head Life | 150 км |
| OS шайкештиги | Windows, Linux, Android, Mac |


