1. Продукт бүтүп калдыview
The ABASK M18 Dash Cam is a comprehensive car camera system designed to enhance driving safety and provide reliable video evidence. It features front 2K (1440P) and rear 1080P recording capabilities, a 3-inch display, and a wide 320° viewing angle. Key functionalities include parking monitoring, motion detection, G-sensor for accident detection, loop recording, WDR technology, and night vision.
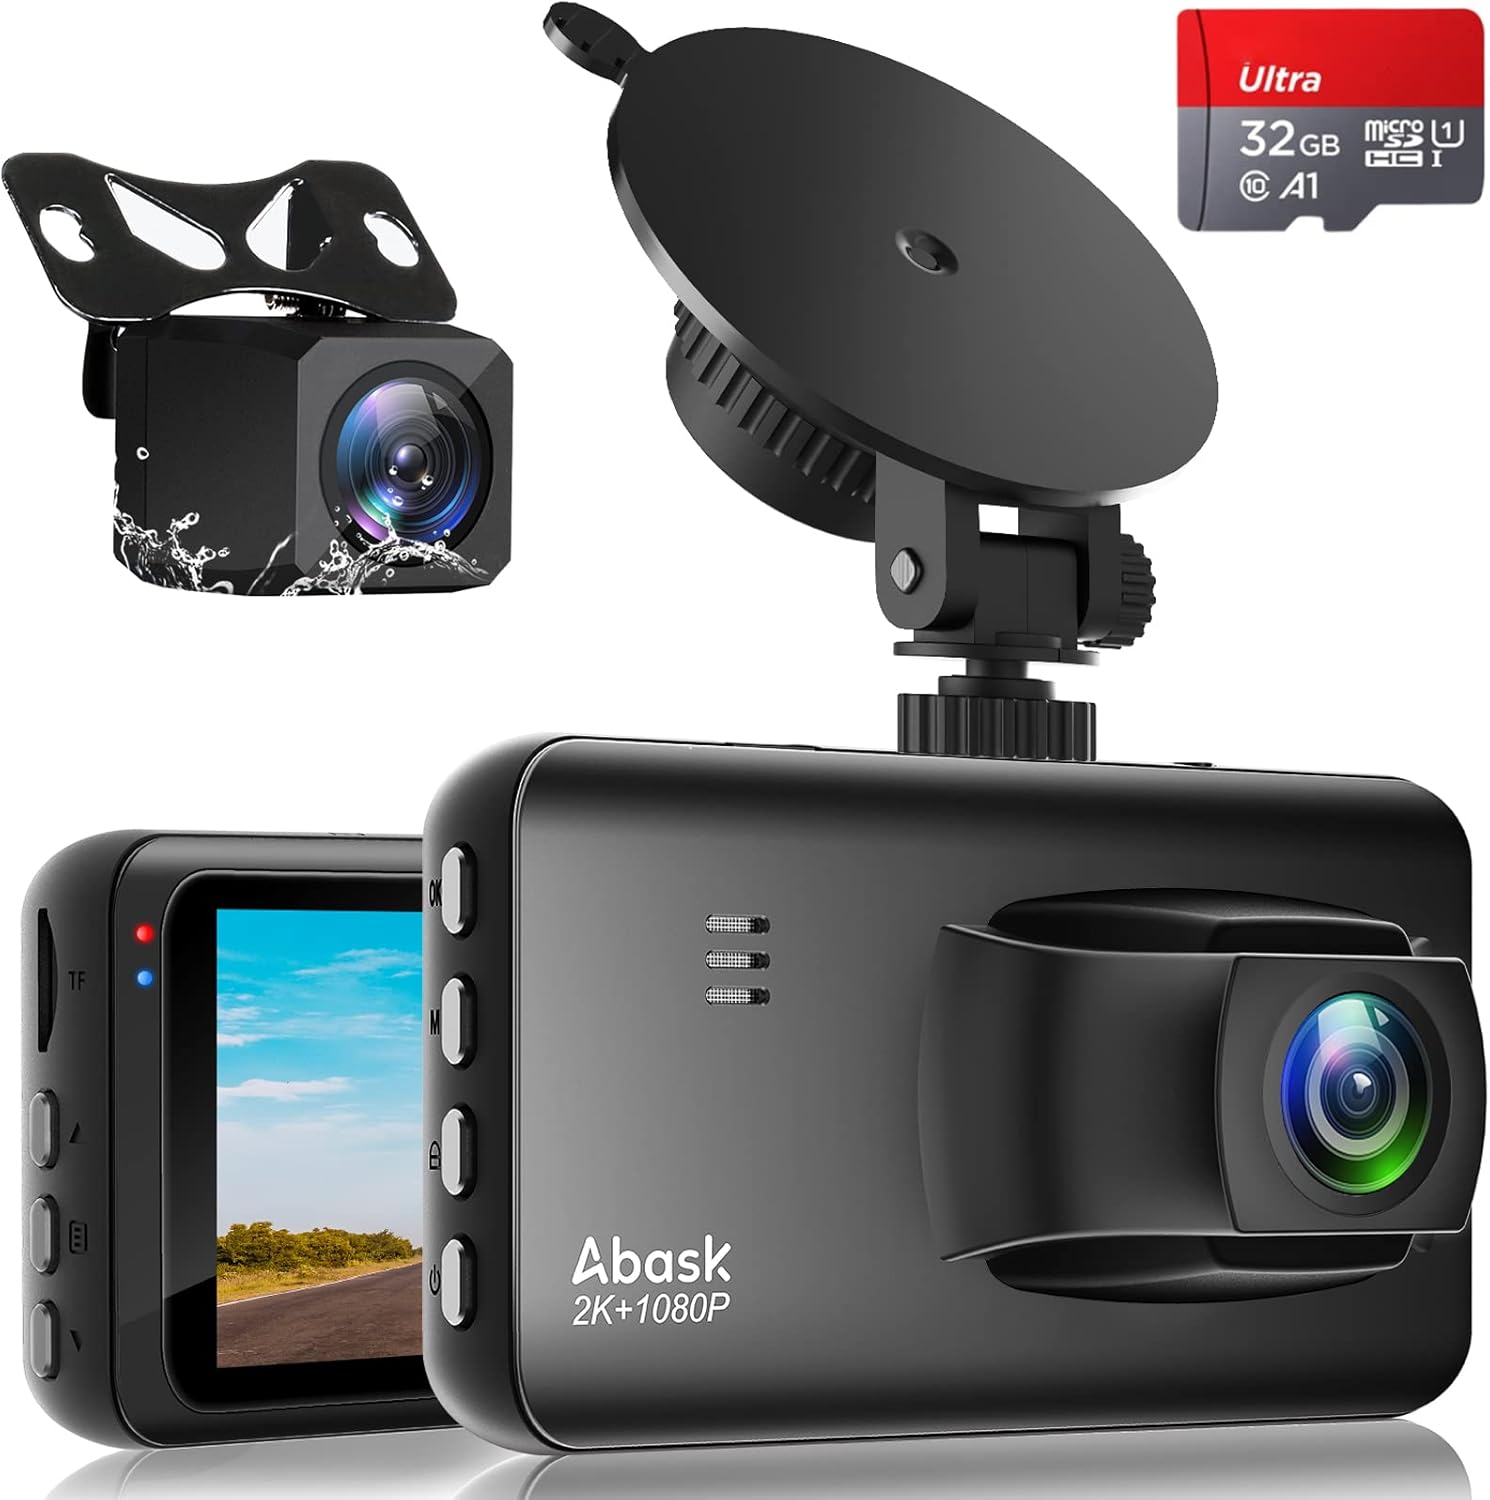
Image: The ABASK M18 Dash Cam system, showing the main unit, rear camera, suction cup mount, and an included 32GB MicroSD card.
2. Пакеттин мазмуну
Бардык компоненттердин бар экенин текшерүү үчүн кутудан чыгарганда таңгактын мазмунун текшериңиз:
- ABASK M18 Dash Cam (Main Unit)
- Арткы View Камера
- Сорох кубогын таһыгар
- Унаа кубаттагыч (тамеки күйгүзгүч адаптер)
- Арткы камера кабели
- USB кабели
- User Manual
- Memory Card (32GB MicroSD)

Image: A visual representation of the items included in the ABASK M18 Dash Cam package.
3. Негизги өзгөчөлүктөрү
- Эки каналдуу жаздыруу: Records simultaneously in 2K (1440P) resolution for the front camera and 1080P for the rear camera, capturing both front and rear views of the road.

Image: Illustration of the dual-channel recording capability, showing clear front and rear video capture.
- 3-Inch Screen & Wide Viewбурч: Features a super high-definition 3-inch screen for clear viewing and easy menu navigation. The front camera offers a 170° viewing angle, and the rear camera offers a 150° angle, providing a comprehensive 320° coverage without blind spots.


Image: The 3-inch display and a diagram illustrating the wide 170° front and 150° rear viewбурчтар.
- Parking Monitor & Motion Detection: Automatically activates and records video when a collision or motion is detected while the vehicle is parked, providing 24-hour surveillance.
Note: A dash cam hardwiring kit (not included) is required to utilize the 24-hour parking monitoring feature.

Image: Visual representation of the 24/7 parking mode, detecting impacts around the vehicle.
- G-сенсор жана циклдик жаздыруу: The G-Sensor detects sudden impacts or collisions, automatically saving and locking the current video footage to prevent it from being overwritten. Loop recording ensures continuous recording by overwriting the oldest unlocked fileэстутум картасы толгондо.

Image: Depiction of G-Sensor locking important footage and loop recording managing storage space.
- WDR (Wide Dynamic Range) & Night Vision: Equipped with a 6-layer HD lens and WDR technology, the dash cam delivers clear images and videos in various lighting conditions, including low-light environments, ensuring excellent night vision performance.

Image: The dash cam's super night vision capability, providing clear recordings in dark conditions.
- Артка кайтуу жардамчысы: When the vehicle is in reverse, the dash cam display automatically shows the rear view with parking guidelines, making parking safer and more convenient.

Image: The reversing assist function displaying parking lines on the screen for easier maneuvering.
4. Орнотуу жана орнотуу
Follow these steps for proper installation of your ABASK M18 Dash Cam:
4.1. Prepare the Memory Card
- Insert the included 32GB MicroSD card into the dash cam's TF card slot.
- Before first use, or if experiencing issues, format the memory card through the dash cam's menu settings. This ensures optimal performance and compatibility.
4.2. Install the Main Camera
- Clean the area on your front windshield where you intend to mount the dash cam. Ensure it does not obstruct your driving view.
- Соргуч чөйчөктүн бекиткичин негизги панелдин камерасына бекитиңиз.
- Press the suction cup firmly against the cleaned windshield and engage the lock lever to secure it.
- Connect the car charger cable to the main dash cam unit and plug the other end into your vehicle's cigarette lighter socket.
- Route the power cable neatly along the windshield edge and down to the cigarette lighter, tucking it into the trim where possible.
4.3. Арткы камераны орнотуңуз
There are two common methods for installing the rear camera:
- Method 1 (Inside Vehicle): Paste the rear camera inside the rear windshield of the vehicle. This method is simpler and protects the camera from external elements.
- Method 2 (Outside Vehicle, near License Plate): Install the camera near the license plate on the outside of the vehicle. This provides a clearer view for reversing assist. If using this method, ensure the camera is securely mounted and the cable is routed safely into the vehicle.
- Арткы камеранын кабелин негизги видеорегистратор блогуна туташтырыңыз.
- For the reversing assist function to work, connect the red wire from the rear camera cable to the positive pole of your vehicle's reverse lamp. This allows the dash cam to automatically switch to the rear view артка берүүчү дөңгөлөктү күйгүзгөндө.
- Route the rear camera cable neatly from the main unit to the rear of the vehicle, tucking it into the headliner and pillar trim.

Image: An illustration detailing the routing of cables for both front and rear camera installation.
5. Иштөө нускамалары
5.1. Күйгүзүү/өчүрүү
- The dash cam will automatically power on and begin recording when your vehicle's ignition is turned on (and power is supplied to the cigarette lighter socket).
- It will automatically power off a few seconds after the ignition is turned off.
- To manually power on/off, press and hold the Power button located on the side of the unit.
5.2. Меню багыттоо жана орнотуулар
- Use the buttons on the side of the dash cam to navigate through the menu options displayed on the 3-inch screen.
- Жалпы жөндөөлөргө төмөнкүлөр кирет:
- Video Resolution (Front/Rear)
- Loop жаздыруу узактыгы
- G-Sensor Sensitivity (High/Medium/Low/Off)
- Parking Monitor (On/Off)
- Motion Detection (On/Off)
- WDR (On/Off)
- Дата/убакыт Stamp
- Аудио жаздыруу (күйгүзүү/өчүрүү)
- Экран сактагыч
- Тил
- SD картаны форматтоо
- Refer to the on-screen prompts and the included quick start guide for detailed menu navigation.
5.3. Playback Videos
- үчүн view recorded videos directly on the dash cam, enter playback mode via the menu.
- Alternatively, remove the MicroSD card and insert it into a computer's card reader.
- Videos are typically saved in MP4 or MOV format. Locked files (from G-Sensor events) will be in a separate folder or marked to prevent overwriting.
6. Техникалык тейлөө
- Тазалоо: Use a soft, dry cloth to clean the dash cam lens and screen. Avoid using abrasive cleaners or solvents that could damage the surfaces.
- Эстутум картасын башкаруу:
- Regularly format the MicroSD card (e.g., once a month) to maintain optimal performance and prevent data corruption.
- Use a high-quality Class 10 or U3 MicroSD card for reliable recording. The dash cam supports up to 256GB.
- Маанилүү видеонун камдык көчүрмөсүн сактаңыз files to a computer before formatting the card.
- Температураны эске алуу: The dash cam is designed to operate within a temperature range of -30°C to 70°C (-86°F to 158°F). Avoid prolonged exposure to extreme temperatures outside this range, which could affect performance or damage the device.

Image: Illustration of the dash cam's ability to withstand a wide range of temperatures.
7. Кыйынчылыктарды
| Көйгөй | Мүмкүн себеп | Чечим |
|---|---|---|
| Dash камерасы күйбөйт. | Электр менен камсыздоо жок; унаанын кубаттагычы бузук; байланышы бош. | Check if the car charger is properly plugged into the cigarette lighter and the dash cam. Ensure the vehicle's ignition is on. Test the charger in another vehicle or use a different USB cable/charger if available. |
| Жаздыруу токтойт же катып калат. | Memory card full; slow or faulty memory card; memory card error. | Format the MicroSD card. Ensure you are using a high-speed (Class 10 or U3) MicroSD card. Try a different MicroSD card. |
| "Эстутум картасынын катасы" билдирүүсү. | Memory card not inserted correctly; corrupted card; incompatible card. | Reinsert the memory card. Format the card in the dash cam's settings. Try a different, compatible MicroSD card. |
| Унаа токтотуучу жайдын монитору иштебей жатат. | Feature not enabled; no continuous power supply. | Ensure Parking Monitor is enabled in the settings. This feature requires a continuous power supply, typically achieved with a hardwiring kit (sold separately) connected to the vehicle's fuse box. |
| мүмкүн эмес view videos on computer (HEVC codec issue). | Computer lacks necessary video codec for HEVC (High-Efficiency Video Coding) files. | Install a free HEVC codec pack or a media player that supports HEVC (e.g., VLC Media Player) on your computer. Avoid purchasing codecs if free alternatives are available. |
| Арткы камера көрүнбөйт. | Loose cable connection; faulty camera or cable. | Check the connection of the rear camera cable to both the main unit and the rear camera itself. Ensure the cable is not damaged. |
8. Техникалык шарттар
| Өзгөчөлүк | Деталь |
|---|---|
| Модель номери | M18 |
| Алдыңкы видеонун чечилиши | 2K (1440P) |
| Арткы видеонун чечилиши | 1080P |
| Screen Size | 3 дюйм |
| Фронт Viewбурч | 170° |
| Арткы Viewбурч | 150° |
| Өзгөчөлүктөр | Night Vision, WDR, G-Sensor, Loop Recording, Parking Monitor, Motion Detection, Reversing Assist |
| Байланыш технологиясы | USB |
| Колдоого алынган эстутум картасы | MicroSD (256 ГБ чейин) |
| Иштөө температурасы | -30°Cден 70°Cге чейин (-86°Fтен 158°Fге чейин) |
| Продукциянын өлчөмдөрү | 7.87 x 4.33 x 2.76 дюйм (болжол менен) |
| Элемент Салмагы | 12.1 унция (болжол менен) |
9. Кепилдик жана колдоо
ABASK is committed to providing high-quality products and customer satisfaction. While specific warranty details are not provided in this manual, please retain your proof of purchase for any warranty claims.
For any questions, technical assistance, or issues encountered with your ABASK Dash Cam, please contact our customer support team. We aim to respond to inquiries within 24 hours and provide a satisfactory solution.
You can typically find contact information on the product packaging, the official ABASK webсайты же сиз продуктуну сатып алган сатуучу аркылуу.

Image: ABASK customer support team ready to assist.


