1. Продукт бүтүп калдыview
The Tenveo PTZ Camera Controller is designed for precise control of various PTZ (Pan-Tilt-Zoom) cameras. It features a 4D joystick for intuitive camera movement and zoom, multiple interface options, and support for common control protocols. This manual provides instructions for setting up, operating, and maintaining your controller.
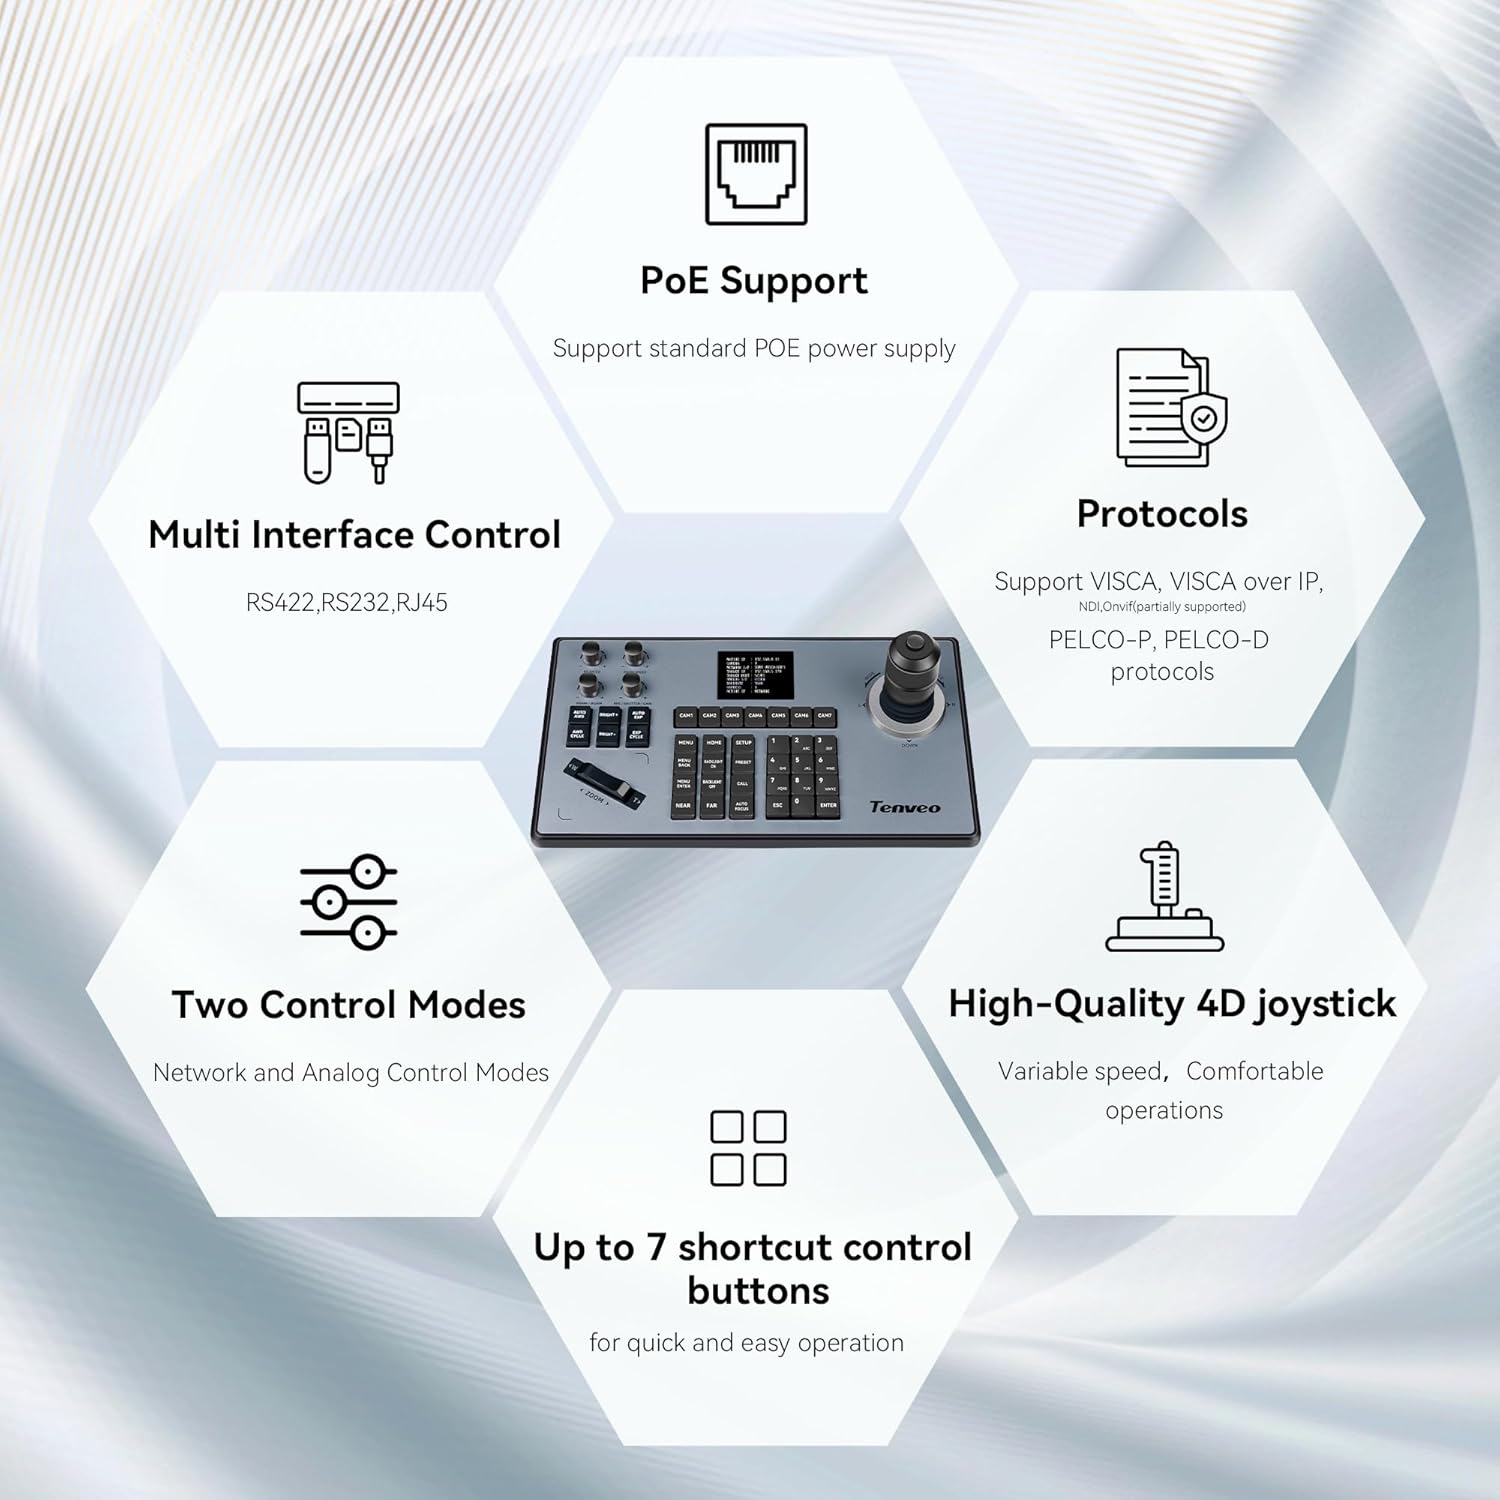
Сүрөт 1: Бүттүview of the Tenveo PTZ Camera Controller's key features, including PoE support, multi-interface control (RS422, RS232, RJ45), protocol compatibility (VISCA, PELCO-P, PELCO-D), two control modes, a high-quality 4D joystick, and up to 7 shortcut buttons.
Негизги өзгөчөлүктөрү:
- 4D джойстик: Provides variable speed control for pan, tilt, and zoom functions, ensuring smooth and precise camera adjustments.
- Multiple Control Interfaces: Supports RS232, RS422, and RJ45 (Ethernet) for versatile connectivity.
- PoE колдоосу: Compatible with standard Power over Ethernet (PoE) power supply, simplifying installation.
- Протоколдун шайкештиги: Supports VISCA, VISCA over IP, PELCO-P, and PELCO-D protocols for broad camera compatibility.
- Кош башкаруу режимдери: Operates in both Network and Analog control modes.
- Жарлык баскычтары: Up to 7 programmable shortcut buttons for quick access to frequently used functions.
2. Орнотуу жана орнотуу
2.1 Таңгактан чыгаруу жана текшерүү
Carefully unpack the controller and inspect it for any signs of damage. Ensure all components are present according to the packing list.
2.2 Контроллерди туташтыруу
The controller offers various connection options to suit your setup. Refer to the rear panel diagram for port identification.
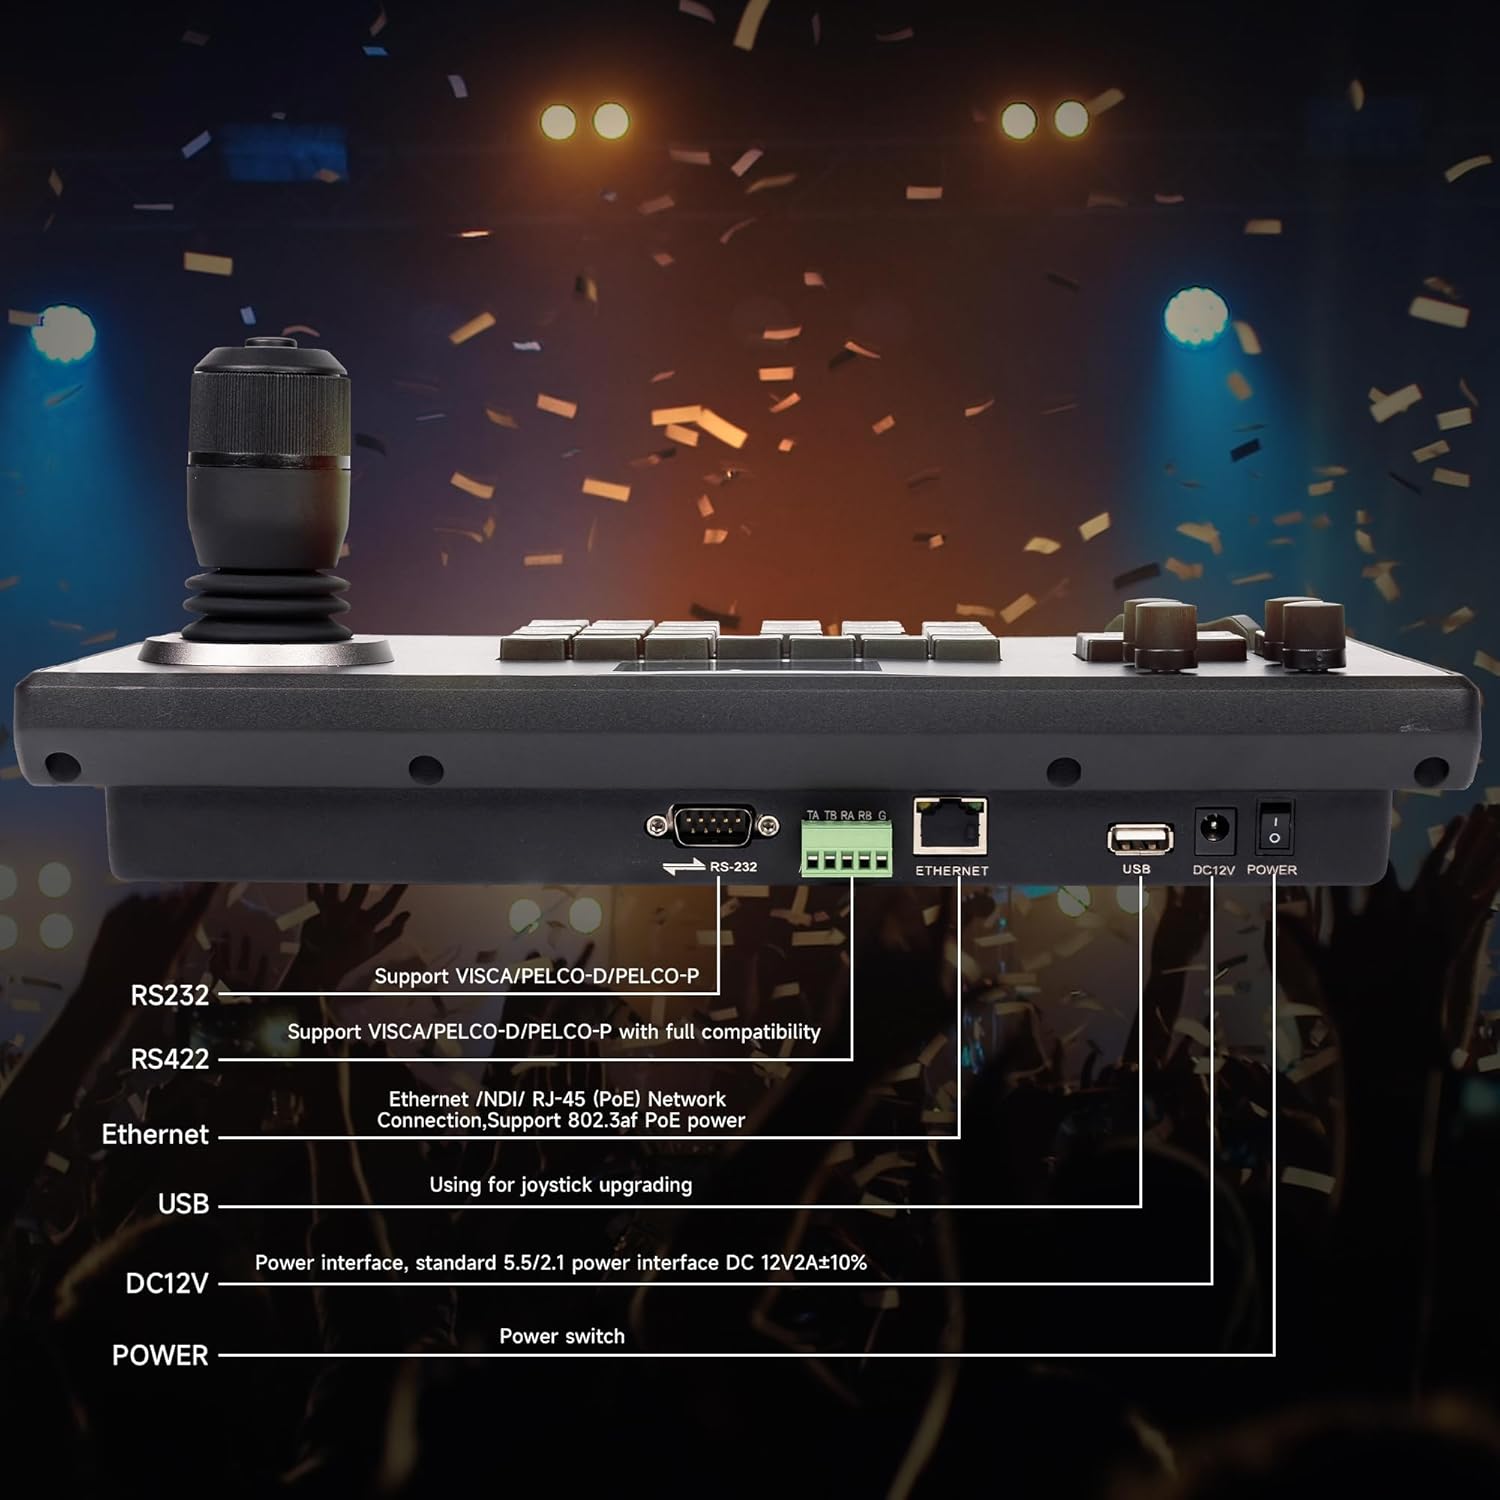
Image 2: Rear panel of the controller showing RS232, RS422, Ethernet (RJ-45), USB, DC12V Power input, and power switch.
- Кубат туташуу: Connect the provided DC12V power adapter to the 'DC12V POWER' port. Alternatively, if using PoE, connect an Ethernet cable from a PoE-enabled switch to the 'ETHERNET' port.
- RS232/RS422 Connection: For serial control, connect your camera(s) to the 'RS232' or 'RS422' ports using appropriate cables. Ensure the correct wiring configuration for your camera model.
- Ethernet (IP) Connection: For IP control, connect an Ethernet cable from the 'ETHERNET' port to your network switch or directly to an IP camera.
- USB порт: The USB port is primarily used for firmware upgrades.
2.3 Camera Connection Examples
The controller supports various camera types and connection methods.

Image 3: Close-up of the 4D joystick, highlighting its design for variable speed control and comfortable operation.

Image 4: Diagram illustrating how to connect conference cameras, dome cameras, and PTZ cameras via a network switch (with PoE) to the controller, supporting both network and analog control modes.

Сүрөт 5: Мурункуample setup showing the controller connected to a PoE switch, which in turn connects to multiple PTZ cameras, demonstrating an easy connection method.
2.4 Баштапкы конфигурация
After connecting, power on the controller. You may need to configure network settings (e.g., IP address) and select the appropriate control protocol for your cameras. Refer to your camera's manual for specific protocol and address settings.
3. Иштөө нускамалары
The controller's interface is designed for efficient camera management.

Сүрөт 6: Детальдуу view of the control panel, identifying the LCD Screen, Function Wheel, Function Keys, Joystick, Camera Select buttons, Zoom controls, and Number Keys.
3.1 Башкаруу панелинин макети
- LCD экран: Displays current camera status, settings, and menu options.
- Джойстик: Controls pan, tilt, and zoom (by twisting) with variable speed.
- Camera Select (CAM1-CAM7): Buttons to select which camera to control.
- Масштабды башкаруу элементтери: Dedicated 'ZOOM <' and '> ZOOM' buttons for fine-tuning zoom.
- Функция баскычтары: Buttons for various camera functions such as MENU, HOME, SETUP, PRESET, CALL, BRIGHTNESS, FOCUS, etc.
- Сан баскычтары: Used for entering values, selecting presets, or navigating menus.
- Function Wheel: For adjusting specific parameters like iris or focus, depending on the selected function.
3.2 Негизги операция
- Күйгүзүү: Flip the power switch on the rear panel. The LCD screen will illuminate.
- Камераны тандоо: Press the corresponding 'CAM' button (e.g., CAM1) to select the camera you wish to control.
- Панорама/Тилт: Move the joystick left, right, up, or down to pan and tilt the selected camera. The speed of movement is proportional to how far you push the joystick.
- Чоңойтуу: Twist the joystick clockwise for telephoto (zoom in) and counter-clockwise for wide-angle (zoom out). Alternatively, use the dedicated 'ZOOM <' and '> ZOOM' buttons.
- Фокус: Use the 'AUTO FOCUS' button or the 'NEAR' and 'FAR' buttons to adjust focus. The Function Wheel may also be assigned for manual focus.
- Алдын ала орнотуулар: To save a preset, position the camera, then press 'PRESET' followed by a number key (0-9). To recall a preset, press 'CALL' followed by the saved number key.
- Меню навигациясы: Press the 'MENU' button to access the camera's OSD (On-Screen Display) menu. Use the joystick and number keys to navigate and select options. Press 'ESC' to exit.
4. Техникалык тейлөө
Туура техникалык тейлөө контроллериңиздин узак мөөнөттүү иштешин жана оптималдуу иштешин камсыз кылат.
- Тазалоо: Контроллердин сыртын тазалоо үчүн жумшак, кургак чүпүрөктү колдонуңуз. Өтө кир болсо, бир азamp cloth with mild detergent can be used, ensuring no liquid enters the device. Avoid abrasive cleaners or solvents.
- Сактагыч: Колдонулбаган учурда контроллерди салкын, кургак жерде, күндүн түз тийген нурларынан жана өтө жогорку температурадан алыс сактаңыз.
- Программалык камсыздоонун жаңыртуулары: Periodically check the Tenveo official website for available firmware updates to ensure optimal performance and compatibility. Use the USB port for updates as per instructions provided with the firmware.
5. Кыйынчылыктарды
Бул бөлүм сиз кабылышы мүмкүн болгон жалпы көйгөйлөрдү карайт.
5.1 Жалпы маселелер жана чечимдер
- Контроллер жооп бербей жатат:
- Ensure the power adapter is securely connected and the power switch is on.
- If using PoE, verify the Ethernet cable is connected to a PoE-enabled switch and the switch is powered.
- Check all connection cables (RS232, RS422, Ethernet) between the controller and cameras.
- Verify the correct camera is selected using the 'CAM' buttons.
- Joystick Movement is Reversed (Pan/Tilt):
- Press the 'SETUP' key.
- Navigate the LED screen menu using the joystick until you reach 'Keyboard Settings'.
- Press the small button on top of the joystick to enter the Keyboard Settings.
- Adjust the settings for Left/Right movement and Tilt movement to match the desired joystick direction.
- Camera Not Switching or Delayed Response:
- Ensure all cameras are properly connected and powered.
- Verify that each camera has a unique address if using serial control, or a unique IP address if using IP control.
- Check for network congestion or interference if using IP control.
- Confirm that the selected protocol on the controller matches the protocol of the camera.
- Limited Functionality with Camera:
- Ensure the camera's control protocol (VISCA, PELCO-P, PELCO-D) is fully compatible with the controller's implementation. Some camera-specific functions may not be universally supported.
- Refer to your camera's manual for supported control commands.
5.2 Универсалдуу шайкештик
The controller is designed for broad compatibility with various PTZ camera protocols.

Image 7: The controller supports universal compatibility with major protocols including VISCA, VISCA over IP, PELCO-D, and PELCO-P.
6. Техникалык шарттар
| Өзгөчөлүк | Деталь |
|---|---|
| Модель номери | B0DK68XJF8 |
| Өндүрүүчү | Tenveo |
| Интерфейстерди көзөмөлдөө | RS232, RS422, RJ45 (Ethernet) |
| Башкаруу протоколдору | VISCA, VISCA over IP, PELCO-P, PELCO-D |
| Джойстик | 4D, Variable Speed |
| Электр камсыздоо | DC12V or PoE (Power over Ethernet) |
| Дата биринчи жеткиликтүү | 11-июнь, 2024-жыл |
| Элемент түрү | Электроника |
7. Кепилдик жана колдоо
For warranty information and technical support, please refer to the documentation included with your purchase or visit the official Tenveo webсайт. Кепилдиктин конкреттүү шарттары аймакка жана сатуучуга жараша өзгөрүшү мүмкүн.
For further assistance, please contact Tenveo customer service through their official channels.