1. Киришүү
This manual provides detailed instructions for the safe and effective operation of your DEPSTECH 50FT Sewer Inspection Camera. This device is designed for visual inspection in hard-to-reach areas such as pipes, drains, engine compartments, and wall cavities. It features a 1080P dual-lens camera, a 5-inch IPS display, and a 50-foot semi-rigid cable with IP67 waterproofing.
2. Коопсуздук маалыматы
- Аппаратты экстремалдык температурага же тике күн нуруна калтырбаңыз.
- Аппаратты күчтүү магнит талаасынан алыс кармаңыз.
- Ensure the camera probe is securely connected before use.
- Түзмөктү бөлүктөргө бөлүүгө же өзгөртүүгө аракет кылбаңыз. Оңдоо иштерин ыйгарым укуктуу кызматкерлер гана жүргүзүшү керек.
- Clean the camera lens and probe after each use to maintain optimal performance.
- The camera probe is IP67 waterproof, but the main unit is not. Avoid exposing the main unit to water.
- Charge the device using the provided Type-C cable and a compatible power adapter (not included).
3. Пакеттин мазмуну
Пакетиңизде бардык буюмдар бар экенин текшериңиз:
- Handheld Endoscope Inspection Camera (with built-in 32GB TF Card)
- 50FT Semi-Rigid Camera Cable with Dual Lens Probe
- C түрүндөгү кубаттоочу кабель
- Accessories: Hook, Magnet, Protective Cap
- User Manual
- Ташуу кутусу

4. Продукт бүтүп калдыview
4.1 Main Unit and Display
The main unit features a 5-inch IPS screen for clear, real-time observation. The ergonomic design ensures comfortable handling during extended use.


4.2 Camera Probe and Cable
The device includes a 50-foot semi-rigid cable with a 7.9mm dual-lens camera probe. The probe is IP67 waterproof and equipped with adjustable LED lights for illumination in dark environments.


4.3 Башкаруу панели
The control panel provides intuitive buttons for power, menu navigation, camera mode selection, light adjustment, and media capture.
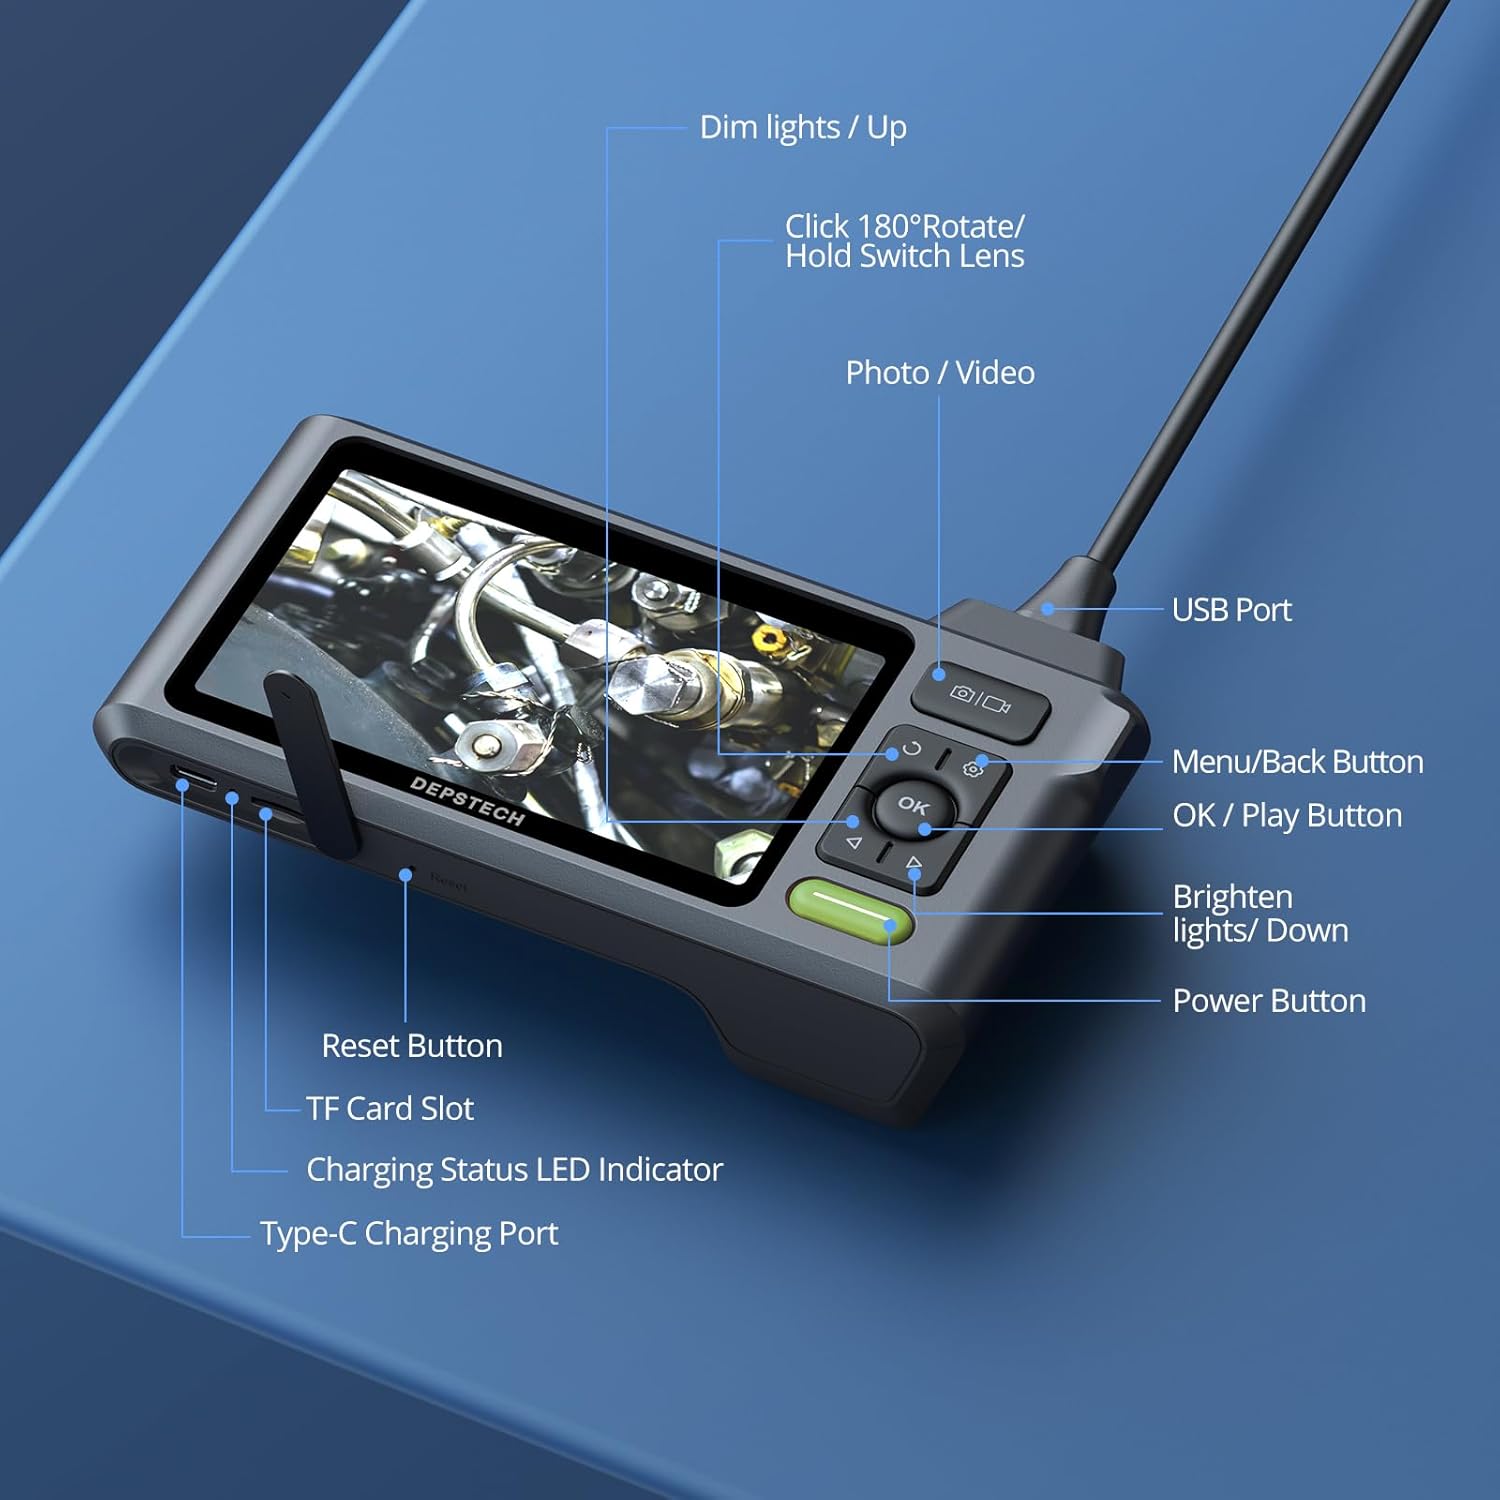
- Кубат баскычы: Түзмөктү күйгүзүү/өчүрүү үчүн басып туруңуз.
- Меню/Артка баскычы: Access menu options or go back.
- OK/Ойнотуу баскычы: Confirm selections or play recorded media.
- Сүрөт/Видео баскычы: Short press to take a photo, long press to start/stop video recording.
- Dim Lights/Up Button: Decrease LED brightness or navigate up in menus.
- Brighten Lights/Down Button: Increase LED brightness or navigate down in menus.
- Rotate 180°/Hold Switch Lens: Short press to rotate the image 180 degrees. Long press to switch between front, side, and split-screen camera views.
5. Орнотуу
5.1 Аппаратты заряддоо
Before first use, fully charge the device. Connect the Type-C charging cable to the charging port on the main unit and plug the other end into a USB power adapter (5V/1A recommended). The charging status LED indicator will show charging progress.
5.2 Connecting the Camera Probe
Insert the USB connector of the camera cable firmly into the USB port on the top of the main unit. Ensure it clicks into place for a secure connection. The device is designed to prevent accidental disconnection.
5.3 TF картасын салуу
The device comes with a built-in 32GB TF card. If you need to replace it, gently insert a new Micro SD card (up to 32GB, Class 10 recommended) into the TF card slot until it clicks.
6. Иштөө нускамалары
6.1 Күйгүзүү/өчүрүү
басып, кармап туруңуз Кубат баскычы for a few seconds to turn the device on. Repeat the action to turn it off.
6.2 LED жарыктарды тууралоо
колдонуу Dim Lights/Up жана Brighten Lights/Down buttons to adjust the brightness of the LED lights on the camera probe. This helps optimize visibility in various lighting conditions.
6.3 Камераны алмаштыруу Views
The dual-lens camera offers multiple viewтандоо параметрлери:
- Алдыңкы камера: Provides a direct forward view.
- Каптал камера: Provides a lateral view.
- Бөлүнгөн экран: Displays both front and side views simultaneously for comprehensive inspection.
көпкө басыңыз Rotate 180°/Hold Switch Lens button to cycle through these camera modes.

6.4 Сүрөттөрдү жана видеолорду тартуу
- Сүрөткө тартуу үчүн: баскычын кыска басыңыз Сүрөт/Видео баскычы.
- Видео жаздыруу үчүн: көпкө басыңыз Сүрөт/Видео баскычы to start recording. Long press again to stop recording.
All captured media is saved to the inserted TF card.
6.5 Маалыматтарды өткөрүү
To transfer photos and videos to a computer:
- Connect the main unit to your computer using the Type-C charging cable.
- Түзмөк алынуучу сактагыч катары пайда болот.
- Alternatively, remove the TF card and insert it into a card reader connected to your computer.

6.6 Bluart 3.0 Technology
The device incorporates Bluart 3.0 technology, which enhances image clarity, processing speed, and low-light performance, providing a clearer and smoother inspection experience.

7. Техникалык тейлөө
7.1 Тазалоо
- After each use, wipe the camera lens and probe with a soft, damp cloth. For stubborn dirt, a small amount of mild soap can be used.
- Ensure the lens is dry before storage.
- Clean the main unit with a dry, soft cloth. Do not use abrasive cleaners or immerse the main unit in water.
7.2 Сактоо
- Store the device and its accessories in the provided carrying case to protect them from dust and damage.
- Салкын, кургак жерде, түз күндүн нурунан жана экстремалдык температурадан алыс сактаңыз.
- Узак мөөнөткө сактасаңыз, анын иштөө мөөнөтүн узартуу үчүн батареянын жарым-жартылай заряддалганын (болжол менен 50%) текшериңиз.
8. Кыйынчылыктарды
- Экранда сүрөт жок: Ensure the camera probe is securely connected to the main unit. Check if the device is powered on and fully charged.
- Сүрөт бүдөмүк: Clean the camera lens. Adjust the LED brightness. Ensure the object is within the camera's focal range (Front Camera: 3-10 cm; Side Camera: 2-5 cm).
- Түзмөк күйбөй жатат: Charge the device for at least 30 minutes. If the issue persists, try pressing the reset button (if available, refer to Figure 4.5).
- Cannot record photos/videos: Check if the TF card is inserted correctly and has sufficient storage space. Ensure the card is not write-protected.
- Difficulty maneuvering the cable: For longer runs or navigating tight bends, consider attaching the probe to a stiffer guide wire or pipe snake (not included) for better control.
9. Техникалык шарттар
| Өзгөчөлүк | Спецификация |
|---|---|
| Модель номери | USDS520DLG-15M |
| Продукциянын өлчөмдөрү | 5.91 x 1.97 x 3.94 дюйм |
| Элемент Салмагы | 4.08 фунт |
| Кабелдин узундугу | 50 фут |
| Камеранын диаметри | 7.9мм |
| Камеранын чечилиши | 1080P (1920 x 1080) |
| Линзанын түрү | Dual Lens (Front & Side) |
| Screen Size | 5 дюймдук IPS |
| Суу өткөрбөйт рейтинги | IP67 (Camera Probe) |
| LED жарыктары | 6+1 Жөнгө салынуучу светодиоддор |
| Батарея | 1 Lithium Ion battery (up to 4 hours use) |
| Сактагыч | Built-in 32GB Micro SD Card (supports up to 32GB) |
| Байланыш | USB Type-C |
| Өндүрүүчү | DEPSTECH |
10. Кепилдик жана колдоо
DEPSTECH products are designed for reliability and performance. For warranty information, technical support, or service inquiries, please refer to the contact information provided with your purchase documentation or visit the official DEPSTECH webсайт. Кепилдик дооматтары үчүн сатып алганыңыздын далилин сактап коюңуз.


