Introduction
This manual provides detailed instructions for the safe and efficient operation of your BAOFENG UV-10R Two Way Radio. Please read this manual thoroughly before using the device to ensure proper functionality and to prevent damage.
Пакеттин мазмуну
Төмөндө тизмеленген нерселердин баары пакетиңизге камтылганын текшериңиз:
- Көчмө радио
- Type-C кабели
- Гарнитура
- Батарея
- Жогорку кирешелүү антенна
- Заряддоо базасы
- Belt Clip
- Hand Strap
- Колдонуучунун колдонмосу (бул документ)

Image: The BAOFENG UV-10R radio displayed with its complete set of accessories, including the headset, USB-C cable, antenna, battery, charger base, belt clip, and hand strap.
Продукт бүттүview
Familiarize yourself with the components of your BAOFENG UV-10R radio:
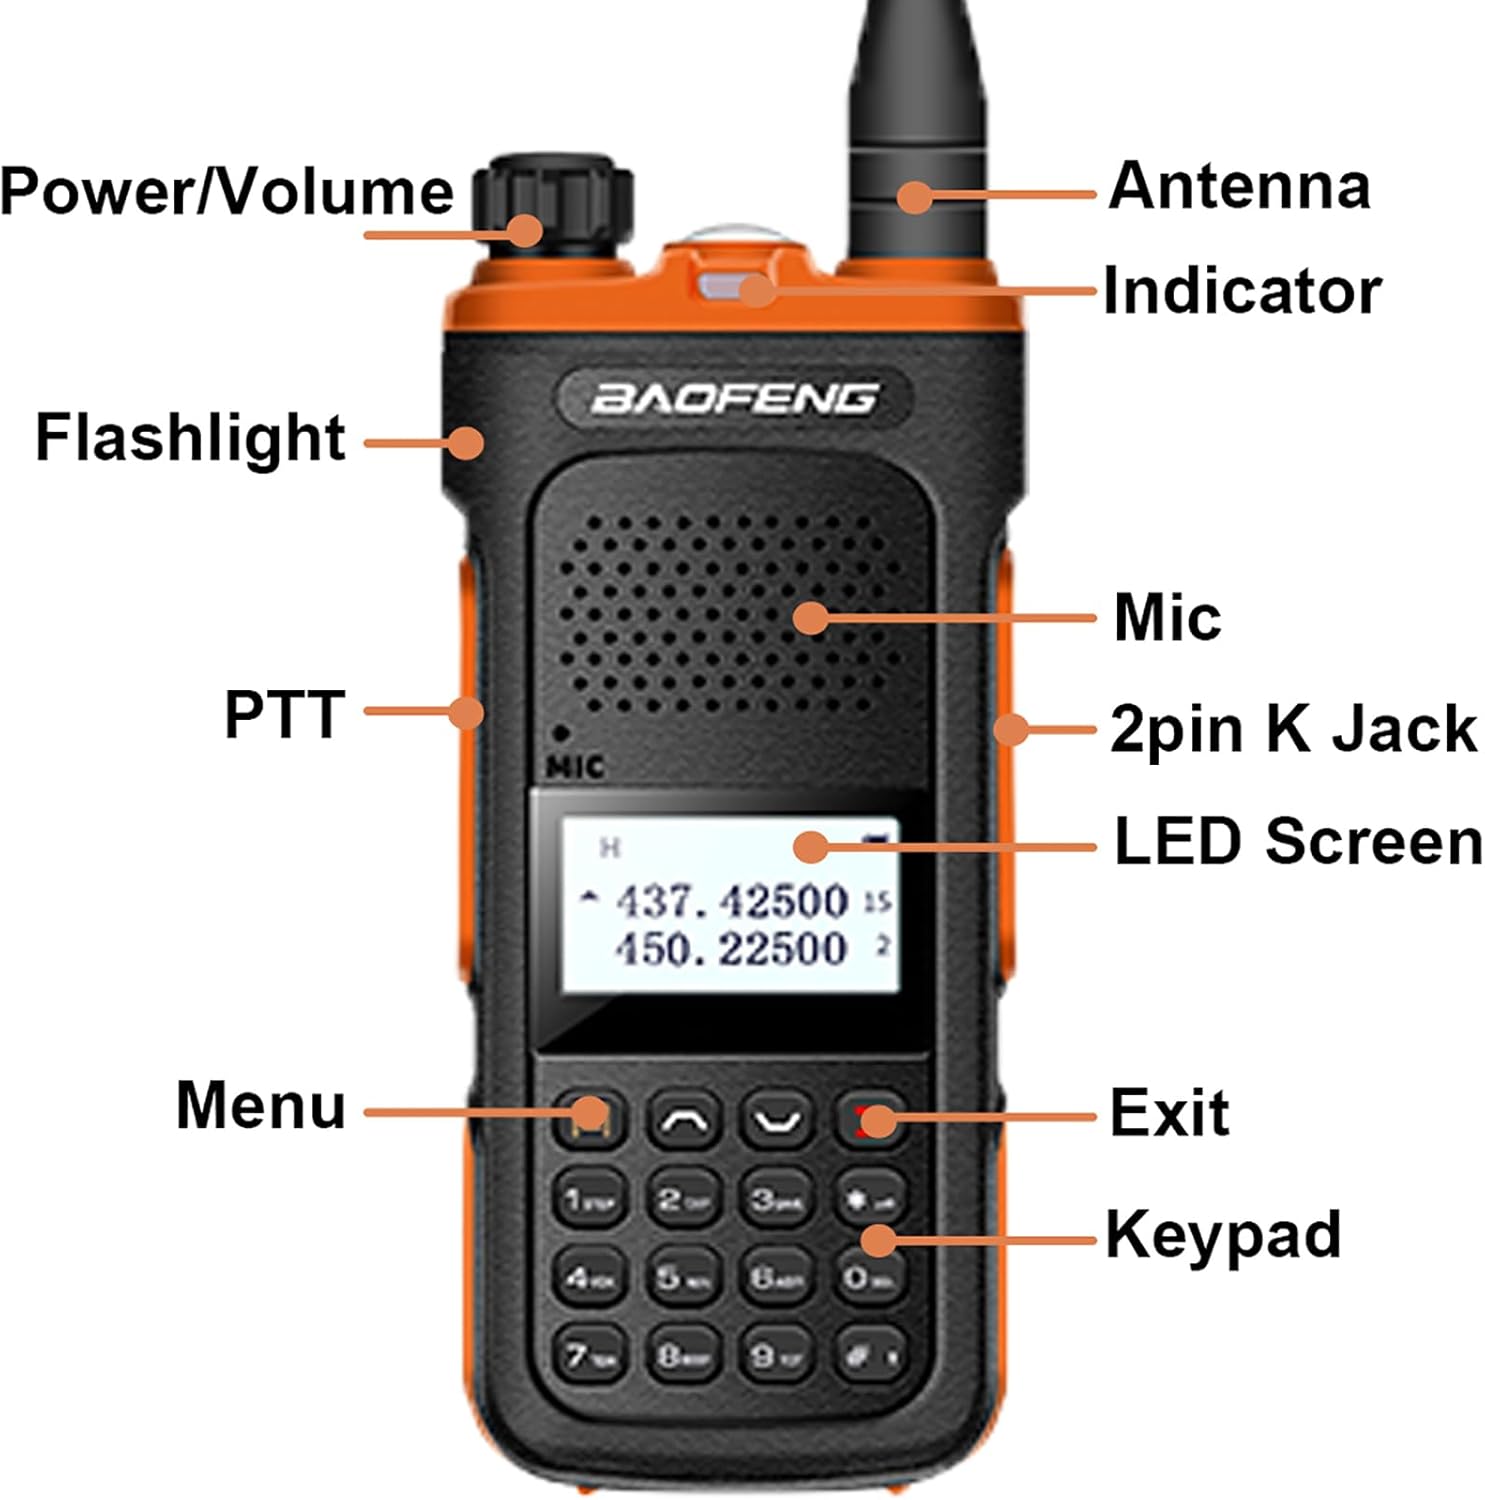
Image: A detailed diagram of the BAOFENG UV-10R radio, pointing out key components such as the Power/Volume knob, Antenna, Indicator LED, Flashlight, PTT button, Microphone, 2-pin K Jack, LED Screen, Menu button, Exit button, and Keypad.
- Кубат/үн баскычы: Радиону күйгүзүү/өчүрүү жана үнүн тууралоо үчүн айланат.
- Антенна: Сигналдарды берүү жана кабыл алуу үчүн.
- Көрсөткүч: LED light indicating radio status (e.g., transmit, receive, charging).
- Кол чырак: Activates the built-in LED light.
- PTT (баскыч менен сүйлөшүү) баскычы: Өтүү үчүн басып туруңуз, кабыл алуу үчүн коё бериңиз.
- Микрофон: Үн менен киргизүү үчүн орнотулган микрофон.
- 2-pin K Jack: Port for connecting external audio accessories like the included headset.
- LED экраны: Displays channel, frequency, and other operational information.
- Меню баскычы: Accesses radio settings and functions.
- Чыгуу баскычы: Менюдан чыгат же операцияларды жокко чыгарат.
- Баскычтоп: For direct frequency input, channel selection, and function activation.
Жайгашуу
1. Батареяны орнотуу
- Радио өчүрүлгөнүн текшериңиз.
- Батарея блогун радионун арткы жагындагы оюктар менен тегиздеңиз.
- Батарея блогун ордуна чыкылдаган үн чыкканча өйдө жылдырыңыз.
- Чыгаруу үчүн, батареяны бошотуучу илгичти басып, батареяны ылдый жылдырыңыз.
2. Антенна тиркемеси
- Антеннаны саат жебеси боюнча радионун үстүнкү жагындагы туташтыргычка манжаңыз менен бекем кысылганча бурап коюңуз. Ашыкча бекемдебеңиз.
3. Батареяны заряддоо
The UV-10R offers two charging methods:
- USB-C Direct Charging: Connect the provided Type-C cable directly to the USB-C port on the side of the radio and to a compatible USB power source (e.g., power bank, PC, car charger, wall adapter).
- Заряддоочу база: Place the radio (with battery installed) into the charger base. Ensure the charging contacts align. The indicator light on the charger will show charging status.

Image: The BAOFENG UV-10R radio connected to a USB-C cable for direct charging, illustrating its compatibility with various USB power sources like car chargers, power banks, and PCs. The radio can also be charged via its dedicated charger base.
4. Гарнитураны туташтыруу
- Insert the 2-pin plug of the headset into the 2-pin K Jack on the side of the radio.
- Ensure the connection is secure for optimal audio performance.
Иштөө нускамалары
1. Күйгүзүү/өчүрүү жана үндү жөндөө
- Күйгүзүү үчүн, чыкылдаган үн чыкканга чейин Кубат/Үн баскычын саат жебеси боюнча буруңуз.
- Үнүн жогорулатуу үчүн сааттын жебеси боюнча айланууну улантыңыз; үнүн азайтуу үчүн саат жебесине каршы буруңуз.
- Өчүрүү үчүн, чыкылдаган үн чыкканга чейин, Кубат/Үн баскычын саат жебесине каршы буруңуз.
2. Channel Selection and Frequency Range
The UV-10R supports 999 channels and operates within the frequency ranges of 144-148MHz and 420-450MHz.
- Use the keypad to directly input frequencies or channel numbers.
- Utilize the up/down arrow keys to navigate through channels or frequencies.
- Press the 'Menu' button to access settings for frequency expansion if desired.

Image: The BAOFENG UV-10R radio screen showing active frequencies, with text highlighting its Dual Band, 999 Channels, NOAA, DTMF features, and frequency range of 144-148MHz and 420-450MHz.
3. Push-to-Talk (PTT)
- To transmit, press and hold the PTT button on the left side of the radio. Speak clearly into the microphone.
- Өткөрүүнү токтотуу жана кабыл алуу режимине кайтуу үчүн PTT баскычын бошотуңуз.
4. Multimode Scanning
The radio supports multimode scanning to find active channels or frequencies.
- Refer to the user manual's specific section on scanning for detailed instructions on activating and configuring scan modes.

Image: A user holding the BAOFENG UV-10R radio, with text overlays emphasizing its long-term standby capability and multimode scanning feature.
5. NOAA аба ырайы жөнүндө эскертүү
The UV-10R includes NOAA Weather Alert functionality to receive critical weather broadcasts.
- Access the NOAA Weather Alert feature through the radio's menu system. Consult the detailed menu guide in the full user manual for activation steps.
6. VOX функциясы
VOX (Voice Operated Exchange) allows hands-free transmission when enabled.
- To activate VOX, navigate to the VOX setting in the menu and select your desired sensitivity level.
- When VOX is active, the radio will transmit automatically when it detects your voice.
7. LED Strong Flashlight
The radio is equipped with a built-in LED flashlight for illumination.
- Press the dedicated flashlight button (if available, refer to Product Overview) or access it via the menu to turn the flashlight on or off.
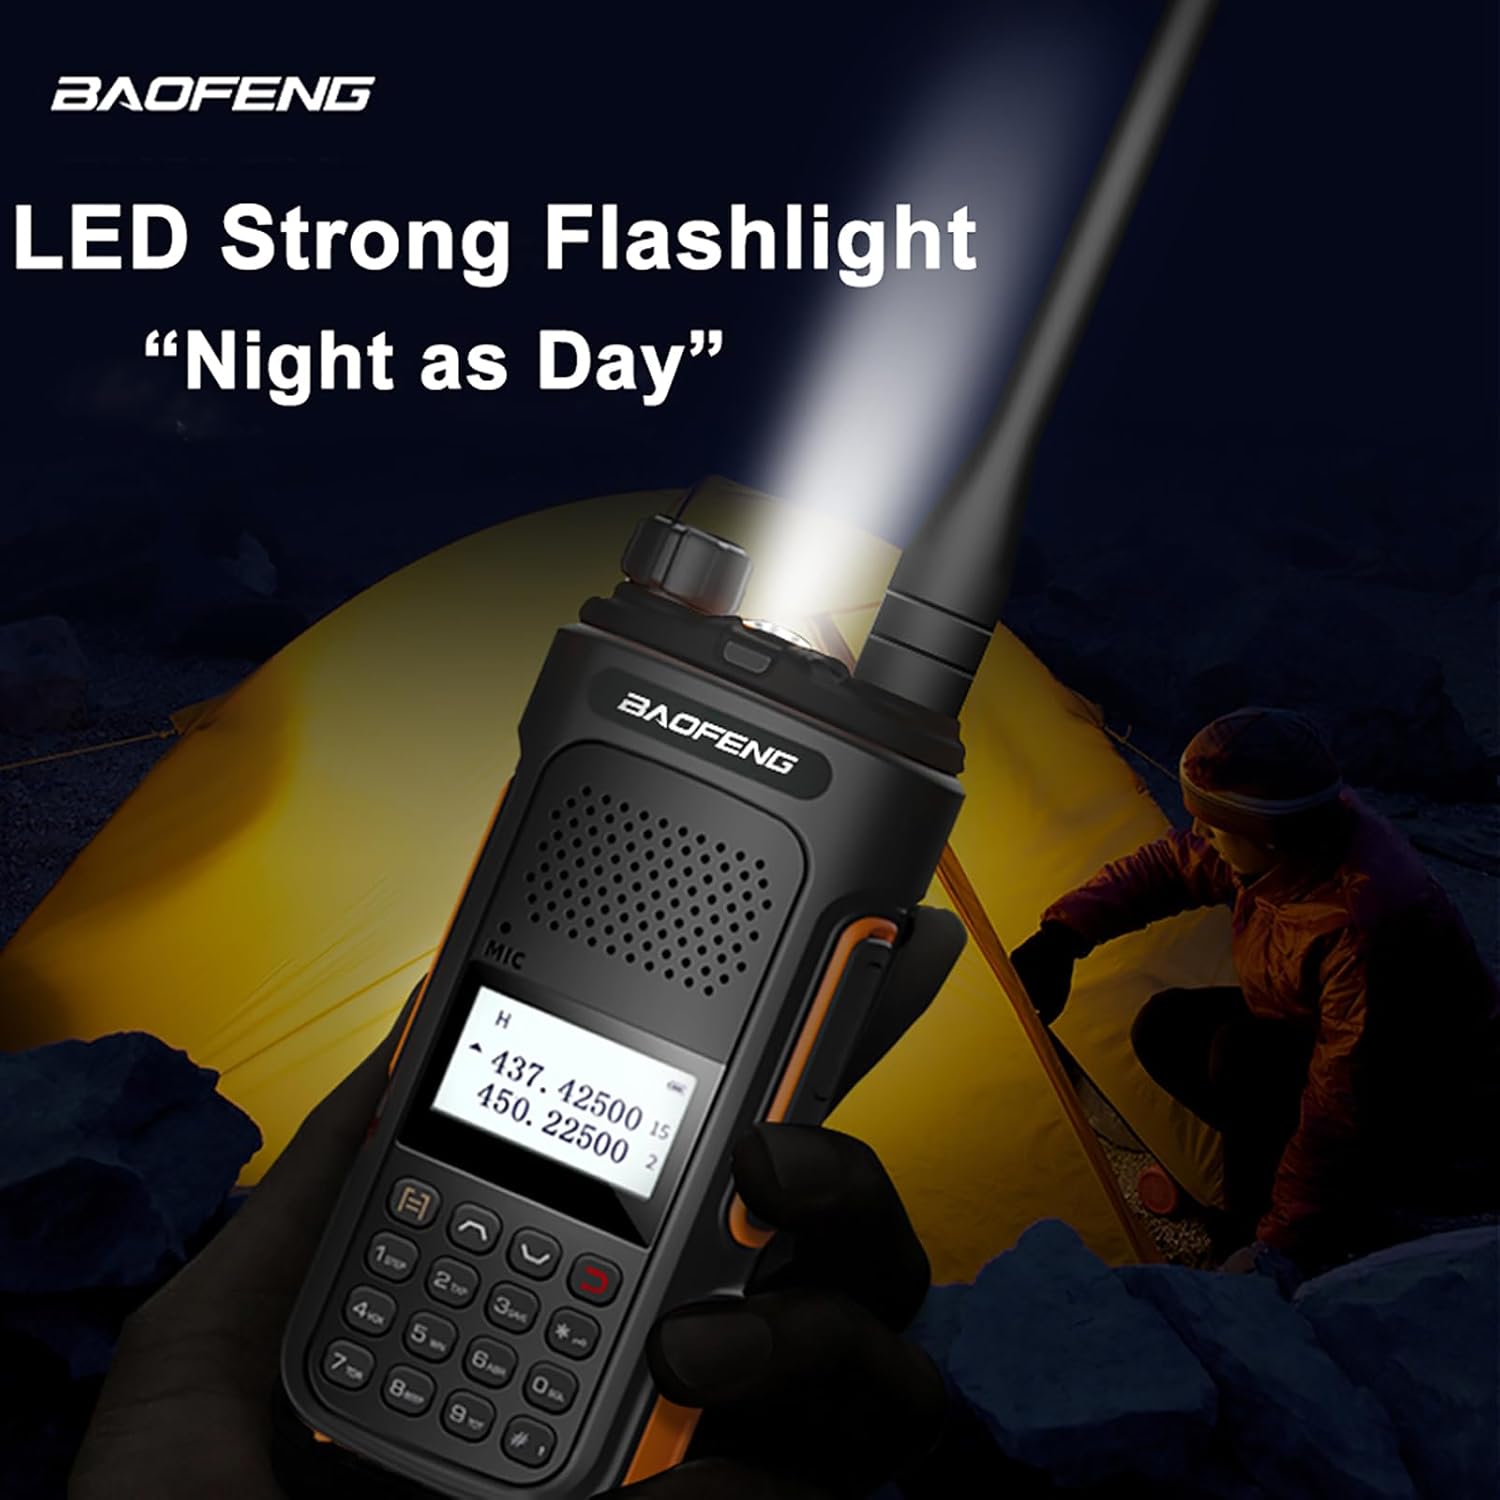
Image: The BAOFENG UV-10R radio's LED flashlight is shown actively illuminating a dark outdoor scene, demonstrating its utility as a light source.
8. DTMF
DTMF (Dual-Tone Multi-Frequency) signaling is supported for various functions, such as remote control or selective calling.
- Consult the advanced features section of the comprehensive user manual for programming and using DTMF tones.
Техникалык тейлөө
Жалпы кам көрүү
- Keep the radio dry. Avoid exposure to rain, moisture, or liquids that may corrode electronic circuits.
- Do not store the radio in dusty or dirty areas.
- Ашыкча температурадан алыс болуңуз. Жогорку температуралар электрондук шаймандардын иштөө мөөнөтүн кыскартып, айрым пластиктерди майыштырып же эритип жибериши мүмкүн.
- Handle the radio gently. Dropping or rough handling can damage internal circuit boards and fine mechanics.
Тазалоо
- Радионун сыртын жумшак, гamp кездеме. Катуу химиялык заттарды, тазалоочу эриткичтерди же күчтүү жуучу каражаттарды колдонбоңуз.
- Ensure the charging contacts on both the radio and the charger base are clean and free of debris for efficient charging.
Проблемаларды чечүү
If you encounter issues with your BAOFENG UV-10R, refer to the following common problems and solutions:
| Көйгөй | Мүмкүн себеп | Чечим |
|---|---|---|
| Радио күйбөйт | Батареянын кубаты түгөнгөн же туура эмес орнотулган. | Батареяны кубаттаңыз. Батарея бекем бекитилгенин текшериңиз. |
| Өткөрүп же кабыл албайт | Incorrect frequency/channel, antenna not attached, or out of range. | Verify frequency/channel settings. Ensure antenna is securely attached. Move closer to the other radio. |
| Аудио сапаты начар | Low battery, antenna issue, or headset connection problem. | Charge the battery. Check antenna connection. Re-seat the headset plug. |
| Батарея заряддалбай жатат | Charger/cable faulty, poor contact, or battery issue. | Try a different USB-C cable/power source or charger base. Clean charging contacts. Ensure battery is properly seated. |
Техникалык шарттар
Key technical specifications for the BAOFENG UV-10R Two Way Radio:
- Модель номери: BF-UV10/UV-10R
- Жыштык диапазону: 144-148 МГц, 420-450 МГц
- Каналдардын саны: 999
- Max колому: Болжол менен 3.1 миль (5 км)
- Киргизүү көлөмүtage: DC 7.4V
- Антеннанын импедансы: 50 Ом
- Батарея түрү: Литий-ион (1 керек)
- Элемент Салмагы: Болжол менен 22.04 унция (625 грамм)
- Продукциянын өлчөмдөрү: 1.1"D x 1.96"W x 4.72"H (2.79cm D x 4.98cm W x 11.99cm H)
- Өзгөчө өзгөчөлүгү: Type-C заряддоо

Image: A visual representation of the BAOFENG UV-10R radio's dimensions, indicating a height of 4.72 inches, width of 1.96 inches, and depth of 1.1 inches.
Кепилдик жана колдоо
Your BAOFENG UV-10R Two Way Radio comes with a warranty and support information:
- Кепилдик: A 1-year warranty is provided exclusively through "Shiqun Electronics Co., Ltd".
- For warranty claims or technical support, please contact the seller or manufacturer directly. Refer to your purchase documentation for contact details.


