1. Киришүү
The MODSTER MDX PRO BF 109 is a Ready-To-Fly (RTF) electric model aircraft, a replica of the historic BF 109 fighter. This model is designed for advanced beginners with basic aileron flight experience, offering enhanced stability and flight enjoyment. It features a 6-axis gyroscope system for stable flight and an acrobatic switch for performing basic maneuvers.
This manual provides essential information for the safe assembly, operation, and maintenance of your MODSTER MDX PRO BF 109 Warbird.
2. Коопсуздук эскертүүлөрү
Please read and understand all safety warnings before operating the aircraft. Failure to follow these instructions may result in injury or damage to the product.
- Тышкы колдонуу үчүн гана.
- Көзгө тийбеңиз.
- Ачык оттон жана түз жылуулук булактарынан алыс болуңуз.
- Recommended age for operation is 14 years and older.
- Ар дайым ачык жерлерде, адамдардан, жаныбарлардан жана тоскоолдуктардан алыс иштеңиз.
- Ensure the battery is charged correctly and handled safely.
3. Пакеттин мазмуну
Төмөндө тизмеленген нерселердин баары пакетиңизге камтылганын текшериңиз:
- MODSTER MDX PRO BF 109 450mm RTF Aircraft
- 2.4 GHz Remote Control (Mode 2)
- 1020 Coreless Drive Motor (pre-installed)
- Regulator Servo Unit with 6-Axis Gyroscope and DSMX/S-Bus Connection (pre-installed)
- LiPo Battery: 1S / 3.7V / 400mAh
- USB LiPo Charging Cable
- 1 Spare Propeller
- 1 Бурагыч
- 4 AA Disposable Batteries for Transmitter
- Instruction Manual (German and English)

Image 3.1: The MODSTER MDX PRO BF 109 Warbird with its 2.4 GHz remote control, spare propeller, USB charging cable, and screwdriver.
4. Орнотуу
4.1 Landing Gear Installation
The model comes pre-assembled and painted. Only the landing gear needs to be installed. Carefully attach the landing gear components as shown in the diagram (refer to the printed manual for detailed diagrams) until they are securely in place.

Image 4.1: The MODSTER MDX PRO BF 109 Warbird with its landing gear fully installed, ready for flight.
4.2 Батареяны заряддоо
- Connect the LiPo battery (1S / 3.7V / 400mAh) to the USB LiPo charging cable.
- Plug the USB charging cable into a suitable USB power source (e.g., computer USB port, USB wall adapter).
- Observe the indicator light on the charging cable. It will typically show red during charging and turn off or change color when fully charged.
- Do not leave the battery unattended during charging. Disconnect once fully charged.
4.3 Трансмиттердин батареясын орнотуу
Open the battery compartment on the back of the 2.4 GHz remote control. Insert the 4 AA disposable batteries, ensuring correct polarity. Close the battery compartment securely.
4.4 Electronic Board Connections
The main electronic board features a DSM2/DSMX connection port (3-pin) and an S-Bus connection port. These ports allow for the use of optional external DSM satellites or S-Bus receivers for advanced control setups. Ensure all connections are secure before flight.

Сүрөт 4.2: Детальдуу view of the main electronic board, highlighting the DSM and S-Bus connection ports.
5. Иштөө нускамалары
5.1 Учуу алдындагы текшерүү
- Ensure the aircraft battery is fully charged.
- Ensure the transmitter batteries are installed and have sufficient power.
- Check all control surfaces (ailerons, elevator, rudder) for free movement and correct response to transmitter inputs.
- Inspect the propeller for any damage.
- Perform a range check of the remote control system.
5.2 Учуу режимдери
The integrated 6-axis gyroscope system offers three flight modes, switchable via the remote control:
- Башталгыч режими: Provides maximum stabilization and limited control throws for easy and stable flight.
- Өркүндөтүлгөн режим: Offers moderate stabilization with increased control authority, suitable for pilots gaining confidence.
- Эксперт режими: Minimal stabilization for full control and agile maneuvers, recommended for experienced pilots.
5.3 Take-off and Flight
- Place the aircraft on a flat surface, facing into the wind.
- Slowly advance the throttle (left stick on Mode 2 transmitter) to gain speed.
- Gently apply up elevator to lift off.
- Use the right stick for aileron (roll) and elevator (pitch) control, and the left stick for rudder (yaw) and throttle.
- The Airobatic switch on the remote control allows for performing basic aerobatic maneuvers like loops and rolls with a single button press.
- Flight duration is approximately 7 to 15 minutes, depending on throttle usage.
5.4 конуу
- Approach the landing area into the wind.
- Reduce throttle gradually to decrease altitude and speed.
- Maintain control with elevator and ailerons.
- Gently flare (pull up elevator) just before touchdown to ensure a smooth landing.
- Once on the ground, cut the throttle completely.
6. Өзгөчөлүктөрү
- Durable EPP Foam: Constructed from robust EPP foam for increased resistance to impacts.
- 6-Axis Gyroscope System: Factory-installed system provides flight stabilization across three selectable modes (Beginner, Advanced, Expert).
- Acrobatic Switch: Enables one-button execution of basic aerobatic maneuvers such as loops and rolls.
- DSMX/S-Bus Connection: Main electronic board includes ports for optional external DSM satellites or S-Bus receivers.
- Prop-Saver: Reduces the risk of propeller damage during impacts or rough landings.
- Ready-To-Fly (RTF): Comes pre-assembled and painted, requiring minimal setup.
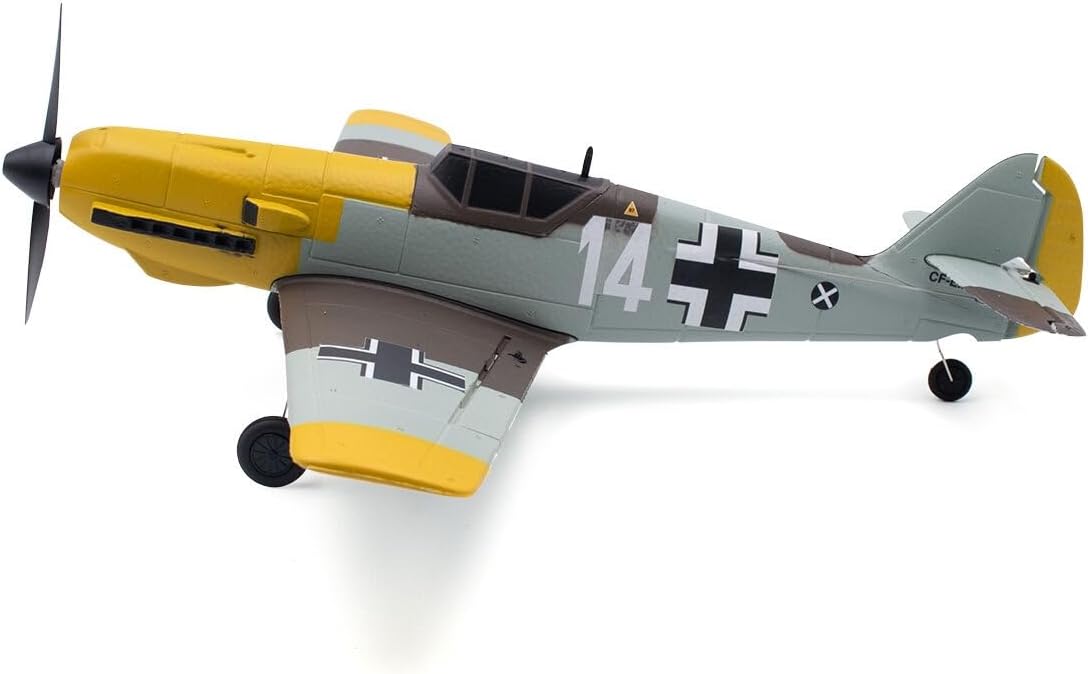
Сүрөт 6.1: Side profile of the MODSTER MDX PRO BF 109 Warbird, showcasing its detailed paint scheme and durable EPP foam construction.
7. Техникалык тейлөө
- Пропеллер текшерүү: Regularly check the propeller for cracks, bends, or other damage. Replace with the spare propeller if necessary. The Prop-Saver helps mitigate damage.
- Тазалоо: Clean the aircraft body with a soft, dry cloth. Avoid using harsh chemicals or solvents.
- Батареяга кам көрүү: Store LiPo batteries in a cool, dry place, away from direct sunlight and heat. Do not overcharge or over-discharge.
- Control Surface Check: Periodically verify that all control surfaces move freely and are securely attached.
8. Кыйынчылыктарды
- Aircraft not responding to controls:
- Ensure both aircraft and transmitter batteries are charged and correctly installed.
- Verify that the aircraft and transmitter are properly bound.
- Check for any physical obstructions to control surfaces.
- Aircraft flies erratically:
- Ensure the gyroscope system is functioning correctly and is set to an appropriate flight mode (e.g., Beginner mode for more stability).
- Check for any damage to the airframe or control surfaces.
- Verify that the propeller is balanced and undamaged.
- Кыска учуу убактысы:
- Ар бир учуунун алдында батарейканын толук заряддалганын текшериңиз.
- Reduce continuous full throttle usage.
- Consider replacing the battery if it shows signs of degradation.
9. Техникалык шарттар
| Өзгөчөлүк | Деталь |
|---|---|
| Продукциянын өлчөмдөрү (L x W x Y) | 41 x 45 x 11.5 см |
| Салмагы | 1.33 килограмм |
| Өндүрүүчүнүн сунуш кылган курагы | 14 жаш жана андан жогору |
| Модель номери | MD11827 |
| Ассамблея талап кылынат | No (minimal landing gear installation) |
| Батареялар талап кылынат | Yes (for aircraft and transmitter) |
| Батареялар камтылган | No (4 AA for transmitter, 1S/3.7V/400mAh LiPo for aircraft are included in package contents, but listed as 'No' in specifications, clarifying here) |
| Негизги материал | EPP Foam, Plastic |
| Учак түрү | Warbird (BF 109) |
| Тема | Аскердик |
| Power Source | Батарея менен иштейт |
| Өзгөчө өзгөчөлүк | Acrobatic Switch and 6-Axis Gyroscope System |
| Камтылган компоненттер | Charging Cable, Remote Control, Spare Propeller, Screwdriver, AA Batteries |
10. Кепилдик жана колдоо
Information regarding specific warranty terms and customer support contacts for the MODSTER MDX PRO BF 109 is not available in the provided product details. Please refer to the documentation included in your product packaging or visit the official MODSTER website for warranty claims and technical support.


